Posts mit dem Label Background werden angezeigt. Alle Posts anzeigen

Mittwoch, 18. September 2024

Walk in the fall (Lavender & Thyme)

Hello everyone,
today I would like to share my card for the newest challenge over at Papercraft Challenges with you! The theme for this month is "Fabulous Fall" and here is what I came up with:


The stamps are from Purple Onion Designs from their designer Stacey Yacula which I am a huge fan of. I just love the cute critters she always comes up with. The two critters are from her "Merriest City" collection but even though they were intended to go on Christmas cards I think the fit perfectly in this little wood with their jackets and the hat. 


For this card I focused on my Copic colouring. I wanted the colours to represent fall and think I nailed it. What do you think? I took ages but I thoroughly enjoyed the process. I glued the background piece flat to the card base and added foam tape behind the critters to give them some dimension. 
I hope you are going to join us with your own "Fabulous Fall" project! Until next time, happy crafting and all the very best to you my crafty friend!!! Yours Maike ;o)


Supplies:
Stamps: "Lavender & Thyme" by Purple Onion Designs
              "Woodland Background" by Purple Onion Designs

Challenges:
Simon Says Wednesday Challenge "Make Your Own Background" (Hope colouring it in counts...)


Samstag, 15. Juni 2024

Have a dino-mite birthday

Hello everyone!
I'd like to share with you my newest creation. It was made for the new theme "For the Boys" over at Papercraft Challenges:


Our kind sponsor Dr Digi provided us with sum fun images and I chose the dino, because there are some birthdays for little boys coming up and for this the cute image is perfect I think. I created a background fpr the dino using a leaves-stencil and also coloured a piece of scrap paper with the same colours I used for the dino to cut the word "birthday" from.


Next step was to assemble everything on an orange-yellowish cardbase to fit with the beak and the bone plates. As a finishing touch I added Nuvo drops in two different colours. If you looks closely you'll see that each drop has a lighter dot in the middle which turned out really great in real life but gets lost a little in the pictures. Next time I want to try creating a rainbow dot that way...


I hope you are going to join us with a creation "For the Boys" and I keep my fingers crossed for you to win the 2 digis by our sponsor Dr. Digi!

Until next time have a fantastic months and happy crafting to you ;o))


Supplies:
Digi stamp: "Stacey the Stegosaurus" by Dr. Digi 
Stamps: "You rock" by Clearly Besotted (discontinued)
Stencil: "Leafy" by Create a Smile
Die: "Birthday" by Create a Smile

Donnerstag, 15. Februar 2024

I see..... soooo many candles ;o))))

Hello everyone,
today I'd like to show you my newest DT card for the Papercraft Challenges blog. The theme this time is "Carneval":


I do not have much use for a carnival themed card, but I have seen so many fortune tellers in this years Rosenmontagsumzug that I thought this would make a great card for the theme. Inside the sentiment goes like this:


I hope you like the card and also that you will join us over at Papercraft Challenges. One lucky crafter will win a prize from Dr. Digistamps who kindly sponsores this month' challenge!
Happy crafting everyone ;o)


Freitag, 19. Januar 2024

To a koality friend

Hello everyone ;o)
I hope you had a great start to the year 2024! Today I would like to share my first DT card of the year with you. Over at Papercraft Challenges we thought you might all want to play with your new stamps and made it an "Anything Goes" theme. This is what I have created (even though the stamp I have used isn't new anymore I still love playing with it):


This card was super easy to make, but I love the way it looks. I started by creating the background with two different yellow shades and used a scalloped frame die to cut it out. I glued the background piece on a yellow card base and added this super cute koala. 


Also I added the three red hearts to have the colour in more than one place. Hope you are going to join us in this month's challenge! Have a fabulous day and happy crafting!!!


Donnerstag, 15. Juni 2023

Girl with saxophone (Happy happy birthday)

Hello and welcome to today's post ;o)
I would like to share my newest card with you which I have created for the new challenge over at Papercraft Challenges. It will be all about girls for the next four weeks and with this image by our kind sponsor Dr. Digi I have created this birthday card:


I really enjoyed colouring this cute girl with her puffy cheeks and after I had coloured her with Copic markers I fussy cut her out. in the stamp there is a dog standing next to her, but I only wanted this part of the image for what I had in mind. Next I prepared the cardbase and stamped a musical note stamp in all the colours of the rainbow because of the piece of background paper I wanted to place the gitl image on. 


The colourful background was created with alcohol inks and some felt pieces on my ink blending tool. It was quite a mess but loads of fun to create ;o) Lastly I added the sentinemt word strips I had heat embossed on black cardstock. I used black to get a really heavy contrast going and I really like the end result. I hope you like it, too and that you will share your "Girls" projects with us over at Papercraft Challenges! Don't forget, you could be the lucky winner and win 2 digis by our sponsor Dr. Digis!!! Have a fabulous day and happy crafting ;o) Yours Maike


Supplies:
Yupo paper by Ranger
Stamps: "Mood music" by Dr. Digi 

Sonntag, 19. Februar 2023

Sending love (Postman)

Hello everyone ;o)
Sorry for posting this late, but life just happened... This is the card I made for the newest Papercraft Challenges theme "Hearts". First I thought about having loads and loads of hearts in the background, but then I felt like I wanted one heart to shine. And this is what I came up with:


If you look closely you can see that I have added hearts to the tie of this fun postman image by our kind sponsor "Dr. Digi". Have you spotted them?


Here they are a little bigger ;o) The card was easy to make but I think the image just maked it shine! I hope you think so, too. I also hope that you'll join us for this lovely challenge. See you in the gallery and happy crafting everyone! Have a fabulous day, yours Maike


Supplies: tba

Sonntag, 15. Januar 2023

Super fun birthday (snowfight)

Hello everyone ;o)

It is the middle of the month and therefore I'd like to invite you to have a look at our newest challenge at Papercraft Challenges. The theme this time is "Anything Goes" so you can share with us your favourite project - no matter what theme it is. I decided to create a wintery birthday card and here it is:


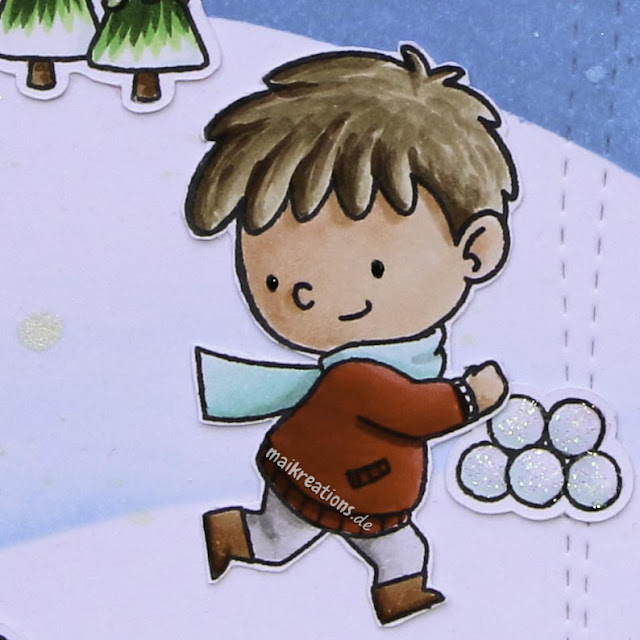
I made the background using Distress Inks and a stencil I cut from thick cardstock in a curvy shape to create the illusion of hills in the background. The images are from My Favourite Things and I love that you can use some of the set for Christmas cards as well as wintery themed ones. Once the background was dry and I knew which images would go where I heat embossed the sentiment which always looks really nice I think ;o)


Colouring the images was really a lot of fun and quicker than I first thought. I added a few trees and snowflakes to the back to make it look more interesting and also put glitter on the snow and the snowballs. To finish the card I stamped loads of snowballs and the girl inside the card in a light blue shade, hoping this will surprise the recipient. 


It would be lovely having you join our challenge this time! Have a fabulous day and happy crafting, yours Maike

Stamps: "Snow much fun" by My Favourite Things
Dies: "Wonky Rectangle Die" by Avery Elle
         "Mini Snowflakes" by Lawn Fawn 

Samstag, 15. Januar 2022

Ice Skating Fun

Hello my dear crafty friends,
I hope you are all doing well and enjoying the wintery and hopefully cozy time! Perfect time for crafting, don't you think? ;o) If so, you will be happy to know that our new theme at Papercraft Challenges is "Winter Wonderland". This is my take on the theme:


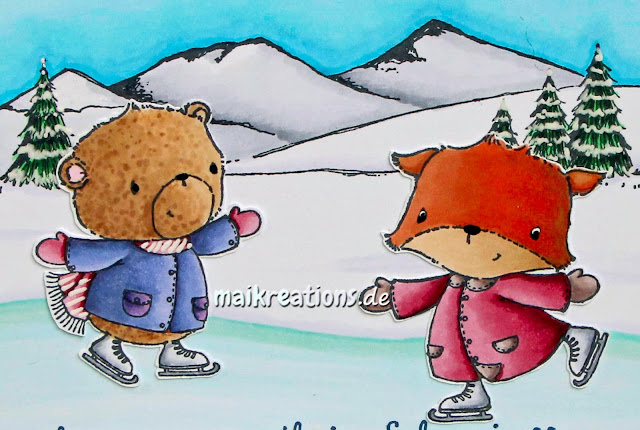
Have I ever told you that I despise having to mask images? I don't mind the work, but I don't seem to be able to find a properly working masking tape that doesn't rip my paper once I am done with all the stamping and inking. That is why I love background stamps such as the one I have used for my card. 


When my crafting mojo leaves me I find that I am able to find it again after colouring a few backgrouds and that way I do have quite a collection gathered by now. As for making this card there was "only" a lot of colouring involved but not a lot more than that. I felt that it was good enough as it was without any more embellishments. By the way: Do you guys have a good Copic colour combination for foxes? Mine became a bit too reddish for my taste, but I could do anything about it anymore once I had noticed. If you do, please could you let me know in the comments? I'd be most grateful ;o)


Hope you will join us in our gallery with your own "Winter Wonderland" ;o) Have a wonderful weekend and happy crafting to you all! And please take care! Hugs, Maike

Supplies:
Stamps: "Henry (Bear)", "Grace (Fox)" & "Mountains large" by Purple Onion Designs

Donnerstag, 1. April 2021

Dots and a fairy ;o)

Hello everyone ;o)
Welcome to my blog and today's post! I am so happy about this card because I love how fun it turned out (even though there were some hurdles to overcome when I made it) and the colours remind me of spring and flowers. We have had the first two sunny days over here and I really loved bathing in the sun and having the dinner on the balcony ;o) Yeah!!! But back to today's card. It was made as an inspiration for the newest challenge over at Challenge Up Your Life and here it is:


The theme is this wonderful moodboard:


The colours are gorgeous and it will probably not be the last card I made with it ;o) Dot backgrounds are always fun I find and so I started the card by stamping such a background using inks that came at least near to the colours from the inspiration pic. When I coloured the cute little fairy I used the colours as well, but left out the reddish pink tone, because I felt, that it overpowered the other two colours on the background a little. That way it helped balance it out.

I put some gold glitter glue on the fun banner piece  to tie it in with the whole "fairies and wishes" theme, hung it from a piece of baker's twine, stamped the sentiment and my card was done! I hope you like it and that you are going to join us for this month' challenge! Happy crafting, everyone ;o) Yours Maike


Supplies:
Stamps: "Flynt" & "Everyday Marquee Sentiments" by Purple Onion Designs
Die: "All Prettied Up" by Mama Elephant

Challenges:

Dienstag, 2. Februar 2021

Liebe Grüße (Bear greetings)

Hello everyone :o)
It is Febuary already - well it has been for a day, but don't tell anyone, because I am a little late posting this card... I have created it for the "Hearts" challenge over at Challenge Up your Life. I am not a whole lot into Valentine's cards because my loved ones never throw those cards away I give to them - which is lovely and shows appreciation and all that, but they tend to pile up in our home, so I usually give other things for Valentines like a cake or some flowers or hugs ;o) However, I love hearts on cards, so even this is a perfect theme for Valentine's cards I created a "Hello" card and love how it turned out. I hoipe you do, too:

To get a bit of a shadow effect I die cut the hearts beackground die twice, once from white and the second time from dark red cardstock and glued the slightly offset together as you can see in the picture. Next i cut a wonky circle and two speech bubbles from the same red cardstick. I heat embossed my sentiment on the speech bubbles and afterwards added the faux stitching line with a white gel pen.


Next I die cut some copic friendly paper with the bear die, added some colouring and or shading to the individual pieces and assembled the bear back together again. The way I do this is to take the biggest die and colouring around it with a pencil. Next I will cut it out not on the line but rather a quarter inch inside of the line to give myself a piece of paper to glue all the individual pieces to. That way I can cover the big peiece with adhesive and don't have to worry about putting a tiny bit of glue on each and every piece. I adhered the bear to the wonky circle using foam tape on the top and regular tape towards the bottom to give it that angle to really make it look at you and also added the speech bubbles. I hope you are going to join us at Challenge Up Your Life. With the updated rules you can now post three projects to our challenge, sharing even more of your talent with us ;o) Have a wonderful day everyone and happy crafting ;o)
Yours Maike


Supplies:
Stamps: "tba
Dies: "Cool Cuts Speech Bubbles" by Create a Smile
         "Big Picture Book Bear" by Simon Says Stamp
         "Fluttering Hearts Cover Plate" by Honey Bee Stamps

Freitag, 1. Januar 2021

Happy Ho Ho Ho-lidays (Foxes)

Happy New Year everyone ;o)
I hope you had a wonderful start in a new year full of hugs, crafting, joy, all the things you love and health! Let's start with a new card! This is one I created for the new "Snowflakes" theme at Challenge Up Your Life. 


I used these cute foxes from Hello Bluebird and created a lovely wintery scene for them using Distress Inks. I just fell in love with the combination of Shaded Lilac,Blueprint Sketch and Chipped Sapphire. You should definately give it a try. Depending on how much you use of each hue you get a more blue or purple result. I think it is the perfect combination and you will be seeing loads of it... So I do hope you like it, too ;o) I added a few splashes of water and dried them off as and also added a few Opaque White splashes to add this "Snow is falling"-feeling. 


I knew I was going to use the snowflake background paper by Stampin Up which is kept in blue and also turquoise hues, so I added a sentiment stamped in Mint Julep and also used Copics grom the BG family for the scarf of the fox on the left and the present. To set the scene I used the trees on the left which I had blinged up a little and added snowflake die cuts around the foxes, so that one of them cut put its tongue out to catch a snowflake with it. ;o) I hope you like my first card of 2021 and that you are not too tired of holiday cards yet... There will be a few more I should think... ;o)
It would be awesome if you would start this crafty year with us and join us with a "Snowflake" project! Hope to see you again soon! Happy crafting my friends and again a very happy new year,
yours Maike


Supplies:
Stamps: "First Snow" by Hello Bluebird
              "Puffy Holiday Greetings" by Mama Elephant

Dies: "Mini Snowflake dies" by Lawn Fawn
          "Manga Fluffiga Granar" by Gummiapan (Tree Dies)

Challenges:
Simon Says Wednesday Challenge "Sparkle and Shine" (Sparkle on trees and gift)
Christmas Craft Creations "Winter Blues"
Sweet Stampers "Anything Goes"
2 Crafty Critter Crazies "January Challenge"
Creative Crafting Uncles "Christmas"
Love To Craft "Anything Goes"
Crafty Galz Creations "Tis the Season"

Sonntag, 15. November 2020

Warme Grüße (Warm greetings - Walrus)

Heya everyone!
I hope you are enjoying a lovely, lazy, sunny, funny Sunday! Today I am back with an inspiration card for the newest Papercraft Challenges theme. This time we would like to see "Selfmade Backgrounds" in your projects. The DT have so many differents examples to share, you really should risk a peek ;o) This is my piece:


I created a wintery background using the Tambai watercolours and after it had dried completely I embossed the snow flakes over top. For that I used a stencil by Create A Smile and dabbed the Versamark ink pad right over it. Worked like a charm!


I die cut the paper with a scalloped die and also die cut a piece of white felt to represent the snowy ground. The cute walrus is a digi by our kind sponsor Dr. Digis and you could win 2 digis from them if you participate in our challenge. This one is a really great image to colour, because it consists of many large areas and also a walrus had smooth looking skin, so there is no need to create fluffiness which for me makes it a lot easier to colour ;o) I hope you are going to join in the fun and that I will get to see your creation in our gallery! Have a wonderful Sunday and happy crafting,
yours Maike


Supplies:
Stempel: "Cuddly Critters Walrus" by Dr. Digis
Stencil: "Schablone" by Create A Smile (discontinued?)


Montag, 26. Oktober 2020

Happy Halloween (cat and dog)

Hello everyone ;o)
this is a sad post to write, even though I really like this card and am quite happy how it turned out. The sad part is that this will be the very last challenge at the Crafty Cardmakers. Our wonderful Lin from the "Twisted Witch" blog has good reasons to step down from coordinating the team and the challenge. However I am really heartbroken that the challenge won't continue. I have met so many lovely and fabulous people and talented crafters through the challenge. I am grateful for having been a part of this team for as long as it lasted and I wish each and everyone just the best of luck, good health and happiness! 
But now onto today's card. This is my inspiration for you for our "Things That Go Bump In The Night" challenge:


I started with the background and used different Distress Inks to create a lighter middle and a darker outside and also stamped a cemetary scene on top of the grassy hill. When in the end that still didn't feel dark enough I went around the panel with "Black Soot" and that really made even the darker, duller colours pop. 


Next I stamped and coloured the two fun images by Simon Says stamp. They are from an older set which is new to me though. They are quite big and I also love the sentiment which is from the same set. That one was stamped and embossed before I added the cat and the dog, but after the background had dried for quite some time. I thought, that the top was a little too bare so I added the spider and her net to the upper left corner and that finished off my card. I hope you like it and I also hope that you will help us leaving blogland with a bang by participating in our last challenge! 


Supplies:

Stamps: "Trick Or Treat" by Simon Says Stamp
Dies: "Cute Cobweb" by Lawn Fawn

Challenges:
Simon Says Wednesday Challenge "Layer it Up" (3 layers plus inked layers)
Animal Friends Challenge "Spiders"
Dragonfly Dreams "Spooky and / or Cute"
Sweet Stampin Challenge "Halloween"
Send a Smile 4 Kids "Anything Goes"
My Time to Craft "Halloween or Cats"

Donnerstag, 15. Oktober 2020

Squirrel having a pile of fun

Heya everyone,
so glad to see you here in my little part of Blogland ;o) Today we are starting a new challenge over at Papercraft Challenges. This time the theme is "Autumn Colours" and the winner will get a little surprise in addition to all the fun ;o) This is my take on the theme:


For this card I used the cute images by MFT stamps and started with stamping the pile of leaves on the already prepared background and quickly coloured in all the leaves in different colours and the "inside" of the pile in a dark green. It could either be that the inside of the pile is quite dark or that you can still see some grass underneath all the leaves. 


Next I stamped the squirrel and some extra leaves and coloured them in using my Copic markers again. This time I made sure I had a lot of contrast and depth to what I coloured. After that was done I die cut the frame and stamped the sentiment right next to the edge of the inside of the frame, placed the squirrel where I thought it looked best and then scattered some of the leaves around to make it look like the suirrel had just jumped into the pile of fun ;o) I hope you like the card and that you are going to join us in our "Autumn Colours" gallery. I would love to see what you create! Have a wonderful and cozy Autumn time, stay safe and happy crafting everyone, yours Maike ;o)


Supplies:
Stamps: "Piles of Fun" by My Favourite Things
              "Wonky Scalloped Frames" by Avery Elle

Challenges:

Montag, 31. August 2020

A Fairy Nice Day

Hello my dear crafty friends!
I hope you are all doing fine and that you get to enjoy some sun outside or some light over your craft desk ;o) I happen to have an idea for the latter: How about joining us at the Crafty Cardmakers with a "Things With Wings" themed project this fortnight??! I had so much fun pairing this cute fairy with the beautiful "Bloom" stencil by Create A Smile Stamps:


It is a rather simple card but I do love it for the vibrant colours. Also when you look at it for some time and focus on the fairy's feet the card gets a more dimensional look. At least it is that way for me. 


For the "Blossom" itself I used three different Distress Inks (Mustard Seeds, Pink Raspberry and Peacock Feathers) and made sure they overlapped quite a bit, to get all the other blended shades too. I didn't want the sentiment to take anything away from the background so I decided to just stamp it there using the MISTI tool to get a really deep black line. I hope you are going to join us for some fun with "Things With Wings" and would love to see your project in our gallery ;o)


Supplies:
Stamps: "Little Fairies" The Greeting Farm
Stencil "Blossom" by Create A Smile Stamps

And if you like fairies, here is another card I made using the same stamp set:


And a whole bunch of fairy goodies for my dearest "Klosterschwestern" in 2018. The tree log contained a special rubber to help when one made a little booboo ;o)


Samstag, 15. August 2020

Congratulations - Bear with Cake

Hello everyone!
Today I am back with a new card for the "Animals" challenge at Papercraft Challenge. We are happy to say that our very kind sponsor Gerda Steiner Designs is offering a $15 prize for their shop ;o) So what are you waiting for... ahhh, yes of course ;o) inspiration ;o) And here is comes:


I started with creating a super fun and vibrant background for this cute bear, die cut it with a hexagon frame die (it seems I have been thinking of bees and honey...) and glued the frame right back into place but upside down ;o) I stamped some confetti splatters on the inside of the frame and adhered the bear on top. 


Related Posts Plugin for WordPress, Blogger...