Posts mit dem Label Stencilling werden angezeigt. Alle Posts anzeigen

Freitag, 16. Dezember 2022

Merry Christmas Penguin (Slim line card)

Hello everyone,
I am a little late in sharing this card for the newest Papercraft Challenge, but I hope you'll forgive me. Right before Christmas it seems to me at least like there are never enough hours in a day - how about you,  do you feel the same? Anyways, here is the card:


The theme of our newest challenge is "Decking the Halls" and this cute critter by Gerda Steiner Designs is doing just that - just not very successfully at the moment. However I bet his little igloo will look very festive once he has finished decorating it. For the card I cut a piece of white cardstock to the right size and used a stencil to create the dot background. Once the ink was completely dry (I let it sit over night) I heat embossed the sentiment right over the dots with Ranger Platinum Embossing Powder. I love that colour. In the picture above it looks silvers, but when you tilt it in the light...


you get a golden look from it. I love it. I coloured the cute digi stamp with Copic markers and cut it out with a tiny white border. I placed it to the side and really like the look of the card! I hope you do, too. Have you ever made a slim line card? 


I hope to see your festive project in our gallery over at Papercraft challenges ;o) Have a great day and happy crafting, everyone!!! Yours Maike


Stamps: "Decorating Penguin" by Gerda Steiner Designs 
              "Merry Christmas" by My Favorite Things (discontinued)
Stencil: tba

Donnerstag, 1. September 2022

Happy Birthday (Sweet Celebrations)

Hello everyone!
Today is the start of the 150th challenge at the Challenge Up Your Life blog and we would like to celebrate this anniversary with all of you. So it might not surprise you, that "Anniversary" is our new theme. I chose a birthday theme, because those are the cards I always need the most of:


I stamped the sentiment in different colours and added the starry background with a stencil to give it more of a fun and festive look and glued the panel to a rainbow coloured background. Next I added the adorable critters and my card was done. Most of the time creating it went into the colouring, but it was a lot of fun!


I hope you are going to join our 150th challenge and share your talent with us! Take care my friends and happy crafting! Yours Maike


Stamps: "Sending Sweet Celebration Wishes"  & "Happy Birthday Blend" by My Favorite Things

Samstag, 2. Juli 2022

Happy tropical birthday

Hello everyone ;o)
I hope you are well and happy! It is summer and so we felt a "Tropical" theme would be perfect for our newest challenge at Challenge up your life! I chose to create a card right out of a tropical jungle and here it is:


I used a stencil to create the background and had these wonderful leave dies which I backed with black, so that they wouldn't get visually lost on the busy background.


I love the combination of pink and green, don't you? It looks so fresh and summery... I hope you are going to join us for our "Tropical" theme and because it is summer we will take a short break and will be back with a new theme in September - which means that you'll have two month to join the fun ;o))) Hope you'll have a lovely summer time and happy crafting everyone ;o))) Yours Maike


Supplies:
Stanps: "Loveable Leopards" by My Favorite Things (retired)
             "Flirty Frames" by Lawn Fawn


Freitag, 15. Januar 2021

Merry Christmas (Skydiving Santa)

Hello everyone,
let me start today's post with saying "After Christmas is Before Christmas" and I do hope you'll agree. It seems that every year there are less cards in my stash than I would actually like to send, so again I vowed to keep creating Christmas cards all year long. And so here is another one I made and would like to share with you:


I created a slider card for the newest theme "Heat Or Dry Embossing" over at Papercraft Challenges with this super cute skydiving Santa by our kind sponsor Dr. Digis. You could win 2 digis from their online store if your entry numbers wins! Isn't that fun? For my card I started by heat embossing the text backround on to a piece of white cardstock and added the clouds through a stencil after it was cooled down completely.


Next I added the sentiment towards the bottom of the card and figured out how long the slider "tunnel" could be for Santa not to fly too high or land on or over the sentiment. I added a piece of foam tape to the back (around where his head is) and stuck this piece through the "tunnel" I had cut into the embossed paper. From behind I added a coin, so it would have enough weight to move. Have you started on a new Christmas card stash already?


I hope you are going to join us at Papercraft Challenges and I wish you and your loved ones all the best and as always happy crafting, yours Maike ;o)

Supplies:
              "Christmas Background" by My Favourite Things
Dies: "Merry Christmas" by My Favourite Things (unfortunately discontinued it seems)


Mittwoch, 3. Juni 2020

Super Duper Hero


Heya everyone!
"Hero" is the theme of our newest challenge at PINspirational Challenges or better this picture is:


I created a friendship card with the hero-theme, because I consider many of my friends heroes. Some are awesome mums or great, inspiring teachers others are brilliant with people or animals or plants... So I will have to choose carefully whom I will send this card to in the end ;o)


Wishing you all a wonderful week, hope you get to meet up with some of your own heroes and happy crafting everyone ;o) Maike


Supplies:
Stamps: "Tiny Heroes" by Mama Elephant
Dies: "Wonky Stitches Elle-Ments" by Avery Elle
Stencil: by MFTstamps, but discontinued. (Here is a similar one however.)

Dienstag, 5. Juni 2018

You arrrrr amazing (Pirat & Mermaid)

Halli Hallo ihr Lieben!
Wie versprochen gibt es nun die zweite Karte von mir am heutigen Tag. Dieses Mal als Inspiration für das Thema "Kinder" bei der Papercraft-Challenge:

Heya my dear crafty friends!
As promised here is the second card I am sharing today. This time as an inspiration for the new challenge theme "Children" at Papercraft-Challenges:


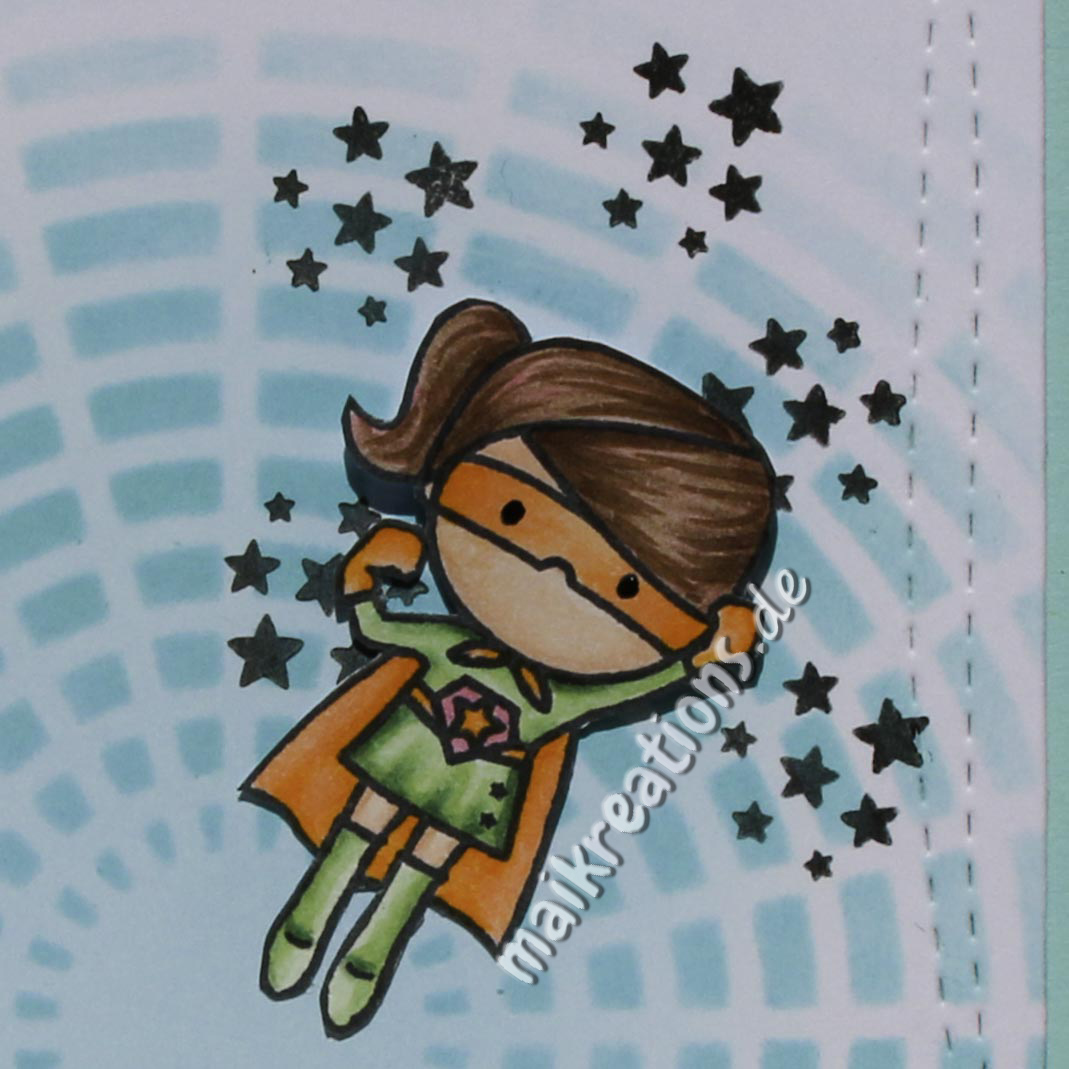
Als erstes habe ich den Hintergrund gestaltet. Dazu habe ich Nuvo Mousse in zwei verschiedenen Blautönen flächig auf weißen Cardstock aufgetragen und kurz trocknen lassen. Anschließend bin ich noch einmal mit den selben Farben drüber gegangen, habe aber dieses Mal eine Schablone benutzt. Das Papier konnte ich dann erst einmal an die Seite legen und trocknen lassen. Normalerweise gestalte ich direkt mindestens zwei Hintergründe, wenn ich das ganze Zeug schon einmal rausgesucht habe und so habe ich es auch dieses Mal wieder gemacht. Also wundert euch nicht, wenn ihr einen sehr ähnlichen Hintergrund noch einmal auf einer meiner Karten erspäht. ;o)

First I started with creating the background. I used Nuvo Embellishment Mousse in two different shades of blue more or less evenly on a whole piece of white paper and let it dry for a few minutes. Next I used those same colours again but also used a stencil to get the awesome pattern plus the shimmer and shine from the mousse ;o) This piece was left to dry as well. Usually when I create backgrounds of the messier kind I try to create a piece so big that I will get at least two background pieces from it. That way - to me - it is worth the fuss and all the cleaning plus I have another great piece ready when I need something like this again the next time. ;o)


Als nächstes habe ich alle Elemente, die ich noch für meine Szene brauchte gestempelt, coloriert und ausgestanzt / ausgeschnitten. Außerdem habe ich noch die Holzplanken als Hintergrund für das Piratenmädchen mit Copics gemalt, von dem sie sich richtzig gut absetzen würde. Es passiert ja nicht oft, dass Stempel (besonders "Menschen"stempel) von verschiedenen Firmen gut zusammenpassen, aber ich finde bei diesen beiden ist das der Fall. Das kann natürlich gut an der Perspektive liegen, die die Karte hier zeigt, aber wie auch immer, ich freu mich, dass es so gut geklappt hat. Ich hoffe, ihr mögt die Karte auch und habt nun Lust bekommen vielleicht auch ein "Kinder"-projekt zu gestalten und mit uns zu teilen ;o) Habt eine fantastische Woche und happy crafting, eure Maike

Next I stamped, coloured and die cut all the other elements I needed to create the scene I had in mind. I also coloured a piece of paper with Copics to create a woodplank background for the little pirate girl.  It isn't often that images from different companies (especially "people" images") go together so well as these and maybe it is just the perspective of the scene that they do, but I just love the look of them together. I hope you are going to join us with a "Children" card of your own ;o) Have an awesome week and happy crafting, yours Maike ;o)


Material / supplies:
Stempel / stamps: "Little Mermaids" von The Greeting Farm
                              "Party Like A Pirate" von MY Favorite Things
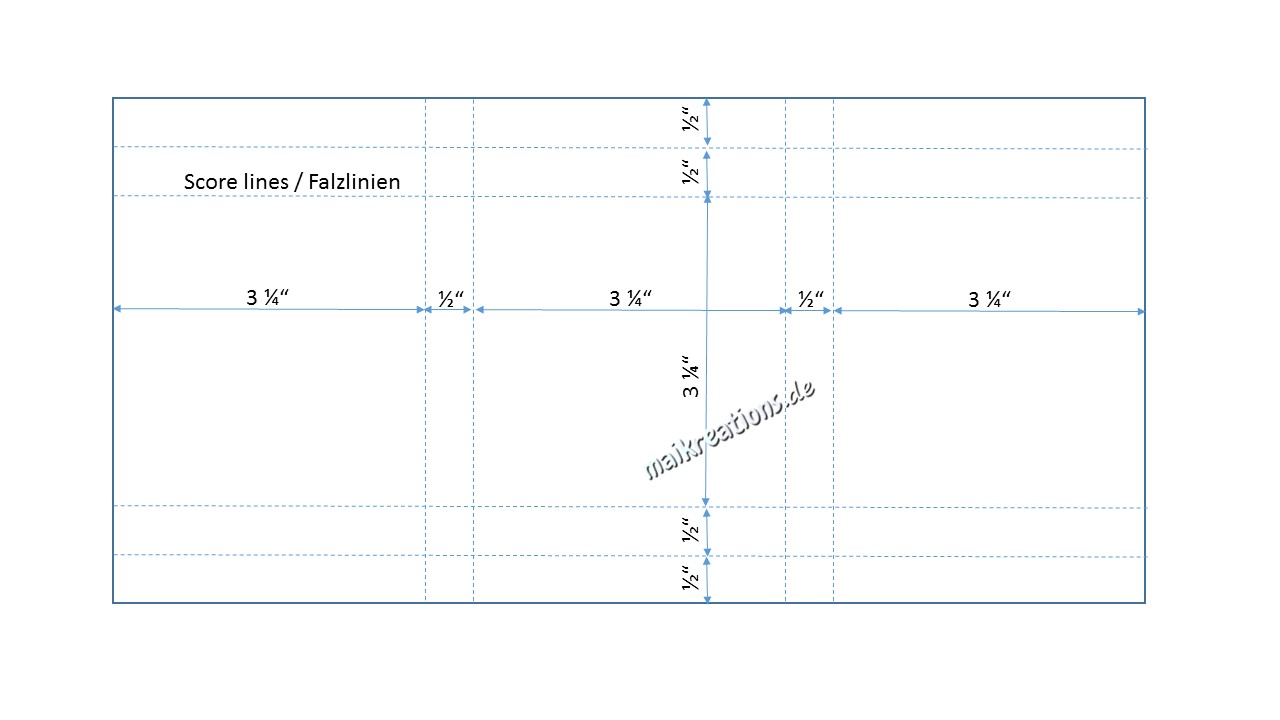
Stanze / die: "All Prettied Up" von Mama Elephant (ich mag die halt echt gern ;o))
                      "Ocean View Porthole" von My Favorite Things
Schablone / Stencil: "Cascading Scallop" von My Favorite Things

Dienstag, 13. Februar 2018

Hope You're Feline Better Soon


Halli Hallo ihr Lieben!
Bei Herzchen und Rosa denkt man ja gerade im Moment häufig an den Valentinstag - ich habe das Inspirationsbild der neusten PINspirational Challenge allerdings als Anlass genommen, um eine Gute-Besserungs-Karte zu basteln. Die fehlen oft bei mir im Vorrat und wenn ich dann mal eine brauche, habe ich meist keine Zeit schnell eine zu machen. Hier seht ihr das Inspirationsbild:

Heya my dear crafty friends!
When one sees hearts and the colours pink and red usually - especially at this time of year - people think of a Valentine - however, I wanted to show, that the theme of our newest challenge at PINspirational Challenges fits well with get well cards also. And seeing that I seem to lack them in my stash whenever I really need one I decided to create one of these. This is our inspiration picture:
 
http://pinspirationalchallenges.blogspot.de/2018/02/pinspirational-challenge-209.html


Ich habe momentan ja wirklich viel Freude mit allen möglichen Schablonen, aber die von Create A Smile benutze ich besonders gerne. Einerseits sind sie toll designed und man kann sie eigentlich fast immer nutzen und was mir außerdem so gefällt ist, dass sie aus einer so schön dicken Folie gestanzt sind.  Mit "Spun Sugar" Distress Ink habe ich sowohl Innen als auch Außen einen Farbverlauf von unten rechts nach oben links gewischt und anschließend die Herzen aufgetragen. Da ich die Farbe außen intensiver haben wollte, habe ich dort "Picked Raspberry" benutzt - innen bin ich bei "Spun Sugar" geblieben.

I used one of Create a Smile's wonderfully sturdy stencils to create the background, using "Spun Sugar" and "Picked Raspberry" Distress Ink for the outside of the card and just the "Spun Sugar" for the inside. For both I created a gradiant from the bottom right to the top left with the light pink and afterwards added the hearts using the stencils.


Aus der Front habe ich mit einem Skalpellmesser ein Quadrat ausgeschnitten und von beiden Seiten einen quadratischen Rahmen aufgeklebt, um ein Fenster zu erhalten, aus dem die Katze herausschauen kann. Geöffnet sieht die Karte dann so aus:

I cut a square from the card front using a craft knife and added a square frame to both sides, so that I would have a window for the cat to look through. This is what the card looks like when you open it:


Alles, was nun noch zu tun war, war die Katze und alle weiteren Elemente aufzukleben und den Spruch außen unter das Fenster zu stempeln. Falls es euch nun auch in den Fingern juckt eine Karte passend zu unserem Inspirationsbild zu basteln, würde ich mich sehr freuen, wenn ihr es in der PINspirational Gallerie verlinken würdet. Zu Gewinnen gibt es dieses Mal 2 Digis von unserem freundlichen Sponsor "Pattie's Creations". Habt einen schönen, kreativen Tag und happy crafting, eure Maike

All that was left to do now was to glue down the cat and all the other elements and also to stamp the sentiment. In case your fingers are now itching from wanting to create something I would love to see your creation in our gallery. You also get the chance to win 2 digi stamps from our kind sponsor "Pattie's Creations" ;o) Have a wonderful and creative week everyone and happy crafting, yours Maike


Material / supplies:
Stempel / stamps: "Smitten Kitten" von My Favorite Things
Stanzen / dies: "Single Stitch Line Rounded Square Frame" von My Favorite Things
Schablone / stencil: "Big Hearts Polka" von Create A Smile

Challenges:

Freitag, 24. November 2017

Christmas Series Card #11 / Weihnachtsserie Karte #11 (POD Holiday Hugs)

Halli Hallo ihr Lieben!
Momentan schwanke ich ja immer zwischen traditionellen Weihnachtsfarben und dann wieder eher modernen Farbkombinationen :-) Heute ist es Letzteres geworden: 

Heya my dear crafty friends!
Lately I found that I vary between traditional Christmas colours and more modern combination :-) This time it turned out to be one of the latter again:


Zuerst habe ich die Hügellandschaft mit zwei freihand geschnittenen Masken und Salty Ocean Distress Ink gestaltet. Um dabei ein bisschen effizienter zu sein habe ich einen A4 Bogen längs halbiert und beide Stücke zu Hügeln "gemacht". So hab ich mit einmal Rumferkeln direkt 4 immer anders aussehende Kartenhintergründe fertig und kann mir das beste Stück für meine Szene heraussuchen. Als nächstes habe ich die beiden süßen Wintertiere von Purple Onion Designs mit den Aquarellmarkern von Windsor und Newton coloriert. ( Welche ich übrigens absolut klasse finde, weil sie eine Spitze haben, die der der Copic Sketch ähnelt und die Farben leuchtend und einfach schön sind.)

I started by creating the hill background using a couple of simple paper masks I cut by hand and Salty Ocean Distress Ink. In order to be more efficient in my card making I filled a whole sheet of paper with varying hills, so that I could choose which part I wanted to use. Next I coloured the two cute critters by Purple Onion Designs using Windsor and Newton watercolour pens. (Which I totally love, because they have a tip just like my Copics and the colours are vibrant and beautiful.)


Auf den getrockneten Hintergrund habe ich Schneeflocken mit der Glitzer-Embossingpaste von Nuvo ausgetragen, die in echt noch viel schöner aussehen, als auf dem Foto :-) Noch zwei Spruchblasen in einem hellen Pinkton dazu und meine Karte war fertig! Ich hoffe, sie hat euch gefallen! Falls ihr noch mehr Inspirationen für Weihnachtskarten  sucht und es noch nicht getan habt, schaut euch doch auch die ersten zehn Karten meiner diesjährigen Serie an und guckt definitiv bei Tag 1 vorbei - da wartet noch mein Giveaway auf Mitspieler :-) Habt einen schönen Tag und happy crafting ihr Lieben, eure Maike 

I created a snow background with Nuvo glitter paste after the hills had dried, added the two sentiment bubbles and my card was done! I hope you liked it! If you are looking for more Christmas card inspirations and haven't done so already you could check out the first ten cards of this season. Make sure to stop at the post for Day 1 so you can enter my annual giveaway :-) All you have to do to be eligible to win a $25 gift card to an online craft store of your choice is to leave a comment on that post and become a follower. Have a wonderful day my friends and happy crafting, yours Maike 


Material / supplies:
Stempel / stamps: "Noel -bear" & "Blizzard - husky" von Purple Onion Designs
                              "Puffy Holiday Greetings" von Mama Elephant
Stanzen / dies: "Small Stitched Rectangle Stackables" von Lawn Fawn

Challenges:

Dienstag, 6. Juni 2017

You are the Best!

Halli Hallo ihr Lieben!
Heute bin ich schon wieder da mit einer neuen Karte ;o) Vielleicht habt ihr meine gestrige Karte gesehen, auf der ich auch schon diese süße "Page-Hugger" Katzen in Szene gesetzt habe? Heute gibt es sie zwar nicht mit Hut, dafür aber mit lieber Post zwischen den Pfoten ;o)

Heya my dear crafty friends!
Today I am back with another card as promised. Maybe you have seen yesterday's card, where I have used the cute "Page-Hugger" cat image as well? Today it isn't wearing a graduation hat, but instead holding some lovely mail in between its paws ;o)


Dies ist das neue Inspirationsbild für die aktuelle PINspirational Challenge und ich habe mich sowohl am Thema Post als auch an den Farben orientiert, weil ich finde, dass sie einfach wundervoll frisch aussehen ,o)

This is the new inspiration picture at PINspirational Challenges and I took the theme as well as the colours as my source of inspiration, because I thought they looked absolutely fresh and gorgeous ;o)


Unser freundlicher Sponsor is dieses Mal "Beccy's Place" und mit ein wenig Glück könnte euer Beitrag gewinnen, wenn ihr euch von uns inspirieren lasst und euer Werk bei uns in der Gallerie einstellt ;o) Ich freu mich schon darauf, mir alles anschauen zu können und bin gespannt, wie ihr das Bild umsetzt!!! Habt eine tolle Woche und happy crafting, eure Maike

Our kind sponsor this time is "Beccy's Place" and with some luck you could be the lucky winner if you join our newest challenge ;o) Hope to see many entries in our gallery!!! Have a great time and happy crafting, yours Maike


Material / supplies:
Stempel / stamps: "Page Huggers" & "Sticky Notes" von Mama Elephant
                             "Garden Bugs" von Purple Onion Designs
Stanze / die: "LJD Jumbo Peek-a-Boo Circle Windows" von My Favorite Things


Dienstag, 30. August 2016

Coffee???


Halli Hallo ihr Lieben!
Die neue Aufgabe auf dem PINspirational Blog dreht sich rund um verschiedene Getränke - wobei ihr euch natürlich auch von den Elementen und Farben des Fotos inspirieren lassen dürft, könnt, sollt ;o):

Heya my dear crafty friends!
The new task on the PINspirational blog is all about drinks - though you can use any element or the colours as inspiration for your project, too, of course ;o):


Als ich das Inspirationsbild gesehen habe, habe ich sofort an das süße "Monster Morning" von Whipper Snapper gedacht. Ich habe diesen Morgenmuffel und den Spruch darunter mit Zig Maerkern coloriert. Da ich den Kaffee in den Fokus bringen wollte, habe ich für die Kaffeetasse ein leuchtendes Pink benutzt und den rest in braunen und bläulichen Tönen gehalten.

However, when I saw the inspiration pic I immediatly though of the cute "Monster Morning" by Whipper Snapper. I coloured it and the sentiment "Coffee?" right below it with Zig markers. Because I wanted the coffee cup to be in the focus I used a vibrant pink for it and used brown and bluish shades for the rest of the card.


Den Hintergrund habe ich mit einer Schablone und Peacock Feathers Distress Ink gestaltet und anschließend noch ein paar Farbspritzer darauf verteilt. Es sollte richtig so aussehen, als sei das Monster noch nicht ganz im "Hier und Jetzt" angekommen, so lange es seinen Kaffee nicht getrunken hat :o)

I created the background using a stencil and Peacock Feathers Distress Ink, which I have also used to add some ink splatters around the monster. I wanted it to look like as if the poor tired creature had not yet arrived in the "here and now" without its coffee to wake it up ;o)


Ich würde mich freuen, wenn ihr Lust hättet euch von unserem Challengefoto inspirieren zu lassen und euer Werk mit uns auf PINspirational zu teilen. Bis dahin: Happy crafting ;o)

I would love to see your projects inspired by our challenge picture uploaded to our gallery over at the PINspirational blog. Until then: Happy crafting ;o)))

Material / supplies:
Stempel / stamps: "Monster Morning" von Whipper Snapper
                              "Sketchy Alpha Stamp Set" von Waffle Flowers
Stanze / die: "Wonky Stitches Elle-Ments" von Avery Elle
Schablone / stencil: "" von My Favorite Things


Dienstag, 5. Juli 2016

By the sea ;o)

Halli Hallo - ein zweites Mal heute ;o)
Dieses Mal bin ich zurück mit der Karte für die aktuelle "Summerfun, Beach, Sea" Challenge des Cards und More Blogs. Hier seht ihr meine Umsetzung:

Hello there - a second time today ;o)
This time I would like to show you my card for the current "Summerfun, Beach, Sea" challenge for the Cards und More blog. This is my take on the topic:


Als erstes habe ich die Kartenbasis vorbereitet. Dazu habe ich Salty Ocean Distress Ink mit meinem Ink Blending Tool über die Schablone getupft und bin nach oben links hin immer heller geworden, damit es einen schönen Verlauf gibt. Um noch mehr an glitzernde Wellen zu erinnern, habe ich ihn mit einer Perfect-Pearls Wassermischung besprüht und die Tropfen nach ca. 30 Sekunden wieder mit einem Tuch aufgenommen.

First I prepared the card base this time. I used Salty Ocean Distress Ink and a round Ink blending tool to sponge some colour over the stencil, getting lighter towards the top left. Because I wanted the background to resemble some water I sprayed a mix of water and perfect pearls on top and waited a few seconds before drying the paper with a paper towel.


Den Pelikan und seine Freunde habe ich anschließend ausgedruckt, mit Copics coloriert und dann so zurechtgeschnitten, dass er hinter mein dunkelblaues Stanzteil passt. Den Rahmen habe ich mit Abstandshaltern auf die Karte geklebt und zum Schluss noch "zum Geburtstag" an den Rand der Karte gestempelt. Die Karte ist für einen Herren gedacht, weshalb ich sie bewusst schlicht gehalten und auf zu viel Schnickschnack verzichtet habe.

After the card base was done I printed, coloured and cut the digi stamp smaller, so that it would fit behind the die cut frame. I adhered the finished piece with foam tape to the card itself and stamped the words "zum Geburtstag" ("for your birthday" to the side. This card is meant to be given to a man, so I kept it very simple and clean. 


Zu gewinnen gibt es dieses Mal einen 15 Dollar Gutschein für unseren Sponsor "Sparkle N Sprinkle" - na, wenn sich das nicht lohnt?!

 You could be the lucky winner of a $15 gift certificate to the shop of our kind sponsor "Sparkle N Sprinkle" - so I hope you play along with us ;o)

Material / supplies:
Stempel / stamps: "Only Fish for Me" von Sparkle N Sprinkle
                            "Mini-Geburtstag" von Create a Smile
Stanze / die: "Classic Scalloped Rectangles" von Spellbinders
Schablone / stencil: "Cascading Scallop" von My Favorite Things

Challenges:

Freitag, 16. Oktober 2015

Halloween monster card

Hallöchen ihr Lieben!
Heute möchte ich euch noch mal eine Halloween-Karte zeigen. Dieses Mal findet ihr darauf ein genauso gruseliges wie irgendwie niedliches Monster von C.C. Designs darauf. Als ich es auf dem Stempelmekka gesehen habe konnte ich nicht anders, als es mitzunehmen:

Hello my dear crafty friends!
Today I would like to show you another Halloween card. It features a monster from C.C. Designs that is cute and somehow scary at the same time. When I had seen it at the last craft fair here in Germany I simply had to get it:


Den Stempel habe ich mit Copic Markern ausgemalt und anschließend per Hand ausgeschnitten. Das Spinnennetz habe ich mit Hilfe einer Schablone und der "Cobblestone" Tinte von Simon Says auf die Kartenbasis aufgetragen. Um das Netz noch etwas zu betonen habe ich alle Fäden mit "Diamond" Stickles nachgezogen. Jetzt glitzert und funkelt es ganz doll ;o)

The image is coloured with Copic markers and then fussy cut. For the spider web on the card base I had used a stencil and "Cobblestone" ink from Simon Says. To give it a little bit more interest I added "Diamond" stickles over the threads of the whole web. Now it shimmers and shines when the card is moved :o)


Als alles getrocknet war habe ich die gestrichelte Linie um den eingefärbten Bereich gezogen und den Kartengruß gestempelt. Normalerweise sind die Stempel ganz gerade, aber das es sich zum Glück um Clear stamps handelt, konnte ich sie so biegen, dass sie genau zwischen die Spinnweben passten. Zum Schluss habe ich dann das Monsterchen mit Klebepunkten aufgeklebt, um es ein ganz klein wenig hochzustellen.

Next I added the dash line around the spider web area and stamped my sentiment. Normally those stamps are straight, but because they are clear stamps I could manipulate them just enough to stamp them between the threads. I added the image last with some glue dots to give it just a tiny bit of dimension. 


Material / supplies:
Stempel / stamps: "Stuck on You" von C.C. Designs
                            "Fright Night" von Clearly Besotted
Schablone / stencil: tba
Coloured with: Copics

Challenges:

Dienstag, 13. Oktober 2015

Best wishes coffee card / Kaffee-Karte ;o)

Hallo ihr Lieben!
Ab heute gibt es wieder eine neue Herausforderung auf dem {PIN}spirational Challenge Blog und einem Preis von unserem Sponsor "Fresh Brewed Designs". Seit einiger Zeit ist das Thema Kaffee ja sehr beliebt... Jetzt habe ich mich auch einmal dran gewagt und das ist dabei rausgekommen:

Hello dear crafty friends!
Today starts a new challenge over at the {PIN}spirational blog which is sponsored by "Fresh Brewed Designs". Coffee seems to be a big thing right now and because the inspiration picture shows a lot of mugs I thought I would try my hands on a coffee card. And here is what I came up with:


Für meine Karte habe ich den Digistamp "" ausgedruckt, mit Copics coloriert und ausgeschnitten. Dann habe ich ein Rechteck ausgestanzt, mit Hilfe einer Schablone die Kaffeekringel getupft und mit einer der Stanzen aus dem "Stitched Basic Edges" Set von My Favorite Things die Lücke kreiert. Vorher war es für meinen Geschmack zu unruhig und die Tasse schien irgendwie in der Luft zu hängen. Das Tag für den Kartenspruch habe ich dann an den oberen Rand der gestreiften Isolierung gestempelt und noch ein weiteres Mal auf ein weißes Papier, damit ich es colorieren und ausschneiden konnte. So konnte ich das Tag im unteren Bereich mit einem Glue-Dot ein wenig von der Karte abheben.

For my card I have printed the digistamp called "", coloured it with my Copic markers and fussy cut it out. Next I die cut the stitched rectangle and added some coffee marks through a stencil by Tim Holtz to give it some interest. Now the background looked a little too busy for my taste and so I created that gap using some My Favorite Things dies which also helped to ground the mug on my card. Next I stamped the tag for my sentiment at the upper edge of the striped isolation piece and again on a white piece of paper so I could colour it in and fussy cut it out. I glued the tag in place using some snail adhesive at the top and glue dots at the bottom to give it more dimension. 


Material / supplies:
Stempel / stamps: "Perk-fect Pair" von Fresh Brewed Designs
                           "Beautiful Bow" von Avery Elle
Stanzen / dies:  "Stitched Basic Edges" by My Favorite Things
                       "Stitched Rectangles" von Simon Says Stamp
Schablone / stencil: "Splatters" von Tim Holtz

Samstag, 3. Oktober 2015

Herbstliche Merci-Verpackung / Autumnal chocolate gift box


Halli Hallo ihr Lieben!
Heute habe ich einen ganz besonderen Post für euch. Einerseits zeige ich euch heute mal eine kleine Geschenkbox in der man eine Kleinigkeit an einen lieben Menschen verschenken kann und zum anderen darf ich euch nun mitteilen, dass ich für die kommenden zwei Monate Gastdesignerin für den "Challenge Up Your Life" Blog sein darf ;o))) Ich freu mich wirklich sehr und hoffe, euch gefällt mein erster Beitrag!

Unser Banner zum Mitnehmen
Hello dear crafty friends!
Today I have a special post for you! On the one hand I am not going to show you a card today, but a little box that fits a small treat for someone very nice and on the other hand I can share with you some fantastic news: I am going to be the guest designer over at the "Challenge Up Your Life" blog for the next two months. ;o)))) I am really very excited and hope you'll like my first submission!


Zuerst habe ich mir einen "Schlachtplan" zurechtgelegt, um vier Merci-Schokoladenriegel in einer hübschen Box verpacken zu können. Dazu habe ich ausgemessen, wie viel Platz 4 Schokoriegel nebeneinander benötigen und mit diesen Angaben dann den Rohling für meine Box zurechtgeschnitten und -gefalzt. Das Papier muss auf die Größe 5 1/4" auf 10 3/4" geschnitten und dann so gefalzt werden, wie ihr es auf dem folgenden Bild seht. Achtung: Gefalzt wird nur bei den gepunkteten Linien - die Linie, an der die Maße stehen wird nicht gefalzt.

First I needed to make a plan for my box. I wanted to insert 4 chocolate bars called "Merci" to it, so I measured out how much space they needed. The paper for this box needs to be cut to 5 1/4" by 10 3/4" and then you need to score them like you can see in the following picture. Attention: You only need to score where you see the dotted line - the line with the measurements is no score line.
Als nächstes muss einiges weggeschnitten werden. Was übrig bleibt seht ihr hier:

Next you need to cut off a bit of you paper. In the following picture you see what your paper should look like after you cut out what isn't needed:

Nun muss die Box noch zusammengeklebt werden. Falls ihr - wie ich - ein Sichtfenster integrieren möchtet ist das jetzt der Zeitpunkt gekommen, aus dem ganz rechten Quadrat eine Form eurer Wahl herauszuschneiden. Um das Ahornblatt auch durch das Designerpapier an der richtigen Stelle zu stanzen, habe ich vor dem Ausstanzen das gemusterte Papier mit einem wieder ablösbaren Kleber vorübergehend befestigt und das ganze dann durch meine Big Shot gejagt. Bevor ich die Box endgültig zusammengeklebt habe, habe ich die Plastikfolie dazwischengeklebt, alle anderen Papiere aufgeklebt und die Innengestaltung der Box erledigt. Ich erwähne das hier, weil die Box auf dem Foto bereits die zweite ist, die ich fertiggestellt habe, weil ich nämlich die Folie vergessen hatte und es wirklich schwierig war, die Musterpapiere anständig aufzukleben.

Now the paper needs to become a box ;o) If you would like to have a window in your box, like I did, now is the time to cut it out of the square on the right. In order to have the acorn leaf at the right space in both the box and the patterned paper I glued the designer paper down temporarily and sent both through my Big Shot. Before I put the box together I glued the acetate between the box and the patterned paper, added the paper for the lid and also stencilled in the acorns. I am saying this here, because the box you see in the picture is actaully the second one I made, because I had forgotten the acetate and also the paper on the front. 


Zum Schluss habe ich nur noch den Streifen mit dem "just a little something" ("nur eine Kleinigkeit") hinzugefügt und dem dem Fuchs mit "Walnut Stain" einen Hügel angedeutet und ihn darauf geklebt. Der Fuchs ist übrigens eine Stanze, die ich mit Copics coloriert habe. Den Körper habe ich dafür 3 Mal ausgestanzt, um ihn ein wenig stabiler zu machen.

All that was left to do now was to glue down the sentiment strip "just a little something", colour in an area for the fox something to stand on and glue him down. The fox is made from a die cut which I have coloured using my Copic markers. I die cut the body three times to give it more thickness and make it more sturdy. 


Material / supplies:
Stempel / stamps: "Woodland Gifts" von Mama Elephant

Stanzen / dies: "Fox Item #TE497" von Taylored Expressions
                       "Decorative Edges Shallow" von Clearly Besotted
                       "Stitched Leaves" von Lawn Fawn

Designer Paper: "Sweater Weather 6x6 Pad" von Lawn Fawn

Coloring: Copics (E99, E97, E37, R20, E51, E53)
Related Posts Plugin for WordPress, Blogger...