Posts mit dem Label Special Card Design werden angezeigt. Alle Posts anzeigen

Donnerstag, 1. Dezember 2022

Hohoho Easel Card

Hello my dear crafty friends,
today I'd like to share my DT card for the current challenge at Challenge Up Your Life with you.


This time it is a  color combo:


For this card I stamped the cute reindeer, masked it and then stamped Santa over it. After colouring everything I cut the image out. I die cut the rectangle die from this fun snowy paper by Lawn Fawn and also from white paper which I then die cut two snowy hills from. That way I could have the stitching go around completely. 


Next I glued the snowy background to the cardbase and scored both pieced at once. I also adhered Santa to the snowy hills, making sure no adhesive went higher than the edge of the hill in the back and glued that piece to the bottom part of the snowy background. 


Depending on how you place the card you can either see the background but have Santa be lifted off it visually oder you can just have the hills with Santa on it visible. Really fun to play around with! 
To add a sentiment I die cut the "ho ho ho" from red and glitter cardstock and placed them over Santa`s head. The "real" sentiment was playced inside the card heat embossed on a small die cut which I backed with the same paper that I made the card base from. That way, when you use the sentiment to placethe card behind it, the bottom  part doesn't go all the way to the white paper (if you know what I mean). 
That was my card for today. I hope you are going to join us with a sentiment of your choice, only keeping in mind the beautiful color combo ;o) Have a fabulous day and happy crafting, Maike


Supplies:
Stamps: "Santa" & "Laurel - reindeer" by Purple OnionDesigns
               "Sweet Holiday Penguins" by My Favorite Things 
Dies: "Cool Cuts Cherry Lower Case" by Create A Smile 
          "Small Stitched Rectangle Stackables" & "Stitched Hillside Boarders" by Lawn Fawn

Dienstag, 30. Juni 2020

Relish the day - Let's BBQ


Hello everyone ;o)
Today I am back with another card! This time it is a pop up card as an inspiration for the newest PINspirational challenge:


I went with the BBQ theme and thought with Corona still keeping us from meeting with friends I would like to have some cards ready for when we can have bbq-parties again ;o) I kept the outside quite simple and clean, because there is a lot going on inside the card. 


For the pop up - mechanism I used a die by Lawn Fawn which really makes creating a card like this very easy ;o) When you open the card the inside twists and opens up, so that you can see the whole scene but the card still fits in an envelope.


This is what it looks like from the side, so that you can get a good look at the machanism itself:


The one thing one has to keep in mind is not to add too much bulk to the inside and that if you would like to have an image "sit" on two panels it is wise to score the image before adhering it down. That helps a lot to have the card lay relatively flat. I would love to see your creation in our PINspirational gallery as well ;o) Remember you can use anything as an inspiration from the picture: theme, colours, images,... whatever you can think of! I hope you are having an amazing week and happy crafting, yours Maike ;o)


Supplies:
Stamps: "Let's BBQ" by Lawn Fawn
Dies: "Pivot Pop Up" by Lawn Fawn

Challenges:
The Crafting Challenge "Summer" (BBQ is summer to me)

Dienstag, 5. Juni 2018

Good luck (Little goal-keeper)


Halli Hallo ihr Lieben!
Heute ist wieder Doppel-Dienstag, das heißt, ich teile jetzt eine Karte mit euch und später am Nachmittag habe ich dann noch einmal eine. Die Karte, die ihr hier schon seht, ist mein Inspirationsbeitrag für die aktuelle PINspirational Challenge und da dreht sich ab heute alles ums Thema "Fußball":

Heya my dear crafty friends!
Today is two-cards-tuesday which means that I am going to share one card with you now and the neyt one later tonight :o) The card you are seeing here already is my inspiration for the current PINspirational Challenge. From today on we would like to see your projects about football or maybe you would much rather be inspired by the beautiful colours of the picture? That's awesome, too ;o)

http://pinspirationalchallenges.blogspot.com/2018/06/pinspirational-challenge-217.html


Meine Inspiration habe ich natürlich vom Thema Fußball genommen, aber auch die vielen Farben und die Kreisform wollte ich aufgreifen. Als ersten Schritt habe ich ein Papier für den  Hintergrund ausgestanzt, aus dem ich zusätzlich noch einen Kreis gestanzt habe und welches ich außerdem mit einem Muster geprägt habe, dass mich an das Netz im Tor erinnert hat. Danach habe ich einen runden Rahmen ausgestanzt, der etwas kleiner als die Öffnung ist und einen noch etwas kleineren Kreis, auf den ich ein Tor gestempelt habe und mit nicht nachge"ladenen" Blendingtools in den passenden Farben das Gras und den Himmel aufgewischt habe.

My inspiration came from the theme obviously but also from the circle form and the many different colours. My first step was to die cut a card panel, which I also die cut a circle from and dry embossed with a pattern that reminded me of the net in the goal. Next I die cut a circle frame that was slightly smaller than the opening, so that it would be able to move and another circle again smaller than the frame. On the latter I stamped a goal and added some grass and sky by simply going over it a few times with a (not re-inked) blending tool.


Auf den Kreisrahmen habe ich die acht verschieden farbigen Fußbälle aufgeklebt. Beim Zusammenbau der Karte habe ich bei der Hälfte der Bälle jeweils einen Kreis von hinten dagegengeklebt, so dass eine Art Führung entstand und die Bälle nicht nach vorne rausfallen konnten. Unter die anderen Bälle habe ich Abstandshalter von MFT geklebt, die für die richtige Höhe sorgen sollten. Bevor ich die Elemente aufkleben konnte, musste ich erst einmal einen Moment überlegen, damit sich die Bälle später auch drehen konnten und das Fußballtor auch am richtigen Platz war. Zum Schluss habe ich dann nur noch den niedlichen Torwart und den Spruch dazu geklebt und meine Karte war fertig ;o) Ich hoffe, sie gefällt euch. Ich würde mich freuen auch euer Werk in der PINspirational Gallerie zu entdecken. Habt eine schöne Woche und happy crafting, eure Maike

I adhered the eight footballs directly to the circle frame and then I started building my card. I had to think twice to make sure that the circle would be able to move, but it worked out just fine with the help of four circles glued behind the balls to stabilize them and also four Spin & Slide discs by MFT. After I had assembled everything I could add the cute little goal keeper and the sentiment as well. I hope you like the card and that I will get to see your creation in our gallery ;o) Have a wonderful week and happy crafting, yours Maike


Material / supplies:
Stempel / stamps: "Game On" von Clearly Besotted (retired?)
                              "Fußball" von Betty's Creations
Stanzen / dies: "All Prettied Up" von Mama Elephant


Freitag, 3. November 2017

Christmas Series Card #4 / Weihnachtsserie Karte #4

Halli Hallo ihr Lieben
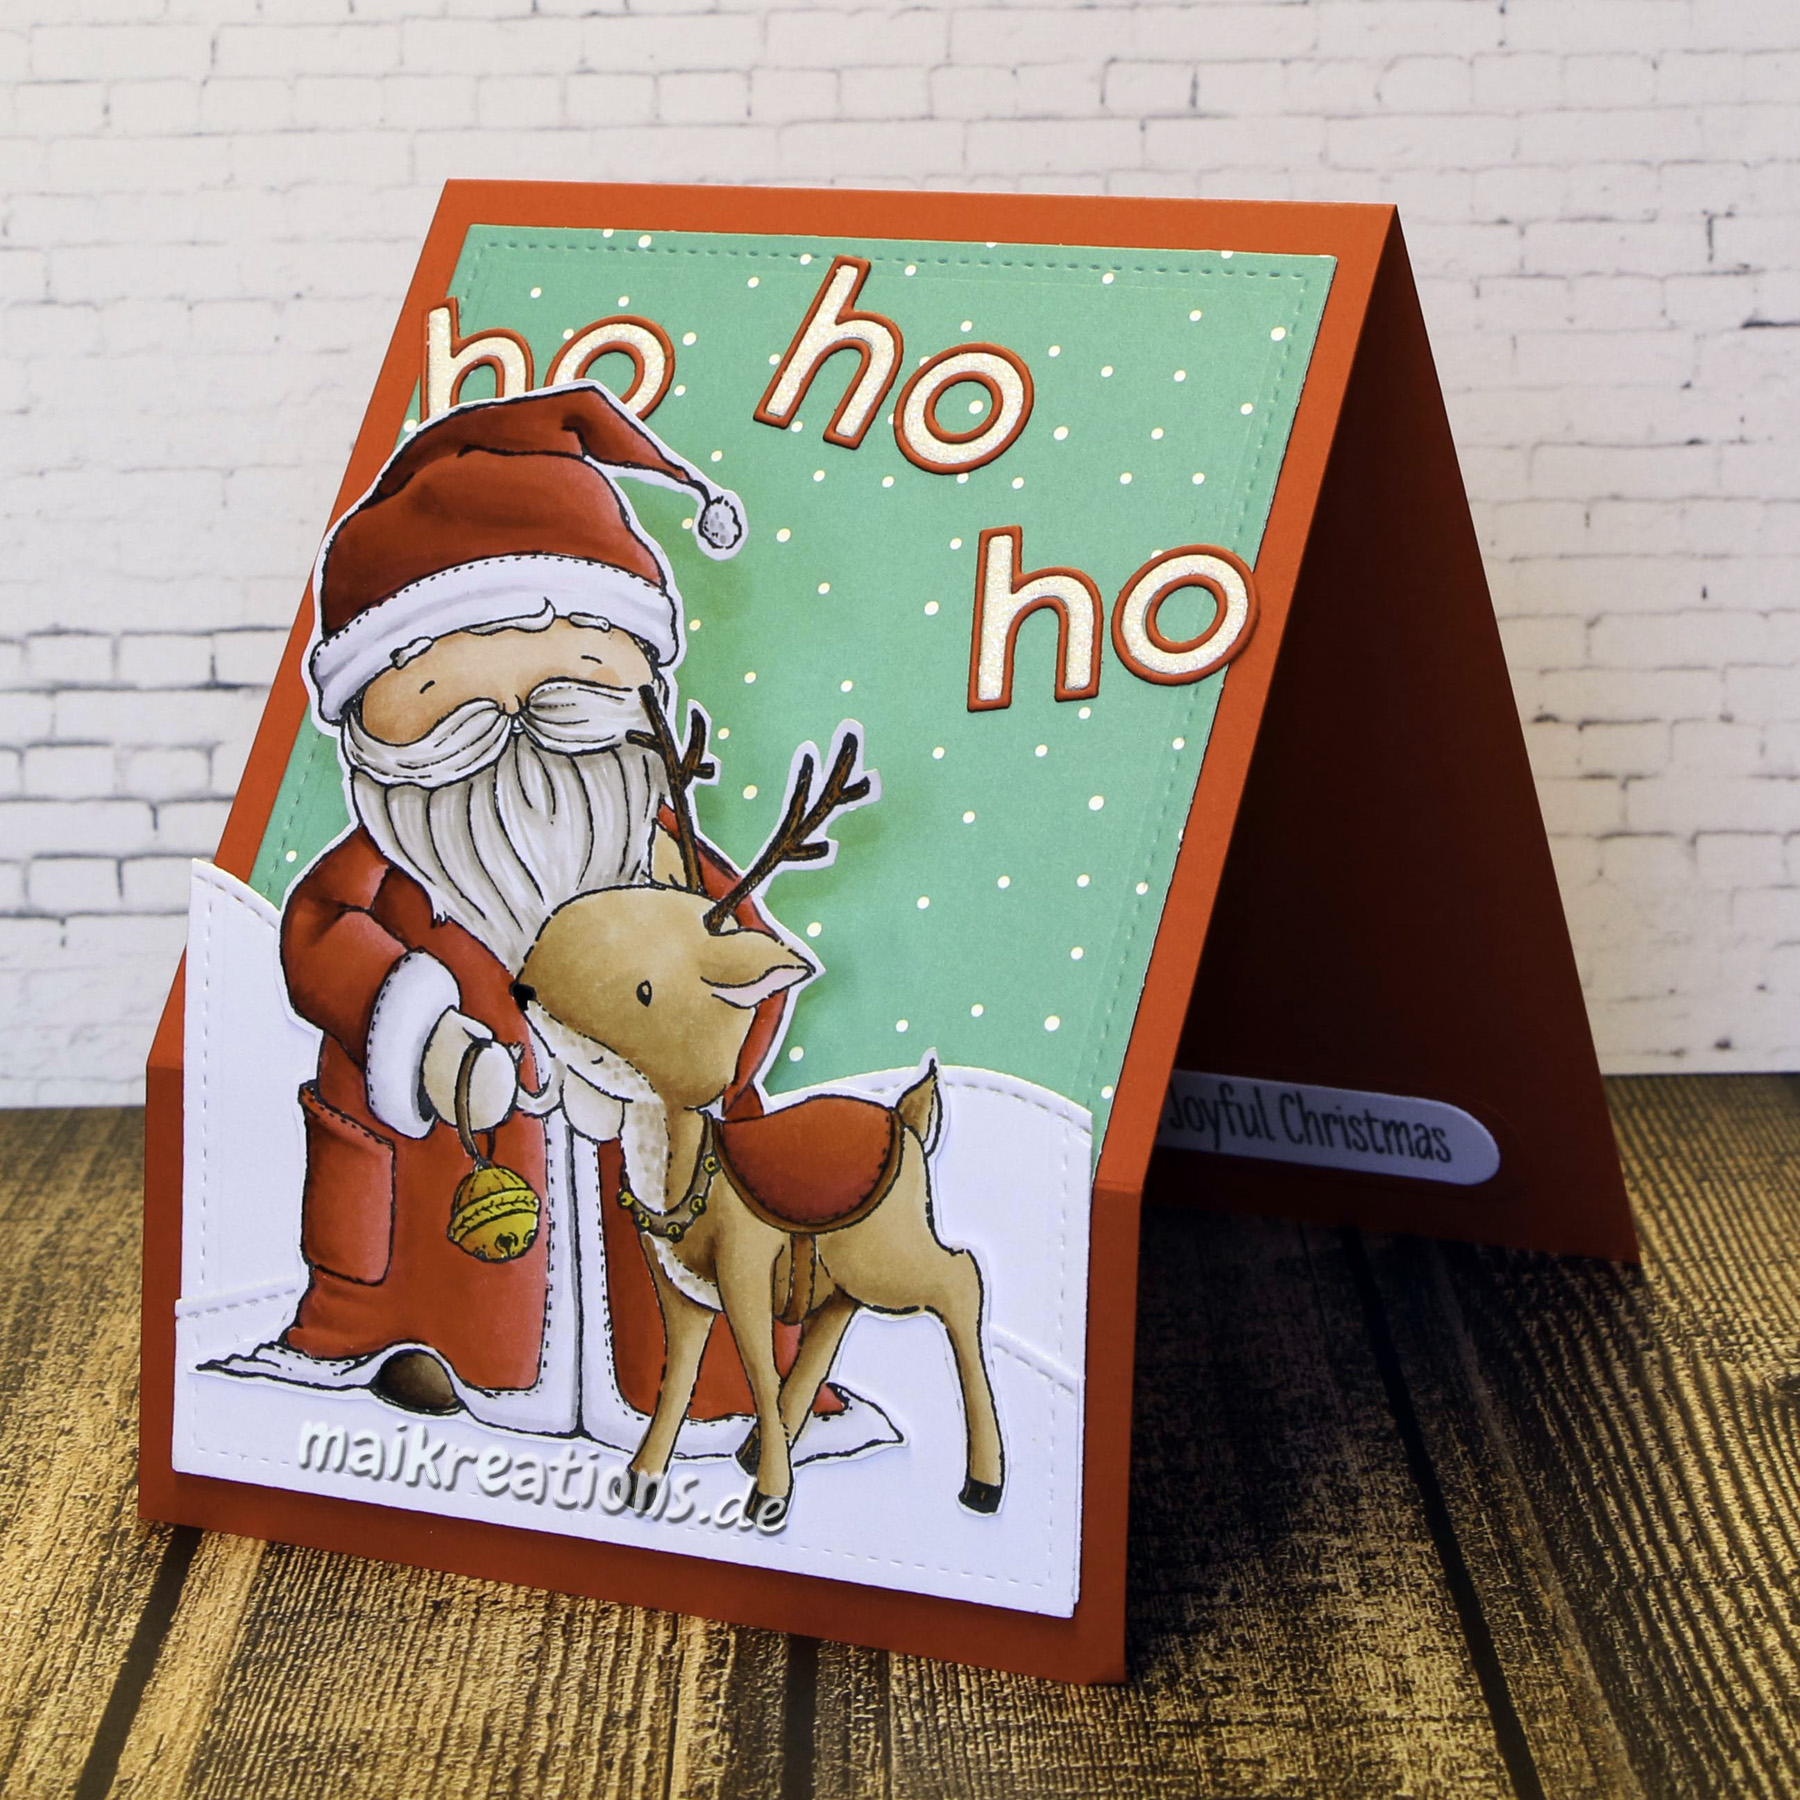
und willkommen zum vierten Teil meiner Weihnachtsserie Heute möchte ich mit euch meinen ersten Versuch einer Shadowbox teilen. Dank Birkas fabelhaftem Video, musste ich mir nicht einmal selber mein Hirn zermatern ;o)

Heya my dear crafty friends
and welcome to part four of my Christmas series. Today I would like to share my first shadow box card, which turned out really great thanks to Birkas fantastic video ;o)


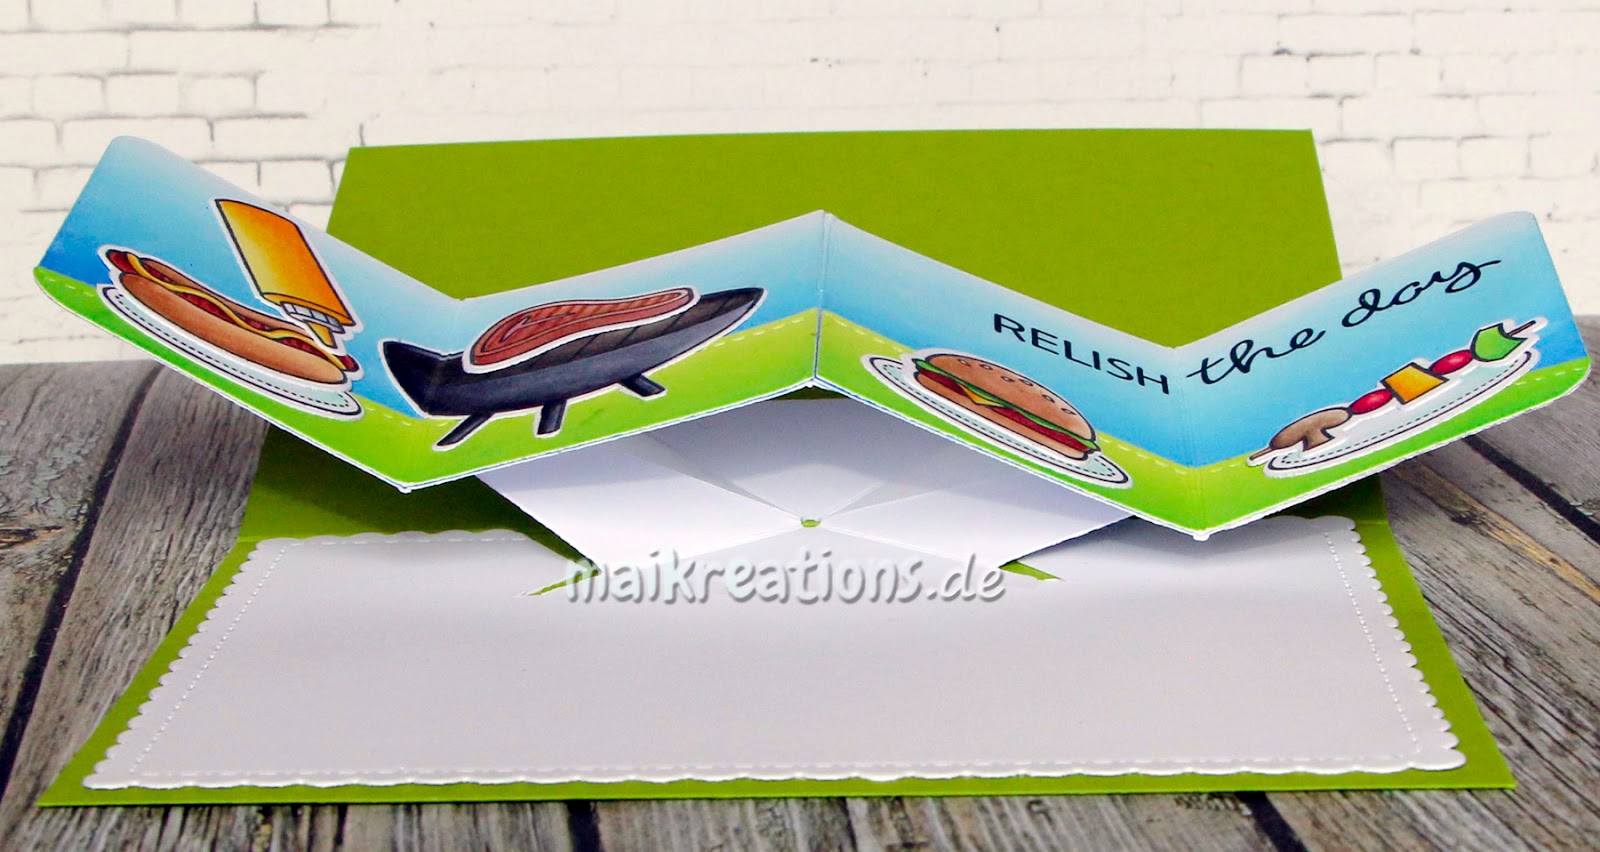
Um diese Art Karte zu machen braucht man nur 2 Papiere in der Höhe, die die Karte später haben soll. Die muss man auf die Breite schneiden, die die Maße der Breite der Karte, die Tiefe plus etwa 1/4 Inch für die Klebelasche zusammenaddiert ergeben. Gefalzt wird an den gleichen Stellen, einmal von links und einmal von rechts aus gesehen. Wenn man die Papiere faltet erhält man 2 Teile, die wie ein eckiges "J" aussehen und die müssen dann nur noch aneinander geklebt werden. Vergesst nicht, vorher noch ein Fenster in eines der Papiere zu schneiden oder stanzen ;o)

To make this kind of card you need two pieces of paper that are the height you want your card be. To figure out the width you need to add up the measurements of the width of the front of the card, plus the depth, plus about 1/4 of an inch for adhering both papers together. You score them at those same measurements, only one time starting from the left and the next time starting from the right. Once you fold the papers, you will get two kind of "J" shapes that now have to be glued together. Before you do though, don't forget to cut or die cut a window from one of the papers ;o)


Die meisten Stempel, die ich benutzt habe, sind von Neat and Tangled - nur das Sternenbanner ist aus einem der neueren Mama Elephant Releases. Um das Design der Schattenbox auch voll auszukosten, habe ich noch zwei Papierstreifen in den unteren Teil geklebt. Die Maße dieser Teile sind: Höhe, wie ihr das möchtet und in der Breite so breit, wie die Kartenfront, plus 1/2 Inch extra, damit ihr an jeder Seite eine 1/4 Inch Klebelasche habt. Einige meiner Elemente, zum Beispiel den Bären und den Pinguin, habe ich mit einem weiteren Stück Papier verstärkt, dass ich einfach hinten drauf geklebt habe. Den anderen reichte die vorhandene Klebefläche, um fest zu bleiben, weshalb ich diese in Ruhe gelassen habe ;o)

Most of the images I have used are from Neat and Tangled - only the star banner is from one of the newer Mama Elephant releases. In oder to make use of the shadow box design I have inserted two pieces of paper. Measurements of this paper: hight as desired and the width of the paper is the width of the card front plus 1/2 inch, so you can have to 1/4 inch flaps at the side to adhere the paper. Some images, like the bear and the penguin, needed a little strip of paper as reinforcement glued to their backs, but all the other elements for sturdy enough as they were so I left them be ;o)

Blick von oben. / View from the top.

Und so kann man die Karte dann flach zusammenfalten.
And this is how you can fold the card and fit it in an envelope.


Ich hoffe, euch hat meine Karte gefallen! Falls ihr es noch nicht getan habt, vergesst nicht euch als Follower für meinen Blog einzutragen, um keine Weihnachtskarteninspiration zu verpassen und schaut auch noch einmal bei meinem Giveaway vorbei: klick. Habt ein wunderbares Wochenende und happy crafting, eure Maike ;o)

I hope you like my card! If you haven't done so already, why not follow by blog to not miss a single Christmas card inspiration and also have a look at my giveaway: click. Have a wonderful weekend and happy crafting, yours Maike ;o)

Material / supplies:
Stempel / stamps: "Beary Merry" von Neat and Tangled (plus coordinating dies)
                              "Sentiments from a Yeti" von Mama Elephant (plus coordinating dies)
Stanzen / dies: "Mini Scalop Square Stax" von My Favorite Things (window)

Challenges:
As you like it Challenge "Christmas or not Christmas and Why?"
Definately Christmas, because I love to share this annual series & like to get a headstart on my Christmas card production ;o)

Samstag, 28. Oktober 2017

Christmas Series Card # 2 / Weihnachtsserie Karte # 2 (North Pole)

Halli Hallo ihr Lieben!
2 oder mehr Stanzen zu benutzen ist die Herausforderung auf dem Challenge Up Your Life Blog. Also habe ich meine Stanzen herausgekramt und die zweite Karte für meine Weihnachtsserie gebastelt ;o)

Heya my dear crafty friends!
2 or more die cuts are the theme for our new challenge at Challenge Up Your Life. So I got out a lot of my dies and created this card for CUYL and as my second card for my Christmas series ;o)


Zuerst habe ich aus gemustertem Papier von Lawn Fawn - ich liebe diesen Schneeflockenhintergrund - das abgerundete Rechteck mit der "Tür" ausgestanzt. Den Rahmen habe ich mit "Stormy Sky" Distress Ink abgedunkelt, um den Fokus mehr auf den inneren Teil zu lenken, aber trotzdem das Muster nicht völlig zu verbergen. Dann habe ich den mittleren Teil mit den Hügeln, Bergen, Bäumen und dem "North Pole" Schild dekoriert. Auf letzteres habe ich vor dem Aufkleben noch etwas von dem "Schneestift" gegeben, den ich mir letztes Jahr bei einem Discounter gekauft habe und war überrascht, wie toll der Effekt wird, wenn man diese Schneeflüssigkeit heiß macht. Es wird ein wirklich schöner 3D-Schnee und sieht klasse aus!

I started by die cutting the frame with the door from some patterned paper by Lawn Fawn - I love this snowy background! In order to have the focus more on the door-part I darkened the frame with "Stormy Sky" Distress Ink. That way the pattern is still visible but a lot more subtle. Next I decorated the inner part with mountains, snowy hills, trees and the "North Pole" sign. For the sign I have used a snow pen for the first time and was excited to see how well it worked. I love this 3D effect and the snow looks almost real!


Wenn man das Törchen öffnet sieht man Santa, der gerade fröhlich durch den Schnee stapft. Vielleicht ist er ja auf dem Weg zu Dir?! ;o) Coloriert habe ich mit Copic Markern und dem Stern auf dem Tannenbaum habe ich später noch etwas Glitzer verpasst. Ich hoffe, euch gefällt meine Karte und ihr habt nun Lust bekommen auch eure Stanzen rauszukramen und euer Werk später bei Challenge Up Your Life zu verlinken und / oder euch an die Weihnachtskarten zu begeben ;o) Mittwoch folgt die dritte Karte der Serie und falls ihr den ersten Beitrag noch nicht gesehen habt, klickt einfach hier (klick), da findet ihr alle Informationen über die Weihnachtsserie und das angeschlossene Giveaway ;o) Und nun: Habt ein schönes Wochenende und happy crafting, eure Maike ;o)))

When the recipient opens the little door part, he or she can see Santa walking happily in the snow carrying a Christmas tree. Wondering where he is going to? ;o) I coloured everything with Copic markers and added a bit of glitter to the star. I hope I could inspire you to get out your dies to share your creation with us at Challenge Up Your Life and / or to get started with your Christmas cards ;o) The next card of my Christmas series will be published on Wednesday and just in case you haven't seen the first card yet, simply click here (click) to find all the information about the series and the giveaway ;o) Have a great week everyone and happy crafting, yours Maike ;o)))


Material / supplies:
Stempel / stamps: "Santa's Wonderland" von Neat and Tangled
                              "Me and my Yeti" von Mama Elephant
Stanzen / dies: "Stitched Basic Edges" & "Blueprints 30" von My Favorite Things
                         "Snow Capped Mountains" von Mama Elephant

Challenges:

Dienstag, 15. August 2017

Happy Birthday, Party Animal (Dogs & Cat)


Halli Hallo ihr Lieben!
Die aktuelle PINspirational Challenge ist genau das Richtige für all uns Hunde- und Katzenliebhaber - seht selbst ;o)

Heya my dear crafty friends!
The newest PINspirational challenge is the perfect one for all us dog and cat lovers out there. But have a look yourself :o)
Inspiration Pic of PINspirational Challenge #197
Für meine Karte habe ich überlegt, was die drei wohl gemacht haben, um so müde zu sein und war sicher, sie haben eine Party gefeiert mit ganz vielen Bällen, denen man nachspringen und -laufen kann ;o) Also habe ich mit Hilfe der MFT round shaker pouches diese Shaker-Karte gebastelt und darin ein paar bunte Tennisbälle fliegen lassen. Ein paar Bälle habe ich auf das Hintergrundpapier gestempelt, damit der Shakerteil nicht komplett leer ausschaut, wenn die Karte aufrecht steht, aber rückblickend wünschte ich, ich hätte noch mehr Bälle gestempelt und einige davon maskiert... Naja, beim nächsten Mal bin ich wieder etwas schlauer, hoffe ich zumindest ;o)

For my card I thought about what the three cuties might have done to end up this tired and thought they must have had a birthday party with lots and lots of things to throught, catch or run after ;o) So I created this shaker card with the MFT round shaker pouches and had some tennisballs flying around in there. I did stamp a few on the paper but in hindsight I wished I would have stamped a few more, so that it would not seem so empty when the card is standing up... Oh well, next time, right? :o)


Das Regenbogenpapier im Hintergrund ist übrigens das Titelblatt eines MFT 6x6 Pads ;o) Und die bunten Punkte überall und die Akzente auf den Hüten habe ich mit Nuvo-Drops gemacht - eine meiner neuen Leidenschaft. Ihr werdet wahrscheinlich auf meinen nächsten Karten ständig Punkte sehen :o) Ich finde sie aber wirklich klasse zu benutzen und liebe vor allem die Farbauswahl und den Umstand, dass man sie nicht umständlich aufkleben muss.

The rainbow paper is the title page of a MFT 6x6 paper pad in case you were wondering ;o) And those tiny drops and the accents on the hats are made with Nuvo drops - one of my newest passions ;o) It is quite likely that you will see loads of them on my next projects as well ;o) I just love how easy they are to use and also their colour pallette is awwesome. Love every single one of them *my wallet is sighing in defeat...


Ich hoffe wirklich sehr, dass ihr bei unserer Challenge mitmachen werdet und bin schon ganz gespannt auf eure Werke ;o) Unsere freundlichen Sponsoren dieses Mal sind Digistamps4Joy und Fred, She Said von denen es jeweils ein 10 Dollar Gutschein zu gewinnen gibt ;o) Na, wenn sich das nicht mal lohnt ;o)) Habt eine wunderbare Woche ihr Lieben! Ich hoffe euch hat meine Karte gefallen und ich konnte euch inspirieren mitzuspielen! Happy crafting, eure Maike

I really hope, you are going to play along with this fun challenge and am looking forward to seeing your projects in our gallery ;o) Our kind sponsors this time are Digistamps4Joy and Fred, She Said and both are offering a $10 gift certificate to their stores for the winners ;o) I hope you like my card! Have a wonderful week everyone and happy crafting, yours Maike

Material / supplies:
Stempel / stamps: "Playful Pups" & "Purrfect Pair" von Mama Elephant
Stanzen / dies: "Circle STAX Set 1" & "Stitched Mini Scallop Circle STAX"
                         von My Favorite Things
Anderes/ other: "Circle Shaker Puches" & "Proper Pinstripes Paper Pack"
                          von My Favorite Things

Challenges:

Montag, 17. Juli 2017

You're a star - Hidden Scene Card

Hallo ihr Lieben!
Die Crafty Cardmakers fordern euch mal wieder zu einer Crafty-Challenge heraus - dieses Mal lautet das Thema "Lots of Layers" und dies ist meine DT-Karte dazu:

Heya my dear friends!
The Crafty Cardmakers have a new challenge for you ;o) This time we would like to see "Lots of Layers" on your project. This is my many layers - card:


Viele Lagen sind nicht wirklich meine Stärke, daher war das diesmal eine ziemliche Herausforderung für mich. Der aktuelle Sketch von der MFT-Challenge gefiel mir sehr und nachdem ich die Idee mit der versteckten Unterwasserwelt hatte lief's ;o) Ich habe erst einmal ganz, ganz viele passende Unterwassertierchen gestempelt und mit Copics coloriert und ein Hintergrundpapier mit Distress Inks (Blueprint Sketch, Salty Ocean & Peacock Feathers) gestaltet.

Many layers on a project are not really my strong suit, so it was quite a challenge for me to create this card. I really like the current MFT sketch and once I had the idea to create an underwater scene all somehow fell into place ;o) I started by stamping and colouring many, many sea-critters and creating a background paper with Distress Inks using Blueprint Sketch, Salty Ocean & Peacock Feathers.


Passend zum Sketch habe ich das rosa Papier zurechtgeschnitten und -gestanzt. Rosa habe ich gewählt, weil es einen guten Kontrast zum blauen Hintergrund bietet. Mit der "Wonky Windows" Stanze habe ich das Fenster in die Front der Karte und das Designpapier gestanzt und außerdem noch aus weißem Papier, um daraus den Rahmen zu schneiden.

I designed the front of the card following the sketch using pink patterned paper as my background paper. I chose pink because it gives a lot of contrast next to the blue of the inside of the card. Using the "Wonky Windows" die I die cut an opening in the card base and the designer paper and also die cut it from some white paper, so I could make a frame with it.


Das blaue Papier habe ich auf die passende Größe geschnitten und ein halbes Inch von links gefalzt und an diesem schmalen Stück mit Score Tape im Inneren der Karte festgeklebt, damit man es später hochklappen und darunter den Text schreiben kann. Dann ging's ans Dekorieren. Zuerst habe ich den Spruch "You are a star" embossed und die Seesterne aufgeklebt, wobei der gelbe über den Rahmen hinausragt, um noch eine Extralage zu erhalten.

I cut the blue paper to size and scored it half an inch from the left side, put score tape on this small strip and adhered it to the inside of my card, so that I can lift the paper to write and hide my message underneath the underwater scene. Now the fun began - I could start decorating ;o) I heat embossed the sentiment in white and added the three starfish, but made sure to have the yellow one sit on the frame to create another layer.


Um zu wissen, wo ich die versteckten Elemente hinkleben konnte habe ich einfach das Innere des Fensters vorübergehend mit Washitape auf dem blauen Papier angebracht und dann noch Lust und Laune die anderen Tierchen aufgeklebt und unter die Qualle noch den Zusatzspruch "I'm so jelly" gestempelt. Ich hoffe, dass der Empfänger der Karte über all das Gewimmel überrascht sein und sich freuen wird ;o) Ich bin sehr auf eure "vielschichtigen" Projekte gespannt und würde mich sehr freuen, viele davon in unserer Gallerie zu sehen. Habt einen guten Start in die Woche und bis bald, eure Maike ;o)

In order to figure out where exactly I could adhere all the other elements I temporarily adhered the inside of the window to the blue paper and added the critters to the outside of it. I also stamped the addition to the sentiment "I'm so jelly" under the jellyfish. I hope the recipient will be surprised of all that is going on on the inside of the card and love it as much as I do ;o) I am looking forward to seeing all your beautiful "multilayer" projects in our gallery ;o) Have a great week and see you soon,k yours Maike ;o)

Material / supplies:
Stempel / stamps: "So Jelly", "Critters in the Sea" & "Life is Good" von Lawn Fawn
Stanzen / dies: "Stitched Scallop Basic Edges" & "Peek-a-Boo Wonky Windows" von My Favorite Things

Montag, 3. Juli 2017

Have fun - Spinner card

Halli Hallo ihr Lieben!
Als ich die "Tic Tac Toe" Tabelle meiner Teamkollegin Marlene von den Crafty Cardmakers gesehen habe, war mir direkt klar, dass die Diagonale von links unten nach rechts oben meine sein würde. Beim Thema Sommer habe ich dann auch direkt an die sonnenliebenden Schweinchen von Gerda Steiner Designs gedacht. Aus der Inspiration ist im Endeffekt eine sommerliche Spinner-Geburtstagskarte geworden - die Schweinedame kann sich auf ihrer pinken Luftmatratzen nach Herzenslust im Meer herumtreiben lassen ;o)

Heya my dear crafty friends!
When I saw the "Tic Tac Toe" for the new Crafty Cardmakers challenge from my teamie Marlene, I knew instantly that I wanted to follow the diagonal line from the bottom left to the top right. When I read the word "Summer" I thought of the cute summer-loving pigs by Gerda Steiner Designs. The inspiration led me to create a summery spinner-birthday card - the little pig lady's air matress can float around the sea while she enjoys the sun ;o)


Angefangen habe ich mit dem Hintergrundpapier, dass ich mit Distress Inks in den Farben Mermaid Lagoon und Peacock Feathers gemacht habe und habe anschließend die Schweinedame und ihre Accessoires mit Copics coloriert. Als die Farbe getrocknet war, konnte ich die Stanzarbeiten erledigen und  dann das Wort "fun" weiß embossen. Die einzelnen Buchstaben habe ich mit einem Distress Marker in Peacock Feathers noch einmal ein wenig nachcoloriert, um ihnen mehr Tiefe zu geben und anschließend den Rest vom Spruch mit Jet Black Archival Ink dazu gestempelt.

I started by creating a blue background piece with Distress Inks (I used Mermaid Lagoon and Peacock Feathers) and colouring the images I needed with Copic markers. Once the background was dry I die cut it to size and also the spinner channel from it and added the word fun with white heat embossing. Next I filled in the letters with a Peacock Feathers Distress marker to give it more depth and added the rest of the sentiment with Jet Black Archival Ink.


Im nächsten Schritt habe ich die Kartenbasis an der Stelle, an der die Führung für das bewegliche Teil auf der Karte enden würde, ebenfalls mit Peacock Feathers eingefärbt, damit es ein einheitliches Bild bleibt und nicht die weiße Karte unter dem "Meer" zu sehen sein würde. Mit zwei ausgestanzten Kreisen aus Pappe und einem Plastikteilchen, das ich extra für diese Spinnercards gekauft habe, habe ich Miss Piggy und ihre Luftmatratze befestigt. Zum Schluss habe ich das ganze Teil mit Abstandskleber auf die Basis geklebt und noch den Wasserball und einige Sequins aufgeklebt. Ich hoffe, euch gefällt die Tic Tac Toe Challenge und ihr verlinkt eure Werke in unserer Gallerie ;o)) Habt eine wunderbare Woche! Bis bald, eure Maike

In my next step I added Peaock Feathers to the part of my card base where the spinner channel would end up, so that one wouldn't be able to see the white beneath the coloured the panel. Using two punched circles and a plastic disc by MFT I adhered Miss Piggy to the channel, but still allowing the matress piece to move. Now all there was to do was to adhere the panel to the card using foam tape and adding some sequins as water droplets and ball to add a touch more colour. I hope you like our tic tac toe challenge and that you will link your projects to our gallery ;o)) Have a fantastic week! See you soon, yours Maike


Material / supplies:
Stempel / stamps: "Pool Piggies" von Gerda Steiner Designs
                             "Sketchy Alpha Stamp Set" von Waffle Flowers
Stanzen / dies: "Circle Spinner Channels" von My Favorite Things
                      "All Prettied Up" von Mama Elephant

Challenges:
Addicted to Stamps "Summer / Beaches"
A Gem of A Challenge "Summer Colours"
Sweet Stampers Challenge "Dies / Punches"
Crafty Awesomeness Challenge "Anything Goes"
Crafty Animals "Anything Goes"

Samstag, 15. April 2017

Happy Insta-Girls Easter Blog Hop

Halli Hallo ihr Lieben!
Sucht ihr noch kurzfristige Ideen für Osterkarten und Ostergeschenktütchen? Dann seid ihr heute bei unserem Happy-Insta-Girls Blog-Hop goldrichtig ;o)) Dieses Mal ging es natürlich um eine Osterkarte, aber es sollte auch noch eine selbstgebastelte Geschenkverpackung mit dabei sein. Falls ihr von unserer netten Truppe heute übrigens zum ersten Mal gelesen habt, schaut doch einfach mal hier vorbei (das ist unser letzter Oster-Hop, wo ihr also noch mehr Inspirationen finden könnt) oder hier (wo ich ein wenig mehr darüber erzähle, wie die Mädels sich gefunden haben und warum).
Aber nun möchte ich euch zeigen, was ich von der lieben Lisa von Project Cupcake für eine wunderbare Überraschung zugeschickt bekommen habe:


Heya my dear crafty friends!
Are you looking for Easter card and gifts inspiration? Well, you have certainly come to the right place today ;o) We have prepared a new Happy-Insta-Girls Blog-Hop for you, showing not only Easter cards but a little handmade gift as well... In case you haven't heard of this lovely group before, you could have a look here (our last Easter hop, showing you even more Easter ideas) or here (where I explain a little more about how and why the Happy-Insta-Girls do what we do).
However, it is high-time that I showed you the wonderful surprise I got from the talented Lisa from Project Cupcake:


Lisas Karte und die tolle Duploverpackung passen optisch einfach wunderbar zusammen und ihre Liebe zum Detail ist in jeder Ecke spürbar - immer wieder entdeckt man etwas Neues ;o) Vielen, vielen Dank liebe Lisa für diese Kunstwerke! Sie werden noch lange über Ostern hinaus mein Regal schmücken, auch wenn ich nicht versprechen kann, dass der Duplospender dann noch was zum Rausrücken haben wird ;o) Es ist einfach zu verführerisch und macht zu viel Spaß, an der Lasche zu ziehen und mit einer Nascherei "überrascht" zu werden!

Lisa's card and her super sweet (hehe) chocolate dispenser look stunning together, because at first glance they seem to be so different, but then you find all the little details that make them one set and it is so much fun finding ever more of these decorations / elements whenever you look at it again ;o) Thank you so, so much dear Lisa for this piece of art! I will put it on my shelf and look at it often, but I can't promise that the dispenser will be able to do its work  after Easter because it is yummy and so much fun to pull at the flap and find a sweet "surprise"!


Mein Osterpaket ging an die liebe Nicole von dem Blog "Frau Vögeli". Ihre bunten, fröhlichen Karten finde ich super klasse und wollte ihr etwas in diese Richtung schicken. Ich hoffe, es hat ihr gefallen:

My Easter packet went to Nicole from the blog "Frau Vögeli". I love her colourful and fun cards and wanted to send her something she would like:


Ich weiß gar nicht, ob ihr das wusstet, aber ich lieeeebe Box-Karten (heißen die so auf deutsch???).  Die Tatsache, dass manauf so vielen Ebenen arbeiten und dadurch Tiefe erzeugen kann, finde ich klasse. Benutzt habe ich die Stempel von dem Set "Eggstra Special Easter" von Lawn Fawn:


Not sure if you know this, but I love box cards. The dimensional look and that one has many levels to decorate the card and create a scene is awesome I think. I used images from the Lawn Fawn "Eggstra Special Easter" set:


Und hier noch einmal ein Blick auf die Verpackungen. In die kleine Tasche habe ich ein Loch gestanzt, um ein Plastikfenster "einzubauen", damit der Osterhase auch hinausschauen kann ohne die Leckereien für Nicole zu verlieren ;o)

And here is a closer look of the gift boxes and the bag. I die cut a circle out of one side of the bag and "sealed" the hole with an acetate window, so that the Easter bunny could have a look around but wouldn't loose his goodies for Nicole ;o)


Falls ihr herausfinden möchtet, was Nicole gebastelt hat und ob ihr mein Geschenk gefallen hat, hüpft doch einfach zu ihrem Blog weiter: hop :o) Und nur für den Fall, dass ihr zwischendurch von all den bunten Ostereiern und niedlichen Häschen abgelenkt werdet, hab ich zur Sicherheit hier noch einmal die komplette Blogliste für euch. Viel Spaß beim Hüpfen ;o)

If you would like to find out what Nicole has made for the hop and whether she liked her gift from me, hop over to her blog: hop ;o) And just in case you get lost along the way, distracted by colourful Easter eggs and cute bunnies, here is the list of the complete Easter-Hop. Have fun hopping along ;o)

Maike <-- hier seid ihr gerade


Und hier wie immer / And here as usual:

Material / supplies:
Stempel / stamps: "Eggstra Special Easter" von Lawn Fawn
Stanzen / dies: "Scalloped Box Card" & "Meadow Border" von Lawn Fawn

Dienstag, 14. März 2017

Endlich Frühling / Finally Spring

Halli Hallo ihr Lieben!
Für die PINspirational Challenge gibt es dieses Mal einen Spruch, der gerade jetzt unglaublich gut passt: "Egal, wie lange der Winter dauert, der Frühling kommt ganz sicher". Und endlich ist es soweit ;o) Bei uns werden die Tage wieder deutlich länger, wir hatten schon ganze Tage ohne Regen und es wird wieder warm!!! Aber bevor ich hier noch anfange Jubelgedichte auf den Frühling zu verfassen zeige ich euch meine Inspirationskarte:

Heya my dear crafty friends!
We have a great idiom (hope that is the right word) for you as inspiration at the PINspirational blog: "No matter how long the winter, spring is sure to follow." And spring is indeed finally here ;o) The days are getting longer, we had complete days without rain or snow and it is getting warmer!!! However, bevor I get too carried away I'll better go ahead and show you my inspiration card:


Als Idee hatte ich einen Garten voller Blumen im Kopf, aber ich wollte die Kartenfront nicht zu überladen haben, weshalb ich mich für diese Fenstervariante entschieden habe. Als erstes habe ich die Kartenbasis so gefalzt, dass ich drei Teile bekam und habe aus der, die bei der Karte vorne sein würde, die Blume herausgestanzt. Durch die Öffnung hindurch habe ich anschließend gestempelt, um die Stelle auch wirklich zu treffen.

I wanted to create a garden full of flowers, but not have the front of the card too busy, so I thought this window-layout would work great. I started by die cutting the flower from the card base which I had scored to get a trifold-card and stamped the same flower through the opening to get the placement right. 


Die Blume habe ich maskiert und noch viele weitere Blumen und Blätter drum herum gestempelt und anschließend habe ich sie mit Copics coloriert. Nachdem ich damit fertig war, habe ich das Wort "birthday" auf ein weißes Tag gestempelt und es über die Blumen geklebt. Ich wusste, dass ich eine Banderole brauchen würde, um die Karte geschlossen zu halten und diese sollte den ersten Teil des Spruches halten. Dazu habe ich vor dem Zusammenkleben aus der Banderole das Wort "happy" ausgestanzt und mit Papier hinterlegt, dass ich zuvor mit den Grüntönen coloriert habe, die ich bereits für die Gartenszene benutzt hatte. ;o)

I masked the flower off and added a whole lot of other flowers and leaves and coloured all of them with Copic markers. I also added a tag with the word "birthday" over the finished flowers. I knew I would need something to keep the card closed so I decided on a kind of sleeve and I wanted it to show the first part of the sentiment. After I had created the sleeve I die cut the word "happy" from it and glued a piece of paper behind it which I had coloured with the same shades of green that I had used for my flower garden ;o)


Ich hoffe, euch gefällt die Karte und ihr seid genauso vom Frühling inspiriert, wie ich es gerade bin und zeigt uns eure Karte auf PINspirational! Habt eine tolle Woche!

I hope that you like my card and that you get inspired by the nicer weather as much as I do and that you'll share your card with us at the PINspirational challenge! Have a wonderful week!


Material / supplies:
Stempel / stamps: "Doodle Buds" von WPlus9
Stanzen / dies: "Blueprints 26" von My Favorite Things

Challenges:

Sonntag, 11. Dezember 2016

Christmas Series Card #19 / Weihnachtsserie Karte #19 (Happy Insta-Girls X-Mas Blog Hop)

Halli Hallo ihr Lieben!
Ich freue mich sooo sehr euch heute mal wieder einen unserer Happy-Instagirls Blog Hops präsentieren zu können ;o))) Vielleicht wisst ihr ja, dass die  Happy Instagirls eine Gruppe Mädels ist, die sich über's Liken und Kommentieren auf Instagram gefunden haben. Wir sind alle Kartenbastlerinnen und haben uns gedacht, es wäre doch klasse, wenn wir uns auch mal Karten zuschicken würden, um sie in den Händen halten und nicht nur auf dem Display bestaunen zu können. Und das haben wir nun schon ein paar Mal gemacht und jedes Mal gab es ganz wunderbare Werke zu bestaunen! Heute gibt es einen Blog Hop zum Thema Weihnachts- und Winterkarten und ich denke, dass auch dieses Mal eine ganze Menge Inspiration auf euch wartet ;o)

Heya my dear crafty friends!
I am delighted to be able to present to you a brand new Happy-Instagirls Blog Hop ;o)))  Maybe you have heard of our group of girls who met on Instagram through liking and commenting on each others posts. We
thought it would be great if we could hold the cards in our hands and not only look at pictures of them on our displays. And that is what we did! There were a few hops already and there was always a lot to swoon about and great inspiration as well. This time our blog hop theme is winter and Christmas cards and I am sure that there are lots and lots of awesome projects waiting for you ;o)
Diese wunderbare Winterkarte habe ich von der lieben Vanessa bekommen. Sehen diese vielen Ebenen nicht einfach fantastisch aus? Und die Mäuse sind zauberhaft süß, finde ich!!!
[Liebe Vanessa, vielen Dank für Deine tolle Karte - kurz nach ihrem Eintreffen hatte sie sich schon mit der Winterdeko angefreundet und passt ganz ausgezeichnet dazu ;o)]
Aber nun will ich euch nicht länger auf die Folter spannen... Hier ist das Werk von Vanessa:

This awesome winter card I got from sweet Vanessa. Look at all this dimension. Doesn't it look awesome? And those cute mice are just adorable!!!
I don't want to keep you waiting any longer.... This is Vanessa's beautiful card:


Ich war Jeanins Karten-Wichtel und wollte ihr eine ganz besondere Freude machen, also habe ich frühzeitig angefangen und ihr eine Twist Pop Up Karte nach Video-Anleitung von Maymay gemacht. Und das ist dabei herausgekommen:

I was Jeanin's Secret Santa and I wanted to create a special card for her so I started early and made a Twist Pop Up card for her following the video tutorial by Maymay. And this is what came out of it all:


Die Maße habe ich so angepasst, dass man auch mit A4-Papier arbeiten kann und nicht auf die US-Maße angewiesen ist, wenn ihr Interesse habt, erstelle ich gerne eine Grafik für euch mit den Maßen, die ich benutzt habe ;o) Die Motive sind aus dem Set "Come Let Us Adore Him" von Sugar Pea Design und ich finde sie absolut klasse. Eigentlich war es ein Ersatz für das Santa-Set und ich dachte, dass man die Tiere ja das ganze Jahr über brauchen kann, aber jetzt, da ich damit gearbeitet habe, finde ich die Stempel absolut genial.

I changed the measurements a tiny bit, so that I could use a standard A4 paper, instead of the American size. If you are interested in the exact measurements, just leave a comment and I will add a graphic for it as soon as I can ;o) I love the images from the "Come Let Us Adore Him" set by Sugar Pea Design. Originally I had wanted the set with the three cute Santas, but with this set I talked myself into liking it at first by telling myself I could use the animal stamps all year long after all. However, now that I have worked with the images I am soooo glad I got them - they are absolutely adorable and so much fun to colour!


Den Hintergrund habe ich inspiriert durch Sandy Allnock selbst in Angriff genommen und bin auf das Ergebnis echt sehr stolz. Zeichnerisch bin ich nicht so unbedingt begabt, aber die vielen Tipps aus Sandys Videos haben mir sehr geholfen mich da überhaupt dran zu trauen!

I coloured the background inspired and enabled by Sandy Allnock's videos on YouTube. Even though I am not very talented when it comes to drawing anything free hand - and truly don't feel comfortable doing it - I am quite pleased with how this one turned out and I am very thankful for Sandy's tutorials!

This is what the mechanism of the card looks like, before everything is assambled.


Die Vorderseite der Karte wollte ich recht schlicht halten und da das Kamel keinen Platz mehr im Stall gefunden hatte, habe ich es nach vorne verfrachtet, um dem Stern nach Bethlehem zu folgen. So konnte ich auch das Papier von innen noch einmal benutzen. Das lässt Karten immer noch eine Spur "runder" und professioneller erscheinen finde ich.

I wanted to keep the outside of the card rather plain and seeing as the camel didn't fit into the stable anymore I let it follow the star on the front of the card. That gave me a chance to use the paper, that I had used on the inside, again to tie everything together. 


Falls ihr sehen wollt, wem Jeanin eine Karte gebastelt und geschickt hat, klickt doch einfach hier ;o) Und nur zur Sicherheit, liste ich euch hier einmal alle Teilnehmer auf - so verpasst ihr hoffentlich keine der tollen Karten:

If you are interested in seeing the card that Jeanin made for Biggi, just click here ;o) And just in case you might get lost along the way, I will list all the stops of the Blog Hop for you - that way you won't miss out on any of the inspiration and awesome cards:


Maike (du bist gerade hier)

Ein großes Dankeschön an dieser Stelle auch an Birka, für die Organisation des Hops und einfach dafür, dass sie mich immer wieder inspiriert und mit ihren tollen Karten zum Lächeln bringt! Danke, Birka! ;o)


Material / supplies:
Stempel / stamps: "Come Let Us Adore Him" von Sugar Pea Design
Papier: "Snowflake Bokeh" von Lawn Fawn

Challenges:
CMD Challenges "Christmas / Weihnachten"
Sweet Stampers "Anything goes"
Addicted To Stamps and More "Christmas"
Christmas Cards All Year Around "Anything Christmas"
Copic Marker Spain "Winter or Christmas"
Stempelsonne "Anything goes"
7 Kids College Fund "Anything Goes"
Moving Along with the Times "Christmas Scenes"
Classic Design Team Open Challenge "Anything Goes"
Related Posts Plugin for WordPress, Blogger...