Posts mit dem Label C.C. Designs werden angezeigt. Alle Posts anzeigen

Sonntag, 15. Mai 2022

Mermaid birthday card with lots of bling

Hello everyone ;o)
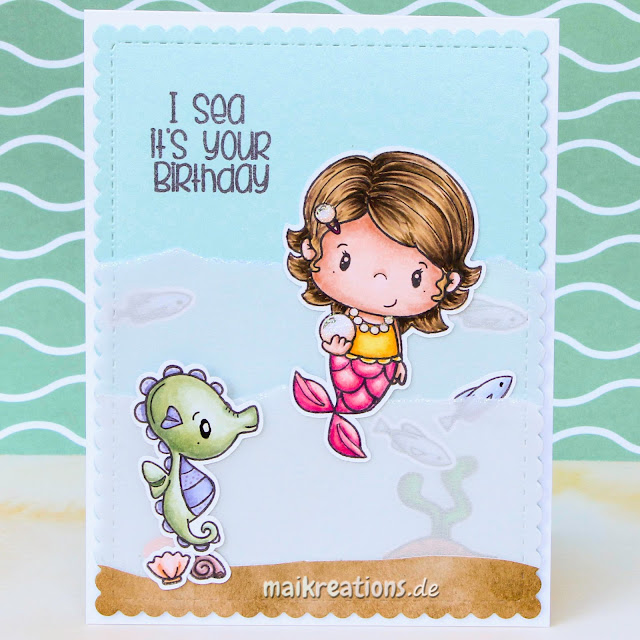
Today I'd like to share a new card for the Papercraft Challenges with you. The theme is "Add Bling" and that I did with this one:

You cannot see it too much on this first photo, but I have used shimmering blue cardstock as my background and added two layers of pearlescent vellum to emphasize the water idea. I also added some glitter glue to the edge of the vellum. In order to be able to add even more bling to my card I chose this adorable mermaid image and added glitter glue to all her pearls and some "Wink of Stella" to her mermaid's tail. 

I didn't want her to have to swim alone so I added the fish, shells and the cute sea horse. (Which, by the way, got glittered up as well....) I hope you like all the bling on my card and I also hope that you are going to join us for this challenge. Have a sunny Sunday and a fabulous week! Happy crafting, everyone ;o) Yours Maike


Supplies:
Stamps: "Under the Sea" by C.C. Designs (unfortunately it is retired)
Dies: "All Prettied Up" by Mama Elephant

Challenges:

Montag, 2. September 2019

You`re a pearl

Heya my dear crafty friends!
I have a new card for you today and it was made as an inspiration for the newest challenge over at the Crafty Cardmakers: we would like to see "Pearls and/ or Gems" on your projects. Here is the card I made:


I created an underwater background using Distress Oxide Inks in three different shades of blue and used the lightes shaded to create those light beams with a stencil. The effect gives it a little more dimension I find and interest.


The little mermaid is just too cute and as she is holding a pearl and wearing jewellery out of pearls she was the perfect image for the challenge. I coloured her with Copic markers and added glitter glue to all the pearls. I hope you are going to join us for our challenge and share your talent with the Crafty Cardmakers. ;o) Have a fabulous week and happy crafting ;o) Yours Maike


Supplies:
Stamps: "Under the Sea" by C.C.Designs
               (was just retired, so if you find it anywhere and like it - grab it ;o)
Dies: "Stitched Rectangle Scallop Frames Die-namics" by My Favorite Things
Stencil: "Ray of Light" by My Favorite Things

Challenges:

Samstag, 4. Mai 2019

I'm not Squidding

Heya my dear crafty friends!
If you have been looking for the new Challenge Up Your Life task last Saturday you might have noticed that there was no new task. This was due to our decision to make CUYL a monthly challenge so more of you get the chance to participate ;o) We hope you are as excited about the change as we are and dive right into our newest challenge themed "Vellum". This is the card I made as an inspiration:


I created a background using Copic refills in various shades of blue on some Yupo paper and I love the look of it. You can achieve such neat looks with alcohol inks that I can promise this won't be the last you'll get to see ;o) I ripped a piece of vellum to get the white looking edge, embossed the sentiment on it and glued it to the back of the Yupo paper so I wouldn't have to use any adhesives at the front. That way I didn't have to worry about the placement of the elements and could just go ahead and put them where I wanted them.


I have combined images from different companies on this card, because I thought they would nonetheless work perfectly together. What do you think? Well, I hope you will join us for this month' challenge and create something awesome with vellum ;o) Have a lovely weekend and happy crafting everybody!!!

Supplies:
Stamps: "Totally Narly" by Your Next Stamp
              "Under The Sea" by C.C.Designs
              "Critters In The Sea" & "Gleeful Gardens" by Lawn Fawn

Challenges:

Dienstag, 12. Februar 2019

TA-DAAAAAA ;o)


Hello everyone!
Finally the winter break is over at PINspirational Challenges! Personally I love getting inspiration from a picture. There are colours, motives, shapes and themes to choose from. This time I got the idea for the card's background from the picture. But have a look yourself:


I punched loads of hearts from cardstock in four different colours and used those hearts to embellish the lower part of the card base. I had created a blue ombre beforehand, so that the colours of the hearts could pop off a bit more. 


Using a circle frame and vellum I created a shaker window and filled in some more of the same hearts and added the focal image over top. As a sentiment I used alphabet stickers to spell out Ta-Daa which I felt was perfect for this image, don't you think? I hope you like the card and also our inspiration picture! I'd love to see your card in the PINspirational Challenge gallery


Material / supplies: tba
Stempel / stamps: "" von C.C. Designs (retired)
Stanzen / dies: "" von Lawn Fawn
Punch: EKSuccess Heart Punch
Letter Stickers: Create A Smile

Challenges:
Dragonfly Dreams Challenge "Love / Hearts"
Sweet Stampes "Stitching Real or Faux"
Shopping Our Stash "Make Your Mark"
Use Your Stuff "Hearts pink or red"

Samstag, 2. Februar 2019

Love is in the ... SEA ;o)

Heya everyone!
Today I'd like to share my card for the current challenge at Challenge Up Your Life with you. The theme is "Love is in the air" which I have altered slightly for my card:
 

For this card I created a background using Distress Oxide Inks: Peacock Feathers, Salty Ocean and a bit of Mermaid Lagoon. I die cut a heart from the panel and dry embossed it as well as giving it a darker edge for more interest.


The cute image is from C.C.Designs, but it seems it is discontinued. However I think this card would work with any two fish facing each other, don't you? The sentiment stamp was only partially inked and I added the word "sea" instead of "air".  I hope you like the card and that you are going to join us for this fortnight's challenge ;o))) Have a lovely weekend and happy crafting, yours Maike

http://challengeupyourlife.blogspot.com/2019/02/challenge-105-liebelove.html#.XFVjvWnuOUk

Material / supplies:
Stempel / stamps: "Love is in the Air" von Hobbywelt Kreativ
Stanzen / dies: "Heart Frame" & "Wonky Stitches" von Avery Elle
Embossing Folder: "Bubbles" von Taylored Expressions


Challenges:
Simon Says Wednesday Challenge "Anything Goes"
Simon Says Monday Challenge "Love is in the Air"
Cards in Envy Challenge "Love"
Pile It On "Land or Water Animal"
Pattie's Creations "Love, Love, Love"

Dienstag, 24. April 2018

Liebe Grüße zum Geburtstag


Halli Hallo ihr Lieben!
Nun ist die Jubiläumschallenge bei Pinspirational vorbei, aber es geht natürlich direkt weiter. Habt ihr schon nachgesehen, ob ihr einer der 15 glücklichen Gewinner seid? Falls nicht, dann macht doch schnell ein Projekt zu unserem aktuellen Inspirationsbild und beim Verlinken, könnt ihr ja überprüfen, ob ihr gewonnen habt. ;o))) Hier ist unsere Inspiration für euch für die nächsten zwei Wochen:

Heya my dear crafty friends!
We are back with a new PINspirational challenge after our huuuuuge anniversary challenge. Have you checked if you are one of the winners yet? If now, how about making a project for this cute inspiration picture and checking for any prizes you might have won when you link it to our gallery ;o)))

http://pinspirationalchallenges.blogspot.de/2018/04/pinspirational-challenge-214.html

Meine Inspiration hatte ich von dem Hemd des kleinen Cowboys und der Tatsache, dass er ein Junge ist ;o) Viel zu häufig vergesse ich, dass ich gelegentlich auch mal eine Geburtstagskarte für Jungs brauche, also habe ich die Gelegenheit beim Schopf gepackt ;o) Ich habe ein passendes Papier aus einem 6x6 Block von Lawn Fawn gewählt und den niedlichen "Birthday Eli" mit Memento Desert Sand auf Copic freundliches  Papier gestempelt.

I got my inspiration from the little guy's shirt and the fact that he is a boy ;o) Often times I forget to make male birthday cards so I thought this opportunity would be perfect. I chose a piece of patterned paper by Lawn Fawn and stamped the cute "Birthday Eli" (with Desert Sand by Memento to only get a very light outline) on some Copic friendly paper and coloured him in.


Nachdem er fertig coloriert war habe ich ihn ausgeschnitten und ihm noch einen Drop Shadow ausgestanzt. Auf diesen habe ich in mehreren Brauntönen und in weiß viele, viele Punkte getupft, damit es nach einem sandigen Boden ausschaut. Mal was anderes hab ich gedacht ;o) Ich habe Eli so auf der Karte platziert, dass der wunderschöne, große Spruch genug Platz hat und ein paar Sternchen dazugeklebt. Weil mir noch ein Farbtupfer fehlte, habe ich das pinke Herz dazugeklebt und meine Karte war fertig. Ich hoffe, ihr habt Gefallen an dem Inspirationsbild oder Aspekten daraus gefunden und macht mit bei unserer aktuellen Challenge. Habt eine fabelhafte Woche und happy crafting, eure Maike ;o)

Once I had Eli all coloured in I fussy cut him out and also die cut a drop shadow for him to stand on. On it I made many, many little dots in various shades of brown and in white to make it look like a sandy ground. Why? Just for something a little different than usual ;o) I placed Eli on the card so that he and the wonderfully huge sentiment would both have enough room and glued some tiny stars on the card for interest. Because I felt there was still a pop of colour missing from this design I added the pink heart and that finished my card. I hope you are going to join us this fortnight! Have a fabulous week and happy crafting, yours Maike ;o)


Material / supplies:
Stempel / stamps: "Birthday Eli" von C.C. Designs
                              "Viele Grüße" von Create a Smile
Stanzen / dies: "Oval Shadows" von My Favorite Things
Papier / paper: "Perfectly Plain Spring Petite Paper Pack" von Lawn Fawn

Samstag, 9. Dezember 2017

Christmas Series #19 / Weihnachtsserie #19 (Engel)

Halli Hallo zusammen!
Heute möchte ich meine Inspirationskatrte für die neue Herausforderung bei Challenge Up Your Life zeigen. Ich nehme an, ihr seid schon drauf gekommen - das Thema dieses Mal heißt "Engel":

Hello there!
Today I would like to share my inspiration card with you that I have made for the newest task at the Challenge Up Your Life blog. I bet you have guessed it already - it is all about "Angels" this time:


Nachdem ich diesen niedlichen Engel coloriert habe (zweimal übrigens, weil beim ersten Mal die Haare grell-orange geworden sind, statt blond...) hat es bis zur Fertigstellung der Karte nicht mehr lang gedauert ;o) Ich habe einen Hintergrund mit Distress Inks in Salty Ocean (auch, wenn man davon nicht viel sieht), Blue Lagoon und Chipped Saphire gewischt und diesen mit Wasser und verwässertem Perfect Pearls Pulver bespritzt, um einen realistischeren Himmel hinzubekommen.

After I had the cute angel coloured in the card came together quite quickly. I created a blue background using Distress Inks in Salty Ocean (though that got lost a bit), Blue Lagoon and Chipped Saphire and splattered water and watered down perfect pearly powder on to there, to give it a more realistic sky-look.


Als nächstes habe ich das Fenster aus einem weißen Panel ausgestanzt, eine Wolke aus weißem Papier und ein paar Sterne aus einem Papier, das ich zuvor mit dem fluoriszierenden FY1 Copic angemalt habe. Ein brauchbares Foto von dem sanften Leuchten habe ich aber leider nicht hinbekommen... Den Spruch habe ich mit dem "Liquid Platinum" Embossing Pulver auf der Vorderseite der Karte zum Glänzen gebracht und so eine Verbindung zum Hintergrund hergestellt. Nun musste ich nur noch alle Elemente an die richtige Stelle kleben und war fertig. Ich hoffe, ihr habt alle ein zauberhaftes zweites Adventswochenende und dass ihr vielleicht Lust und Zeit habt, selber ein Engelprojekt zu starten und mit uns zu teilen. Happy crafting und passt auf euch auf, ihr Lieben! Eure Maike

Next I die cut a window from a white panel, a cloud, also from white paper and some stars from a paper I had coloured with a FY1 Copic marker that glows in the dark. Unfortunately I couldn't get a proper picture of the glow... I embossed the sentiment and used "Liquid Platinum" embossing powder to continue the shimmer of the background to the front of the card. Now all that was left to do was to assemble all the elements. I hope you have a great weekend everyone and that you will join us with an project featuring an angel as well. Happy crafting, everyone and take care, yours Maike


Material / supplies:
Stempel / stamps: "Angel" von C.C.Designs (unfortunately discontinued)
                              "Friede, Freude, Lebkuchen" von Create a Smile (Sentiment)
Stanzen / dies: "Puffy Clouds" & "Peek-A-Boo Wonky Windows" von My Favorite Things
                         "Mini Stars Craft Die" von Simon Says Stamp

Challenges:

Montag, 18. April 2016

Ballon Girl (Shaker Card)

Hallo ihr Lieben!
Das Leben hier an meinem Ende der Welt ist gerade etwas hektisch (Näheres kann ich euch vermutlich in meinem nächsten Post berichten), daher zeige ich euch heute nur schnell meine Karte für die neue Challenge bei den Crafty Cardmakers, ohne euch groß zuzuquasseln ;o)

Hello my dear crafty friends!
Life here at my end of the world is rather hectic at the moment (I can hopefully tell you more about it in my next post), so I will show you my card for the Crafty Cardmakers blog without too much gibberish ;o)


Dieses Mal lautet das Thema der Challenge "123", was heißt, auf euren Karten sollen genau 1 Stempelabdruck, 2 verschiedene Design-Papiere und 3 Arten Verzierungen zu finden sein. Ich hoffe, ihr findet alles auf meiner Karte.

The challenge the is "123" which means 1 image, 2 different papers and three types of embellishment. I hope you can find everything on my card. 


Und falls ihr euch wundert, wo mein Kartenspruch ist... ich habe mich dafür entschieden, das Hintergrundpapier vom Shaker "sprechen" zu lassen ;o) Darauf findet man nämlich in vielen verschiedenen Sprachen den Geburtstagsspruch: "Herzlichen Glückwunsch".

And in case you are wondering where my sentiment is... I chose to leave it out, because the background paper of the shaker element says "Happy Birthday" in loads of different languages. 


Material / supplies:
Stempel / stamps: "Sweetheart" von C.C. Designs
Stanze / die: "Stitched Rectangle Scallop Frames" von My Favorite Things

Challenges:

Freitag, 16. Oktober 2015

Halloween monster card

Hallöchen ihr Lieben!
Heute möchte ich euch noch mal eine Halloween-Karte zeigen. Dieses Mal findet ihr darauf ein genauso gruseliges wie irgendwie niedliches Monster von C.C. Designs darauf. Als ich es auf dem Stempelmekka gesehen habe konnte ich nicht anders, als es mitzunehmen:

Hello my dear crafty friends!
Today I would like to show you another Halloween card. It features a monster from C.C. Designs that is cute and somehow scary at the same time. When I had seen it at the last craft fair here in Germany I simply had to get it:


Den Stempel habe ich mit Copic Markern ausgemalt und anschließend per Hand ausgeschnitten. Das Spinnennetz habe ich mit Hilfe einer Schablone und der "Cobblestone" Tinte von Simon Says auf die Kartenbasis aufgetragen. Um das Netz noch etwas zu betonen habe ich alle Fäden mit "Diamond" Stickles nachgezogen. Jetzt glitzert und funkelt es ganz doll ;o)

The image is coloured with Copic markers and then fussy cut. For the spider web on the card base I had used a stencil and "Cobblestone" ink from Simon Says. To give it a little bit more interest I added "Diamond" stickles over the threads of the whole web. Now it shimmers and shines when the card is moved :o)


Als alles getrocknet war habe ich die gestrichelte Linie um den eingefärbten Bereich gezogen und den Kartengruß gestempelt. Normalerweise sind die Stempel ganz gerade, aber das es sich zum Glück um Clear stamps handelt, konnte ich sie so biegen, dass sie genau zwischen die Spinnweben passten. Zum Schluss habe ich dann das Monsterchen mit Klebepunkten aufgeklebt, um es ein ganz klein wenig hochzustellen.

Next I added the dash line around the spider web area and stamped my sentiment. Normally those stamps are straight, but because they are clear stamps I could manipulate them just enough to stamp them between the threads. I added the image last with some glue dots to give it just a tiny bit of dimension. 


Material / supplies:
Stempel / stamps: "Stuck on You" von C.C. Designs
                            "Fright Night" von Clearly Besotted
Schablone / stencil: tba
Coloured with: Copics

Challenges:

Mittwoch, 7. Oktober 2015

Geburtstagsjunge / Birthday boy with cupcake

Hallo ihr Lieben!
Für die "The Daily Marker Challenge" von Kathy Rac habe ich in der letzten Zeit viel coloriert und möchte die Bilder nun nach und nach zu Karten verarbeiten ;o) Hier sehr ihr "Eli" vonn C.C. Designs auf einer sehr klar gehaltenen Karte, die man gut auch einem männlichen Wesen schenken kann:

Hello my dear crafty friends!
I have been colouring lots and lots of images for "The Daily Marker Challenge" by Kathy Rac and am now about to turn those coloured images into cards. Here you can see "Eli" from C.C.Designs. I kept the card relatively simply so that it qualifies as a male card:


Nachdem ich Eli coloriert hatte, habe ich ihn mit einer Flaggen-Stanze von MFT ausgestanzt. Von da an hat es Ewigkeiten gedauert, bis ich herausgefunden habe, was ich nun damit tun wollte. Letztendlich habe ich mich für den Look entschieden, den ihr hier seht: Das gemusterte Papier ist von Carta Bella, die Sterne sind ausgestanzt und coloriert, so dass sie zu Elis T-Shirt passen und einen Geburtstagsgruß. Mir gefällt besonders gut, dass dieses Design das ausgemalte Bild wirklich zum Star der Show macht.

Once I had coloured Eli I cut him out using a flag die by MFT. From there on it took me hours to figure out what I wanted to do with it. Finally I decided on the look you see here: Some patterned paper from Carty Bella, die cut and coloured stars to match Eli's T-Shirt and a birthday sentiment. I love that this design makes the coloured image the star of the show.


Material / supplies:
Stempel / stamps: "Birthday Eli" von C.C. Designs
                           "Birthday Greetings" Altenew

Stanzen / dies: "Fishtail Flag STAX" von My Favorite Things
                      "Stitched Rectangles" & "Mini Stars" von Simon Says Stamp


Challenges:

Freitag, 11. September 2015

Need a Hug? Colouring fur with Copics & creating a scene

Hallöchen ihr Lieben!
Statt euch heute in allen Einzelheiten zu verraten, was ich gemacht habe, um diese Karte zu machen, dachte ich, sie wäre ein gutes Beispiel, um euch mal zu erklären, wie eine Karte bei mir entsteht...
Angefangen hat alles mit dieser bekloppten Katze, die ich einfach auf ein Stanzteil gestempelt habe, um sie zu kolorieren. Aber was nun? Ich habe hin und her überlegt, wollte sie erst ausschneiden und auf einen Action Wobbler kleben, aber dann hab ich gedacht, dass ich ja auch zuerst einmal probieren könnte, ob ich eine passende Szene für ihn stempeln oder malen kann. Mir fiel ein, dass ich einen Sofastempel von Clearly Besotted habe, den man hervorragend nutzen könnte, damit es so ausschaut, als wäre der Kater aus seinem Schlaf gerissen worden und würde den Betrachter nun entgegenspringen. Um ihn zum umarmen oder ihm ins Gesicht zu springen (wie meine Kater das vermutlich tun würden, wenn sie so aussähen) sei einfach mal dahingestellt. ;o)

Hello my dear friends!
Instead of walking you through the process of how this card came together (as it is almost a one layer card) I thought that this might be a good card to explain to you more about my thoughts when making a card...
I started out by stamping the cat on a die cut piece. The only thing I thought about at this point was how to colour fur properly and so I forgot to plan ahead. Once I had coloured the fur ball I was stuck and didn't know what to do next. I thought about fussy cutting him out and putting him on an Action Wobbler, but then I thought I could try to create a scene for him. (If that hadn't worked out I could have still fussy cut him out to use him on a card differently.) I remembered that sofa stamp I had purchased from Clearly Besotted. It was just the right size to look like the cat had been sleeping on it, until he was woken up and jumped toward the viewer of this card. Whether he jumped up to hug them or scratch their face (like my cats probably would do if I woke them really rudely and they would look like this cat from C.C. Designs) remains to be seen ;o)


Die Couch habe ich blau gemalt, weil das eine gute Komplementärfarbe zu Braun- bzw. Orangetönen ist. Der Teppich sollte eher neutral bleiben, also habe ich meine C-Marker von Copics gewählt und die Farbe überwiegend aufgetupft, um einen faserigen Effekt zu bekommen. Leider ist das im Foto nur andeutungsweise zu sehen... Viel Platz blieb mir leider nicht für meinen Kartenspruch (an dem Punkt hab ich mir mal wieder gewünscht, ich würde genauer planen...), aber solche Probleme sind da, um kreativ angegangen und gelöst zu werden. Darum habe ich mir oranges Papier herausgesucht und mit einer Stanze ausgeschnitten, die gerade so groß war, dass ich den Spruch drauf stempeln konnte. Ein zweites Stanzteil in Blau kam noch als Kontrast darunter und eine Klammer an die Seite, um wenigstens ein bisschen zu verzieren. Zum Schluss habe ich das weiße Papier mit Abstandshaltern auf eine Kraft-Kartenbasis geklebt, die ich zuvor mit einem Pfoten-Hintergrundstempel etwas interessanter gestaltet hatte.

I coloured the couch blue because it is a nice complementary colour to the orange and brown and I chose grey for the carpet as a neutral colour. For it I used my Copic C-markers and dabbed the marker on to get the knotty look. There wasn't a lot of space left for my sentiment at this point (and I wished for the hundreth time I would plan out my cards a bit more..., but especially those tight spots are there to get creative, don't you think?! I chose an orange piece of paper which I cut out with one of my punches and stamped my sentiment on it. Now I needed a contrasting colour to mount the orange piece on, so I grabbed a light blue paper and punched it out using the same punch as before. I finished the sentiment part of with a clip on the side to have a bit of embellishment on the card. Lastly I added the white panel on top of my kraft card base on which I had stamped the pawprint background stamp from MFT in a brown colour. 

Material / supplies:
Stempel / stamps: "Scaredy Cat " von C.C. Designs
                           "Time to relax 2" von Clearly Besotted
                           "Paw Print BAckground" von My Favorite Things
Stanze / die: "Wonky Stitches Elle-ments" von Avery Elle
Colouring: Copics


Challenges:
Simon Says Wednesday Challenge "Use a Stamp"
 "Time Out Challenges "Make your Mark"
Addicted To Stamps "Anything goes"
Creative Knockouts "Clean and Simple"
Moving along with the times "Cute Animal"
Freshly Made Sketches  #203
Related Posts Plugin for WordPress, Blogger...