Montag, 30. Mai 2016

You are the coolest

Halli Hallo ihr Lieben!
Heute möchte ich euch meine Karte für die neue Challenge bei den Crafty Cardmakers zeigen. Das Thema ist "Monochrom", sprich eine Farbe plus die neutralen Farben. Wer genau hinschaut sieht, dass ich ein klitzekleines bisschen geschummelt habe, denn der Schnabel von dem süßen Pinguin musste einfach gelb sein. Ansonsten war ich aber brav und habe mich an das Thema gehalten ;o)

Heya my dear crafty friends!
Today I would like to show you my newest card for the current Crafty Cardmakers challenge. We would love to see "Monochrome" cards and projects, so only one colour plus neutrals. However, if you look really closely you might see that I cheated a tiny little bit, because the cute penguin just needed to have a yellow beak. Other than that I was good ;o)


Ich habe Peacock Feathers Distress Ink auf ein weißes Stück Papier aufgewischt, die Farbe dabei nach oben links hin verblassen lassen und habe anschließend einige dicke Tropfen Wasser darauf tropfen lassen. Nach circa einer halben Minute habe ich die Restfeuchtigkeit mit einem Tuch aufgenommen und ein Rechteck aus dem Papier gestanzt. Diesen fast-Bokeh-Effekt finde ich wirklich klasse - der Hintergrund bekommt dadurch wirklich noch viel mehr Tiefe ;o)

I sponged some Peacock Feathers Distress Ink on a piece of white paper, letting it fade out towards the upper left and splattered some big drops of water on it. After about half a minute I used a piece of cloth to blot the paper dry and die cut the stitched rectangle from it. I love the almost bokeh effect ;o)


Als nächstes habe ich den Pinguin einmal auf ein weißes und auf ein gemustertes Papier gestempelt, weil ich mal wieder Paper Piecen wollte. Das Papier mit den Blümchen hat sich als Schwimmshortsmuster einfach zu sehr angeboten ;o) Mit Copics habe ich der Hose etwas Schattierung verpasst, damit sie verglichen mit dem Pinguin nicht einfach nur flach ausschaut.

Next I stamped the penguin once on a white piece of paper and once on some patterned paper, which later became the trunks. I don't often use paper piecing, but I thought the pattern would look so cool on his trousers, so I had to try it. I added some shading with Copic markers, so that they wouldn't look too flat compared with the penguin.


Ich hoffe, ihr spielt bei uns mit und zeigt uns eure monochromen Werke! ;o)

I hope you are going to play along with us and show us your monochrome projects! ;o)

Material/ supplies:
Stempel / stamps: "Penguins in Paradise" von My Favorite Things
Stanze / Die: "Wonky Stitches Elle-Ments" von Avery Elle

Challenges:

Samstag, 28. Mai 2016

Welcome Baby Girl

Halli Hallo ihr Lieben!
Ich wünsche euch einen wunderschönen Samstag! Heute startet die neue Challenge bei Challenge Up Your Life und dieses Mal fordern wir eure Kreativität heraus: Gerne würden wir auf euren Projekten Gegenstände sehen, diees in jedem Haushalt zu finden gibt. Ich habe eine Büroklammer zu einem Mini-Kleiderbügel für den Strampler umfunktioniert:

Heya my dear crafty friends!
I hope you are all having a good start into a fabulous weekend. What would be better than to start the weekend with a new challenge from the Challenge Up Your Life blog?! This time we would like to see projects that incorporate ordinary household items. I transformed a paper clip into a miniature clothes hanger for the onesie:


Die Anleitung dazu habe ich auf Pinterest gefunden (klick) und habe mir auch direkt ein paar zurechtgebogen, obwohl ich für die Karte nur einen brauchte. Die Mitte des Papiers sollte glatt bleiben (damit ich darauf noch stempeln konnte), weshalb ich mich für die Methode des Teil-Embossings entschieden habe. Dazu habe ich einen "Diffuser" von Tim Holtz benutzt und ich finde klasse, dass die Herzchen zur Mitte etwas undeutlicher werden.

I found the instructions on Pinterest (click) and already made a few, even though I just needed one for the card. I wanted the area in the center of the panel to remain smooth (for staming on it) so I used partial dry embossing. To achieve the look I used a "Diffuser" by Tim Holtz and I love how the hearts are fading out towards the middle.


Da ich für die Kartenbasis eine Farbe haben wollte, die zu dem Strampler passt, habe ich mich dazu entschieden mit Picked Rasperry Distress Ink einen Ombre-Verlauf aufzutragen und auch noch das kleine Stück Papier für das "Baby Girl" einzufärben. Nachdem ich den Kartenspruch gestempelt habe, habe ich alle anderen Element auf das weiße Papier aufgeklebt und dieses dann mit Moosgummi hinterlegt, um mehr Tiefe zu erhalten und gleichzeitig zu verhindern, dass es irgendwo "einsinkt".


Because I wanted the card base to match the colour of the onesie I used Picked Rasperry Distress Ink to create a slight ombre effect and also coloured a tine piece of paper for the "Baby Girl" part of the sentiment. After stamping the sentiment I assembled all the elements on the panel and pane and put that on the card base using some fun foam beneath it for a bit of dimension.


Ich hoffe, ihr spielt mit und haltet in den nächsten zwei Wochen die Augen zu Hause weit aus und findet etwas, was perfekt auf euer Projekt oder eure Karte passt ;o) Happy crafting!!!

I hope you are going to play along with us and keep your eyes open at home, so you find the perfect item to use on your project or card ;o) Happy crafting!!!

Material / supplies:
Stempel / stamps: "Onesie" von Hero Arts?
                             "Little Bundle" von Lawn Fawn

Stanze/ die: "Stitched Rectangle" von Simon Says Stamp
Coloration: Copics

Challenges:
Simon Says Wednesday Challenge "Anything goes"
7 Kids College Fund #152 "Anything goes"

Craft Rocket Challenges "Monochrome"
Alphabet Challenge "G for Girlie"
Crafting for all Seasons "Make it Girlie"

Dienstag, 24. Mai 2016

Summery birthday card

Halli Hallo ihr Lieben!
Vielen Dank erst einmal an alle, die mir gute Besserung gewünscht haben. Der Infekt ist zwar noch nicht ganz verschwunden, aber ich fühle mich schon hundertmal besser ;o) Nun aber zur heutigen Karte. Ich habe sie als Inspiration für die neue Challenge auf dem PINspirational Blog gemacht:

Heya my dear crafty friends!
Thank you all so much for your get well wishes. The infection isn't completely defeated, but I am feeling a hundred times better than last week ;o) But now on to today's card which I have made as an inspiration card for the new challenge over at the PINspirational blog:


Für die Karte habe ich mich von den Farben auf dem Inspirationsbild (siehe unten) leiten lassen und habe einen Hintergrund mit Distress Inks gestaltet. Dazu habe ich mit einem Fingerschwämmchen die Farben Picked Raspberry und Squeezed Lemonade jeweils abwechselnd von links nach rechts aufgetragen. Nachdem die Farbe trocken war habe ich das Papier ausgestanzt und embossed.

I took my inspiration from the colours of the inspiration pic and created a background using Distress Inks. With a finger dabber I sponged Picked Raspberry and Squeezed Lemonade across my panel which I die cut and dry embossed after the ink was dry.


Für diese Karte habe ich die süße Maus von der Progressive Challenge von Gerda Steiner in der Hinterhand behalten sozusagen, weil ich finde, dass sie einfach wunderbar zu dem fröhlichen und sommerlichen Hintergrund passt. Die Maus habe ich mit Copics coloriert und anschließend ausgeschnitten.Das Wort "happy" habe ich aus schwarzem Papier ausgestanzt, damit es sich deutlich vom Hintergrund abhebt und für das Tag habe ich Vellum gewählt, damit nicht zu viel von den Farben dahinter optisch verloren geht.

I wanted to use the cute mouse digi stamp from Gerda Steiner's Progressive Challenge, because I think it fits perfectly with the bright and fun background. I coloured the mouse in with Copic markers and fussy cut it out. Then I die cut the word happy from black cardstock, because I wanted the sentiment to stand out enough so that it wouldn't get lost and I die cut the tag from vellum, so that it would create a focal point, but not take away too much from the background.


Als nächstes habe ich den zweiten Teil vom Spruch aufgestempelt, ausgeschnitten und auf das Tag geklebt, damit die Maus einen Platz hat, auf dem sie stehen kann. Dann dachte ich, dass der Karte noch das letzte i-Tüpfelchen fehlt und habe daher gelbe und schwarze Enamel-Dots um den durstigen Vierbeiner drum herum verteilt.
Ich würde mich freuen, wenn ihr bei uns mitspielen würdet ;o) Natürlich gibt es von unseren Sponsoren SLSLines and Melonheadz auch wieder etwas zu gewinnen. Dies ist unser neustes Inspirationsbild für euch:
Next I stamped the word "birthday" and glued it to the tag, so that the mouse could "stand" on it. I thought the card needed a little bit more, so I added some enamel dots around the thirsty mouse. 
 I hope you are going to play along with us :o) Our kind sponsors this time are SLSLines and Melonheadz. This is the inspiration picture for the current challenge:


Material / supplies:
Stempel / stamps: "Label Maker Sentiments" von My Favorite Things
                           "Mouse with Drink" von Gerda Steiner Designs
Stanzen / dies: "Sunshine Layers Die" von WPlus9
                      "Blueprints 26" von My Favorite Things
Embossing Folder: "Bubbles" (?) von Sizzix (seems to be discontinued)

Challenges:
Gerda Steiner Progressive Challenge Mai 2016
Allsorts Challenge "Happy Birthday"
Send a Smile 4 Kids "Bright Colours"
Alphabet Challenge "F for Furry Friends"
Polkadoodles "Birthday Celebration"
In the Pink "Happy Anything" (I hope my card is pink enough!?)

Freitag, 20. Mai 2016

Best wishes on your birthday

Hallöchen ihr Lieben!
Leider hat mich eine Grippe fest im Griff und daher habt ihr seit Montag nichts mehr Neues von mir hier auf dem Blog gesehen. Heute hat der Basteltisch aber gerufen und mit warmem Tee neben mir ist dies hier entstanden:

Heya my dear crafty friends!
Unfortunately I have been sick the whole week, which is why you haven't seen anything new on here since Monday. Today my craft table called out to me though and with a warm cup of tea next to me I made this card:


Ich habe die Purple Onion Stempel der letzten Saison benutzt (obwohl ich gestehen muss, dass die neuen bereits auf dem Weg zu mir sind *grins) und wieder meine Zig Marker geausgekramt. Einige von euch wissen vielleicht, dass ich meine Liebe zu den Zigs entdeckt habe, nachdem ich Birkas Videa dazu gesehen habe. (Einen Link findet ihr in diesem Post - klick.) Ich muss ja zugeben, dass es lange nicht so schnell war, wie mit Copics zu colorieren, aber das Endergenis von den Zigs ist wirklich klasse. Ich hoffe, das findet ihr auch ;o)

I have used some Purple Onion Designs stamps from last season (though the new ones are already on their way to me *smile) and also took out some Zig markers to colour the whole scene in. Some of you might now that I found my love for Zig markers after watching Birka's video about how to colour with them (you find a link in this post - click). I must say colouring a complete scene wasn't as quick as colouring with Copics, but I love the result. I hope you do, too ;o)


Nachdem das Papier trocken war, habe ich das Quadrat und die ovale Aussparung für den Spruch ausgestanzt. Um alles abzurunden, habe ich zum Schluss noch Diamond Stickles auf die Eiscreme getupft - ein ganz klein bisschen kann man es auch erkennen, wenn man genau hinschaut ;o)

After the paper had dried completely I die cut the stitched square and also die cut a shape that would fit my sentiment from the panel. To finish the card I added some Diamond Stickles to the ice cream. 


Material / supplies:
Stempel / stamps: Fox "Joey" & "Picnic" von Purple Onion Designs
                            "Birthday Wishes" von Pink and Main
Stanzen / dies: "Wonky Stitched Square STAX" von My Favorite Things
                       "Stacked Pierced Ovals" von Create a Smile

Challenges:

Montag, 16. Mai 2016

HB2U (Fox)

Huhu ihr Lieben!
Bei den Crafty Cardmakern startet heute eine neue Challenge zum Thema "Stitching - Real or Faux". Zwar würde ich gerne mal richtige Nähte auf meine Karten bringen, aber da ich an der Nähmaschine gänzlich unbegabt bin, hab ich mich auf das "Faux Stitching" also hier die geprägten Nähte besonnen ;o)

Heya my crafty friends!
A new challenge starts today at the Crafty Cardmakers blog and we would like to see your projects using "Stitching - Real or Faux". Even though I would love to use real stitching on one of my cards, I stuck with the faux stitching, because I am rather untalented at using a sewing machine...


Als erstes habe ich einen Teil meines Stanzen mit "Naht" herausgesucht, die gut zueinander passen. Das quadratische Teil, das ich weiß gelassen habe, war die erste Stanze, bei der ich mir sicher war, dass ich sie benutzen wollte. Es ist eine von Paper Smooches und das geniale daran ist, dass nur die Linie geprägt, aber nichts ausgeschnitten wird. Den quadratischen Teil habe ich maskiert und dann auf den Rest Farbe aufgewischt, drüber gestempelt und zu guter Letzt habe ich es noch mit der rechteckigen Stanze ausgestanzt.

I have pulled out some of my stitched dies and chose a few that coordinate well with one another. I started with the square piece that I kept white. It is a die by Paper Smooches that gives you just the stitching but doesn't cut the paper at the same time. After I had masked that section off and coloured the rest, I die cut it out using a stitched rectangle die. 


Für meinen Spruch habe ich das Set "Stitched Alphabets & Numbers" von MFT herausgesucht. So hatte ich am Ende "faux stitching" für drei der Kartenelemente, nämlich für die Basis, den Fokusbereich und den Spruch ;o) Nun habe ich noch den Fuchs in sein Quadrat gesetzt und drei rote Luftballons um ihn herum verteilt, die ich noch mit Glossy Accents überzogen habe, um sie mehr wie echte Ballons aussehen zu lassen.

For my sentiment I used the "Stitched Alphabets & Numbers" by MFT. This way I have stitching details for three elements of my card: the panel, the focus area and the sentiment. ;o) To finish the card I added the fox to the blank square and also added three balloons which I had coated with Glossy Accents to give them this balloony shine.


Material / supplies:
Stanzen / dies:  "Stitched Alphabets"  & "Stitched Numbers" von My Favorite Things
                        "Stitched Frames Dies" von Paper Smooches
                        "Party Balloons" von Lawn Fawn
                        "Little Bits Fox Die Set" von Taylored Expressions


Challenges:
Stempelküche Challenge "Tierische Grüße"
Dies R Us #49 "Birthday"

Samstag, 14. Mai 2016

Happy Wishes (2 score lines - challenge)

Hallo zusammen!
Für den Challenge Up Your Life Blog startet heute wieder eine neue Challenge und dieses Mal habe ich mir das Thema aussuchen dürfen. Und weil ich immer so begeistert darüber bin, welche verschiedenen Kartenformate ihr so alle werkelt, habe ich mir als Thema "Genau 2 Falzungen" ausgesucht. Ich würde mich total freuen, wenn ihr auch mitmachen und uns eure Umsetzungsidee zeigen würdet oder euch von einer der Karten meiner Teamkolleginnen inspirieren lassen würdet. Hier ist meine:
[Ein recht bekanntes Format, aber auch eines, das ich immer wieder gerne nutze ;o) ]

Heya eyeryone!
Today starts a new challenge over at the Challenge Up Your Life blog and this time I could choose a topic. Because I always love to see all the different card shapes and formats you guys create, I chose "Exactly 2 score lines" as the topic for the upcoming two weeks. I would love if you would like to show us your idea of a 2 score lines card or if we managed to inspire you with one of the team member's cards. This is my card:
[I know it isn't a very unusual design, but I love using it, because it is quite unique ;o) ]


Ich hab mich in dieses niedliche "Woodland Wonders" Set von Avery Elle und wollte damit schon ewig eine Karte machen. Ich hoffe, ihr mögt diese hier ;o)

I love this cute "Woodland Wonders" set by Avery Elle and have wanted to make a card with it for the longest time. Hope you like it ;o)


Material / supplies:
Stempel / stamps: "Woddland Wonders" von Avery Elle

Dienstag, 10. Mai 2016

An Astronaut saying "Hi" ;o)

Halli Hallo ihr Lieben!
Für die Cards und More Challenge sollten es dieses Mal "Männerkarten" sein. Zu gewinnen gibt es 2 Digis von unserem Sponsor Dr. Digi's. Mein Astronaut hat es mir aber ziemlich leicht gemacht, weil ich ihn ins All setzen konnte, was heißt, ein blau-grün-dunkellila Hintergrund war gefragt und ich konnte den Anzug in entsprechenden Farben colorieren:

Heya my dear crafty friends!
We want to see "Male Cards" over at the Cards and More Challenge blog. You could be the lucky winner of 2 digi stamps from our kind sponsor Dr. Digi's. Luckily the image of the austranaut helped me quite a lot with this challenge, because I could place him in outer space (which is mostly blue and a bit green and dark purple...) and I could colour his spacesuit any way I wanted:


Als erstes habe ich den Hintergrund mit den Gansai Tambi Wasserfarben von Kuretake gemalt. Nachdem dieser getrocknet war, hab ich dann noch ein paar (viele) Spitzer in gold und silber darübergesetzt. Dazu habe ich die Farben von dem Finetec Mica Gold Set benutzt und ich bin absolut begeistert darüber, wie sehr sie leuchten und wie klasse sie sich von dem dunklen Hintergrund abheben!!!

I started by colouring the background, using the Gansai Tambi watercolours by Kuretake. After that was dry I flicked some gold and silver paint over it. I have used paint from the Finetec Mica Gold palette and let me tell you, the way this paint looks on dark backgrounds is just amazing!!! 


Als nächstes habe ich den Astronauten mit Copics coloriert und den Spruch "Hi" auf seine Flagge gestempelt. Da die Schrift auf dem dunkleren Hintergrund leider etwas verloren ging, habe ich sie mit einem weißen Gelstift umrandet und außerdem noch ein paar Punkte hinzugefügt. Als Kartenbasis habe ich ein graues Papier ausgewählt und das Rechteck aus Aquarellpapier direkt darauf geklebt. Im Nachhinein wünschte ich, ich hätte einen stärkeren Kleber gewählt, weil sich die Ecken doch ein wenig lösen. Den Astronauten habe ich dann zum Schluss noch mit Abstandshaltern aufgeklebt und Enamel Dots in weiß und hellblau um ihn herumgeklebt.

Next I coloured the astronaut using Copic markers and stamped a greeting on his flag. Because it got lost on the coloured background I outlined it with a white gel pen and also added lots of tiny dots on there as well, to give it more interest. I chose a grey paper as my card base and adhered the watercolour piece directly on top. I wished I had used a stronger adhesive, because the edges lift up a tiny bit. I put the astronaut on top using foam tape and placed five enalem dots around him.


Material / supplies:
Stempel / stamps: "One Small Step" von Dr. Digis
                              "Hi" von Purple Onion Designs
Stanzen / dies: "Cross Stitch Rectangle Stax" von My Favorite Things

Other:
"Perlglanzfarben Gold und Silber" von Finetec
Gansai Tambi Wasserfarben von Kuretake 
Enamel Dots von Create A Smile

Challenges:
Lets Color Linky Party #9
Through the Purple Haze "Anything goes"
Send a Smile 4 Kids "For Dads or Special Males"
Scapper's Delights "Anything Goes"
Crafting From The Heart "Anything goes"

Camp Rules (Well Done card)

Hallöchen ihr Lieben!
Für die Pinspirational Challenge habe ich dieses Mal eine Karte zum Thema "Camp Rules" erstellen sollen. Ich weiß nicht, wie es euch geht, aber wenn ich an Camps denke, kommt mir als erstes ein gemütlicher Abend am Lagerfeuer in den Sinn:

Heya my dear crafty friends!
For this new Pinspirational "Camp Rules" Challenge I made a card that shows a fire and some yummy food on sticks. I don't know about you, but whenever I think about camps I instantly think of cozy evenings around a nice camp fire:


Die Bilder sind von unserem Sponsor "Imagine That" und ich habe versucht, wie Sandy Allnock zu denken und die Szene so realistisch wie möglich zu colorieren, zumindest was den Feuerschein und das Schattieren angeht. ;o)

The images are from our kind sponsor "Image That" and I have tried to channel my inner Sandy Allnock and create a realistic looking scene as far as it comes to the light from the fire and shading. ;o)


Nachdem ich alles ausgemalt hatte, habe ich die Szene mit einer Cross Stitch Stanze ausgestanzt und auf ein gelbes Papier geklebt. Das soll den Fokus auf das Feuer noch verstärken. Danach habe ich den Spruch in weiß embossed und das alles dann auf meine Kartenbasis geklebt. Die hatte ich zuvor mit "Walnut Stain" Distress Ink eingefärbt und dann mit der gleichen Farbe die Holzstruktur darüber gestempelt.

After I had coloured in the whole scene I die cut it with a cross stitch die and matted it on some yellow paper to emphasize the yellow of the fire. Then I heat embossed the sentiment "Well Done" and placed my piece on a cardbase that I had sponged some "Walnut Stain" Distress Ink on and had also stamped this wood background stamp in the same colour on top.


Das ist das Inspirationsbild: / This is the inspiration pic:


Material / supplies:
Stempel / stamps: "Summer BBQ Kit" von Imagine That
                              "Wood Plank Background" von My Favorite Things
                              "Let's bbq" von Lawn Fawn
Stanzen / dies: "Cross Stitched Rectangle STAX" von My Favorite Things
Coloration: Copics

Challenges:
Addicted to stamps and more "Make Your Mark"
Lets Color Linky Party #9"
Through the Purple Haze "Anything goes"
Send a Smile 4 Kids "For Dads or Special Males"
Scapper's Delights "Anything Goes"
Crafting From the Heart "Anything Goes"

Samstag, 7. Mai 2016

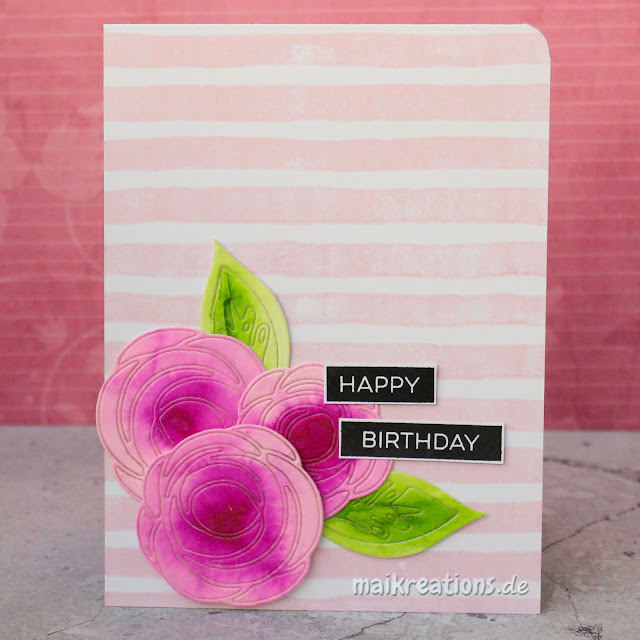
Flowery Birthday Card

Einen wunderschönen guten Morgen ;o)
Morgen ist Muttertag und auch, wenn die Karte, die ich euch heute zeige eine Geburtstagskarte ist, lässt sie sich einfach durch austauschen des Spruches ganz einfach auch zu einer Muttertagskarte machen:

A beautiful morning to you all ;o)
Tomorrow is Mother's Day and even though this particular card is a birthday card, you could easily turn it into a Mother's Day card simply by changing the sentiment:


Zuerst habe ich den Hintergrund mit Spun Sugar gestempelt. Dazu habe ich mein Misti benutzt, weil mir bewusst ist, dass die Distress Inks nicht so gute Abdrücke produzieren, aber dieses Mal fand ich den Look sehr passend und habe nicht noch einmal drübergestempelt. 

First I stamped the background stamp with Spun Sugar and had used the Misti, because I am aware that Distress Inks don't always give the best impressions. However this time I liked the "not completely stamped" look and did not stamp it a second time.


Als nächstes habe ich an meinen Blumen und Blättern gearbeitet. Dazu habe ich zwei Zig Marker ("Purple" #82 & "May Green" #47) benutzt und die Mitte der Formen eingefärbt - um zu wissen, welchen Bereich ich colorieren wollte, hatte ich zuvor grob mit einem Bleistift um die Stanzen drum herum gezeichnet.

Next I worked on my flowers and the leaves. I used two different Zig markers ("Purple" #82 & "May Green" #47) to colour the center of the shapes - I had roughly sketched around the dies, so that I would know which area to colour. Then I used a brush and some water to messily move the colour towards the outside edges.


Nachdem alles trocken war, habe ich die Blumen und Blätter ausgestanzt und so wie ihr es hier sehen könnt, letztendlich auf der Karte festgeklebt. Fällt es euch auch immer so schwer, den richtigen Platz für eure Elemente auf der Karte zu finden? Normalerweise bekommt man übrigens viele kleine Teile, was toll ist, weil man da viel mit machen kann, aber dieses Mal wollte ich sie einfach so lassen, wie sie waren und habe deshalb hinten einfach Tesafilm drüber geklebt. Zum Schluss habe ich noch die beiden Wortstreifen aufgeklebt und meine Karte war fertig.

Next I die cut the flowers and the leaves and arranged them on the card base as you can see in the picture. With these dies you usually get a lot of individual pieces, which is great, but this time I wanted to keep them as they were, so I removed them very carefully from my die cutting plate using and added scotch tape to the back. Lastly I adhered the two word strips to the card as well and it was done.

Material / supplies:
Stempel / stamps: "Watercolor Stripes" & "Label Marker Sentiments"
                              von My Favorite Things
Stanzen / dies: "Wild Garden by Julie Ebersol" von Ellen Hutson
                        "Scribble Roses Overlay" von My Favorite Things

Mittwoch, 4. Mai 2016

Birthday Card

Hallo zusammen!
Ich habe mir letztes Jahr auf dem Stempel-Mekka einige Stempel von "Cats on Appletrees" zugelegt, weil ich die Motive einfach super niedlich finde. Allerdings benutze ich nur sehr selten vollflächige Stempel und wusste nicht so recht, was ich damit machen sollte. Nachdem ich mich eine Weile mit den Stempeln beschäftigt habe, habe ich herausgefunden, dass ich ein recht grafisches Design in Kombination mit dem soliden schwarzen Abdruck wirklich klasse finde. Was meint ihr?

Hello my dear crafty friends!
Last year I have purchased some stamps from "Cats on Appletrees" because I love their cute images. However, I do not often use solid stamps on my cards and therefore didn't really know what to do with them. After a bit of experimenting with them I found, that I like a rather graphic design in combination with a solid black impression. What do you think?


Als erstes habe ich das Wort "birthday" ausgestanzt und sowohl den Spruch, als auch die süße Katze gestempelt. Danach habe ich drei verschiedene Distress Inks auf ein Papier gewischt, um einen Ombre-Look zu erhalten und habe dieses hinter die ausgestanzten Buchstaben geklebt. Nun konnte ich auch die inneren Teile der Buchstaben aufkleben, was die Lesbarkeit des Wortes doch sehr erhöht ;o)

First I die cut the word "birthday" from a white panel and stamped the greeting as well as the cute cat around it. Next I blended three different Distress Inks together to achieve an ombre look and glued the piece behind the cut out letters. Now I could adhere the inner parts of the letters, which helped quite a bit with the legibility of the word ;o)


Den "Happy Birthday" Hintergrundstempel von MFT habe ich sowohl auf die Vorder- als auch auf die Rückseite der Kartenbasis gestempelt und dann das fertige Panel mit Abstandshaltern aufgeklebt. Zum Schluss habe ich noch ein paar Sequins hinzugefügt, um die Farbe des Wortes "birthday" noch einmal aufzugreifen.

I stamped the "Happy Birthday" background stamp both on the front and on the back of the card base and glued the panel down using foam tape. I added a few sequins to repeat the colours of the word birthday on the card and my card was done.


Material / supplies:
Stempel / stamps: "Kätzchen Frida" von Cats on Appletrees
                              "Birthday Wishes" von Pink and Main
                              "Happy Birthday BG" von My Favorite Things
Stanzen / dies: "Best Birthday Ever" von Memory Box
                         "Small Stitched Rectangle Stackables" von Lawn Fawn

Challenges:
As You Like It "Favorite Animal & Why" - Cats are my fav. animals, bec. the are so cute and most of the time cuddly ;o)

Montag, 2. Mai 2016

Wishing You Rainbows ;o)

Hallöchen ihr Lieben!
Ich hoffe, ihr seid gut in die Woche gestartet und dass unsere neue Challenge bei den Crafty Cardmakers sie höchstens noch strahlender macht. Unsere neue Herausforderung für euch ist ein Projekt mit "Perlen oder Juwelen" und dies ist meine Inspirationskarte für euch:

Hello everyone!
I hope you are off to a good start with this week and that our new challenge at the Crafty cardmakers will only make it more sparkly ;o) Our new challenge is all about "Pearls or Gems" and here is my inspiration card for you:


Für den Hintergrund habe ich den unteren Teil meines Papieres mit Post-Its maskiert und mit dem Ink Blending Tool von Ranger den Regenbogenverlauf aufgetragen. Als nächstes habe ich dann mit Copics klare Gems in bunte "verwandelt", damit der süße Drache mit ihnen jonglieren konnte. Fragt mich nicht, wieso, aber irgendwie fand ich, dass der Drache aussah, wie ein weises, ehrwürdiges Tier, das jonglieren kann. ;o)

To create the background I masked off the lower part of my paper and used an Ink Blending Tool and six different shades of Distress Ink to colour a rainbow.  Next I used Copic markers to turn the clear gems into the colours I wanted, so I could have the cute dragon juggle with them ;o)

Perlen und diese Juwelenaufkleber auf meinen Projekten zu benutzen fällt mir wirklich nicht so leicht, aber dadurch, dass ich sie bunt gemalt habe, hat es letztendlich doch funktioniert und ich mag den Look auf dieser Karte wirklich gerne ;o) Wie benutzt ihr denn Perlen und Gems auf euren Projekten? Falls ihr sie regelmäßig benutzt solltet ihr definitiv bei unserer Challenge mitmachen - falls ihr sie genauso oft benutzt wie ich, vielleicht nutzt ihr sie, um kreativ zu werden... Würde mich freuen eure Werke bei den Crafty Cardmakers zu sehen! ;o) Bis dahin, happy crafting!

Let me tell you, to put pearls and gems is nothing that comes natural to me, but by colouring them and using them as I did I found a way to make gems work for me and now I love the look of them on this particular card ;o) How do you use pearls and / or gems on your projects if you use them? If you use them regularly our challenge is definately for you - and if you don't (just like me) maybe you use the challenge to get creative and make them work for you, too ;o) I would love to see your creations over at the Crafty Cardmakers. Until then, happy crafting!


Material / supplies:
Stempel /stamps: "Lunar Animals" & "Unicorns and Rainbows" von Mama Elephant
Stanzen / dies: "Wonky Stitches Elle-Ments" von Avery Elle
Inks: "Candies Apple", "Carved Pumpkin", "Mustard Seed", "Mowed Lawn",
        "Blueprint Sketch" & "Seedless Preserves"

Challenges:
Related Posts Plugin for WordPress, Blogger...