Mittwoch, 15. Dezember 2021

Driving Home For Christmas (Old Betsy)

Hello everyone!
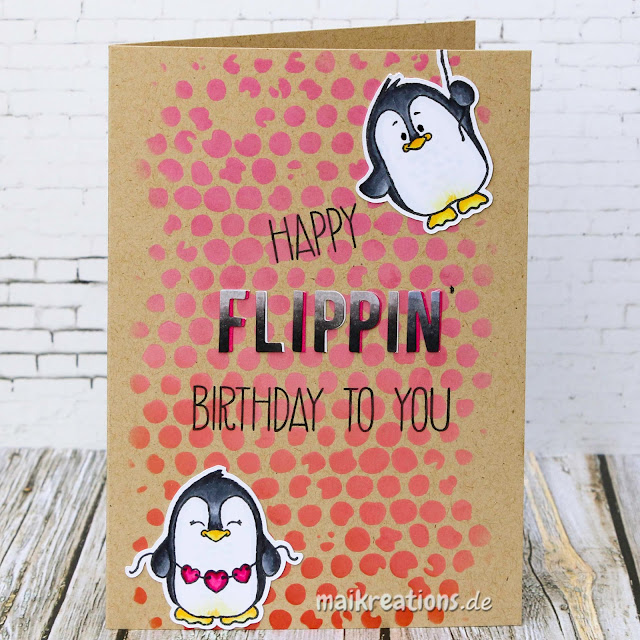
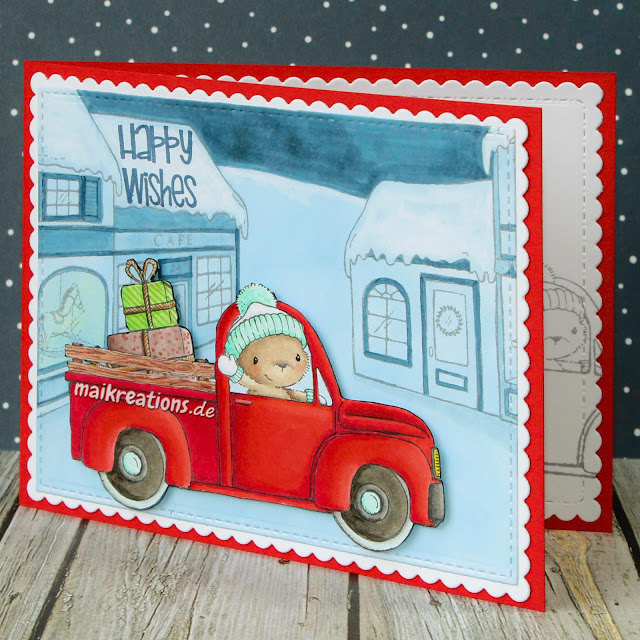
Today I would like to share a card with you that I have created as an inspiration for our newest challenge over at Papercraft Challenges. The theme is "Driving Home For Christmas". I hope you might have guessed it even without me saying so ;o) A car is rather unusual on cards of mine, but this image is just so super cute - I just love the happy bear in its truck!


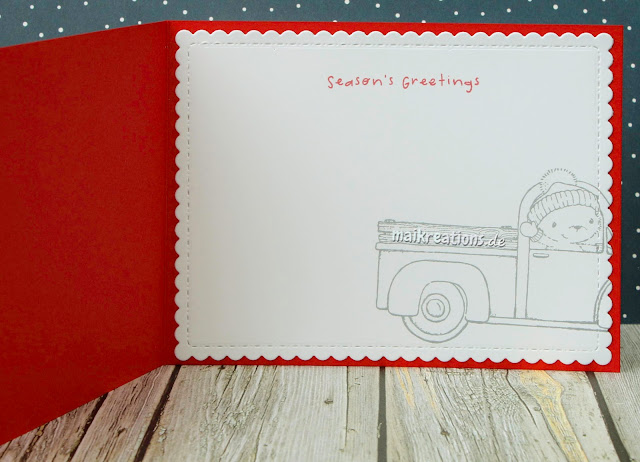
All the stamps are from Purple Onion Designs which are all just adorable I think. Sometimes I hesitate to use them because they take a little bit of extra time to colour for me, but everytime I do use their images I just love how the cards turn out. For this card I started by airbrushing on a light blue (B91) and then took it from there. I didn't have a stamp saying "driving home for Christmas", so I thought with the presents in the back I'd let "Old Betsy" speak for "her"-self ;o) Old Betsy is what the stamp of the car and the bear is called ;o)


I hope you are having a wonderful time now and around Christmas and I wish you all the happiest of times with your loved ones and your family. Maybe you'll have the odd spare moment and if you do and you'd like to craft a little then, I'd love it if you would share a project with us in our gallery.


Stamps: "Old Betsy", "Toy Store Background", "Bakery Background" by
              Purple Onion Designs

Mittwoch, 1. Dezember 2021

Magical Christmas (Christmas card with dragons)

Hello everyone ;o)
Today I would love to share my card for this month`"Magical Christmas" challenge at Challenge Up your Life!


I love these cute dragons by Lawn Fawn and I really like that are not the typical image for a Christmas card. Many friends of mine like the fatasy genre for books or movies so this would be a perfect card for them, don't you think. 


The background was quickly prepared thanks to the wonderful "Over the Mountain Border" stamp and a mask I had created. I used Distress Inks in Tumbled Glass and Shaded Lilac to create the chilly looking sky and coloured the trees and mountain tops with Copic. Last I stamped the sentiment and also added the cute dragons to complete the card. A little shimmer was added for that little bit extra for Christmas and my card was done.

I hope you are going to join us for the last challenge of 2021. Hope to see you around! Have a wonderful time until then and happy crafting, 

                                       yours Maike

Supplies:

Stamps: "Over the Mountain Border" & "Winter Dragon" & "Little Dragon"
               by Lawn Fawn

Happy Flipping Birthday (penguins)

Hello everyone,
I hope you are all happy and doing well. For some reason time always flies around this time of year, so I have to admit it flew by a little and I completely forgot to post this card for Papercraft Challenges. My apologies for those of you who wanted to take a closer look!!!

The card was made for the "Color on Kraft" challenge and I love the effect just of this stencil on the darker paper. It looks great I think:


I used Distress Oxide Inks in three different shades of pink and red and just added those lovely penguins to the front above and below the sentiment.


I hope you still got time to play along with our challenge this month! Our generous sponsor is Gerda Steiner Designs and you might just be the lucky winner and get a gift certificate to their store. Who knows? ;o) Have a lovely day and happy crafting my friends!

                                                    Yours Maike

Supplies:
tba

Freitag, 12. November 2021

Interactive card - camera and hedgehog

Hello everyone,
I am here with an interactive card today as inspiration for the newest challenge at Challenge Up Your Life


I have used the "Magic Iris Camera Add On" to create this card for a lovely person who loves photography and all things outdoor. 


There are many videos out there explaining how to assemble this wonderful die so I won't bore you with it, but I really like the decorated fronts for this "Camera Add On" and thought I would share some tipps and tricks in this regard. The grassy hill in the opening area of the camera gave me a hard time at first. I wanted everything to line up perfectly, but didn't want to glue anything in the circular opening area, if you know what I mean. So I figured a way out in the end: I decided to die cut the grassy part and then use the camera die to die cut it again, so it would match completely - stitches and all. That left me with a tiny piece of grass. So I glued some thin white paper behind the scrap piece of grass that was large enough that it could be adhered beneath the rest of the grassy front. That way the iris could still open and close. 


I hope you are going to join us with an interactice project of your own. They are always so much fun, don't you think so, too? Have a wonderful day and happy crafting everyone ;o))) Yours Maike

Supplies:
Stamps: "Happy Hedgehogs" by My Favorite Things
Dies: "Magic Iris" & "Magic Iris Camera Add On" & "Small Stitched Leaves"
          by Lawn Fawn


Mittwoch, 15. September 2021

Happy Birthday from the penguins

Hello everyone ;o)
Today I am back with a new card for Papercraft Challenges. This time we want to see the sentiment as the focus piece of your card. I chose to use this huge die from Honey Bee Stamps and love the result:


I started by creating this fun background in pink, red and a very pale pink as well and placed the birthday sentiment on top right in the center. 


Because of all the die cut pieces I feel like the card has a lot of dimension without being bulky though. After adhering the sentiment I placed the two cute penguins around it and stuck the "Happy"-piece to one of the penguin's wings, so that it looks like it is holding it while flying by holding a balloon. 


I decorated the inside as well and added some star sequins to the front and my card was done. I really love the look of this huge sentiment on the front. I hope I could inspire you to create a card with the sentiment as your focus as well and hope you are going to share it with us in our gallery! Have a fabulous day and happy crafting ;o) Yours Maike

Supplies:
Stamps: "Valentine Penguins" by Gerda Steiner Designs
Dies: "Birthday Honey Cuts" by Honey Bee Stamps
         "Sweet Stacks Rectangles Honey Cuts" by Honey Bee Stamps

Mittwoch, 1. September 2021

Herzlichen GLÜCK-wunsch

Hello my dear crafty friends,
I don't know about you, but life has gotten way more hectic over the last two months in my little corner of the world. That is why you haven't seen a lot of new cards lately and I am afraid more than two or so a month won't be managable for me right now. However I do hope you still come by every now and then. Today's card is for the "Fortune, Good Luck, Mushrooms" challenge over at Challenge Up Your Life. In German the theme of the challenge is simply called "Glückspilz", which is the name of a person who has a lot of good luck and "Pilz" is the word for mushroom, so that is why you will see a giant mushroom on my card:


With the wonderful stamp set "Always bring a smile" by MFT I created this little scene. My idea was that it is the foxes birthday and the turtle is about to bring a flower as a gift. The sentiment "Herzlichen Glückwunsch" means congratulations and is used to wish someone a happy brithday over here. 


The whole scene was coloured with Copic markers and when everything was completely dry I added the sentiment. The word "Glück" is stamped in "Lime Green" ink by MFT and then covered with a clear embossing powder. 


Wonder what the foy will think about that sweet gesture ;o) I hope you like the card and I wish you the happiest of days and happy crafting of course! Maybe you like to create something that fits our theme?! It would be wonderful to see your creation in our gallery! Yours Maike

Supplies:
Stamps: "SY Always Bring A Smile" by My Favourite Things 
              "Glückwunsch" von Create A Smile
Dies: "All Prettied Up" by Mama Elephant

I would like to share my card here:


Dienstag, 15. Juni 2021

Herzlichen Glückwunsch - Wedding card

Heya everyone ;o)

I hope you are all doing well and that maybe life has returned to a somewhat-normal for you. I am so happy you found your way to my blog and would like to share this simple wedding card with you. It was made for the newest challenge over at Papercraft Challenges, so if you have any weddings coming up we would love it if you could share your creation with us in our gallery:


I chose to go with a square card base, because for some reason that is my preferred format for a wedding card. No idea why, but let's roll with it for now ;o) I die the heart frame and the heart from some pearl cardstock which gives just a tiny bit of shine when you tilt it in the light. I glued both to a die cut banner cut from vellum and added the sentiment with stickers and another die cut. By the way for all the intricate die cut pieces like the frame and the word I always use "Stick it" on the back to make life easier for myself and also so that it is completely adhered and won't lift in odd places. I adhered the banner on the decorated card front and my card was almost done.


Because it was rather plain on the outside, I decorated the inside a little bit as well. It is all stamped, but makes it a proper wedding card as the outside could be a birthday card as well. I would love it if you would join us in this month challenge and am looking forward to seeing you again soon - somewhere in Blogland ;o) Have a fantastic day and happy crafting! Yours Maike


Supplies:
Stamps: "Hochzeit Glückwunsch" by Klartext Stempel
Dies: "Heart Frame" by Avery Elle
         "Traditional Tag STAX" by My Favorite Things

Dienstag, 1. Juni 2021

I sea it`s your special day - dimensional underwater card

Hello everyone ;o)
As cardmakers most of us - I'd daresay - we all love cards that are different from the cards you can buy in the store, right? For me it is cards with a lot of dimension like the one I am sharing with you today. I created it as a birthday card for a dear friend who loves diving, but the inspiration came from this month' inspiration "Under Water" over at Challenge Up Your Life. I wanted the feeling of the card to be a little like diving deep in the sea. What do you think? Did I nail it?


I created the box card by preparing two strips of paper and scoring them each 2 times. The deeper you want the box to be, the smaller the front piece needs to be in order to fit into a standard envelope. I wanted to cut this window with a die so I added a half inch to each side as a frame and defined the depth of the box accordingly. Then I added in some layers of water in a sense ;o) I needed those to add some fish that I glued to a piece of clear plastic in order to make it look like they are actually swimming. I also added the whale (because my friend likes whales very much) and also made the scene look more alive using some coral die cuts. I had cut these from a paper I had covered in nuvo shimmer paste. I love how they change colour just a little bit when you tilt them in the light. 


I also glued down a jellyfish which you can only see when you move the card as an extra surprise ;o) Also it added a pop of colour which I thought had been missing otherwise. The sentiment is a combination of letter stickers and a heat embossed piece. I wanted the "special day" part to stand out the most so I stamped on black cardstock with Versamark ink and heat embossed it. It was such a fun project to make and I love that it totally works as decoration, too. I hope you are going to join us this month at Challenge Up Your Life. We would love to see your projects, layouts and cards in our gallery! Have a fabulous week and happy crafting, everyone ;o) Maike


Supplies:
Stamps: "tba" (I cannot find the stamp set so I can't tell you the name.... Sorry - I will continue to search ;o))
Dies: "Build a scene - Underwater" by Taylored Expressions

Challenges:


Samstag, 15. Mai 2021

Surprise - Birthday Cards

Hello everyone,
how are you all doing? I hope you all get to enjoy some sun, great food, a wide smile from someone and some happy time crafting today ;o) Doesn't that sound like a wonderful day?! Here it has been raining all day, but except for the sun I got all of the other things I mentioned above and consider myself blessed! With the pandemic still going on I feel it helps to really think about the things we enjoy. However, enough talking for mow and more sharing... This is the card I'd like to share with you today which I made for the current "Anything Goes" theme at Papercraft Challenges:


I love this "Critter Crew" stamp by Avery Elle. It has the perfect size for a card and there is no need to mask anything yet have an interesting image. Do you like using "pre-arranged" images? For the background I created a quick pattern with some Distress Ink and a stencil and also die cut the oval as a way to anchor the image on the background. 


If you have been on my blog before you might now that I love rainbow coloured images, so with this one I chose to colour the hats in rainbow colours. Because the yellow was the only colour that was only represented once on the card I decided to use a piece of yellow paper for the banner to stamp the sentiment on. That way it all looks balanced I think. I hope you are going to join us for our "Anything Goes" theme at Papercraft Challenges ;o) Have a wonderful weekend and happy crafting everyone, yours Maike


Supplies:
Stamps: "Critter Crew" by Avery Elle
Stencil: "Balloons" by Echo Park (right at the bottom of the page)

Challenges:

Sonntag, 2. Mai 2021

Happy Birthday, Gnomie!

Hello everyone ;o)

I'd quickly like to share my card for this month' theme over at Challenge Up Your Life with you. The theme is "Under a hat":


I love the "Next Door Gnomes" by Hello Bluebird, so this was a perfect opportunity to break it out. I used polaroid fames to make it look like you were looking through openings to this magical world of little gnowmes when holding the card. Also I liked the white space underneath the opening as the place for my sentiment. For the background I used a card base in purple and a wonderful design paper by Lawn fawn to match the colour and mood. I hope you like the card and I also hope that you will join us in May at Challenge Up Your Life! Have a wonderful day and happy crafting, yours Maike


Supplies:
Stamps: "Next Door Gnomes" & "Party on The Farm" by Hello Bluebird Stamps
Dies: "Wonky Stitches Elle-Ments" by Avery Elle
         "Precious Polaroids" by My Favourite Things

Challenges:

Donnerstag, 15. April 2021

Have a BERRY sweet birthday (mouse and snail)

Hello everyone,
today I am back with a brand new card for Papercraft Challenges. This time the theme was "Fruits, Food and Vegetables" and this is what I made:


When I was making this card I looked outside the window and saw a rainy grey outside and really craved for some warmth and most of all sunshine and spring. I think you might feel it when you look at the finished project. It is so bright and quirky and so much more "in your face" than my cards usually are... Looking back I would definately have put vellum behind the designer paper and my cover and also switched the papers for the "berry" part of the sentiment. However I still like how it turned out, but thought I should let you know what I would change if I were to make it again. ;o)

To create the card I started by stamping and colouring in a whole bunch of strawberries, because I wasn't sure how many I would need in the end. (Now I have around 10 of them left, so you might see some tiny strawberries again in future projects...) Next I stamped and coloured the cute mouse and the sweet snail and die cut the letters and the front cover. The latter was cut twice: once from white cardstock and another time from the same red cardstock I used as my card base. I adhered them together after I had trimmed of a tiny bit of both one short and one long side from the red cardstock. This way you get the shadowed effect very easily. The assembling of the letters and the straberries took a bit of time, but when I was happy with the placement I stamped the rest of the sentiment and also adhered the two critters. I hope you like the card and even more so that you will play along with us at Papercraft Challenges this time! Have a lovely day and happy crafting my friends! Yours Maike


Supplies:
Stamps: "Dotty" & "Garden Bugs" by Purple Onion Designs
              "" by Gummiapan
Dies: "Cool Cuts Cherry lowercase" by Create a Smile 
          "Circle Panel Die" by Your Next Stamp

Donnerstag, 1. April 2021

Dots and a fairy ;o)

Hello everyone ;o)
Welcome to my blog and today's post! I am so happy about this card because I love how fun it turned out (even though there were some hurdles to overcome when I made it) and the colours remind me of spring and flowers. We have had the first two sunny days over here and I really loved bathing in the sun and having the dinner on the balcony ;o) Yeah!!! But back to today's card. It was made as an inspiration for the newest challenge over at Challenge Up Your Life and here it is:


The theme is this wonderful moodboard:


The colours are gorgeous and it will probably not be the last card I made with it ;o) Dot backgrounds are always fun I find and so I started the card by stamping such a background using inks that came at least near to the colours from the inspiration pic. When I coloured the cute little fairy I used the colours as well, but left out the reddish pink tone, because I felt, that it overpowered the other two colours on the background a little. That way it helped balance it out.

I put some gold glitter glue on the fun banner piece  to tie it in with the whole "fairies and wishes" theme, hung it from a piece of baker's twine, stamped the sentiment and my card was done! I hope you like it and that you are going to join us for this month' challenge! Happy crafting, everyone ;o) Yours Maike


Supplies:
Stamps: "Flynt" & "Everyday Marquee Sentiments" by Purple Onion Designs
Die: "All Prettied Up" by Mama Elephant

Challenges:

Montag, 15. März 2021

Sending Birthday Sunshine & Rainbows.... (Bunny and chick)

Heya everyone ;o)))
Has spring arrived where you live already? It has over here and I am so grateful for it. I hear the birds sing in the morning and it is already light when I leave the house for work. So, when we were told our new Papercraft Challenge theme "Rainbows" and kindly given a bunny image from our sponsor Gerda Steiner Designs I immediatly knew what kind of carrd I wanted to create:


I'll admit it is a rather unusual birthday card, but I always felt that this bunny was giving the carrot to someone to make them happe, so I chose the sentiment "Sending birthday sunshine & rainbows" and added "... and Möhrchen" (which is carrot in German) on the inside. Plus I added a tiny little carrot there as well. I so hope it will make someone smile in the near future. 


For the background I chose a patterned paper featuring some cute clouds and added two grassy hills die cut from some green paper. I added the cute chick tucked behind  the first layer and I just love this surprised look. I bet the chick is very happy to have cracked the egg early enough to attend the birthday party ;o) Both images, as well as the rainbow were coloured with Copic markers. The sentiment was stamped on in black ink and then I heat embossed over it with clear embossing powder to give it a more shiny and raised finish. I hope you like this card and if you love the images and just find them half as cute as I do I recommend you play along this time and maybe you could be the lucky winner of a $15 gift certificate to Gerade Steiner Designs. Have a wonderful time and happy crafting, yours Maike


Supplies:
Stamps: "Easter Bunnies" by Gerda Steiner Designs
Dies: "Rainbow Whimsy Die" by My Favourite Things
          "Meadow Borders" by Lawn Fawn

Challenges:
Simon Says Wednesday Challenge "A Bit O' Green"
Animal Friend's Challenge "Hasen / Bunnies"
Send a Smile 4 Kids "Anything Goes 4 Kids"
Sweet Stampers Challenge "Easter or Spring"

Montag, 15. Februar 2021

For A Loved One (Giraffe with heart)

Heya my dear crafty friends!
Today I would like to share my make for the newest challenge over at Papercraft Challenges with you. The theme is "For a loved one" and I love this cute giraffe by our kind sponsor Bugaboo:


I created a background using a stencil and a light pink Distress Ink and die cut the heart frame to help focus the eyes a bit. The giraffe was coloured with Copic markers and I coloured its hooves and the snout (?) twice so I could create something more 3D:


You can see it a bit better in this picture above. I only added two strips of paper to somehow center the image even more and stamped the greeting a bit below from where I wanted the image to be. I hope you are going to create something "For a loved one" and share it with us in our gallery! Remember you can win a lovely prize from our sponsor as well as making someone you love happy ;o))) Isn't that a win-win? Have a wonderful week everyone and happy crafting, yours Maike


Supplies:
Stamps: "Giraffe Heart" by Bugaboo
              "tba" by Neat and Tangled
Dies: "Heart Frame" by Avery Elle
Stencil: "Polka Hearts" by Create A Smile


Dienstag, 2. Februar 2021

Liebe Grüße (Bear greetings)

Hello everyone :o)
It is Febuary already - well it has been for a day, but don't tell anyone, because I am a little late posting this card... I have created it for the "Hearts" challenge over at Challenge Up your Life. I am not a whole lot into Valentine's cards because my loved ones never throw those cards away I give to them - which is lovely and shows appreciation and all that, but they tend to pile up in our home, so I usually give other things for Valentines like a cake or some flowers or hugs ;o) However, I love hearts on cards, so even this is a perfect theme for Valentine's cards I created a "Hello" card and love how it turned out. I hoipe you do, too:

To get a bit of a shadow effect I die cut the hearts beackground die twice, once from white and the second time from dark red cardstock and glued the slightly offset together as you can see in the picture. Next i cut a wonky circle and two speech bubbles from the same red cardstick. I heat embossed my sentiment on the speech bubbles and afterwards added the faux stitching line with a white gel pen.


Next I die cut some copic friendly paper with the bear die, added some colouring and or shading to the individual pieces and assembled the bear back together again. The way I do this is to take the biggest die and colouring around it with a pencil. Next I will cut it out not on the line but rather a quarter inch inside of the line to give myself a piece of paper to glue all the individual pieces to. That way I can cover the big peiece with adhesive and don't have to worry about putting a tiny bit of glue on each and every piece. I adhered the bear to the wonky circle using foam tape on the top and regular tape towards the bottom to give it that angle to really make it look at you and also added the speech bubbles. I hope you are going to join us at Challenge Up Your Life. With the updated rules you can now post three projects to our challenge, sharing even more of your talent with us ;o) Have a wonderful day everyone and happy crafting ;o)
Yours Maike


Supplies:
Stamps: "tba
Dies: "Cool Cuts Speech Bubbles" by Create a Smile
         "Big Picture Book Bear" by Simon Says Stamp
         "Fluttering Hearts Cover Plate" by Honey Bee Stamps

Freitag, 15. Januar 2021

Merry Christmas (Skydiving Santa)

Hello everyone,
let me start today's post with saying "After Christmas is Before Christmas" and I do hope you'll agree. It seems that every year there are less cards in my stash than I would actually like to send, so again I vowed to keep creating Christmas cards all year long. And so here is another one I made and would like to share with you:


I created a slider card for the newest theme "Heat Or Dry Embossing" over at Papercraft Challenges with this super cute skydiving Santa by our kind sponsor Dr. Digis. You could win 2 digis from their online store if your entry numbers wins! Isn't that fun? For my card I started by heat embossing the text backround on to a piece of white cardstock and added the clouds through a stencil after it was cooled down completely.


Next I added the sentiment towards the bottom of the card and figured out how long the slider "tunnel" could be for Santa not to fly too high or land on or over the sentiment. I added a piece of foam tape to the back (around where his head is) and stuck this piece through the "tunnel" I had cut into the embossed paper. From behind I added a coin, so it would have enough weight to move. Have you started on a new Christmas card stash already?


I hope you are going to join us at Papercraft Challenges and I wish you and your loved ones all the best and as always happy crafting, yours Maike ;o)

Supplies:
              "Christmas Background" by My Favourite Things
Dies: "Merry Christmas" by My Favourite Things (unfortunately discontinued it seems)


Freitag, 1. Januar 2021

Happy Ho Ho Ho-lidays (Foxes)

Happy New Year everyone ;o)
I hope you had a wonderful start in a new year full of hugs, crafting, joy, all the things you love and health! Let's start with a new card! This is one I created for the new "Snowflakes" theme at Challenge Up Your Life. 


I used these cute foxes from Hello Bluebird and created a lovely wintery scene for them using Distress Inks. I just fell in love with the combination of Shaded Lilac,Blueprint Sketch and Chipped Sapphire. You should definately give it a try. Depending on how much you use of each hue you get a more blue or purple result. I think it is the perfect combination and you will be seeing loads of it... So I do hope you like it, too ;o) I added a few splashes of water and dried them off as and also added a few Opaque White splashes to add this "Snow is falling"-feeling. 


I knew I was going to use the snowflake background paper by Stampin Up which is kept in blue and also turquoise hues, so I added a sentiment stamped in Mint Julep and also used Copics grom the BG family for the scarf of the fox on the left and the present. To set the scene I used the trees on the left which I had blinged up a little and added snowflake die cuts around the foxes, so that one of them cut put its tongue out to catch a snowflake with it. ;o) I hope you like my first card of 2021 and that you are not too tired of holiday cards yet... There will be a few more I should think... ;o)
It would be awesome if you would start this crafty year with us and join us with a "Snowflake" project! Hope to see you again soon! Happy crafting my friends and again a very happy new year,
yours Maike


Supplies:
Stamps: "First Snow" by Hello Bluebird
              "Puffy Holiday Greetings" by Mama Elephant

Dies: "Mini Snowflake dies" by Lawn Fawn
          "Manga Fluffiga Granar" by Gummiapan (Tree Dies)

Challenges:
Simon Says Wednesday Challenge "Sparkle and Shine" (Sparkle on trees and gift)
Christmas Craft Creations "Winter Blues"
Sweet Stampers "Anything Goes"
2 Crafty Critter Crazies "January Challenge"
Creative Crafting Uncles "Christmas"
Love To Craft "Anything Goes"
Crafty Galz Creations "Tis the Season"

Related Posts Plugin for WordPress, Blogger...