Posts mit dem Label Paper Smooches werden angezeigt. Alle Posts anzeigen

Dienstag, 1. März 2022

Easter Bunny with flowers

Hello all!!!
Today I am back with sharing my card for the newest Challenge Up Your Life mood board:

And this is the card I have created for this challenge:


I have used yellowish-(golden)-green hues for the background to create the mood for this card. Going from there I decided to make it an Easter card and used one of the cute bunnies from Gerda Steiner Designs. 


I used some fun flower dies from Paper Smooches and a frame by Honey Bee Stamps to set the scene for the Easter bunny and added the sentiment and my card was done. It came together rather quickly, even through those flowers had so many little parts. A bit of "Stick it" behind the paper is a very good way to save on time - and maybe frustration ;o)


I'd love to see one of your creations in our gallery at Challenge Up Your Life. Have a fabulous day! Happy crafting, Maike

Supplies:
Stamps: "Easter Bunnies" by Gerda Steiner Designs
Dies: "Dainty Flowers" by Paper Smooches (retired)
          "Happy Christmas" (frame die) by Honey Bee Stamps
           "Frohe Ostern" by tba

Freitag, 14. August 2020

Precious Baby


Hello my friends,
I have been super busy with the first few days at school this week - everything is different and strange and there is a lot of need for reflecting on how things went and adjusting to it for the next day. So I hope you will forgive that I am very, very late publishing the newest PINspirational Challenge inspiration card... This is the super cute inspiration picture:


I obviously went with the theme, but also thought I would like to use a grey card base and, as the baby clothes are kind of in the focus, I used a onesie as my focus element as well. But as you can see I felt that a baby card needed a bit more colour, so I decided to go with greens and blues as well. 


I hope you are going to join us any am looking forward to seeing your lovely projects. Happy crafting and take care, yours Maike


Supplies: tba

Montag, 14. Januar 2019

Warm thoughts on a cold day

Hello everyone ;o)
I would like to share my card for the newest challenge for the Crafty Cardmakers with you. The theme is "Winter" so I thought a snowman would be the perfect image for it:


I used a piece of patterned paper for my background and added a very glittery hill to it. The paper is from Simon Says Stamp and has a fantastic shimmery look without leaving pieces of glitter all around it. I love it! 


I cut a long rectangle from some black paper and added my heat embossed sentiment to the left side which I had cut to a flag shape beforehand. Lastly I added the "Starry Frame" and the cute, cuuuute snowman from Paper Smooches.
I hope you are going to join our "Winter" challenge ;o) Have a lovely week everyone and happy crafting! Yours Maike


Material / supplies:
Stempel / stamps: "Cool Dudes" von Paper Smooches
                              "Snow Dance Mini Set" von Create A Smile
Stanzen / dies: "Star Frame Die" von Avery Elle
                        "Stitched Scallop Basic Edges" von My Favorite Things

Challenges:

Montag, 19. Juni 2017

It is Happy Hour Somewhere

Halli Hallo ihr Lieben!
Das Thema der aktuellen Crafty Cardmakers Challenge lautet "Hallo Sommer" und wenn ich an Sommer denke, denke ich sofort an türkisblaues Meer und einen wunderschönen Strand. Für mich heißt das mehr oder weniger menschenleer mit einer Sitz- oder Liegegelegenheit, damit ich in Ruhe ein tolles Buch lesen kann. Nette Gesellschaft wäre jetzt noch schön, also - wer von euch kommt mit?

Heya my dear crafty friends!
The theme of the current Crafty Cardmakers challenge is "Hello Summer" and when I think of summer, I think about lovely turquoise water and a beautiful beach. For me that means white sand without too many people around, but a nice shady space to sit and read a good book. Nice company would be very welcome though - so who would like to join me there?


Ich habe die beiden Palmen und die Hängematte auf ein weißes Blatt von dem "Perfect Coloring"Papier gestempelt, das ich gerne benutze, wenn ich mit Copics coloriere. Den Rest der Szene habe ich dann "frei Hand" dazu gemalt. Dazu suche ich mir bei google ein Bild, das mir gefällt und nutze das dann als Vorlage. So klappt es dann meist auch mit den Hintergründen. Als nächstes habe ich den lecker aussehenden Cocktail gestempelt und coloriert.

I stamped the two palm trees and the hammock on a piece of white "Perfect Coloring" paper, coloured the images in and added the sea, sky and beach. In order to find a look I liked I did a google search for beach pictures and chose the one that spoke to me the loudest as my inspiration. I really love how it turned out ;o) Next I stamped and coloured the coconut drink.


Die Kartenbasis habe ich komplett mit diesem wunderschönen Papier von My Favorite Things abgedeckt und habe dann das Strandbild leicht schräg erst einmal nur aufgelegt, damit ich den Spruch an die richtige Stelle stempeln konnte. Danach musste ich einfach nur noch alles aufkleben. Dazu habe ich bei allen Teilen - außer dem orangenen und dem grünen Banner - Abstandskleber benutzt. Um noch ein wenig mehr Aufmerksamkeit auf den Spruch zu lenken, habe ich die drei Enamel-Pfeile davor geklebt. Und als allerletzten Schritt habe ich das Meer großzügig beglitzert, damit es ausschaut, als würde sich die Sonne auf der Wasseroberfläche spiegeln. ;o) Ich hoffe, ihr findet das neue Thema genau so klasse wie ich und teilt eure sommerlichen Werke mit uns ;o) Habt eine fantastische Sommerwoche und happy crafting, eure Maike

I decided to cover my card base completely with this lovely striped paper by My Favorite Things and after that was done I lay the coloured piece of paper down at an angle I liked and stamped the sentiment. Now all I had to do was to glue everything to the card base. I used foam tape for most elements - only the orange and green banner pieces were glued to the paper beneath it directly. In order to draw more attention to the sentiment I also added three enamel arrow shaped stickers as well. The last step was to add a lot of shimmer to the sea, so that it would look like the waves catch the sun beams. ;o) I hope you are as excited as me about our new challenge theme at that you are going to join us with your summery creations! Have a great week and happy crafting, yours Maike


Material / supplies:
Stempel / stamps: "Life is good" von Lawn Fawn
                              "Tiki Party" & "BG Chevron Grid Background" von My Favorite Things
                              "Get Outta Town" von Paper Smooches (sentiment)
Challenges:

Samstag, 9. Juli 2016

May all your dreams come true

Halli Hallo ihr Lieben!
Heute möchte ich euch meine Inspirationskarte für den Challenge Up Your Life Blog zum Thema Wasserfarben zeigen:

Heya my dear friends!
Today I would like to share with you the inspiration card I made for the Challenge Up Your Life blog's newest challenge. This time we would like to see you watercolor creations. 


Als erstes habe ich den Hintergrund auf Aquarellpapier gestaltet. Dazu habe ich Peacock Feathers und Worn Lipstick verdünnt und mit einem Pinsel mit der Wet in Wet Technik aufgetragen. Als die Farbe getrocknet war, habe ich etwas Picket Fence auf einen Acrylblock gedrückt und mit einem trockenen Pinsel Tropfen auf das Papier gewischt. Leider sind die nicht ganz so strahlend geworden, wie ich gehofft habe. Werde es wohl beim nächsten Mal mit einer anderen Farbe versuchen. (Falls jemand von euch einen guten Tipp für mich hat, würde ich mich sehr über einen Kommentar freuen.)

First I created the background on some watercolour paper. I watered down Peacock Feathers and Worn Lipstick Distress Ink and used the wet in wet technique to paint them onto the paper. After the ink had dried I put some Picket Fence Paint on an acrylic block and flicked it on the background piece using a brush. Unfortunately it didn't turn out as opaque as I had hoped, so next time I would try a different paint. (If you have a tip for me I would love to read about it in the comments.)


Als nächstes habe ich die Staffelei ausgestanzt und das Einhorn auf die "Leinwand" gestempelt. Coloriert habe ich dieses Mal mit Zig Markern, um das Thema Wasserfarben auch in diesem Element noch einmal aufzugreifen. Mit einem weißen Gelstift habe ich noch ein paar Sterne auf den Hintergrund gepunktet ;o) und anschließend die Wolkenränder ausgestanzt.

Next I die cut the easel and stamped the unicorn on the inside piece. Because this challenge is all about watercolouring I used the Zig markers to colour in the unicorn and the background. With my white gel pen I added some stars to the background and then die cut the cloud borders. 


Das Aquarellpapier habe ich mit starkem, doppelseitigem Klebeband auf die Kartenbasis geklebt, weil es sich ein wenig gewellt hatte und ich aber wollte, dass es ganz glatt aufliegt und dann auch so bleibt. Um den Spruch zu stempeln habe ich mal wieder das MISTI herausgeholt, weil das Papier doch deutlich strukturierter ist, als mein normales Papier. Und dass das eine gute Entscheidung war, hat sich gezeigt, als der erste Abdruck gerade einmal erträglich geworden ist und der zweite dann perfekt geworden ist ;o) Nun blieb nur noch die Wolken und die Staffelei mit Abstandshaltern aufzukleben und die Karte war fertig. Ich hoffe, ihr werdet bei uns mitspielen und uns in den nächsten 2 Wochen eure Wasserfarb-Werke zeigen!

I added the watercolor paper to the card base using some very strong double sided tape, because it had curled a little and I wanted it to lay completely flat. I figured out where I wanted the sentiment to be and used a MISTI to stamp it, because I was afrait it wouldn't stamp correctly because of the rougher texture of watercoloor paper. And I actually had to stamp it twice - so thank you again dear MISTI for saving my card! Now all that was left was to adhere the borders and the easel with foam tape to give the card a little more dimension. Hope you will join us this fortnight and share your watercolour creations with us!

Material / supplies
Stempel / stamps: "Critters Ever After" von Lawn Fawn
Stanzen / dies: "Easel Die" von Paper Smooches
                       "Puffy Cloud Borders" von Lawn Fawn

Challenges:


Montag, 21. März 2016

Happy Easter

Hallo ihr Lieben!
Ich wünsche euch einen guten Start in die Woche! Heute habe ich noch eine Osterkarte, die euch als Inspiration für die neue Challenge von den Crafty Cardmakers dienen soll ;o)

Heya my dear crafty friends!
I hope you are having a great start to your week! Today I would like to share with you my inspiration card for the new "Easter" challenge over at the Crafty Cardmakers blog:


Als erstes habe ich den blauen Hintergrund und die beiden Grashügel aus gemustertem Papier ausgestanzt. Den "Himmel" und den hinteren Hügel habe ich direkt im Anschluss auf die Kartenbasis aufgeklebt und noch schnell die Blume dazugesetzt. Schon lange hatte ich die Idee einen echten Miniholzzaun zu verwenden und diese Karte hat sich förmlich angeboten. Also hab ich's ausprobiert. Mit meiner Zange habe die Holzstäbchen durchgeschnitten und mit Multi Medium Matte aufgeklebt.

I started by die cutting the blue background and the grassy hills from patterned paper. I glued down the "sky" and the "hill" in the back to the card base first and then stuck down the die cut flower to the left side as well. I had this idea of a proper wooden fence on one of my cards for a while now and this seemed to be the perfect opportunity to give it a go. So i did. With my pliers I cut the wooded pieces (little rods?) in half and glued them to the paper using Multi Medium Matte.


Nachdem der Zaun getrocknet war, habe ich den zweiten Grashügel darüber und die Wolken aufgeklebt. Meinen Spruch wollte ich auf einem Osterei haben, also habe ich mir eine meiner neuen Stanzen geschnappt, eines in der passenden Größe ausgeschnitten und dann mit Copics coloriert. (Y00 & R20 und C2 & C0 für die Schattierung) Bevor ich es neben den süßen Hasen geklebt habe, habe ich noch schnell das "Happy Easter" darauf gestempelt. Fertig war meine Karte ;o)

When everything was dry I added the smaller grassy hill, the clouds and the cute little bunny as well. I wanted my sentiment to be on an Easter egg, so I die cut one of my new Easter egg shaped dies coloured it with Copics (Y00 & R20 and C2 & C0 for the shading). Before I adhered it next to the cute bunny I stamped "Happy Easter" on there and my card was done ;o)


Ich hoffe, ihr teilt eure Oster Kreationen mit uns auf dem Crafty Cardmakers Challenge Blog! Happy crafting ;o)

I hope you will show us your Easter creations over at the Crafty Cardmakers challenge blog! Happy crafting ;o)

Material / supplies:
Stempel/ stamps: "Carrot Bunny Digital Stamp" von Gerda Steiner Designs
                           "Springtime Bunnies" von Memory Box
Stanzen / dies: "Blueprints 26" von My Favorite Things
                        "Straight Easter Egg" von Nellie Snellen
                        "Clouds Dies" & "Dainty Flowers Dies" von Paper Smooches


Samstag, 19. März 2016

Frohe Ostern mit Willa / Happy Easter with Willa

Huhu ihr Lieben!
Dieser kleine süße Hase heißt Willa und wie man sieht geht sie gern spazieren ;o) Die Karte habe ich als Inspirationskarte für die neue Herausforderung auf dem Challenge Up Your Life Blog gewerkelt. Das Thema lautet dieses Mal "Häschen":

Hello my dear crafty friends!
May I introduce you to the cute bunny Willa, who loves to be outside and to go for a walk ;o) I made this card for the newest challenge over at the Challenge Up Your Life blog. The topic this time is "bunnies":


Als erstes habe ich den Hintergrund für die Karte gestaltet. Dazu habe ich die Ostereier mit Antique Linen Distress Ink aufgestempelt und mit Copics coloriert. Mit Hilfe der E20er und einem braunen Multi Liner habe ich die Holzstruktur aufgemalt, wobei ich darauf geachtet habe, die obere rechte Ecke heller zu lassen, da ich mir aus der Richtung meine Lichtquelle vorgestellt habe.

I started by creating the Easter egg background. I stamped the eggs with Antique Linen Distress Ink and coloured them using Copic markers. Then I created a paper that looked like wood using E20ies markers and a brown Multi Liner, making sure to leave a highlight at the top right, where I imagined my light source to be.


Mit meinem Skalpellmesser habe ich ein Loch in das Ostereierpapier geschnitten, das groß genug war, dass man es nicht mehr sehen konnte, aber nicht zu groß, damit ich den Rahmen noch darauf festkleben konnte. Aud die Kartenbasis habe ich einen Himmel gewischt (mit dem Ink Blending Tool und einer Wolkenmaske) und 2 Lagen Gras darüber geklebt. Jetzt war es an der Zeit den Spruch zu stempeln und das Papier mit Abstandshaltern aufzukleben. Als letztes habe ich Willa in den Rahmen geklebt. Da ihre Ohren aus dem Rahmen herausschauen und sie als gehendes Häschen gezeichnet wurde, sieht es so aus, als würde sie auf einen zu laufen, wenn man die Karte in den Händen hält.

With the help of my craft knife I cut a hole into the Easter egg panel that was big enough, so that the edges wouldn't be visible, but not too big, so that I would still have enough room for the adhesive. I sponged a sky directly on the card base and added to layers of grass on top. Now it was time to stamp the sentiment and to adhere the panel to the card base using foam tape, to give the card a bit of dimension. Finally I added Willa to the frame. Because her ears are on top of the frame and she is drawn as a walking bunny it actually looks like she is walking towards whoever is holding the card.


Ich würde mich freuen, wenn ihr bei der "Häschen" Challenge mitmachen und eure Werke bei uns verlinken würdet ;o)

I hope you are going to join us for this fun "Bunnies" Challenge over at Challenge Up Your Life ;o)

Material / supplies:
Stempel / stamps: "Willa" von Purple Onion Designs
                            "Frohe Ostern" von Efco
Stanzen /dies: "Frame 4" von Paper Smooches
                      "Grassy Border" von Lawn Fawn


Montag, 14. Dezember 2015

Christmas Series Card # 17 ( Weihnachtsserie Karte # 17 (Let's be Merry)

Halli Hallo ihr Lieben!
Ich hoffe, ihr alle hattet einen schönen 3. Advent und habt euer kreatives Mojo aufgefrischt. Heute startet nämlich bei den Crafty Cardmakers & More eine neue Challenge. Dieses Mal geht es um das Thema "Schnee"! Auf meiner Karte habe ich daher Schneeflocken und einen Schneemann verbastelt:

Hello my dear crafty friends!
I hope you all had a wonderful third advent. (Do you celebrate this where you live?) Today starts a new challenge over at the Crafty Cardmakers & More blog and we are asking for cards with "Snow" on it. For my card I paired some snowflakes with a snowman:


Zuerst habe ich einen schmalen Kreis mit Hilfe zweier ineinandergelegten Kreisstanzen und dann noch viele, viele Schneeflocken ausgestanzt. Als nächstes habe ich den Schneemann von Paper Smooches in hellgrau gestempelt und mit der No-Line-Technik ausgemalt. Da seine Arme leider nicht mehr sichtbar waren, habe ich sie einfach abgeschnitten (autsch...) und ihm welche aus Papier zurechtgeschnitten. Im Nachhinein betrachtet denke ich, dass ich sie in Dunkelbraun noch lieber gehabt hätte, aber ich find ihn auch so ganz knuffig ;o)
First I cut out a thin circle of white paper using two of my circle dies and adhered lots and lots of snowflakes to it. Then I stamped and coloured the cute snowman from a Paper Smooches set with Copic markers using the no-line technique. Because his arms weren't visible at all anymore I decided to cut them off (ouch...) but then reattach new ones that I had cut from paper. I think I would have liked them even better had I cut them from dark brown instead of black paper, but nonetheless I think it turned out okay ;o)


Als der Schneeflockenkranz fertig und gut durchgetrocknet war, habe ich ihn auf die Kartenfront gelegt, um den richtigen Platz für den Kartenspruch zu finden. Nachdem ich den Spruch "Let's be Merry" gestempelt habe, habe ich den Kranz an die richtige Stelle geklebt und den Schneemann mit einem Gluedot oben drauf befestigt. Der Form des hellblauen Papier folgend habe ich die oberen Ecken der Kartenbasis abgeschnitten. Eigentlich wollte ich die Karte so lassen, aber dann hatte ich das Gefühl das noch etwas fehlt. Wenn ich dieses Gefühl habe, helfen mir übrigens fast immer die Sequins von Pretty Pink Posh weiter. So auch hier. Nachdem ich die klaren, weißen und rosa-farbenen Sequins aufgeklebt hatte, war die Karte fertig ;o)

When my snowflake-wreath was done and dry I put it on my front panel to find the right placement for the sentiment. After I had stamped the "Let's be Merry" I glued the wreath and the snowman in place and cut off the upper corners of the card base. I thought I would leave it like that, but my card felt a little too empty for my taste. So I added a few Pretty Pink Posh sequins in clear, white and watermelon.

Material / supplies:
Stempel / stamps: "Cool Dudes" von Paper Smooches
                           "Let it snow" von The Greetingfarm
Stanzen / dies: "Stitched Snowflakes" & "Mini-Snowflakes" von Lawn Fawn
                       "Tags a Lot" von Mama Elephant

Freitag, 4. Dezember 2015

Christmas Series Card # 13 / Weihnachtsserie Karte # 13 (Cozy Christmas)

Hallo ihr Lieben!
Die Temperaturen haben sich ja zum Glück wieder ein wenig nach oben bewegt - trotzdem habe ich Kuscheldecke, Kissen und Plüschsocken schon zurecht gelegt. Ihr auch? Passend dazu habe ich heute eine neue Karte für euch. Wie wäre es einmal mit gemütlichen Weihnachtsgrüßen?

Hello my dear crafty friends!
The temperatures in Germany have been quite low a couple of days back, but fortunately it is getting a little warmer again. However, I do have my soft blanket, pillows and warm socks ready ;o) Today's card fits right in with some cozy christmas wishes:


Als erstes habe ich den Pinguin gestempelt und anschließend mit einer Maske abgedeckt, um die Kissen genau über ihn zu stempeln. Ich wollte erreichen, dass es so aussieht, als würde der Pinguin ganz bequem und gemütlich in den Kissen sitzen ;o) Das Sofa habe ich freihand um die Szene drum herum gemalt und hoffe, ihr habt es als solches erkannt *grins. Als nächstes habe ich mit Hellgrau den Hintergrund auf mein blaues Papier gestempelt und das "Wonky Window" aus dem Papier gestanzt.

I started out by stamping and masking the cute penguin by Purple Onion Designs and stamping the pillows from My Favorite Things right on top. I wanted it to look like the penguin is sitting cozily between those fluffy pillows ;o) I added some texture to the back, that is meant to look like a sofa... I hope you did recognize it *grin. Next I stamped the background stamp on top of my blue panel and cut the wonky window out of it. 


Ich habe das gleiche Fenster auch noch einmal aus rotem Cardstock ausgestanzt und den Rahmenteil ausgeschnitten. Alles, was nun noch zu tun war, war den ersten Teil meines Spruches zu stempeln und zu embossen und den zweiten Teil aus schwarzem Cardstock auszuschneiden und aufzukleben. Und dazu muss ich euch was erzählen... Endlich, endlich habe ich "Stick-it paper" bei mir zu Hause und es benutzt, um das Wort "christmas" aufzukleben. Es war sooo viel einfacher, schneller und außerdem klebt es wirklich sehr zuverlässig. Solltet ihr also "Stick-it" finden, dann gönnt euch welches! Wir alle haben uns doch hin und wieder mal eine nette Kleinigkeit verdient, oder? ;o) Das wäre auf jeden Fall mein Tipp dafür ;o)

I cut the window from a red piece of paper as well and fuzzy cut the frame out and glued it on top of the blue panel. All that was left to do now was to stamp and heat emboss the first part of the sentiment and finish it with a black die cut piece. I have to tell you... I finally got my hand on some StickIt-paper and that makes glueing a word die cut down much, much easier. So if you get your hands on some sheets I think you should treat yourself to it! Don't we all deserve a treat once in a while? ;o)


Material / supplies:
Stempel / stamps: "Frost" von Purple Onion Designs
                            "Merry Christmoose" von My Favorite Things
                            "Jessie's ABCs" von Lawn Fawn
Stanzen / dies: "Peek-a-Boo Wonky Windows" von My Favorite Things
                      "Stitched Rectangle" von Simon Says Stamp

Challenges:
Click To Play

Sonntag, 22. November 2015

Christmas Series Card # 7 / Weihnachtsserie Karte # 7 (Snowmen Couple)

Hallo ihr Lieben!
Heute habe ich eine super schnelle Karte für euch, die meiner Meinung nach aber trotzdem viel her macht. Ich mag ja sehr gerne so ganz klare Karten, falls ihr es noch nicht bemerkt haben solltet *grins ;o)

Hello my dear crafty friends!
Today I am showing you a really quick card, that still has that little something I think. In case you haven't noticed it, I love very clean cards *grin ;o)


Als erstes habe ich das weiße Papier ausgestanzt und dann mit Memento Tuxedo "Gray Flannel" das Schneemannpärchen gestempelt. Habe mich für grau entschieden, weil ich schwarz als Umriss bei dem Motiv zu dunkel fand. Nachdem ich die beiden mit Copics ausgemalt hatte, habe ich mit meinem Powder Tool die Fläche um sie herum "bearbeitet". Dabei wird ein leichter Puder auf das Papier aufgetragen, damit eventuelle statische Aufladungen verschwinden und das Embossing Pulver wirklich nur an den gestempelten Stellen haftet. Beim Stempeln habe ich darauf geachtet, dass einige Schneeflocken über den Rand der Schneemännchen ragen. So sieht es natürlicher aus. Für diesen wundervollen Schimmer habe ich "Silver Pearl Super Fine" Embossing Pulver von "Wow!" benutzt.

First I cut out the panel and then stamped the pair of snowmen in Memento Tuxedo "Gray Flannel" Ink, because I wanted to do some Copic colouring, but I didn't want that harsh black outline this time. After I had coloured the two cuties in I prepped my panel with my powder tool and stamped the snowflakes in Versamark Ink, making sure I overlapped them with the image in a couple of places. I used "Silver Pearl Super Fine" embossing powder from "Wow!" which gives the snowflake a really nice shimmer.


Als nächstes habe ich den Kartenspruch ("Warme Winterwünsche") mit meinem "Grey to Black" Ombre Ink Stempelkissen von Hero Arts unter das Schneepärchen gestempelt. Als ich das Papier auf die graue Kartenbasis gelegt habe, hatte ich aber noch immer das Gefühl, als würde etwas fehlen. Daher habe ich mit einem weißen Gelly Roll Stift die Linien auf Höhe des Spruchs gezogen. Die Karte lässt sich übrigens super mit der Post verschicken, da sie ja fast eine "One-Layer card" ist. I hoffe, euch gefällt die Karte und ich konnte euch ein bisschen inspirieren ;o)

Now I added the sentiment below the snowmen using my "Grey to Black" Ombre Ink pad from Hero Arts. When I put the panel on the grey card base I felt that something was missing, so I added the white lines with my Gelly Roll Pen to give the area with the sentiment a bit more interest. This is a very easy to mail card, because it is almost a one layer card, but there are still a lot of things going on ;o) Hope you enjoyed this card and that I could inspire you today ;o)


Material / supplies:
Stempel / stamps: "Cool Dudes" von Paper Smooches 
                           "Let it Snow" von Simon Says
Stanze / die: "Sunshine Layers Die" von WPlus9
Coloured with: Copics

Sonntag, 8. November 2015

Christmas Series Card # 2 / Weihnachtsserie Karte # 2 (No stamping)


Halli Hallo ihr Lieben!
Als zweites Werk der Serie möchte ich euch nun eine Karte zeigen,  für die ich nicht einen einzigen Stempel benutzt habe und die sich daher recht zügig reproduzieren lässt:

Hello my dear crafty friends!
In this second post of my series I would like to show you a card for which I didn't need a single stamp and which can be reproduced were quickly if need be:


Zuerst habe ich mein Papier zurechtgeschnitten und so gefalzt, dass ich eine Top-Folding Karte bekomme, also eine, die sich nach oben hin öffnen lässt. Dann habe ich das Wort "Merry" aus der Kartenvorderseite herausgeschnitten - naja, eigentlich eher alles außer den Buchstaben ausgestanzt. Als nächstes habe ich ein gemustertes Papier auf die gleiche Größe wie die Karte geschnitten und hinter die Vorderseite geklebt. Einerseits sieht man so das Muster und andererseits stabilisiert das Papier die Karte.

First I cut and folded my cardbase and die cut the "Merry" from it - well, the negatives of the letters would describe it more accurately. Next I cut a piece of paper to the same size as the card front and glued it behind the front of the card. That way it stabilizes the card base and also provides a pretty design for the card.


Danach habe ich das Wort "christmas" zwei Mal aus weißem und einmal aus einem roten Papier mit Pünktchen ausgeschnitten und zusammengeklebt. Dadurch wird es so dick wie ein Chipboard-Element und macht richtig was her auf der Karte. Um dem Design noch etwas mehr Festlichkeit zu verleihen habe ich die Blätter und Beeren vom Ilex ausgestanzt und mit Copic Markern coloriert. Sie habe ich links über das "Merry" geklebt, damit das Auge von oben links nach unten rechts wandern kann. Das Design wirkt so in der Regel recht ausbalanciert. Zum Schluss habe ich mit einem Lineal die schwarze Linie außen herum gezeichnet und auf die Beeren "Diamond Stickles" aufgetragen.

Next I die cut the word "christmas" two times from white and one time from a red designer paper and glued all the pieces together. That way it feels almost like a chipboard element and has lots of dimension on the card. To bring in a little more festiveness I cut out some holly leaves and berries and coloured them in using Copics. I glued them more to the top left, so that the eye can wander from the top left to the bottom right. This is a design tip I learned along the way and I find that it really helps to balance a card out. To finisch this card I drew a black line around the card and also added some "Diamond Stickles" to the berries.


Material / supplies:
Stempel / stamps: none
Stanzen / dies: "Merry" von My Favorite Things
                       "Christmas Words 2" von Paper Smooches

Denkt daran, dass es einen Gutschein zu gewinnen gibt ;o) Infos findet ihr im Post zur ersten Karte: hier. :o)
If you'd like the chance to win a $25 gift card and haven't done so already, go and check out card # 1: here.

Challenges:
Stempelküche "Keine Stempel"

Time Out Challenges "Christmas"
Addicted to stamps and more "Clean and Simple"
Fab n Funky Challenges "Die cuts and / or Punches"
Crafting With Friends "Anything goes"

Freitag, 25. September 2015

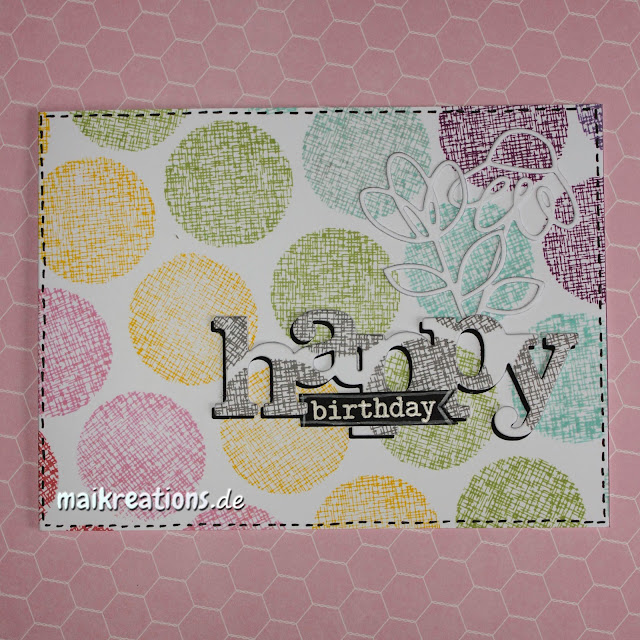
Happy birthday Rainbow dots / Geburtstagskarte

Hallo ihr Lieben!
Heute gibt es mal eine kleine Pause von all den niedlichen Tieren und statt dessen eine recht grafische Karte:

Heya my dear crafty friends!
Today there will be no cute animal on my card for a change. Instead this is a rather graphic card:


Den Stempelkreis mit Leinenstruktur (?) habe ich diagonal über meine gesamte Kartenbasis gestempelt und dabei die Farben in der Reihenfolge der Regenbogenfarben gewählt. In der Regel benutze ich bei schrägem Stempeln für die erste Reihe ein Lineal und stempel am Rand entlang. Den Rest mache ich dann Pi mal Daumen ;o) Während die Tinte trocknete, habe ich das Wort "happy" einmal aus schwarzem und einmal aus weißem Papier ausgestanzt und so übereinandergeklebt, dass ein schmaler schwarzer Rand zu sehen ist. Das Stanzteil habe ich danach dort auf die Karte gelegt, wo ich es am Ende haben wollte und habe mit dem gleichen Stempel wie zuvor noch einmal in dunkelgrau dort abgestempelt, wo das Wort die bunten Kreise verdeckt hat. Um meine Kartenbasis zu schützen, habe ich ein Stück Plastik dazwischengelegt, das ich danach einfach sauber wischen konnte.

I stamped the circle with the burlap structure to create a diagonal line of dots across my card base following the rainbow order. Usually I use a ruler to stamp my first row (here is was the yellow one) along the edge of it to end up with a straight line and then eyeball the other rows. While the stamping dried I cut out the word "happy" from white and black cardstock. I glued them together, so that there was a bit of a black outline visible under the white die cut and placed it on my card where I wanted it to end up. Then I took the same stamp again and stamped on the word die, where the coloured dots were. To protect my card yet be able to see where I needed to stamp I used a piece of acetate beneath the die cut which I could simply wipe clean after using it.


Nachdem ich das ausgestanzte und bestempelte Wort aufgeklebt hatte, habe ich die Blumen und das schwarze "birthday"-Fähnchen aufgeklebt. Für Letzteres hatte ich den Spruch mit Versamark gestempelt und dann mit weißem Embossingpulver embossed. Die Linie außen herum habe ich mit einem Kreisemarker von Stampin Up dazugezeichnet.

After I glued the word die in place I added the outline-flower die cuts and also the black birthday tag. I had heat embossed the word in white and added the line around it using a chalk marker from Stampin Up.


Material / supplies:
Stempel / stamps: "Flower Circles" von Waffle Flower
                            "The Big, the Bold and the Happy" von Winnie & Walter

Stanzen: "In a Word: Happy Cutaway" von Winnie & Walter
              "Dainty Flowers" von Paper Smooches

Sonntag, 12. Juli 2015

Best Fishes

Hallöchen zusammen!
Heute habe ich eine Karte für euch, auf der ihr Distress Inks, Copic Colouring und Embossing findet. 

Hello everybody!
Today I'd like to show you a card where I have used Distress Inks, Copic colouring and heat embossing.


Als erstes habe ich meine Distress Ink Pads in den Farben "Tumbled Glass", "Broken China" und "Peacock Feathers" horizontal über mein Papier gewischt, so dass es aussieht wie Wellen. Dazu habe ich die hellste Farbe oben benutzt und bin nach unten hin immer dunkler geworden. Mit einem Pinsel habe ich anschließend die komplette Fläche mit Farbe gefüllt, habe aber darauf geachtet, dass ich die Konturen soweit es ging behalten habe. Als ich mit dem Farbverlauf zufrieden war, habe ich mit Hilfe des Pinsels Wasser aufgetropft, einen Moment gewartet und das Ganze dass mit einem trockenen Tuch vorsichtig wieder abgetropft. So entstehen die helleren Punkte, die Aussehen wie Luftblasen. 

First I got out my Distress Ink pads in the colours "Tumbled Glass", "Broken China" and "Peacock Feathers" and swiped them over my water colour paper horizontally, so that it looked like waves. I started with my lightest colour for the top part of the paper and worked my way to the darkest colour for the bottom part. Using a brush I pulled the colour from the swipes to fill in the whole paper. I made sure that I kept as much as I could from the wave shapes though. After everything was filled in I flicked some water on top of my background piece, let it sit for a minute and then took it off with a dry towel. That way you get these cool bright spots that look like air bubbles in the water.


Danach habe ich den Hintergrund in Form gestanzt und den Spruch "Best fishes" (in Anlehnung an "Best Wishes" - beste Wünsche) mit Versamark aufgestempelt und weiß embossed. Zum Schluss kamen noch die niedlichen Meeresbewohner von "Sweet Stamp Shop" dazu, die ich schon vor ein paar Tagen mit meinen Copics für #thedailymarker30day2 Challenge ausgemalt hatte.

Then I die cut the nice background shape, added the embossed sentiment and also the sweet fish and other critters from the sea from "Sweet Stamp Shop" which I had already coloured for #thedailymarker30day2 challenge a couple of days back. 


Material / supplies:
Stempel / stamps: "Fishy" von Sweet Stamp Shop
                           "Mini Monograms" von Paper Smooches ("best")
                           "Alphabet Lower Case 1" von Habico ("fishes")

Stanze / die: "Sunshine Layers Die" von WPlus9

Freitag, 29. Mai 2015

Mask-erade cards part 1 / Teil 1 meiner Karten für Mask-erade

Hallöchen zusammen!
Heute zeige ich euch mal ein paar Karten in einem Post und werde daher nicht so sehr ins Detail gehen können. Solltet ihr aber Fragen haben, dann immer her damit ;o)
Meine erste Karte folgt dem MFT Sketch für die aktuelle Challenge und das Tag hatte ich maskiert, um Platz für meinen Spruch zu haben. 

Heya dear friends!
Today I will show you a few cards in one post, so I won't be able to mention all the steps I took creating these cards. However, if you have questions, please feel free to ask ;o)
I made this first card with the MFT Sketch for the current challenge in mind and also used some masking to have an area reserved for my sentiment. 


Material / supplies:
Stempel: "Love you tons", "birthday tags" & "bon voyage" von Lawn Fawn
Stanzen / dies: "Die-namics Stitched Rounded Rectangle STAX" von My Favorite Things

Challenges:
MFT Sketch Challenge

Simon Says Wednesday Challenge "Anything goes"
Addicted to stamps and More! "Anything goes"
Seize the birthday "Anything goes"


Und nun zu meiner zweiten Karte heute. Dafür habe ich die Technik benutzt, die Debbie Hughes für ihre Karte an Tag 1 benutzt hat, bei der man sich eine Maske mit einem Kreis in der Mitte erstellt und durch diesen die Tinte auf das Papier aufbringt. Nachdem alles getrocknet ist, kann man dann den ausgestanzten Kreis als Maske benutzen und drum herum Blumen oder andere kleinere Motive stempeln. Wie gesagt, ich mochte die Karte sehr gerne und habe versucht sie zu reproduzieren. Versucht ist dabei das ausschlaggebende Wort... Es lief alles gut und sah toll aus, bis ich die letzten Blumen gestempelt habe und die Maske aufgegeben und Tinte durchgelassen hat. Ich konnte meine Karte retten, indem ich einen Kreis aus vorher eingefärbtem Cardstock ausgestanzt und das dann über den Originalkreis geklebt habe. Dabei verliert man allerdings den 1-Layer-Look, der eigentlich das Besondere an dieser Technik ist. Trotzdem wollte ich die Karte mit euch teilen, um euch vielleicht davon abzuhalten den gleichen Fehler zu machen wie ich und um zu zeigen, dass man die meisten Fehler irgendwie wieder hingebogen bekommt ;o)
 
On to my second card for today! I used the technique we were shown on day 1, where you first put ink over a mask with a circle cut out of it and next - after the ink has dried - you put a mask over that circle and then stamp little elements around it. I liked the design of Debbie Debbie Hughes' card and tried to replicate it... Tried being the operative word here. It all went well until I stamped the last flowers and leaves, because by that time my (much too thin mask) had given up and let some ink through. I could save my card somewhat by colouring a piece of paper and then die cutting the circle out of it and then putting it on top of the original circle shape. However you loose the one layer design and it doesn't look as interesting anymore. I wanted to share this with you anyhow, because I thought I could help you avoid the mistake I made and maybe even show you that even if you have made a mistake you can almost always fix it ;o)


Material / supplies:
Stempel/ stamps: "Reflections" von Paper Smooches
                          "Milo's ABCs" von Lawn Fawn
Stanzen / dies: "Stitched Circles" von Simon Says Stamp


Challenges:


Hier könnt ihr meinen Fehler sehen...
Here you can see my little mishap...

Karte Nummer 3 ist eine Trauerkarte... Nie ein schönes Thema, aber wenn ich eine machen muss, hilft es mir immer, wenn ich ein wenig Inspiration bekomme. Immerhin geht es bei einer Trauerkarte ja darum, Anteilnahme zu zeigen und da finde ich es noch wichtiger als bei den anderen Kartenarten das passende für dem Empfänger zu finden.

Card #3 is a sympathy card... Never a very nice topic, but whenever I have to make one, I look for inspiration from other card makers. In my opinion it is even more important that a sympathy card suits the recipient and the circumstances, than all the other types of cards, because we want to show that we care, right? So here is my card number 3:


Material /supplies:
Stempel / stamps: "In Gedanken bei dir" von Stampin Up (Sentiment: "Our sincere condolences")
                            "Romantic Script Background" von My Favorite Things
                            Feather is from a fair and there was no name on the package and the provided link doesn't work,
                            so I won't be sharing it here. Sorry, guys!


Das war's für heute! Danke, dass ihr auf meinem Blog vorbeigeschaut habt! Viel Spaß beim Basteln ;o)
That was it for today! Thank you for stopping by! Happy crafting ;o)
Related Posts Plugin for WordPress, Blogger...