Posts mit dem Label Congrats werden angezeigt. Alle Posts anzeigen

Montag, 2. Juli 2018

Happy Birthday Birdies

Halli Hallo zusammen!
Heute startet bei den Crafty Cardmakers wieder eine neue Challenge. Kramt schon einmal eure Stanzen hervor, denn wir wollen "Mindestens 2 Stanzteile" auf euren Werken sehen. Ist machbar? Dann mal ran ;o) Findet ihr alle Stanzteile auf meiner Karte?

Heya dear crafty friends!
A new challenge at the Crafty Cardmakers has started today and if you would like to participate you should get out your dies and punches, because we would like to see you use "At Least 2 Dies or Punches" on your projects. Can you find all the different die cut pieces I have used on my card?


Den Rahmen habe ich einmal aus blauem und einmal aus grünem Papier ausgestanzt und später aus Letzterem noch die sanften Grashügel ausgestanzt. Dann habe ich noch den Zaun und viel Wolken ausgestanzt. Die süßen Piepmätze sind von Gerda Steiner, aber die sind einfach nur per Hand ausgeschnitten, damit ich sie auf dem Zaun platzieren konnte.

I die cut the frame twice, once from blue and another time from green paper. I die cut the grass or hill border as well as the fence and four clouds. The cute birdies are from Gerda Steiner, but they are not die cut but fussy cut by hand so that I could place them on top of the fence.


Es wäre toll, wenn ihr Lust hättet eure Karte bei uns einzustellen und mit uns zu teilen. Habt eine tolle Woche und happy crafting, eure Maike ;o)

I hope you are going to join us! Have a wonderful week and happy crafting, yours Maike ;o)


Material / supplies:
Stempel / stamps: "Febuary / March Digital Stamp Bundle" von Gerda Steiner Designs
Stanzen / dies: "Small Stitched Rectangles" von Lawn Fawn
                         "Puffy Clouds" von My Favorite Things
                         "Fence die" von La La Land Crafts (discontinued?)

Montag, 4. September 2017

Congratulations Panda


Halli Hallo ihr Lieben!
Zu monochromen Karten – dem Thema unserer neuen Challenge bei den Crafty Cardmakers - fallen mir immer als erstes Trauerkarten ein, aber danach stand mir so gar nicht der Sinn. Deshalb dachte ich, ich gehe mit meiner Karte einfach mal in die komplett andere Richtig: pink statt grau oder schwarz und Freude statt Trauer. Das ist dabei herausgekommen:

Heya my dear crafty friends!
When I think about monochrome cards – which is the theme of our newest challenge over at the Crafty Cardmakers - I usually think of condolence cards first, but I didn't feel like making one of those. That is why I decided to go in a completely opposite direction: pink instead of black and joy instead of grief. This is the result:


Angefangen habe ich mit dem gewischten Hintergrund in "Ultra Pink", wobei ich darauf geachtet habe, dass die Fläche etwas größer war, als der Herz-Rahmen, damit er sich nachher deutlich abheben könnte / kann.  Als die Farbe getrocknet war, habe ich den Herzrahmen direkt auf den pinken Kreis geklebt und den Panda hineingestellt.

I started by applying "Ultra Pink" ink to the card base, making sure, the coloured area was big enough for the heart frame. After the ink was completely dry I adhered the circle frame directly to the pink space and added the panda to it. 


Anschließend habe ich ein Stück Papier mit der gleichen Stempelfarbe eingefärbt und daraus die kleinen Herzchen gestanzt. Für den Spruch habe ich dieses Mal das MISTI benutzt, obwohl ich sonst oft genug zu faul bin es rauszuholen, aber da die Linie des Stempels recht dick ist, wollte ich eine vernünftige Deckung erreichen. Tatsächlich habe ich auch zwei Mal stempeln müssen, damit es gut aussah. Die Herzchen habe ich dann um das Gestempelte herum verteilt und dann war meine Karte fertig. Ich hoffe, euch gefällt meine Karte und dass ihr nun vielleicht auch Lust bekommen habt eine monochrome Karte zu basteln. Habt eine wundervolle Woche ;o) Happy crafting ;o) Eure Maike

Next I coloured a piece of paper with the same pink ink I had used for the background and die cut the little hearts from it. I stamped the sentiment twice with the help of the MISTI, because I wanted it to be nice and black and added the hearts around it. I hope you like the card and that you feel inspired to create a monochrome card yourself. Have a great week everyone ;o) Happy crafting, yours Maike


Material / supplies:
Stempel / stamps: "Happy Pandas" von My Favorite Things
                             "Whatnot Sentiments Nine" von Your Next Stamp
Stanzen / dies: "Heart Frame Elle-ments" von Avery Elle

Montag, 5. Juni 2017

You are one smart kitty - Congrats card

Halli Hallo ihr Lieben!
Heute gibt es endlich mal wieder einen Post von mir... Tut mir wirklich Leid, dass ich mich so lange nicht gemeldet habe, aber mein Bruder hat vor Kurzem geheiratet und als seine ältere Schwester konnte ich es mir natürlich nicht nehmen lassen (zusammen mit meinen beiden neuen Schwagern) die Feier noch ein wenig zu pimpen ;o) Das und die anstehenden Zeugnisse haben mich mehr in Beschlag genommen, als ich es gedacht hätte. Aber nun sollte es wieder regelmäßig etwas zu lesen und schauen geben hier auf dem Blog! Den Anfang macht die Karte die ich für die neue "For a special man" - Challenge der Crafty Cardmakers gebastelt habe:

Heya my dear crafty friends!
Today there is finally a new post from me... I really would like to apologize for me being so quiet for the last couple of weeks. My brother's wedding wasn't too long ago and also I am in the process of writing the reports for my students which all in all took so much more time than I'd ever had anticipated. However, I am sure I'll be able to post more frequently again and this card, that I created for the new "For a special man" challenge at the Crafty Cardmakers, marks the beginning of this new era ;o)


Diese Karte ist wirklich recht schnell gemacht. Die süßen Mama Elephant Stempel sind durch ihre unschnörkelige Form schnell ausgemalt (ich habe Copics benutzt) und die Mauer habe ich mit Hilfe einer Schablone gewischt. Am zeitraubendsten am Hintergrund war beinahe schon das Hineinmalen von Unebenheiten in die Steine (mit Copic Markern in W1 und W00), aber auch das hat höchstens zwei bis drei Minuten gedauert.

It is a quick and easy card with these cute Mama Elephant images that are very easy to colour and the background being made with a stencil. I used Copic markers in W1 and W00 to add some roughness to the stones, but that only took a couple of minutes.


Die Katze samt Hut habe ich flach auf die Karte geklebt und nur den Bücherstapel mit Abstandshaltern hochgestellt. Anschließend habe ich noch die Linie oben und unten sowie den tatsächlichen Kartenspruch gestempelt. Mit den Linien wollte ich mal etwas anderes machen, als meine normalen (gestrichelten) Linien oder den Gebrauch von Washitape und finde es passt ganz gut. Was meint ihr? Falls ihr nun total inspiriert seid auch ein Projekt für einen wichtigen Mann in eurem Leben zu basteln, würde ich mich freuen, wenn ihr eurer Projekt auf dem Crafty Cardmakers Blog verlinken würdet ;o) Habt noch einen ruhigen, schönen, aufregenden, entspannten und tollen (Feier)-Tag, eure Maike!

I glued the cat with its hat directly to the card and only put foam tape behind the stack of books. Afterwards I stamped the line of words at the top and the bottom of the card and also added the main sentiment. These lines were an attempt to use something different than faux stitching lines or Washi tape to add interest and I think it works really well with this design. What do you think? In case you feel inspired now to create a project for a special man in your life I would love to see it in the Crafty Cardmakers gallery ;o) Have a great start to your week and enjoy the bank holiday if you have one as luckily we do here in Germany, yours Maike!


Material / supplies:
Stempel / stamps: "Page Huggers" von Mama Elephant
                              "Smart Kitty" von W Plus 9
Schablone / stencil: "Brick Wall" von tba

Challenges:
Simon Says Wednesday Challenge "Anything Goes"
Addicted to CAS "Codeword Graduation"
A Gem of A Challenge "For the Boys / Men"
Send a Smile 4 Kids "Anything Goes"
Craft Rocket Challenges "For the MEn /Boys"
Moving Along With The Times "Graduation"


Montag, 24. April 2017

Hochzeitswünsche im Vintage / Modern Mix

Hallo ihr Lieben!
Bei den Crafty Cardmakers startet eine neue Challenge mit dem Thema "Gems und Perls" für euch. Nuuuun, das ist nicht unbedingt meine starke Seite, wenn es ums Kartenbasteln (und auch sonst) geht, aber ich habe mit zwei Perlen einen, wie ich finde, schönen Akzent setzen können. Ohne diese Challenge hätte ich vermutlich nicht mal in meine Perlenkiste (hihi) hineingeschaut. Aber seht selbst:

Heya my dear crafty friends!
The Crafty Cardmakers have a new challenge for you ;o) This time our theme is "Gems and Pearls", which isn't really my strong suit when it comes to cardmaking, but I added a lovely details or so I think withtwo pearls to my card. Without this challenge I would probably not even have thought about having a look in my pearl-box (hehe). Have a look yourself:


Die Einladungskarte des Paares war überwiegend rosa und daher wollte ich diese Farbe auch in der Glückwunschkarte aufnehmen. Das Hochzeitspaar habe ich direkt auf die Kartenbasis gestempelt und anschließend Transparentpapier darüber geklebt, um sie ein wenig in den Hintergrund treten zu lassen - den Effekt finde ich wirklich ganz klasse, wenn ich das selber so sagen darf ;o)

The invitation we got was mainly pink so I thought I'd stick to that colour for our congratulations card. I stamped the couple directly to the cardbase and added some vellum over the stamped image, so that the people would be a little more in the background. I really like the effect, if I may say so mayself ;o)


Und unten rechts sieht man dann auch noch die beiden Perlherzen, die für mich das Hochzeitspaar symbolisieren. Vielleicht kramt ihr ja auch einmal in eurer Perlen-Kiste und habt Lust etwas damit zu basteln? Dann habt ihr 2 Wochen Zeit euer Projekt bei den Crafty Cardmakers zu verlinken. Ich freu mich schon darauf, durch die Perlen- und Juwelenbesetzten Werke zu stöbern. ;o) Happy crafting, eure Maike

In the right bottom corner you can see the two heart shaped pearls I have used. For me they symbolize the wedding couple.. Maybe you feel inspired to create a project with some pearly or gems, too?! Then I would love for you to link them to our gallery at the Crafty Cardmakers ;o) Happy crafting, yours Maike


Material / supplies:
Stempel / stamps: "Hochzeit Glückwunsch" von Klartext (Dani Peuss)
                              "Happy Wedding" von Lawn Fawn
Stanzen / dies: "Stitched Arch Stax" von My Favorite Things

Challenges:
A Gem of a Challenge "Ribbon or Lace" (hope the sticker lace counts)
As you like it "Favorite Colour and why?"
(I really like pink shades and it is also the bride's favourite colour)
Crafty Addicts "Anything Goes"
Creative Knockouts "Lots of Layers"

Donnerstag, 23. März 2017

Hooray!!!

Hallo meine Lieben!
Heute möchte ich noch mit euch - leider etwas verspätet - meine Karte für die aktuelle Challenge bei CUYL mit euch teilen. Das Thema lautet dieses Mal "Chevron":

Heya my dear crafty friends!
Today I would like to share with you - unfortunately a little belatedly - my card for the new challenge at CUYL. The theme this time is "Chevron" :


Es ist eine Karte für die Lehramtsanwärterin an meiner Schule, die vor Kurzem sehr erfolgreich ihr zweites Staatsexamen bestanden hat. Das Chevron-Papier habe ich sowohl für den unteren Teil der Karte, als auch für das Banner benutzt. Letzteres habe ich mit Copics noch ein wenig nachschattiert, damit es nicht zu flach im Vergleich mit den süßen Tieren aussieht.

This card was made for the teacher in training at our school who aced her final exam a while ago. I used chevron patterned paper for the bottom part of my card as well as for the banner. For the latter I used Copics to give it a bit more dimension.


Zum Colorieren habe ich Winsor & Newton Wasserfarben benutzt, die weniger deckend sind als zum Beispiel Gansai Tambis und zudem noch sehr gut mit Wasser reagieren - so habe ich die Wolken für den Hintergrund "gemalt". Ich hoffe, euch gefällt die Karte und vielleicht habt ihr ja auch noch Chevron Papier zu Hause im Regal oder gestaltet euer eigenes Muster und teilt euer Werk dann auf Challenge Up Your Life ;o) Habt eine tolle Restwoche und happy crafting ;o)

The colouring medium I used for the rest of the card are Winsor & Newton watercolours. They are less opaque than Gansai Tambi watercolours and they react really well with water - that is how I created the clouds in the background. I hope you like the card and maybe you'll find some chevron paper and show us your card with it. (Or you create your own pattern?!) Happy crafting, everyone ;o)


Material / supplies:
Stempel / stamps: "Itty Bitty Welcoming Committee" von Neat and Tangled
Stanzen / dies: "Stitched Basic Scallop Edges" von My Favorite Things
                         "Small Stitched Rectangle Dies" von Lawn Fawn

Challenges:
Simon Says Stamp Wednesday Challenge "More than one Die or Punch"
Stampavie and More "Paper Piecing"
Crafty Addicts "Add a Sentiment"
QKR Stampede "Congratulations"
Cute Card Thursday "Spring Fever"

Dienstag, 7. Juni 2016

Jessas Hochzeitskarte / Jessa's wedding card

Hallöchen zusammen!
Ich hoffe, ihr hattet einen guten Start in die Woche ;o) Ich weiß nicht, ob ihr es wusstet, aber die liebe Jessa von "Useless Trinkets" hat vor Kurzem geheiratet und die Herstellung ihrer Hochzeitskarte fiel genau in den Zeitraum, in dem ich meine Inspirationskarte für die neue PINspirational Challenge werkeln wollte. Das Bild zeigt Vögel in einem Nest und bei Nest habe ich an ein Zuhause gedacht, bei Zuhause an Geborgenheit, bei Geborgenheit dann an Liebe und von Liebe bin ich zurück zur Hochzeit von Jessa gekommen. Das erklärt dann sicherlich auch, wie es zu dieser Karte kam:

Heya everybody!
I hope you had a good start to your week ;o) I don't know if you knew, but the lovely Jessa from "Useless Trinkets" got married in May and the making of her card happened, when I started thinking about the inspiration card for the new PINspirational Challenge. The inspiration pic shows some birds near their nest and my thought process suddenly went from nest to home to a feeling of security to love and from there right back to Jessa's wedding. This seems to be the reason why I came up with this card:


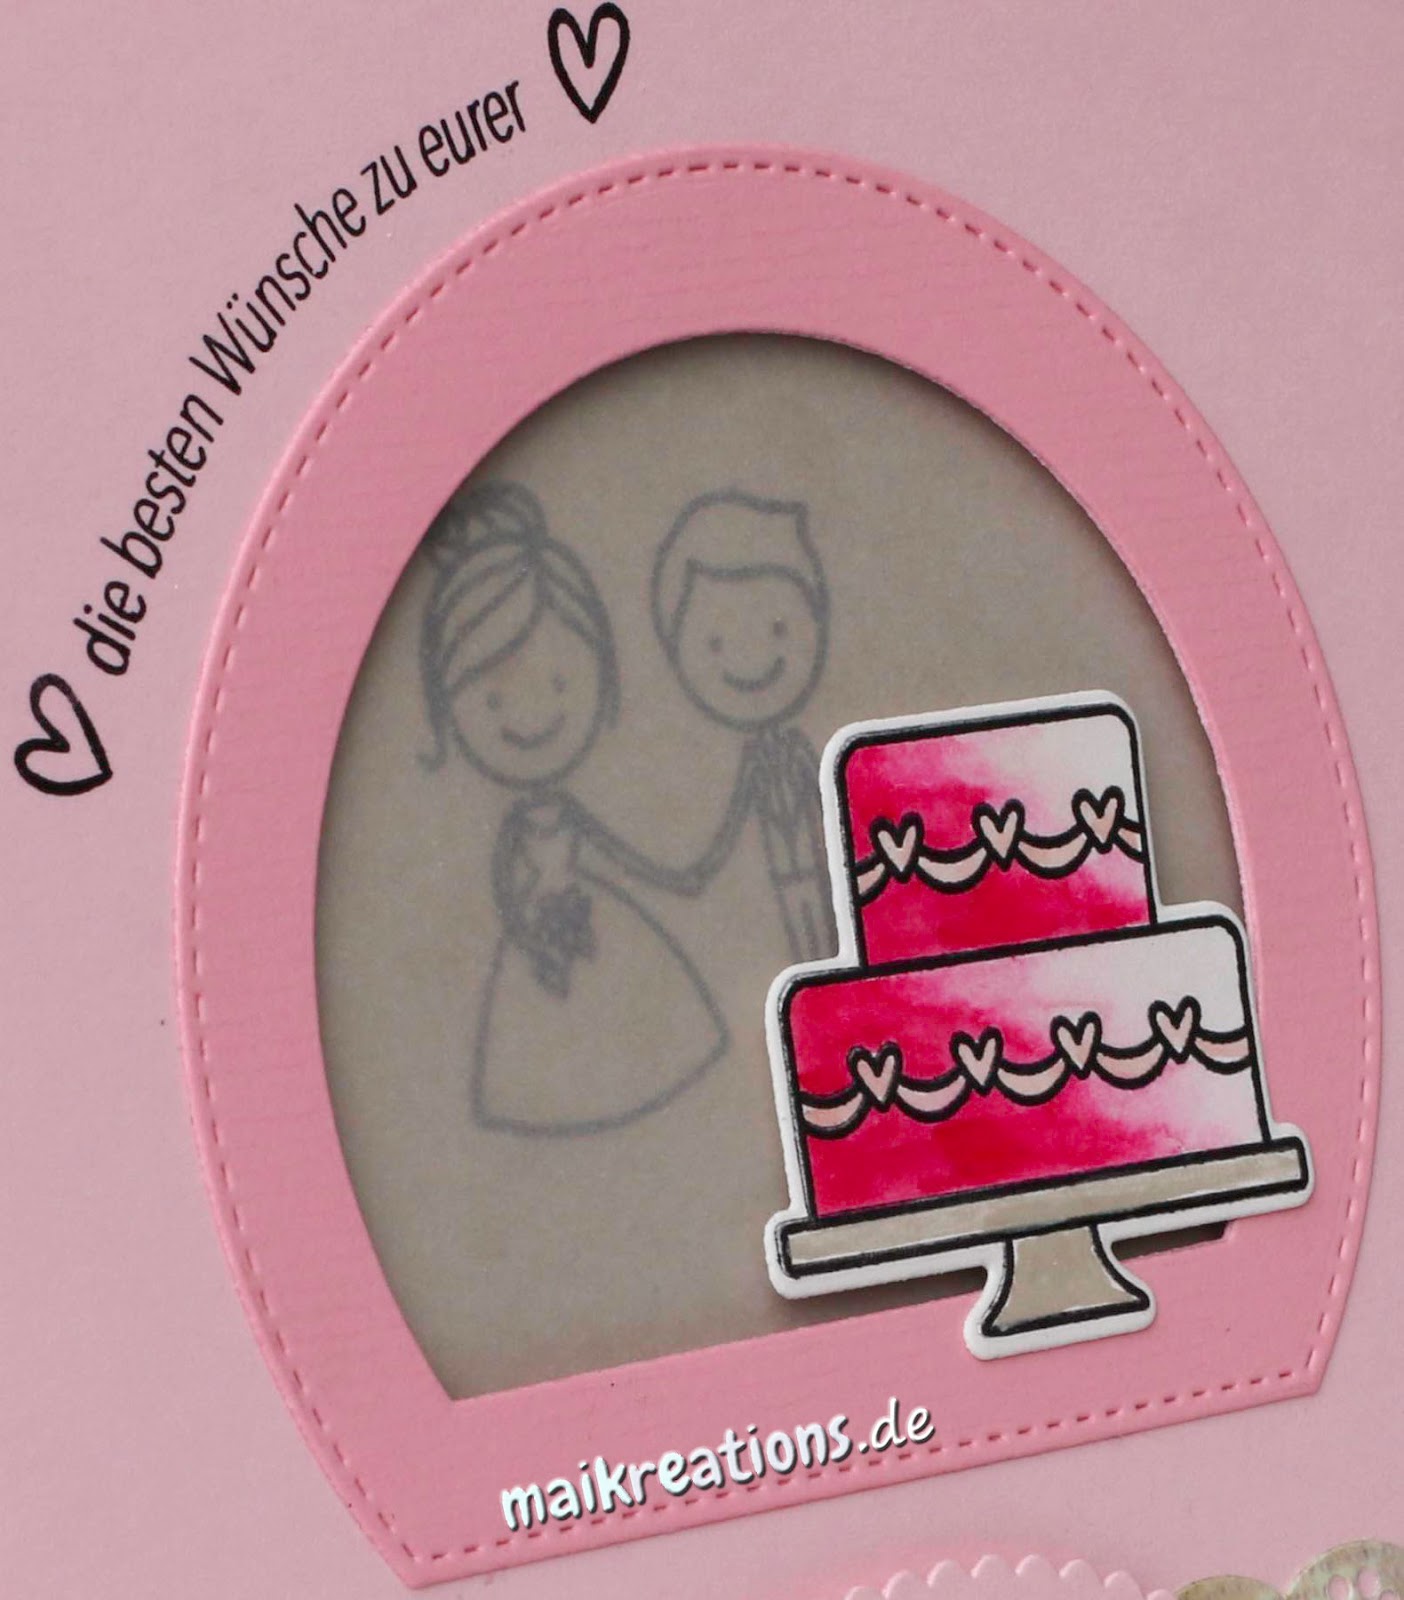
Erst wollte ich Jessa ja eine Monster-Hochzeitskarte machen ( - wer mit ihren wunderbar humorvollen Werken vertraut ist, weiß sicherlich warum und wer sie nicht kennt, sollte schnell mal bei ihr vorbei hüpfen). Aber da ich keine Monsterchen habe, hoffe ich, dass sie sich auch über die Piepmätze gefreut hat ;o) Bei dem Design habe ich mich an ihren Gäste-Goodies orientiert. (Falls ihr möchtet, schaut sie euch doch mal hier auf Jessas Instagram-Account an.)

First I wanted to make a card using monsters (and if you know Jessa's wonderfully and humorous cards, you will certainly know why and if you aren't familiar with her projects I highly recommend taking a look at them). Unfortunately I don't own any monster stamps, so I hope she likes those little love birds, too ;o) The design of my card loosely follows her design of the gift bags for her guest. (If you are interested in comparing those designs and in getting to know Jessa's work a little better, why not also take a look here at her instagram account?!)


Und nun zum Karten-Rezept: Als erstes habe ich die Schneekugel, die Vögelchen und die Torte gestempelt und mit Zigs coloriert, weil ich einen recht soften Look für die Karte haben wollte. Als nächstes habe ich dann alles ausgeschnitten und mit weißem Embossingpulver noch einen Spruch auf den Sockel der Schneekugel hinzugefügt. Danach habe ich das karierte Muster auf Vanille-farbenes Papier gestempelt, es auf die richtige Größe geschnitten und das Stück Glitzertape oben angebracht - genauso, wie Jessa auf ihren Gastgeschenken. Allerdings habe ich mich für ein goldenes Tape entschieden, statt ein pinkes zu benutzen ;o) Alles, was nun zu tun war, war alles an die richtige Stelle zu kleben. Ein kleiner Trick, der das Leben eines jeden Crafters leichter macht, hat mir dabei geholfen: Die Füße der Vögel habe ich nicht ausgeschnitten, weil mir das zu fisselig ist. Stattdessen habe ich die beiden an die Stelle gestempelt, wo sie stehen sollte und dann die Körper einfach nur noch auf die Beinchen drauf geklebt. Viel einfacher so ;o)

Now to the card-recipe: I stamped the snow globe, the birds and the cake all seperately and coloured them with Zig markers, because I wanted to achieve a rather soft look. Next I fussy cut all of them out and added the sentiment with white embossing powder to the bottom part of the globe. Afterwards I stamped a grid pattern on some vanilla coloured cardstock, cut it to size and added a piece of glitter tape to the top, just as Jessa did on her gift bags. I used a golden colour instead of a bright pink one though ;o) Now all that was left to do was to assemble the card. A little trick to make a crafter's life easier helped me: I didn't cut out the bird's feet but rather stamped them and then placed the coloured birds on top. Much easier ;o)


Das ist das aktuelle Inspirationsbild für die PINspirational Challenge und vergesst nicht, dass unser Sponsor "Robyn's Fetish" einen Preis von 2 Digistamps für den Gewinner gestiftet hat.

This is the current inspiration pic at the PINspirational Challenge and don't forget our kind sponsor "Robyn's Fetish" offers a prize of 2 digi stamps to the winner ;o)


Material / supplies:
Stempel / stamps: "Happy wedding" & "Ready, Set, Snow" von Lawn Fawn
                              "Grid Background" von My Favorite Things

Challenges:

Dienstag, 18. August 2015

Congrats - way to go / Glückwunsch - gut gemacht

Hallo zusammen!
Ist das zu fassen? Die zwei Wochen sind schon wieder rum und es gibt eine neue Pinspirational Challenge! Dieses Mal haben wir wieder 2 Sponsoren und damit auch wieder die doppelte Chance auf einen Gewinn ;o) Es handelt sich um "The Cutting Cafe" und "The Stamping Boutique"! Und hier ist meine Karte:

Heya dear crafty friends!
Time flies, doesn't it? The last two weeks have gone by so quickly that I can't believe it is time for a new Pinspirational Challenge already ;o) This time we have two sponsors for you again which means double the chance to win some of their great digital stamps. Our sponsors are "The Cutting Cafe" and "The Stamping Boutique"! And this is where inspiration took me:


Ich habe den Hintergrund mit drei verschiedenen Gelbtönen gefärbt und dann einen Stencil von Tim Holtz benutzt, um die Buchstaben am linken Rand aufzutupfen. Als nächstes habe ich die Bücher (von Stampin Boutique) ausgedruckt, koloriert und dann die Eulenbeine daraufgestempelt. Die Eule habe ich dann noch ein zweites Mal auf weißes Papier gestempelt und nur den Körper ausgemalt und ausgeschnitten.

First I inked up the background with three different shades of yellow and used a Tim Holtz stencil to get these letters on the left edge of my card. Next I printed out the books (from Stamping Boutique), coloured them with my Copics and stamped the owl's legs on there, too. I stamped the owl a second time on to white paper and coloured it also with my Copics, but only cut out the body.


Ein drittes Mal habe ich die Eule dann dorthin gestempelt, wo sie am Ende auf der Karte sein sollte, damit auch ihre Haare und Beine zu sehen sind und habe dann sowohl den Eulenkörper als auch die Bücher an die richtige Stelle geklebt. Für meinen Kartenspruch habe ich zwei Tags an den oberen rechten Rand geklebt und auf das oberste das "Congrats" gestempelt und mit weiß embossed. Das Muster, was ihr unter dem Spruch seht sind übrigens die  Hüte, die amerikanische Schüler bei ihrem Abschluss tragen - die habe ich einfach mit Versamark auf die frisch aufgetragene Farbe gestempelt und mit meiner Heatgun erhitzt. (Eine genauere Erklärung findet ihr hier.) Zum Schluss habe ich dann noch Wink of Stelle auf alle Buchstaben im Hintergrund aufgetragen.

I figured out where I wanted to place my owl and stamped it a third time, so that I would have its hair and legs and glued both the owl's body and the books in place. I added two tags to the upper right, after I had stamped and embossed my greeting on the orange one. The pattern you can see on the top tag is made with a hat stamp and Versamark. (If you'd like to see what I did to achieve this look just click here.) Lastly I added some Wink of Stella to all the letters in the background.


Ich hoffe, euch juckt es nun auch in den Fingern eine neue Karte zu machen. Hier ist unser Inspirationsbild:
I hope you are itching to make a new card as well now. This is our inspiration picture:


Material / supplies:
Stempel / stamps: "Audrey's Books" von Stamping Boutique
                           "Owl Trio" von Hero Arts
                           "Smart Kitty" von WPlus9
Stanze / die:         "Stitched Labels" von Lawn Fawn
Stencil:                "Schoolhouse" von Tim Holtz 


Auch an dieser Stelle möchte ich noch einmal an mein Gewinnspiel erinnern. Zu Gewinnen gibt es einen $15 Gutschein für den Onlineshop von Simon Says Stamp. Klickt einfach hier, um zum Gewinnspiel und einer meiner Lieblingskarten zu kommen ;o)

I would like to remind you all that there is an active giveaway here on my blog until Friday. You could win a $15 gift certificate to the Simon Says Stamp Online Store. Click here, to get to the giveaway and one of my favourite cards ;o)

Challenges:

Related Posts Plugin for WordPress, Blogger...