Posts mit dem Label Thank you werden angezeigt. Alle Posts anzeigen

Dienstag, 8. September 2020

Thanks - You're an A+ kind of friend


Hello everyone,
I hope you are all doing well and that you find some time to play and be creative ;o) I am glad I did for the newest PINspirational challenge. Even though this card doesn't feel like "my style" I really, really like it. Without this challenge I don't think I would have ever created it... This is the inspiration picture for you to pick a colour (combo), theme, saying, or whatever you like really ;o)


I decided to go with the theme of pens and also used the pink as inspiration for the wrapping paper around the crayons. First I was tempted to go for the donut, but then I would have only wanted some pastry - that way I only wanted new pens ;o) 
For my cardbase I picked a kraft coloured cardstock and stamped a repeated pattern on it with the ruler- image and only left a gap for the (heat embossed) sentiment. Next I added the crayons which I had stamped and fussy cut. 


Lastly I added the die cut word which I had cut twice: once from black paper and another time from a rainbow patterned paper. I layered them together and glued it directly to the card base. I hope you are getting inspired by the fun inspiration picture and that you are going to join us at PINspirational challenges! Have a wonderful week and happy crafting everyone ;o)

Freitag, 1. Mai 2020

Lifesaver


Heya everyone,
this is my card for the latest PINspirational Challenge! I am a bit late - well very late really, but life is getting in the way all the time recently... So I hope you'll forgive me. This is our challenge inspiration picture, though it is an "Anything Goes" theme at the moment to give everyone the "room" to create whatever is good for them or needed at the moment ;o)


I created the card using a background die by HEllo Bluebird and an older stamp set by Simon Says Stamp. 


I hope you are all well and that maybe if you feel like crafting you will share your project with us at PINspirational Challenge! Take care and happy crafting, everyone ;o)))


Supplies:
Stamps:
Die: "Ocean Scene Die" by Hello Bluebird

Dienstag, 8. Oktober 2019

Thank you Owl


 Heya everyone!
Today I would like to share my card for our PINspirational challenge with you. I am always in need of some "Thank you" cards, so I really like our current inspiration and this is the card I made:


I love this cute image by Purple Onion Designs and it was a lot of fun creating this card! 


We would love to see your projects in our gallery. You can let yourself be inspired by any aspect of our inspiration picture and get inky ;o) Hope you'll have a wonderful week. Take care and happy crafting, yours Maike ;o)


Supplies:
tba

Montag, 2. September 2019

You`re a pearl

Heya my dear crafty friends!
I have a new card for you today and it was made as an inspiration for the newest challenge over at the Crafty Cardmakers: we would like to see "Pearls and/ or Gems" on your projects. Here is the card I made:


I created an underwater background using Distress Oxide Inks in three different shades of blue and used the lightes shaded to create those light beams with a stencil. The effect gives it a little more dimension I find and interest.


The little mermaid is just too cute and as she is holding a pearl and wearing jewellery out of pearls she was the perfect image for the challenge. I coloured her with Copic markers and added glitter glue to all the pearls. I hope you are going to join us for our challenge and share your talent with the Crafty Cardmakers. ;o) Have a fabulous week and happy crafting ;o) Yours Maike


Supplies:
Stamps: "Under the Sea" by C.C.Designs
               (was just retired, so if you find it anywhere and like it - grab it ;o)
Dies: "Stitched Rectangle Scallop Frames Die-namics" by My Favorite Things
Stencil: "Ray of Light" by My Favorite Things

Challenges:

Dienstag, 11. Juni 2019

Thank you- Box with a fox

Heya everyone ;o)
Today I would like to share a little project with you that I made with some kind people in mind. They have been helping with our bicycle training at school even though they have loads on their plates as well. So I thought I would create a little gift box for all of them. That fit perfectly with our "No Cards / Keine Karten" challenge at Papercraft Challenges which starts today.


I am not sure what will go inside the boxes yet, but I will hopefully think of something soon ;o) The cute fox image is a stamp by Purple Onion Designs. I coloured all of them differently using the watercolour pens from Winsor & Newton. They are lightfast and also have very rich colours. 


I hope you will join us in our "No cards" challenge! Have a lovely week and happy crafting ;o) Yours Maike


Supplies:
Stamp: "Free Spirits" by Purple Onion Design
Dies: "Pillow Box" by Lawn Fawn
         "Danke 5" by Gummiapan

Challenges:

In case you are interested in some other kinds of gift box as inspiration, here are a few examples:


Montag, 15. Januar 2018

You are a Gem!

Halli Hallo ihr Lieben!
Mögt ihr Juwelen, Glitzer und Schimmer? Dann seid ihr bei der neuen Crafty Cardmakers Challenge komplett richtig. Für meine Inspirationskarte habe ich einen Stempel benutzt, den ich schon eine Weile habe und der offenbar nur auf das richtige Thema gewartet hat:

Heya my dear crafty friends!
Do you like gems, glitter and shimmer? In that case the current Crafty Cardmakers challenge "Bling's the Thing" is definately for you ;o) For my inspirational card I used a stamp that has been in my stash for a little while now and it seems like it has waited for its turn with this challenge. Have a look yourself:


Auf eine Kartenbasis aus Kraftpapier habe ich das rote gestreifte Papier vollflächig aufgeklebt, einen schwarzen Streifen Papier mit dem Spruch weiß embosst und das dann erst einmal zur Seite gelegt. Als nächstes habe ich den weißen Rahmen aus Copic freundlichem Papier (Perfect Coloring Paper) ausgestanzt und das innere Teil bestempelt.

This time I chose to make a card base out of craft paper, covered it with this lovely red patterned paper and also embossed the sentiment in a small piece of black cardstock. I put all of this to the side while I die cut the frame from some copic friendly paper (Perfect Coloring Paper to be precise) and stamped the cute image on the inside piece.


Das Colorieren hat viel Spaß gemacht, hat aber auch einen Moment gedauert. Zusammen mit dem weißen Rahmen habe ich das Motiv leicht versetzt auf die Karte geklebt, um es etwas interessanter zu gestalten, habe den Spruch mit Abstandskleber festgeklebt und auf der Karte noch ein paar bunte Gems als Verzierung verteilt. Ich hoffe, sie gefällt euch und ihr habt auch Luste bekommen eure Glitzerstifte, Gems und Glitterdosen auszupacken ;o)  Falls ihr zum Jahresbeginn noch etwas mehr Inspiration haben möchtet, guckt einfach morgen noch einmal hier vorbei, da habe ich dann direkt zwei neue Karten für euch ;o) Ich wünsche euch eine tolle Woche und happy crafting, eure Maike

I did enjoy the colouring very much, but it took quite some time. With the frame in place I adhered the coloured piece to the left of the card base to give it some extra interest, used foam tape to adhere the sentiment and scattered a few gems around the gopher for embellishment. I hope you like my card and that you are feeling inspired to get out your glitter, gems and shimmer pens as well ;o) In case you would like some more inspiration come back tomorrow for two new cards ;o) I hope you'll have a fantastic week and happy crafting, yours Maike


Material / supplies:
Stempel / stamps: "Go-pher It" von Sugar Pea Designs
Stanzen / dies: "Single Stitch Line Rounded Square Frames" von My Favorite Things

Challenges:

Montag, 8. Mai 2017

Thank Mew

Halli Hallo ihr Lieben!
Und schon wieder wartet eine neue Challenge auf euch ;o) Dieses Mal eine ganz einfach umzusetzende: Wir von den Crafty Cardmakers wollen einen "Spruch" auf eurem Werk sehen. Da es um den Spruch geht, habe ich mir einen mit einem kleinen Wortspiel herausgesucht:

Heya my dear crafty friends!
From today on there is a new Crafty Cardmaker's challenge waiting for you. This time it is a really easy one: All you have to do is to find a "Sentiment" for your creation. ;o) I thought about it for a bit and decided to go with a punny sentiment (and I so hope that punny is the right word to use here *grins):


Ich finde die Kakteen und dazu die Katze in den Blumentöpfe von Gerda Steiner wirklich super süß. Ich habe sie mit Copics coloriert, ausgeschnitten und so hingestellt, dass es ausschaut, als würden sie auf einem Regal stehen.

I love these cactuses and the cute cat all in their flower pots by Gerda Steiner. I coloured all the images with Copic markers, cut them out by hand and placed them, so that it looks like they are standing on some kind of shelf.


Ich hoffe, euch gefällt die Karte und ihr macht mit euren wundervollen Kreationen bei unserer Challenge mit ;o) Habt eine tolle und kreative Woche!

I hope you like my card and that you will join our challenge with your wonderful creations ;o) Have a great and creative week!
Material / supplies:
Stempel / stamps: "Spring Digital Stamp Bundle" von Gerda Steiner (still on sale) ;o)
                              "BB Cool Cat" von My Favorite Things
Stanzen / dies: "Blueprint 29" von My Favorite Things

Samstag, 30. April 2016

You are so tweet! (Toucan)

Halli Hallo und einen wunderschönen guten Morgen ;o)
Es ist Samstag und damit nicht nur Wochenende, sondern auch der Start einer neuen Herausforderung auf dem "Challenge Up Your Life" Blog! Dieses Mal wollen wir eure Werke mit allen Arten von Tieren bewundern. Ganz egal, ob Hund, Katze, Maus oder.... Tukan:

Hello everyone and goodl morning ;o)
Today is Saturday and this does not only mean, that the weekend is finally here, but also that we have a new challenge for you ate the "Challenge Up Your Life" blog. This time we would like to see projects with all kinds of critters. It doesn't matter wether you use the image of a cat, a dog, a mouse or.... a toucan:


Vielleicht hat die ein oder andere unter euch meine Muttertagskarte von vor ein paar Tagen gesehen? Ich hatte da nämlich seit langer Zeit mal wieder meine Zigs herausgekramt. Die leuchtenden Farben finde ich wirklich wunderschön, aber ich hab mich nie so wirklich an die Stifte dran getraut. Was mir geholfen hat? Das könnt ihr hier nachlesen. ;o) Meinem Tukan wollte ich auch gerne ein so leuchtendes Federkleid malen, also habe ich mich wieder für die Zigs entschieden und dieses Mal für einen No-Line Look. Die Ränder sind leider nicht ganz so klar geworden, wie ich das gern gehabt hätte, weil die starke Struktur vom Papier gegen mich gearbeitet hat. Aber... ich finde den No-Line-Wasserfarbeffekt wirklich super schön und werde weiter üben und auch mal andere Papiere mit den Zigs ausprobieren, um herauszufinden, was am besten funktioniert.

Maybe some of you have seen the Mother's Day card with the crocuses, that I have posted a couple of days ago? (click) I had used my Zig markers again, after having forgotten about them for the longest time and I loved the vibrant look they gave me. I wanted my toucan to have the same vibrant colours, so I used them again, but this time I went for a no-line look. Quite frankly: it took ages and in the close up picture you can see that the edges aren't nearly as clean, as I would like them to be. But... I think no-line watercolour look is absolutely amazing and I will definately try out different papers with the Zigs, to find out which one works best.


Den Hintergrund für die Karte habe ich direkt auf der Kartenbasis gestaltet. Dazu habe ich mit dem Mini Round Ink Blending Tool "Peacock Feathers" Distress Ink aufgetragen und anschließend die Federn mit der gleichen Farbe gestempelt. Normalerweise kann man mit den Distress Inks ja nicht so gut stempeln (finde ich), aber hier haben sie mich wirklich überrascht. Meistens probiere ich das an einer Stelle aus, die man später nicht mehr sehen kann und dieses Mal hatte ich schon gedacht, dass ich mein MISTI rausholen müsste, aber es hat ganz wunderbar geklappt. 

I created the background directly on the card base itself, using a Mini Round Ink Blending Tool and Peacock Feathers Distress Ink. Next I used the same ink again to stamp the feathers, because I love the tone on tone look it gives. Usually Distress Inks aren't all that great for stamping, but I was really surprised this time. When I remember to do so, I test the stamping on a spot that will be covered later on and I have already seen myself getting out the MISTI to get a crisp image, but the ink worked really well with those feathers from WPlus9.


Ich hoffe, dass ihr bei uns mitspielt und ich eure Werke auf dem CUYL Blog zu sehen bekomme! Happy crafting und euch allen ein tolles Wochenende ;o)

I hope you are going to play along with us and to see you over at the CUYL blog! Happy crafting and a great weekend, everyone ;o)


Material / supplies:
Stempel / stamps: "Some Birdie Loves You" von Clearly Besotted
                              "Fanciful Feathers" von WPlus9
Stanzen / dies: "Stitched Rounded Rectangles" & "Hi There" von My Favorite Things

Challenge:
Animal Friends Challenge "Birds"
Simon Says Stamp "Anything goes"
Aud Sentiment Challenge "Animal + A Sentiment"

Donnerstag, 31. März 2016

Thanks - a carrot bunch ;o)

Hallo ihr lieben Kreativen,
bevor wir alle keine Häschen mehr sehen können, wollte ich euch noch schnell diese Karte zeigen:

Hello everyone ;o)
Before you can't stand the sight of cute little bunnies anymore, I wanted to show you my newest card:


Eine liebe Freundin hat mir vor Kurzem bei ein wenig Gartenarbeit geholfen und ich habe diese Karte gemacht, um mich für ihre Hilfe zu bedanken. Das Papier habe ich selber hergestellt, weil ich einen Erdton haben wollte und meine Papiersammlung das nicht hergegeben hat. (Und das, obwohl ich so viel Papier habe...) Den Himmel habe ich auch mit Distress Inks gewischt und habe, als alles trocken war, die nötigen Teile ausgestanzt.

A dear friend of mine helped with some gardening, so I made this card to thank her. I made the paper myself by sponging different shades of browns on a piece of white paper. I wanted to create the look of earth and am rather pleased with the result ;o) I did the same for the sky and waited until everything was dry before die cutting the three hills and the sky piece. 


Als nächstes habe ich die Möhren und den Hasen gestempelt, coloriert und ausgeschnitten. Da ich den Hasen auf den "Hügel" hinter dem "s" stellen wollte und es -für mich- besser wirkt, wenn der erhobene Fuß außen ist, habe ich ihn mit der Spiegeltechnik gestempelt. (Die Technik habe ich in diesem Post ausführlicher beschrieben und mit Bildern veranschaulicht: klick) Man bekommt mit dieser Stempeltechnik zwar in der Regel keinen ganz so klaren Abdruck, aber er ist okay und im Gesicht arbeite ich dann einfach ein wenig nach.

Next I stamped, coloured and fussy cut the carrots and the bunny. Because I wanted the bunny to stand on the slight "hill" behind the letter "s" I used the mirror stamping technique. (I have described it in detail and with the help of a few pictures in this post: click) You won't get as crips an outline as if you would stamp directly to paper, but it usually works well enough ;o)


Ich wollte noch einen kleinen Clou für die Karte und habe deshalb noch eine Nachricht unter den fünf Karotten versteckt, die ich als Gruppe zusammengestempelt habe. Zum Schluss habe ich noch ein paar Wölkchen in den Himmel gestempelt (die leider deutlich blasser geworden sind, als ich es wollte) und alles an seinem Ort festgeklebt.

I didn't want the card to be too plain, so I hid this message unter the five carrots that I had stamped as a group. Lastly I stamped some clouds in the sky (which turned out a lot paler than I had hoped) and glued everything down at its designated place. 


Material / supplies:
Stempel / stamps: "Happy Hoppy" von Gerda Steiner Designs
                             "Thank you Tags" von Lawn Fawn
Stanzen / dies: "Stitched Hillside Borders" von Lawn Fawn
                         "Thanks Word Die" von Clearly Besotted
Distress Ink Colours: Earth - Walnut Stain, Vintage Photo & Ground Espresso
                                  Sky - Tumbled Glass, Broken China & Peacock Feathers

Challenges:
GSD Share Your Designs Challenge
Stempelküche Challenge "Frühlingsgefühle" (Endlich wieder Gartenarbeit - hihi ;o)
Simon Says Wednesday Challenge "Anything goes"
Marker Pop Challenge "Critters"
Addicted To Stamps and More "Make your mark"

Montag, 25. Januar 2016

Thank you card: No stamping - just dies (Dankeskarte nur mit Stanzen)

Huhu ihr Lieben!
Bei den Crafty Cardmakers dreht sich dieses Mal alles um Stanzen und daher hatte ich mir vorgenommen eine Karte zu basteln, bei der nichts gestempelt ist. Dies hier ist dabei rausgekommen:

Heya my friends!
The Crafty Cardmakers new challenge theme is "Punches and / or Dies", so I thought I would go ahead and make a card without any stamping on it. This is what I came up with:


Da ich dieses Mal ja nichts zum Ausmalen hatte, habe ich bei der Papierauswahl besonders darauf geachtet, dass die Farben und Muster einerseits gut zusammen passen, andererseits sich aber auch genug voneinander abheben. Die schöne Blumenstanze hatte ich schon lange einmal benutzen wollen und so kam mir die Idee sie als Fokus für eine Dankeskarte zu benutzen.

Because I didn't have anything to colour for / on this card, I made sure that I chose colours and patterns that go well together and that also had enough contrast. I had wanted to use the flower die for a long time and this seemed to be a good time to use it as my focal point.


Den Schmetterling habe ich noch hinzugefügt, nachdem ich mir meine Karte eine Weile angesehen hatte und sie noch zu "blah" fand. Die Oberfläche vom Schmetterling habe ich für etwas Glanz auf meiner Karte noch mit dem Clear Wink of Stella bemalt.

After I thought my card was finished I looked at it for a while and decided it looked too plain for my taste, so I added the butterfly on top of the bloom. I coloured its wings and its body with Clear Wink of Stella and now I was happy with the result.


Material /supplies:
Stanzen/ dies: "Wild Garden by Julie Ebersol" von Essentials by Ellen
                      "Scripty Thanks" von Lawn Fawn
                      "Sunshine Layers Die" von WPlus9
                      "Pippi Butterfly" von Memory Box 

Challenges:

Montag, 2. November 2015

"Thanks so much" from Cedar (Dankeskarte)

Hallo ihr Lieben!
Im November wird ja in einigen Teilen der Erde "Thanksgiving" gefeiert und ums Danke sagen dreht es sich daher auch bei der neusten Challenge des "Crafty Cardmakers & More" Challenge Blogs. Hier ist meine Inspiration für euch:

Hello my dear crafty friends!
Many people around the world celebrate "Thanksgiving" in November and in the new "Crafty Cardmakers & more" challenge we ask you to show us your "Thank you" creations. This is my inspiration card for you:


Mir war nach einer herbstlichen aber schlichten Karte, also habe ich Cedar direkt auf meine Kartenbasis gestempelt und coloriert. Mit einer aus Post-its geschnittenen Maske habe ich ihn dann vor den Distress Inks geschützt, die ich benutzt habe, um den Hügel und den Himmel zu gestalten. Die gleiche Technik habe ich vor einiger Zeit bei dieser Karte benutzt und zu Francine's (1001 cartes) Video verlinkt, von der ich sie gelernt habe.

I really wanted to make an autumnal but CAS card, so I stamped Cedar directly onto my card base and coloured him in using Copic markers. After I had covered this cute fox with a mask I made from a post-it note I took out my Distress Inks and Ink Blending Tool to create thge hill and the sky. I used the "sky technique" on this card a while back and linked to Francine's (1001 cartes) Video where I had first seen how to do it.


Als nächstes habe ich das Wort "thanks" drei Mal ausgeschnitten und eines davon im Obre-Stil mit den gleichen Farben coloriert, die ich zuvor für Cedars Fell benutzt habe. Danach habe ich den Rest des Spruches gestempelt, alle drei Stanzteile zusammen- und sie dann auf die Karte geklebt. Mehr wollte ich nicht hinzufügen, aber es fehlte noch irgendwas in meinen Augen. Daher habe ich den Cornewr Chomper herausgekramt und alle vier Ecken abgerundet. Das hatte der Karte noch gefehlt.

Next I die cut the word "thanks" three times and coloured one of them in an ombre fashion using the same markers I had used on Cedar's fur. I glued all three together and adhered the chipboard like die cut on the card base after stamping the words "so much". I didn't want to add any more to the card but it was still not finished. So I used my Corner Chomper on all four edges and that did the trick. 


Material / supplies:
Stempel / stamps: "Cedar" von Purple Onion Designs
                           "Thank you tags" von Lawn Fawn
Stanzen / dies: "Scripty Thanks" von Lawn Fawn
Coloration: Copics E99, E97, YR27, YR24, E53, E51, R20
                              BG18, BG15, BG13, BG 32

Challenges:
Animal Friends Challenge "Animals with hat, scarf or gloves"
Copic Marker Espana "Anything goes"
Avenue613 Challenge "Thank you"
Stempelsonnenchallenge "Stamp as main focus"
Simon Says Wednesday Challenge "Anything goes"

Samstag, 24. Oktober 2015

Bird's House for a sweet chocolate owl / Eulenhäuschen

Hallo ihr Lieben!
Als ich diese niedlichen Lindt-Eulen im Laden gesehen habe, konnte ich einfach nicht vorbei gehen. Ich hatte sofort die Idee, dass ich ein kleines Häuschen für die bauen wollte und mich - zurück an meinem Schreibtisch - direkt an eine Konstruktion begeben:

Heya dear crafty friends!
A chocolate brand called Lindt has recently come up with these cute owls and I immediatly bought one, because I wanted to construct a house for it. So here it is:

 
Am schwierigsten fand ich die Konstruktion vom Dach, weil ich wollte, dass es nicht nur aufliegt und dann auch noch leicht zu entfernen ist. Nach einigen Fehlversuchen habe ich mich letztendlich für eine Variante entschieden, bei der es extra Seitenteile gibt, die man in das Häuschen hinein steckt. Die Vorteile davon sind: a) dass die Seitenteile dem Eulenhaus noch mehr Stabilität verleihen, b) man selber durch ihre Länge bestimmen kann, welchen Winkel man für das Dach haben möchte und c) dass man es einfach herausnehmen kann und so schnell an die leckere Eule kommt.

The most difficult to figure out was, how I wanted to construct the roof part, because I wanted it to be removable yet sturdy. So I came up with a roof that can be tucked into the house. That had several advantages: a) it gives the house itself more stability, b) with the lenght of the parts that are tucked into the house you can determine the angle of the roof and c) it is easily removed. 


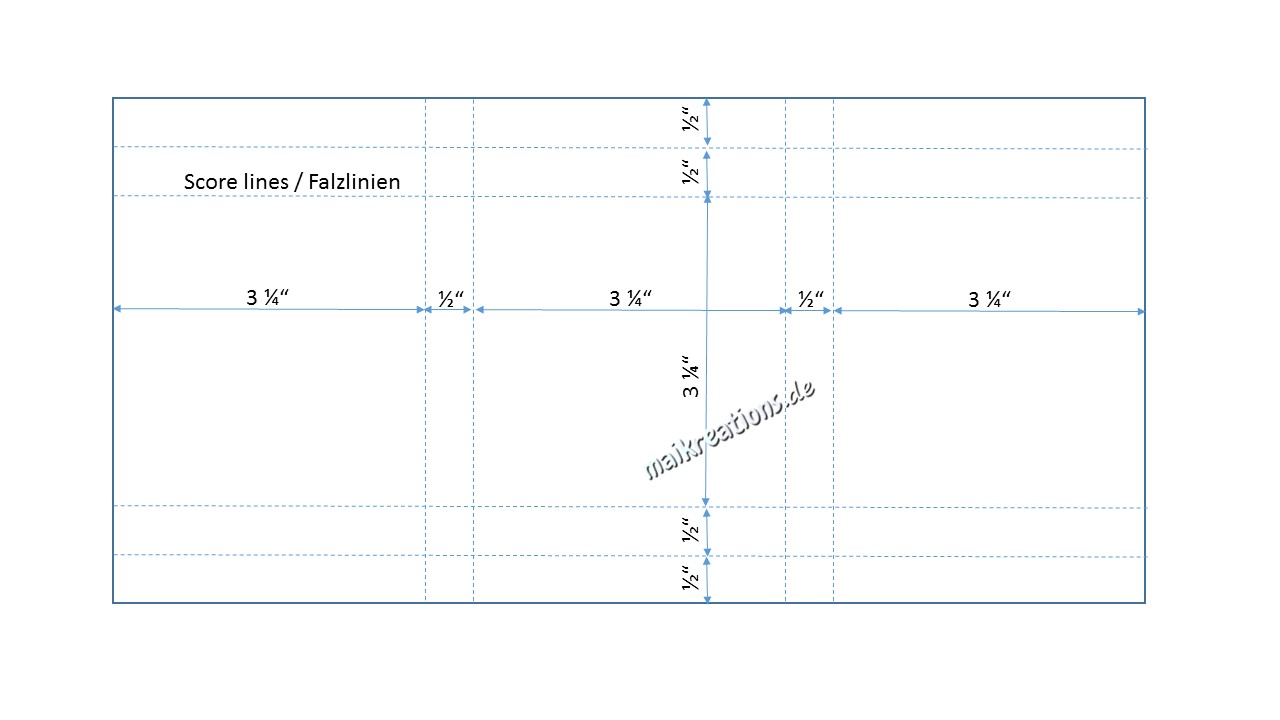
Falls Du auch Lust hast ein solches Eulenhäuschen zu bauen, kannst Du diesen Plänen die Maße, Falzungen und Schneidelinien entnehmen:

If you would like to make one of these houses as well, here is how I did it:

1. Haus / House

2. Dach / Roof


Für die Dachziegel habe ich einen Bordürenstanzer von Fiskars benutzt und eine komplette Seite eines großen Scrapbookingpapiers damit bearbeitet. Davon habe ich dann einen ca.1 Inch breiten Streifen abgeschnitten und die Prozedur noch 2x wiederholt. So hatte ich genug "Ziegel" für das komplette Dach. Am einfachsten lässt es sich aufkleben, wenn man eine Dachseite komplett mit Kleber versieht und dann am unteren Ende mit dem Auflegen beginnt - so muss man nicht immer zwischen Kleber und Papier hin- und herwechseln. Um es mir einfacher zu machen habe ich außerdem immer den gesamten Streifen aufgelegt und dann das Überstehende an der Dachseite abgeschnitten. Das habe ich so lange gemacht, bis der Rest nicht mehr für eine weitere Reihe ausreichte und hab dann einen neuen Streifen benutzt.

In order to create the roof tiles I used a decorative edge punch from Fiskars. I punched the scalloped edge along the whole side of a 12" paper and then cut it off at about an inch width. I needed three of these stripes to have enough for the roof. The easiest way I find to attach the tiles is to completely cover one side of the roof with adhesive and then start gluing down the scalloped paper strip at the bottom of it. Cut off the overlap and glue it down again until you do not have enough paper left to cover the witdh of the roof, then use the second strip of paper and so on ;o)


Um das Dach der Jahreszeit anzupassen habe ich ein paar Herbstblätter darauf geklebt. Zum Schluss habe ich das Wort "Thanks" auf das gleiche Papier gestempelt, wie das, was ich für das Häuschen an sich benutzt habe, es ausgeschnitten und dann noch die Ränder eingefärbt, damit man es auf dem Hintergrund besser sehen kann. Danach hat die Pinke Eule schnell ihr neues Heim bezogen und scheint sich dort drin sehr wohl zu fühlen ;o)

I wanted to decorate the house according to the season so I added a few autumn leaves to the roof. Next I stamped the word "thanks" and cut it out. After I added a ribbon end to one side I used my Ink Blending tool to colour the edges, so that it would stand out a little more against the background. After that was done the little owl could move into her house and she seems rather happy with it ;o)


Material / supplies:
Stempel / stamps: "Designer Woodgrain" von Hero Arts
                           "Lots of Thanks" von Simon Says Stamp
Stanzen / Dies: "Stitched Leaves" von Lawn Fawn
                       "Scalloped Edge Punch" von Fiskars

Samstag, 3. Oktober 2015

Herbstliche Merci-Verpackung / Autumnal chocolate gift box


Halli Hallo ihr Lieben!
Heute habe ich einen ganz besonderen Post für euch. Einerseits zeige ich euch heute mal eine kleine Geschenkbox in der man eine Kleinigkeit an einen lieben Menschen verschenken kann und zum anderen darf ich euch nun mitteilen, dass ich für die kommenden zwei Monate Gastdesignerin für den "Challenge Up Your Life" Blog sein darf ;o))) Ich freu mich wirklich sehr und hoffe, euch gefällt mein erster Beitrag!

Unser Banner zum Mitnehmen
Hello dear crafty friends!
Today I have a special post for you! On the one hand I am not going to show you a card today, but a little box that fits a small treat for someone very nice and on the other hand I can share with you some fantastic news: I am going to be the guest designer over at the "Challenge Up Your Life" blog for the next two months. ;o)))) I am really very excited and hope you'll like my first submission!


Zuerst habe ich mir einen "Schlachtplan" zurechtgelegt, um vier Merci-Schokoladenriegel in einer hübschen Box verpacken zu können. Dazu habe ich ausgemessen, wie viel Platz 4 Schokoriegel nebeneinander benötigen und mit diesen Angaben dann den Rohling für meine Box zurechtgeschnitten und -gefalzt. Das Papier muss auf die Größe 5 1/4" auf 10 3/4" geschnitten und dann so gefalzt werden, wie ihr es auf dem folgenden Bild seht. Achtung: Gefalzt wird nur bei den gepunkteten Linien - die Linie, an der die Maße stehen wird nicht gefalzt.

First I needed to make a plan for my box. I wanted to insert 4 chocolate bars called "Merci" to it, so I measured out how much space they needed. The paper for this box needs to be cut to 5 1/4" by 10 3/4" and then you need to score them like you can see in the following picture. Attention: You only need to score where you see the dotted line - the line with the measurements is no score line.
Als nächstes muss einiges weggeschnitten werden. Was übrig bleibt seht ihr hier:

Next you need to cut off a bit of you paper. In the following picture you see what your paper should look like after you cut out what isn't needed:

Nun muss die Box noch zusammengeklebt werden. Falls ihr - wie ich - ein Sichtfenster integrieren möchtet ist das jetzt der Zeitpunkt gekommen, aus dem ganz rechten Quadrat eine Form eurer Wahl herauszuschneiden. Um das Ahornblatt auch durch das Designerpapier an der richtigen Stelle zu stanzen, habe ich vor dem Ausstanzen das gemusterte Papier mit einem wieder ablösbaren Kleber vorübergehend befestigt und das ganze dann durch meine Big Shot gejagt. Bevor ich die Box endgültig zusammengeklebt habe, habe ich die Plastikfolie dazwischengeklebt, alle anderen Papiere aufgeklebt und die Innengestaltung der Box erledigt. Ich erwähne das hier, weil die Box auf dem Foto bereits die zweite ist, die ich fertiggestellt habe, weil ich nämlich die Folie vergessen hatte und es wirklich schwierig war, die Musterpapiere anständig aufzukleben.

Now the paper needs to become a box ;o) If you would like to have a window in your box, like I did, now is the time to cut it out of the square on the right. In order to have the acorn leaf at the right space in both the box and the patterned paper I glued the designer paper down temporarily and sent both through my Big Shot. Before I put the box together I glued the acetate between the box and the patterned paper, added the paper for the lid and also stencilled in the acorns. I am saying this here, because the box you see in the picture is actaully the second one I made, because I had forgotten the acetate and also the paper on the front. 


Zum Schluss habe ich nur noch den Streifen mit dem "just a little something" ("nur eine Kleinigkeit") hinzugefügt und dem dem Fuchs mit "Walnut Stain" einen Hügel angedeutet und ihn darauf geklebt. Der Fuchs ist übrigens eine Stanze, die ich mit Copics coloriert habe. Den Körper habe ich dafür 3 Mal ausgestanzt, um ihn ein wenig stabiler zu machen.

All that was left to do now was to glue down the sentiment strip "just a little something", colour in an area for the fox something to stand on and glue him down. The fox is made from a die cut which I have coloured using my Copic markers. I die cut the body three times to give it more thickness and make it more sturdy. 


Material / supplies:
Stempel / stamps: "Woodland Gifts" von Mama Elephant

Stanzen / dies: "Fox Item #TE497" von Taylored Expressions
                       "Decorative Edges Shallow" von Clearly Besotted
                       "Stitched Leaves" von Lawn Fawn

Designer Paper: "Sweater Weather 6x6 Pad" von Lawn Fawn

Coloring: Copics (E99, E97, E37, R20, E51, E53)
Related Posts Plugin for WordPress, Blogger...