Posts mit dem Label Masking werden angezeigt. Alle Posts anzeigen

Donnerstag, 1. Dezember 2022

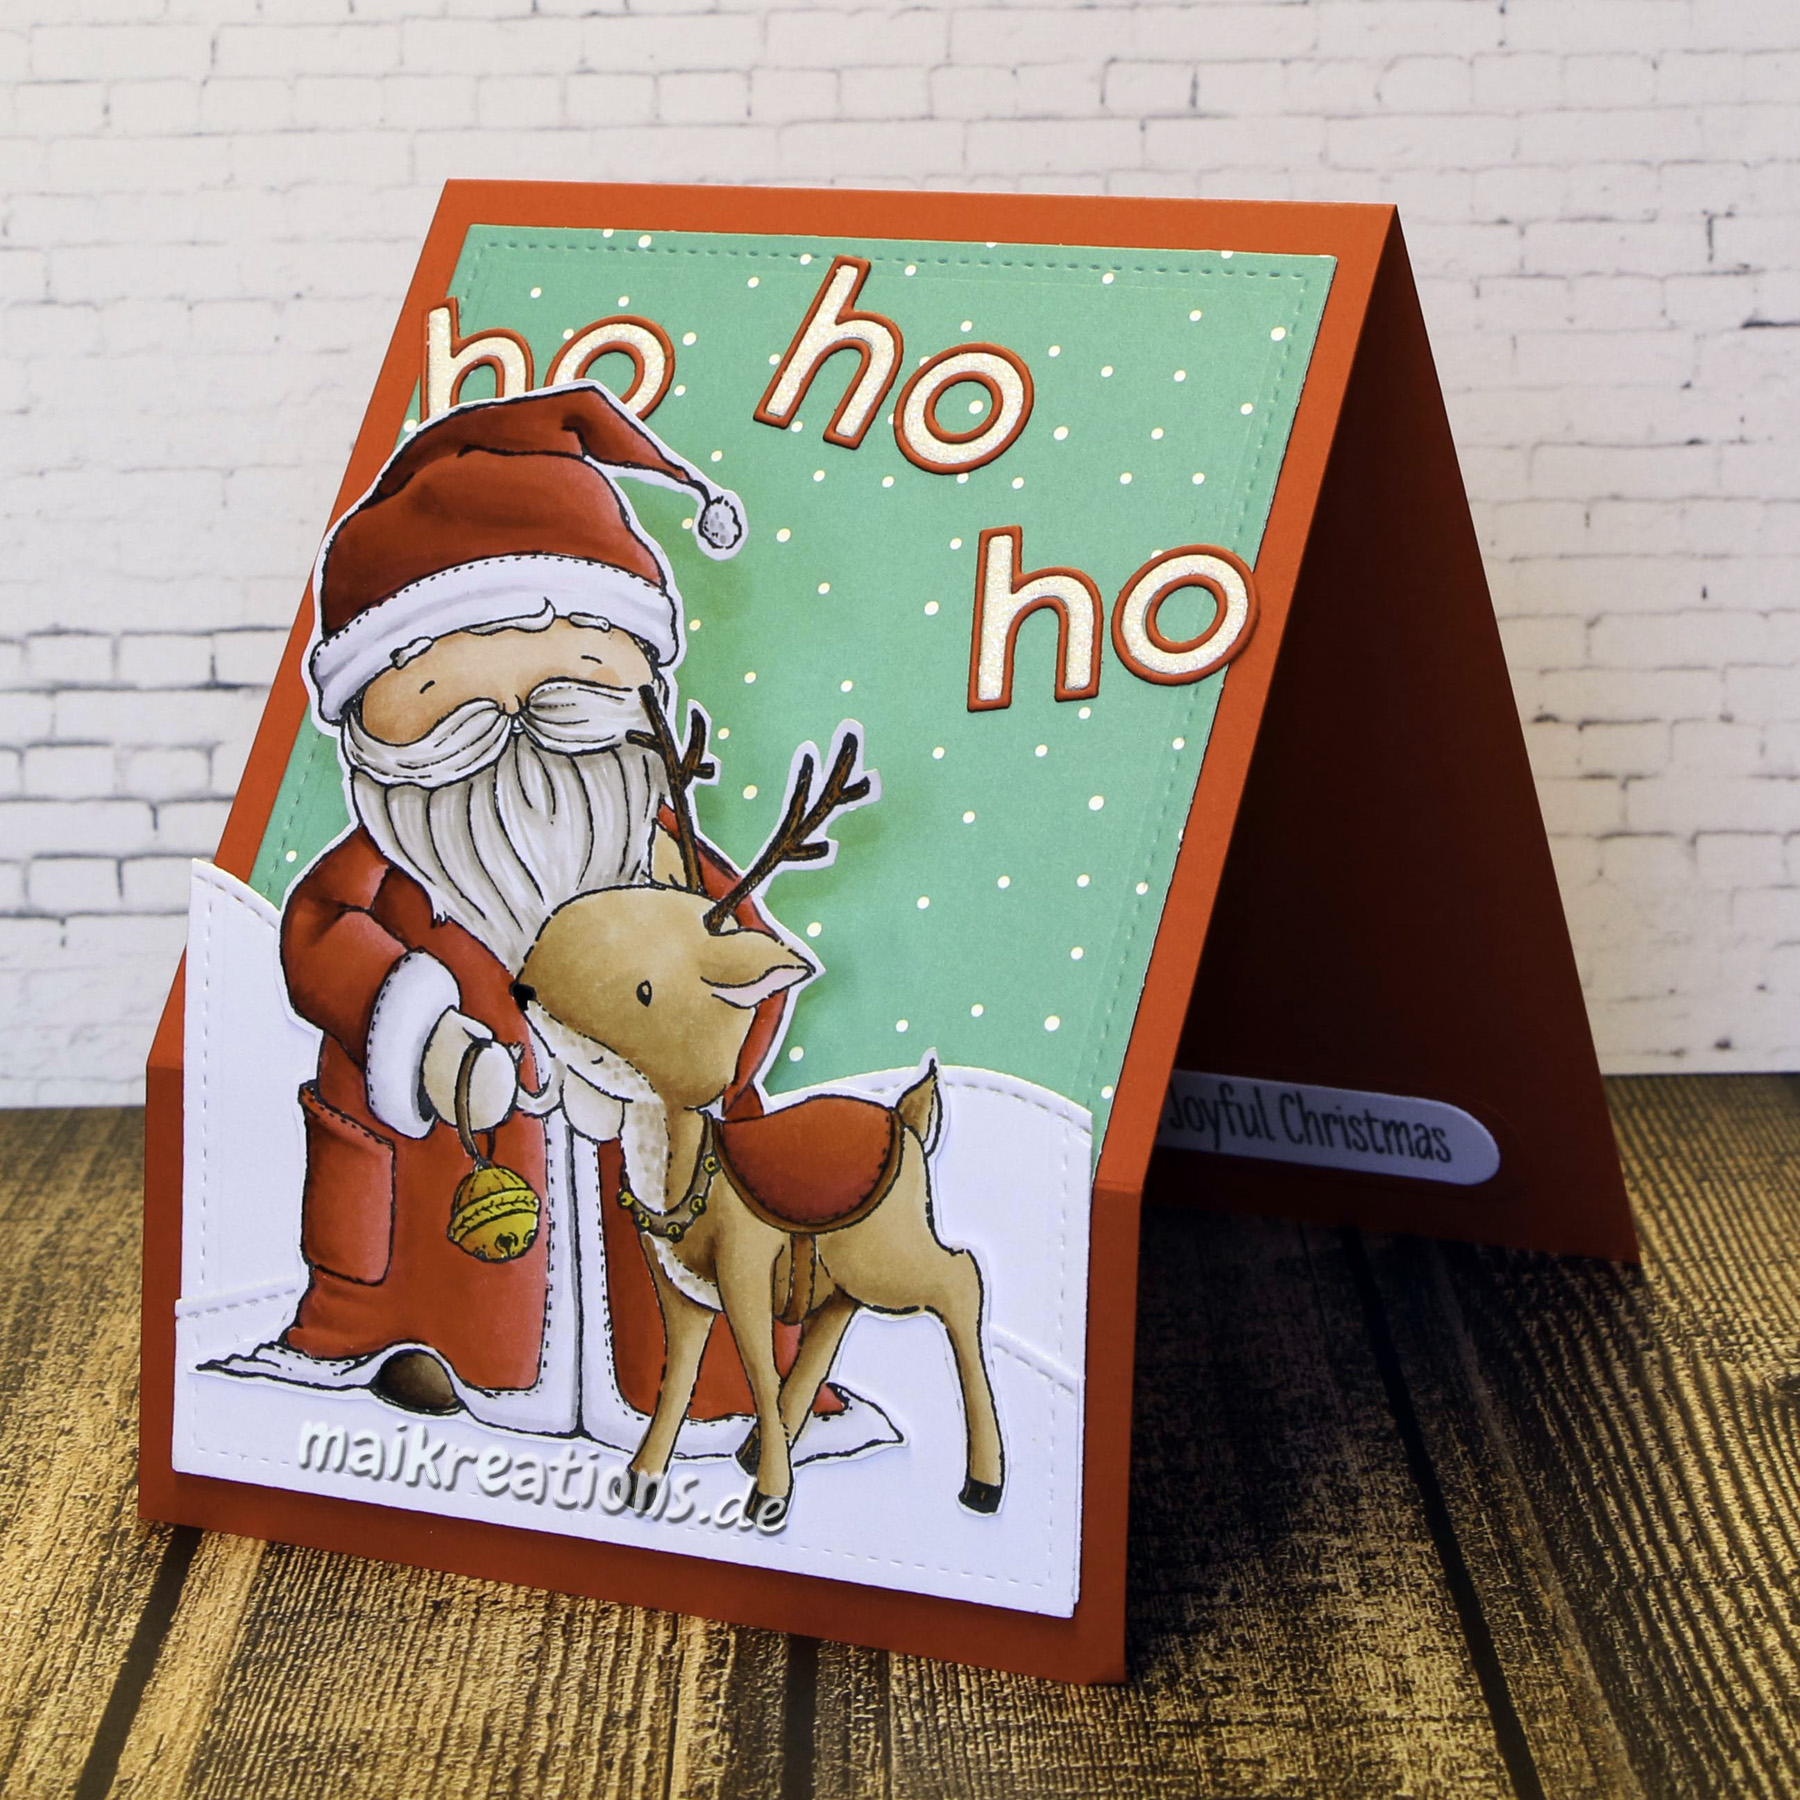
Hohoho Easel Card

Hello my dear crafty friends,
today I'd like to share my DT card for the current challenge at Challenge Up Your Life with you.


This time it is a  color combo:


For this card I stamped the cute reindeer, masked it and then stamped Santa over it. After colouring everything I cut the image out. I die cut the rectangle die from this fun snowy paper by Lawn Fawn and also from white paper which I then die cut two snowy hills from. That way I could have the stitching go around completely. 


Next I glued the snowy background to the cardbase and scored both pieced at once. I also adhered Santa to the snowy hills, making sure no adhesive went higher than the edge of the hill in the back and glued that piece to the bottom part of the snowy background. 


Depending on how you place the card you can either see the background but have Santa be lifted off it visually oder you can just have the hills with Santa on it visible. Really fun to play around with! 
To add a sentiment I die cut the "ho ho ho" from red and glitter cardstock and placed them over Santa`s head. The "real" sentiment was playced inside the card heat embossed on a small die cut which I backed with the same paper that I made the card base from. That way, when you use the sentiment to placethe card behind it, the bottom  part doesn't go all the way to the white paper (if you know what I mean). 
That was my card for today. I hope you are going to join us with a sentiment of your choice, only keeping in mind the beautiful color combo ;o) Have a fabulous day and happy crafting, Maike


Supplies:
Stamps: "Santa" & "Laurel - reindeer" by Purple OnionDesigns
               "Sweet Holiday Penguins" by My Favorite Things 
Dies: "Cool Cuts Cherry Lower Case" by Create A Smile 
          "Small Stitched Rectangle Stackables" & "Stitched Hillside Boarders" by Lawn Fawn

Donnerstag, 15. September 2022

Waving hello - one layer card

Heya everyone,
the newest theme over at Papercraft Challenges was a real challenge for me. The theme is "One Layer Wonder" and I always have problems with one layer cards. For some reason, no matter which masking tape I use (and believe me I have tried at least ten different ones), it never really works. Often times I rip the paper and have to start all over again. The one thing that does sort of work is post-it-notes, but with them I only have a small area that is sticky. Ah well, I managed a card in the end and I am rather proud of it, so here it is:

I used some sweet images of Purple Onion Designs and stamped them with "Ink on 3" vanishing ink on my piece of Copic friendly paper and then... I had to hurry ;o) I masked all my images and created the sea and the sky with Distress Inks. Next, while I could still see the lines I coloured all the critters and the other elements with Copic markers. Towards the end I needed a reference sheet with all the images I needed and it was more guessing than actually seeing the lines, but I love the soft look of the no-line-coloring in this summer one-layer card. And I hope you do too ;o))
Have a wonderful day and please consider joining our challenge, especially when you do not like creating one-layer cards that much - in the end it is always very rewarding and a lot of fun, when one accepts a real challenge I find ;o) Happy crafting and I hope to see you soon, yours Maike


Supplies:
Stamps - all by Purple Onion Designs:
"Ida - rabbit", "Peony - mouse", "rocks, seaweed and coral", "Neptune - fish"


Samstag, 1. Februar 2020

Have an ice day! (Bunny and Bear)


Hello everyone!
Januar hasn't been half bad here in Germany... How was the weather where you live? I am asking because for this month we would like to challenge you to create a "Winter Scene" crafty project and share it with us at Challenge Up Your Life!


For my card I used the sweet images from the "Skating Party" stamp set by Hello Bluebird. I used the masking technique to create an almost one layer card because I knew I wanted to add the puffy snow later and didn't want the card to become too thick and have too much dimension if that makes sense. After I had stamped the images I masked them and used Oxide Inks for the ice and the sky and die cut the panel from it. The images then were coloured in using Copic markers and I stamped the sentiment using Memento Tuxido Black ink.


Unfortunately I didn't wait long enough before I added the puffy snow and so it turned pink in some places. In the end I don't mind it very much, because it could be a reflection or something, but if you would like your snow to stay crisp white make sure to give the ink eneough time to dry completely.  After adding some white dots for a bit more added fun to their winter outfits my card was done. I really hope you are going to join us for our "Winter Scene" challenge at Challenge Up Your Life and that you all are going to have a wonderful weekend! Happy crafting, yours Maike


Supplies:
Stamps: "Skating Party" by Hello Bluebird
Die: "All Prettied Up" by Mama Elephant

Mittwoch, 29. Januar 2020

Have your cake and eat it too ;o) (Bird)


Heya everyone!
I am back with a card for our newest PINspirational challenge. This is the inspiration picture we have chosen for you this time:

I just love the colours and at first thought I'd create a card using the colour palette, but I also liked the cake and just like too many other times in my life the cake won... Though luckily this sweetness doesn't go straight to the hips ;o) 


I created the front by stamping and masking the bird popping out of the box and next stamping the cake behind that and covered that image with a mask as well to be able to add some colour to the background. Using the same ink (Merman Ink by Lawn Fawn) I also added the bubbles to give the background more interest. Now it was time to remove the masks and to colour in the images with my beloved Copics! The confetti was added last and even though I couldn't have the pieces light yellow, I think it still works this way and saved me a lot of work! 
The images are from a rather new to me stamp set by Lawn Fawn which was created with a magic picture changer in mind. I like that the set has two images, that go together: like the cake with the candles lit and then


someone has blown them out and tried a piece of that cake. So I decided to use the second image on the inside as a little unexpected surprise. I hope you like my card and that you are going to join us at PINspirational for this super sweet challenge ;o) Have a lovely day and happy crafting, everyone! Yours Maike


Supplies:
Stamps: "Birthday Before'n Afters" by Lawn Fawn
Stencil: "Layering Stencil: Bubble THS 002" by Tim Holzt

Challenges:

Dienstag, 20. Juni 2017

Love is in the Air (Cat in Balloon)

Halli Hallo ihr Lieben!
Für die aktuelle PINspirational Challenge ist diese Karte entstanden:

Heya my dear crafty friends!
I made this card for the newest PINspirational challenge:


Und dies hier ist das aktuelle Inspirationsbild:

And this is the current inspiration picture:


Meine Inspiration habe ich durch das Thema des Bildes und auch von den Farben genommen. Gut, ich habe noch blau für den Himmel und etwas Rosa hinzugefügt, aber mich trotzdem bemüht viel Weiß und Grün auf der Karte zu haben. Den Hintergrund habe ich mit Masking und verschiedenen Arten "Wasserfarbe" gestaltet. (Distress Inks für das Gras, Zigs für den Ballon und normaler Wasserfarben für den Himmel.) Nachdem alles gut getrocknet war, habe ich den Spruch auf die Grasfläche mit weißem Pulver embosst und das in Form gestanzte Papier mit dem stärksten Doppelseitigen Kleber, den ich besitze, auf die Kartenbasis geklebt.

I took my inspiration from the theme of the picture but also from the colours in a way that I have used a lot of green and white on my card. I had to mix in a little blue for the sky and wanted to add in some pink to really make those hearts shine. The background was created using the masking technique for the trees and all kinds of watercolours (Distress Inks for the grass, Zigs for the trees and ordinary watercolours for the sky) to colour the background in. After everything was dry I added the sentiment to the grassy part with white embossing powder and glued the panel to the cardbase using very strong double sided adhesive.


Den Ballon habe ich dann einmal auf den Hintergrund und noch einmal auf ein Stück Aquarellpapier gestempelt, damit ich den Korb und den Ballon selbst ausschneiden konnte, aber trotzdem die Verbindungslinien zu sehen sind. Außerdem habe ich die kleine Katze gestempelt, ebenfalls mit Zigs coloriert und sie dann mit Abstandskleber knapp über den Korb geklebt.

I stamped the balloon one on the background panel and once on another piece of watercolour paper, so that I could cut the balloon and the basket out, but still have the lines connecting the two. I also stamped and coloured the cat, fussy cut everything out and glued it to the panel using foam tape. 


Es wäre toll, wenn ihr euch von unserem Challengebild inspirieren lassen und eine Karte oder ein Layout dazu bei uns hochladen würdet. Ich freu mich immer sehr, eure Werke anzuschauen ;o) Und wer weiß, vielleicht werdet ihr ja der Gewinner der beiden Digistamps, die unser freundlicher Sponsor "Morgan's Artworld" als Preis anbietet. ;o) Habt eine tolle Woche und happy crafting!

I hope you are going to join us and maybe you are going to be the lucky winner of two digi stamps by our kind sponsor Morgan's Artworld ;o) Have a great week and happy crafting, everyone!

Material / supplies:
Stempel / stamps: "BB Up in the Air" von My Favorite Things
Stanze / die: "All Prettied Up" von Mama Elephant

Challenges:

Dienstag, 6. Juni 2017

That Bites!

Halli Hallo ihr Lieben!
Wie versprochen geht es zügig weiter mit den neuen Karten. Diese hier ist als DT-Karte für die aktuelle Cards und More Challenge zum Thema "Under the Sea" entstanden:

Heya my dear crafty friends!
Like I promised there will be a lot more going on here and so here is another new card as my DT creation for the current "Under the Sea" challenge at the Cards und More blog:


Ich habe die Fensterstanze ("Triple Peek-a-Boo Windows") von MFT benutzt, um meine bissigen Kerlchen in Szene zu setzen. Dazu habe ich sie einmal aus einem schönes Rechteck und einmal aus Schmierpapier ausgestanzt. Letzteres habe ich als Maske benutzt, um die Blautöne auf die Kartenbasis zu wischen. Ich wollte unbedingt, dass der Leuchtefisch in ganz dunkelblauem Wasser schwimmt und habe mich daher für einen Ombre-Look entschieden, bei dem es nach oben hin immer heller und karibischer wurde ;o)

I used the "Triple Peek-a-Boo Windows" from MFT to set my scene. I die cut them once out of a nice stitched rectangle and another time from some scratch paper I had on my desk. That way I could use the windows in the scratch paper as masks to add some colour to the card base. I went for an ombre look, because I wanted that fish with the "lamp" on its nose to swim through very dark water and the water to gradually get lighter towards the top. 


Bevor ich das Rechteck mit den Fenstern mit Abstandshaltern aufkleben konnte, musste ich noch schnell den Spruch und ein paar Wasserbläschen stempeln. Als nächstes habe ich die Fische auf Aquarelpapier gestempelt und mit Zigs ausgemalt. Nachdem sie alle auf dem Trockenen lagen ;o)  habe ich sie ebenfalls mit Foam Tape in die Öffnungen hineingeklebt. Dabei habe ich die unteren beiden Meeresbewohner ein wenig über den Rand der Fenster hinausragen lassen, um das Ganze Design etwas aufzulockern. Damit war meine Karte auch schon fertig ;o) Vielleicht habt ihr ja auch Lust bekommen ein "Unter Wasser"-Werk zu zaubern und es dann auf dem Cards und More Blog zu verlinken! Zu gewinnen gibt es übrigens eine Überraschung aus der Stempelküche. Ich wünsche euch viel Glück und happy crafting! Eure Maike ;o)

Before I adhered the window panel to the card base with some foam tape I stamped the sentiment and also added some water bubbles. Next I stamped and coloured the fish using Zig markers. After they had all dried completely I glued them into the windows using foam again and my card was done. I hope you are going to join us with a "Under the Sea" creation and with some luck you could win a surprise from our kind sponsor the "Stempelküche". Good luck and happy crafting, yours Maike ;o)


Material / supplies:
Stempel / stamps: "That Bites" von Avery Elle
Stanzen / dies: "Triple Peek-a-Boo Windows" von My Favorite Things

Montag, 17. Oktober 2016

Things that go bump in the Night (Pop-up card)

Halli Hallo ihr Lieben!
Wenn ihr euch jetzt fragt, was dieser Titel bedeuten soll, dann gibt es darauf zwei Antworten: Zum Einen ist es der Titel für unsere neue Challenge bei den Crafty Cardmakers. Das war einfach. Die tatsächliche Bedeutung hat sich mir allerdings trotz gar nicht mal so übler Englishkenntnisse entzogen und ich habe eine Erklärung auf Leo.org gefunden (click), die ungefähr besagt, dass es sich um (Halloween-) Wesen handelt, die in der Nacht ihr Unwesen treiben. Neben Fledermäusen, dachte ich, könnten auch einmal eher halloweenuntypische Tierchen am 31.10. herumgeistern:

Heya my dear crafty friends!
"Things that go bump in the night" is the new challenge theme at the Crafty Cardmakers blog. I have learned that bats, black cats and such are meant with that saying and I hope noone mind that I streched its meaning a little and included some... ummm... scary pigs in costume as well:


Als ich meine erste Pop-up Karte veröffentlicht habe (klick hier) habe ich versprochen meine Erkenntnisse und Lernfortschritte zu dieser Kartenart mit euch zu teilen und das werde ich nach weiteren Versuchen damit nun auch gerne tun ;o) Ganz besonders zwei Erkenntnisse haben mir dabei geholfen diese Karte schneller und mit weniger Knoten im Hirn zu basteln. Die erste war, dass ich viel freier gestalten kann, wenn ich ein quadratisches oder ein Hochformat wähle, da dann die Gefahr geringer ist, dass Elemente aus der Karte herausblitzen.

When I posted my last and first pop-up card (click here) I had promised to write a bit more about the topic in the future, which is what I want to do now ;o) There are two main realisations that helped me to create this card way more efficient than the last one. The first was, that I find it a lot easier to make a square or a portrait card, because then the chance of the added elements sticking out is lessened (hope that is the right word...).


Die andere Erleichterung erfährt man durch dünnes Papier. Innen in meiner Karte habe ich ganz bewusst sehr dünnes schwarzes Papier für die Landschaft benutzt, weil sich die Karte dann immer noch schließen lässt und man nicht auch noch eine Banderole herstellen und ins Design einplanen muss.

The other thing was, to use thin(ner) paper whereever possible. In this case the black paper on the inside of the card has the thickness of normal printer paper, so the card can be closed a lot easier.


Für die Schweinchen habe ich übrigens munter zwei Sets von verschiedenen Firmen gemixt. Die Haare / Kopfbedeckungen aus dem "Booyah" Set von Lawn Fawn passten hervorragend auf die Köpfe von den "Hog Heaven" von MFT und so kam ich zu den verkleideten Piggys.

I used two sets from different companies to dress up the little pigs. The hair and the hats from the "Booyah" set by Lawn Fawn made a perfect costume for the pigs from the "Hogs Heaven" set by MFT.


Vielleicht habt ihr ja auch Lust ein paar Halloweentiere, Geister und verwunschene Häuser zum Leben zu erwecken?! Dann macht doch mit bei der aktuellen Crafty Cardmakers Challenge und verlinkt euer Werk ;o) Happy crafting!!!

Maybe you feel your fingers itch by now and you would like to create a Halloween project as well?! If so then please join us for our current challenge :o) Happy crafting!!!


Material / supplies:
Stempel / stamps: "Hog Heaven" von My Favorite Things
                              "Booyah" von Lawn Fawn
                              "Meow-lloween" von Art Impressions (sentiment)
Stanzen / dies: "Grassy Border" & "Forest Border" von Lawn Fawn
                         "Trick or Treat" von My Favorite Things (boo & bats) / (retired)

Challenges:

Freitag, 20. Mai 2016

Best wishes on your birthday

Hallöchen ihr Lieben!
Leider hat mich eine Grippe fest im Griff und daher habt ihr seit Montag nichts mehr Neues von mir hier auf dem Blog gesehen. Heute hat der Basteltisch aber gerufen und mit warmem Tee neben mir ist dies hier entstanden:

Heya my dear crafty friends!
Unfortunately I have been sick the whole week, which is why you haven't seen anything new on here since Monday. Today my craft table called out to me though and with a warm cup of tea next to me I made this card:


Ich habe die Purple Onion Stempel der letzten Saison benutzt (obwohl ich gestehen muss, dass die neuen bereits auf dem Weg zu mir sind *grins) und wieder meine Zig Marker geausgekramt. Einige von euch wissen vielleicht, dass ich meine Liebe zu den Zigs entdeckt habe, nachdem ich Birkas Videa dazu gesehen habe. (Einen Link findet ihr in diesem Post - klick.) Ich muss ja zugeben, dass es lange nicht so schnell war, wie mit Copics zu colorieren, aber das Endergenis von den Zigs ist wirklich klasse. Ich hoffe, das findet ihr auch ;o)

I have used some Purple Onion Designs stamps from last season (though the new ones are already on their way to me *smile) and also took out some Zig markers to colour the whole scene in. Some of you might now that I found my love for Zig markers after watching Birka's video about how to colour with them (you find a link in this post - click). I must say colouring a complete scene wasn't as quick as colouring with Copics, but I love the result. I hope you do, too ;o)


Nachdem das Papier trocken war, habe ich das Quadrat und die ovale Aussparung für den Spruch ausgestanzt. Um alles abzurunden, habe ich zum Schluss noch Diamond Stickles auf die Eiscreme getupft - ein ganz klein bisschen kann man es auch erkennen, wenn man genau hinschaut ;o)

After the paper had dried completely I die cut the stitched square and also die cut a shape that would fit my sentiment from the panel. To finish the card I added some Diamond Stickles to the ice cream. 


Material / supplies:
Stempel / stamps: Fox "Joey" & "Picnic" von Purple Onion Designs
                            "Birthday Wishes" von Pink and Main
Stanzen / dies: "Wonky Stitched Square STAX" von My Favorite Things
                       "Stacked Pierced Ovals" von Create a Smile

Challenges:

Dienstag, 26. April 2016

Kroküsse für den Muttertag


Halli Hallo ihr Lieben!
Heute habe ich noch einen zweiten Post für euch. Auf dem PINspirational Blog startet heute eine Challenge zum Thema "Muttertag", allerdings könnt ihr euch natürlich wie immer auch von den Farben oder Elementen des Inspirationsbildes inspirieren lassen:

Hello again my dear crafty friends!
Today I have two posts to share with you. At the PINspirational Blog starts a new challenge today. The picture can inspire you in different ways: theme (Mother's Day), colours or elements:


Für meine Karte habe ich ein paar Kroküsse aufgestempelt und dafür die Masking Technik benutzt, damit es wirklich nach einer kleinen Ansammlung dieser hübschen Frühlingsboten ausschaut. Coloriert habe ich dieses Mal mit den Zig Real Brush Stiften. Ich liebe die leuchtenden Farben von den Zigs, hab aber immer noch Schwierigkeiten im Umgang mit ihnen... Zum Glück ist meine liebe Bastelfreundin Birka ein Naturtalent und sie macht außerdem Videos zu allen möglichen Themen. Nachdem sie letztens ein sehr ausführliches Video zum Thema Zigs veröffentlicht hat, hab ich mich auch noch einmal dran getraut und liebe den Effekt.

For my card I stamped a few crocuses using the masking technique and coloured them in using ZIG Real Brush markers. I love their vibrant colours combined with the watercoloured look, but I still have trouble using them. Fortunately my friend Birka is very talented with them and because she makes great videos for all kind of helpful things, I felt I could give my Zigs another try and love how it turned out.


Die Blumen habe ich nach dem Trocknen einfach mit dieser genialen ovalen Stanze ausgestanzt und mit Abstandshaltern auf ein embosstes weißes Papier geklebt. Dann habe ich das Stück Papier mit dem Wort "Mama" dazu geklebt und noch einige Enamel Dots um die Blumen drum herum verteilt und meine Karte war fertig. Hoffe, sie gefällt euch auch so sehr wie mir ;o) Habt einen wundervollen Tag ;o)

I simply die cut the flowers with this great oval shape and mounted it on a pice of embossed card stock. I added the paper strip with the word "Mama" and also scattered some enamel dots around the flowers and my card was done. Hope you like it as much as I do ;o) Have a great day everyone ;o)

Happy crafting!!!


Material / supplies:
Stempel / stamps: "Kroküsse" von Create a Smile
                             "" von Tiddly Inks
Stanzen / dies: "Stacked Pierced Ovals" von Create a Smile
                         "Stitched Rectangle" von Simon Says Stamp
Embossing Folder: "Wild Garden" von Little B

Challenges:

Samstag, 26. März 2016

ENTlich bist Du da

Halli Hallo ihr Lieben!
Dies hier ist meine vierte und leider auch schon letzte Gastdesign Karte für den Gerda Steiner Blog.
Hello my dear crafty friends!
This is my fourth and unfortunately last card for my guest design over at the Gerda Steiner Designs blog.


Ich wollte den Kartenspruch unter den Enten stehen habe, weshalb ich beim Stempeln des süßen Federviehs darauf geachtet habe, ausreichend Platz nach unten zu lassen. Nachdem ich alle Abdrücke aufgestempelt hatte, holte ich die Copics raus und machte mich an die Arbeit sie zu colorieren. Den Rest habe ich dann im Anschluss hinzugemalt. Es hat sich herausgestellt, dass es am einfachsten war zuerst ein ganz helles Blau für den Himmel zu benutzen und erst dann das Gras hinzuzufügen. Ganz zum Schluss kam dann das kühle Nass hinzu.

I knew I wanted the sentiment to be below the ducks so I made sure to leave enough space. Once I had stamped all the images, I coloured them in using Copic markers. Next I added the grass at the shore and the water.


Als ich die Buchstaben für meinen Spruch ausgestanzt habe, habe ich bewusst die ersten drei als Gro- und die weiteren als Kleinbuchstaben ausgestanzt, um das Wortspiel noch ein wenig mehr hervorzuheben. Nachdem ich den unteren Teil mit Versamark gestempelt und dann weiß embossed habe, hab ich die Buchstaben mit Abstandshaltern aufgeklebt.

When I die cut the letters for the sentiment I deliberately die cut the first ones in capital letters to emphasize the play on words here. The sentiment means "Finally you are here", but usually you would spell the first word a bit differently. I purposely misspelled it and wrote "ENTlich", because in German the word "Ente" means duck. After I had heat embossed the second part of the sentiment I adhered the die cut letters and glued the panel to a white card base.


Material / supplies:
Stempel / stamps: "Lucky Duck" von Gerda Steiner Designs
                            "Jessie's ABCs" von Lawn Fawn
Stanzen / dies: "Quinns ABCs - Lawn Cuts" von Lawn Fawn
                      "Stiched Rectangle" von Simon Says Stamp

Samstag, 12. März 2016

Hello Duck (Guest Design for Gerda Steiner Designs)

Hallöchen ihr Lieben!
Heute gibt es hier auf meinem Blog die zweite Karte, die ich als Gastdesignerin für Gerda Steiner Designs gewerkelt habe. Hierfür habe ich das süße Stempelset "Lucky Duck" verwendet:

Hello my dear crafty friends!
Today I'd like to show you the second card I have made as the guest designer for Gerda Steiner Designs. I used the adorable "Lucky Duck" stamp set:


Als erstes habe ich die niedliche tauchende Ente gestempelt und ihr direkt eine Maske verpasst. Um den Hintergrund zu gestalten habe ich mir als erstes den unteren Teil vorgenommen. Dazu habe ich die Distress Inks Salty Ocean, Blueprint Sketch und Chipped Sapphire mit dem Ink Blending Tool aufgetragen, dann einige Tropfen Wasser auf den Bereich gespritzt und nach etwa einer Minuten mit einem trockenen Tuch die restliche Flüssigkeit abgetupft. Als nächstes habe ich eine Maske über das Wasser geklebt und den Bereich darüber mit der Farbe Mustard Seed eingefärbt, bevor ich die runde Maske für die Sonne aufgeklebt habe. Da ich einen Sonnenuntergang darstellen wollte, habe ich überwiegend orange-rote Farben benutzt: Spiced Marmelade, Abandoned Coral, Candied Apple und ein kleines bisschen Seedless Preserves ganz oben am Rand.

First I stamped the cute diving duck and  masked it off. In order to create the background I started with the bottom part first using three different shades of blue Distress Inks: Salty Ocean, Blueprint Sketch and Chipped Sapphire and added a few drops of water next. I let the droplets sit for about a minute before I took them off with a tissue. Next I masked the water area as well and added a layer of Mustard Seed before placing a circle mask on top. Because I wanted to create the look of a sunset I used red and orangy colours: Spiced Marmelade, Abandoned Coral, Candied Apple and a tiny, tiny bit of Seedless Preserves at the very top.

Nachdem alles trocken war, habe ich die Ente mit Copics coloriert und das Wort "hello" aus dem unteres Teil herausgestanzt. Hinter das entstandene Loch habe ich Vellum geklebt und anschließend die inneren Buchstabenteile wieder aufgeklebt. Hinter das ausgestanzte Wort habe ich orangefarbenen Cardstock auf die Kartenbasis geklebt, weil das am ehesten nach dem Licht eines Sonnenuntergangs ausschaute. Nun blieb nur noch die Fische um das Wort herum zu verteilen und die Szene mit Abstandshaltern auf die Kartenbasis zu kleben.

When everything was dry I coloured the duck in using Copic markers and also die cut the word hello from the bottom part of the panel. I adhered some vellum behind the panel to be able to stick the inner parts of the letters back where they belonged. Then I placed an orange piece of cardstock behind the area with the die cutting to make it look like the red from the sun set would shine through the vellum. Now all that was left to do was to glue the little fish all around the die cut sentiment and to adhere the finished panel to the vanilla card base. 


Habt ein schönes Wochenende & happy crafting ;o)
Have a great weekend, everone & happy crafting ;o)

Maike

Material / supplies:
Stempel / stamps: "Lucky Duck" von Gerda Steiner Designs
Stanzen / dies: "Scripty Hello" von Lawn Fawn
                      "Sunshine Layers Dies" von WPlus9

Freitag, 4. Dezember 2015

Christmas Series Card # 13 / Weihnachtsserie Karte # 13 (Cozy Christmas)

Hallo ihr Lieben!
Die Temperaturen haben sich ja zum Glück wieder ein wenig nach oben bewegt - trotzdem habe ich Kuscheldecke, Kissen und Plüschsocken schon zurecht gelegt. Ihr auch? Passend dazu habe ich heute eine neue Karte für euch. Wie wäre es einmal mit gemütlichen Weihnachtsgrüßen?

Hello my dear crafty friends!
The temperatures in Germany have been quite low a couple of days back, but fortunately it is getting a little warmer again. However, I do have my soft blanket, pillows and warm socks ready ;o) Today's card fits right in with some cozy christmas wishes:


Als erstes habe ich den Pinguin gestempelt und anschließend mit einer Maske abgedeckt, um die Kissen genau über ihn zu stempeln. Ich wollte erreichen, dass es so aussieht, als würde der Pinguin ganz bequem und gemütlich in den Kissen sitzen ;o) Das Sofa habe ich freihand um die Szene drum herum gemalt und hoffe, ihr habt es als solches erkannt *grins. Als nächstes habe ich mit Hellgrau den Hintergrund auf mein blaues Papier gestempelt und das "Wonky Window" aus dem Papier gestanzt.

I started out by stamping and masking the cute penguin by Purple Onion Designs and stamping the pillows from My Favorite Things right on top. I wanted it to look like the penguin is sitting cozily between those fluffy pillows ;o) I added some texture to the back, that is meant to look like a sofa... I hope you did recognize it *grin. Next I stamped the background stamp on top of my blue panel and cut the wonky window out of it. 


Ich habe das gleiche Fenster auch noch einmal aus rotem Cardstock ausgestanzt und den Rahmenteil ausgeschnitten. Alles, was nun noch zu tun war, war den ersten Teil meines Spruches zu stempeln und zu embossen und den zweiten Teil aus schwarzem Cardstock auszuschneiden und aufzukleben. Und dazu muss ich euch was erzählen... Endlich, endlich habe ich "Stick-it paper" bei mir zu Hause und es benutzt, um das Wort "christmas" aufzukleben. Es war sooo viel einfacher, schneller und außerdem klebt es wirklich sehr zuverlässig. Solltet ihr also "Stick-it" finden, dann gönnt euch welches! Wir alle haben uns doch hin und wieder mal eine nette Kleinigkeit verdient, oder? ;o) Das wäre auf jeden Fall mein Tipp dafür ;o)

I cut the window from a red piece of paper as well and fuzzy cut the frame out and glued it on top of the blue panel. All that was left to do now was to stamp and heat emboss the first part of the sentiment and finish it with a black die cut piece. I have to tell you... I finally got my hand on some StickIt-paper and that makes glueing a word die cut down much, much easier. So if you get your hands on some sheets I think you should treat yourself to it! Don't we all deserve a treat once in a while? ;o)


Material / supplies:
Stempel / stamps: "Frost" von Purple Onion Designs
                            "Merry Christmoose" von My Favorite Things
                            "Jessie's ABCs" von Lawn Fawn
Stanzen / dies: "Peek-a-Boo Wonky Windows" von My Favorite Things
                      "Stitched Rectangle" von Simon Says Stamp

Challenges:
Click To Play

Dienstag, 24. November 2015

Christmas Series Card # 8 / Weihnachtsserie Karte # 8 (Elf on Shelf) :o)

Hallo ihr Lieben!
Dieser süße Wichtel wollte schon lange mal auf eine Karte und dieses Mal hat er es geschafft. Er passt aber auch einfach zu gut zur aktuellen {PINspirational} Challenge. ;o) (Inspirationsbild seht ihr unten im Post.) Unser Sponsor ist dieses Mal Aurora Wings und ihr könnt einen Preis für ihren Digi-Store gewinnen.

Heya dear crafty friends!
This cute elf wanted to be on a card for the longest time and now - he is. He was just to perfect for this fortnights {PIN}spirational challenge ;o) (You can find the inspiration picture further down in this post.) Our sponsor this time is Aurora Wings and as always you can win a prize for her store!


Das Motiv besteht eigentlich aus zwei Stempeln, daher musste ich mit einer Maske arbeiten. Zuerst habe ich den Wichtel gestempelt, anschließend dann das Bücherregal mit dem Tannenbaum und den Büchern. Nach dem Colorieren habe ich noch Titel auf die Bücher geschrieben und Schrift auf der "Naughty or Nice" - Liste angedeutet. Eigentlich war damit die Karte fertig, aber irgendwie war sie mir im unteren Bereich dann doch zu leer. Um das schnell zu ändern, habe ich einen meiner Prägefolder herausgesucht und auf den unteren Teil der Karte Geschenke geprägt. Nun war ich zufrienden ;o)

The image actually consists of two stamps, so I needed to do a bit of masking. First I stamped the little guy, next the shelf with the books and the little tree on top. After I had coloured everything in and had stamped the sentiment I used a Copic Multiliner to write the titles of the books and also to give the appearance of writing on the "Naughty or Nice" - list. Now my card was done - had I stuck to my original idea. However I felt like the card was a bit too empty, so I used one of my embossing folders to give the bottom of the card base a bit more interest. Now I was happy with the result ;o)


Ich hoffe, ihr zeigt uns eure Werke bei der aktuellen {PIN}spirational Challenge und dass ihr euch von meiner Karte und dem Bild von Pinterest inspirieren lasst:

Hope you will join us for our current {PIN}spirational challenge and get inspired by my card and the inspiration picture itself:


Material / supplies:
Stempel / stamps: "Little Elves" von Clearly Besotted
Embossingfolder: "Gifts, Ornaments & Snowflakes Set #657257" von Sizzix


Freitag, 6. November 2015

Christmas Series Card # 1/ Weihnachtsserie Karte # 1 & GIVEAWAY (Grumpy Christmas Cat)

Halli Hallo ihr Lieben!
Es geht ja nun mit großen Schritten auf Weihnachten zu und ich habe euch ja bereits angekündigt, dass ich eine Weihnachtsserie geplant habe. Und sie startet heute ;o) ;o) ;o) In der Zeit bis Heiligabend werde ich euch 24 Weihnachtskarten zeigen, die von meinem Basteltisch gehüpft sind. Den Anfang macht eine Karte, bei der ich durch Masking das Motiv verändert habe. Inspiriert hat mich dazu eine Karte von Maaike von "Cards by Maaike":

Hello my dear crafty friends!
Christmas isn't far now and as promised my christmas card series will start today :o) :o) :o) From now until the 24th of December, which is the first day we usually celebrate christmas here in Germany, I will post 24 christmas cards for your inspiration. Today i would like to show you a card where I have altered the image through some masking. I was inspired by Maaike from "Cards by Maaike" for this card:


Als erstes habe ich das weiße Papier zurecht geschnitten und dann überlegt, auf welcher Höhe mein Kater sitzen sollte. Dazu habe ich den Stempel einmal mit StazOn auf Transparentpapier gestempelt und grob ausgeschnitten. Als nächstes habe ich den Mützenstempel über seinen Ohren platziert und abgestempelt - natürlich habe ich vorher das Transparentpapier wieder entfernt ;o)

First I die cut the white panel and thought about where I wanted to place my cat. To get this right I had stamped the image on a piece of vellum first and roughly cut it out. After I had the correct placement I went ahead and placed the Santa hat over the cat's ears and stamped down - of course after I had taken away the vellum piece ;o)


Nachdem ich das ganze Fell mit Copics coloriert hatre, habe ich mir ein aufgerautes Stück Stoff und die Blenderflüssigkeit aus dem Nachfüller rausgekramt, um ein bisschen Struktur hinzubekommen. Dazu habe ich den Stoff in die Flüssigkeit getaucht und dann etwa zwei bis drei Sekunden auf die Katze gedrückt. Es ist immer besser den Stoff erst mal nicht zu lange auf den Stempel zu drücken, da der Blender noch einen Moment weiter aufhellt, auch nachdem man das Tuch wieder weggenommen hat. Nachdem ich mit dem Endergebnis zufrieden war habe ich noch die Katzennase und die Augen sowie den Hut coloriert. Trotzdem fehlte dann am Ende noch etwas und darum habe ich die blaue Linie um das Motiv herum gemalt. Dazu verwende ich die beiden hellsten Blautöne, die ich habe und verwische sie anschließend mit dem Blender. 

After I had coloured in the fur parts with Copic markers I used a piece of roughened up cloth (I hope, that is how one would say it...) and a few drops of the blender pen ink from a refiller. I pressed the cloth in to the liquid and then on my image. Don't do it for longer than say two or three seconds. It is always better to see what the blender does, before applying anymore, because it does lighten up a bit more once you remove the fabric. After I was happy with the result I coloured in the cat's nose and eyes and also the hat. Also I added a blue outline around him to give him more interest.


Als Kartenspruch habe ich "Ho, Ho... Oh!" statt des üblichen "Ho Ho Ho" gewählt, weil das Katerchen so schlecht gelaunt ausschaut. Ich hab mir vorgestellt, ich komme in einen Raum und fange an mit "Ho, Ho...", dann sehe ich den Gesichtsausdruck und ende mit einem überraschten "Oh!". Hoffe, ich konnte euch meinen Gedankengang halbwegs verständlich erklären ;o) Um die Karte noch ein wenig abzurunden, habe ich Schneeflocken in meiner neusten Lieblingsfarbe gestempelt: "Encore Ultimate Metallic Silver" von Tsukineko. Das Silber glänzt genauso wie silbernes Embossingpulver, ohne, dass man das ganze Gewusel mit Heat Gun und Pulver hat - allerdings bekommt man auch nicht das Plusterige hin. Trotzdem liebe ich die Farbe für einen schnellen silbrigen Touch!!!

As my sentiment I chose to stamp "Ho Ho... Oh" instead of the usual "Ho Ho Ho", because the cat looks sooo grumpy that I imagined coming into a room, saying "Ho, Ho..." and then stopping in my tracks after seeing its face and ending with a surprised "Oh!" Hope I could explain my train of thoughts here - I just think it is too funny ;o) To finish the card off I stamped some snowflakes around the image and the sentiment in my new absolute favourite silver Ink: "Encore Ultimate Metallic Silver" from Tsukineko. It gives the most fantastic silver shine and looks almost like it is embossed without going through all the fuss - though without the raised finished as well.. Still - love it!!!


GIVEAWAY:
Nun blogge ich schon seit fast einem Jahr und freu mich über jeden einzelnen, der hier vorbei schaut und sich einen Moment Zeit nimmt, um meine Karten anzuschauen und vielleicht sogar noch ein paar liebe Worte hier lässt. Eine liebe Freundin sagte letztens zu einer anderen Bloggerin, dass "Kommentare das Brot der Blogger" seien und ich stimme ihr da voll und ganz zu. Mit diesem Giveaway möchte ich jedem meiner Follower "Danke!" sagen.
Was man gewinnen kann???
Einen $25 Gutschein für einen Online-Bastelshop eurer Wahl. (Das sind momentan etwa 23 Euro...)
Wie kann man gewinnen???
Gewinnberechtigt ist jeder, der meinem Blog über Google Friend Connect oder Google+ folgt und bei mindestens einer Karte der Weihnachtsserie 2015 kommentiert. Für jeden Kommentar zu einer meiner Karten der Weihnachtsserie kommt ein Los für euch in den Lostopf (ein Los pro Post) und wer es schafft sogar bei jeder Karte der Serie bis zum 26.12.2015 zu kommentieren (bitte im Kommentar zur Karte #24 Bescheid sagen) bekommt 10 Extralose!!!
Am 27.12.2015 werde ich den Gewinner oder die Gewinnerin ziehen und auf meinem Blog veröffentlichen. Falls sich der Gewinner / die Gewinnerin bis zum 31.12.2015 nicht bei mir meldet, verfällt sein / ihr Gewinn und ich ziehe am 01.01.2016 erneut einen Namen aus dem Lostopf.
Ich wünsche euch und mir viel Freude an der Weihnachtsserie, hoffe, dass ich euch ein wenig inspirieren kann und drücke jedem fest die Daumen!

Eure Maike ;o)

GIVEAWAY:
I have started my blog almost one year ago and appreciate each and every one of you who reads my posts, looks at my cards and maybe leaves some lovely words for me to read. A very good friend of mine said a few days ago, that "comments are a blogger's bread" and I completely agree with her. With this giveaway I would like to say "Thank you" to all my followers.
What can you win?
A $25 gift certificate to an online crafting shop of your choice.

What do you have to do to win?
Eligible for the $25 gift certificate is anyone who follows my blog through Google Friend Connect or is a Google+ follower and who leaves at least one comment on one of the posts of my christmas card series 2015. For each comment I will put one token with your name on it into a box (one token per post). If someone manages to leave a comment on each card of this series (please let me know in your comment of card #24) gets 10 extra tokens!!!
I will draw and announce the winner's name on the 27th of December 2015 on my blog. If the winner doesn't get back to me until the 31st of December 2015 they forfeit their prize and I will draw a new winner on the 1st of January 2016.

I hope you all are going to enjoy the christmas series as much as I do and hope to be able to inspire you. Good luck everybody!

Yours Maike


Material / supplies:
Stempel / stamps: "Les Chats russes" von Katzelkraft
                           "Hats Off To You" von Lawn Fawn

Stanze / die: "Sunshine Layers Die" von WPlus9


Related Posts Plugin for WordPress, Blogger...