Posts mit dem Label Distress Inks werden angezeigt. Alle Posts anzeigen

Sonntag, 15. Januar 2023

Super fun birthday (snowfight)

Hello everyone ;o)

It is the middle of the month and therefore I'd like to invite you to have a look at our newest challenge at Papercraft Challenges. The theme this time is "Anything Goes" so you can share with us your favourite project - no matter what theme it is. I decided to create a wintery birthday card and here it is:


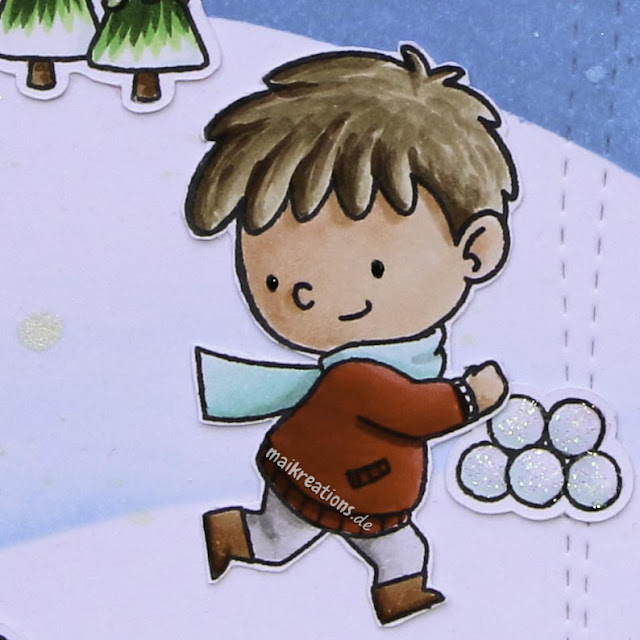
I made the background using Distress Inks and a stencil I cut from thick cardstock in a curvy shape to create the illusion of hills in the background. The images are from My Favourite Things and I love that you can use some of the set for Christmas cards as well as wintery themed ones. Once the background was dry and I knew which images would go where I heat embossed the sentiment which always looks really nice I think ;o)


Colouring the images was really a lot of fun and quicker than I first thought. I added a few trees and snowflakes to the back to make it look more interesting and also put glitter on the snow and the snowballs. To finish the card I stamped loads of snowballs and the girl inside the card in a light blue shade, hoping this will surprise the recipient. 


It would be lovely having you join our challenge this time! Have a fabulous day and happy crafting, yours Maike

Stamps: "Snow much fun" by My Favourite Things
Dies: "Wonky Rectangle Die" by Avery Elle
         "Mini Snowflakes" by Lawn Fawn 

Montag, 26. Oktober 2020

Happy Halloween (cat and dog)

Hello everyone ;o)
this is a sad post to write, even though I really like this card and am quite happy how it turned out. The sad part is that this will be the very last challenge at the Crafty Cardmakers. Our wonderful Lin from the "Twisted Witch" blog has good reasons to step down from coordinating the team and the challenge. However I am really heartbroken that the challenge won't continue. I have met so many lovely and fabulous people and talented crafters through the challenge. I am grateful for having been a part of this team for as long as it lasted and I wish each and everyone just the best of luck, good health and happiness! 
But now onto today's card. This is my inspiration for you for our "Things That Go Bump In The Night" challenge:


I started with the background and used different Distress Inks to create a lighter middle and a darker outside and also stamped a cemetary scene on top of the grassy hill. When in the end that still didn't feel dark enough I went around the panel with "Black Soot" and that really made even the darker, duller colours pop. 


Next I stamped and coloured the two fun images by Simon Says stamp. They are from an older set which is new to me though. They are quite big and I also love the sentiment which is from the same set. That one was stamped and embossed before I added the cat and the dog, but after the background had dried for quite some time. I thought, that the top was a little too bare so I added the spider and her net to the upper left corner and that finished off my card. I hope you like it and I also hope that you will help us leaving blogland with a bang by participating in our last challenge! 


Supplies:

Stamps: "Trick Or Treat" by Simon Says Stamp
Dies: "Cute Cobweb" by Lawn Fawn

Challenges:
Simon Says Wednesday Challenge "Layer it Up" (3 layers plus inked layers)
Animal Friends Challenge "Spiders"
Dragonfly Dreams "Spooky and / or Cute"
Sweet Stampin Challenge "Halloween"
Send a Smile 4 Kids "Anything Goes"
My Time to Craft "Halloween or Cats"

Dienstag, 2. Juli 2019

Beary Happy Birthday!


Hello everyone ;o)
I am back with a new card for the "Dies or Punches" challenge over at the Crafty Cardmakers blog: 


For my card I used three different kinds of dies: the panel die, a letter / sentiment die and a letter / banner die. In my head I had pictured something fun and colourful so I started by creating the background paper. I have used Distress Inks in Peacock Feathers and Fozzilized Amber and blended them together to get a kind of ombre background and splattered it with water to get these fun drops in the background.


Once the background was dry I glued it to a card base and added the panel die-cut on top. The bear fit perfectly size- and themewise for what I had in mind, so I took out my Zig markers and coloured it in. 


Once I had the bear adhered I added the sentiment. I always loved the banner letters and thought they would be perfect for this challenge, so I spelled "beary" with it and finished the sentiment with a die-cut "Happy" and a stamped "birthday". I hope you are going to join us for our challenge at the Crafty Cardmakers! Happy crafting, everyone ;o))) Maike

Supplies:
Stamps: "Birthday Bears"  by My Favorite Things (retired it seems)
Dies: "Circle Panel Die" by Your Next Stamp
          "Stitched Banner Alphabet Dies" by My Favorite Things
          "Happy Birthday Wafer Die" by Simon Says Stamp

Challenges:

Samstag, 5. Januar 2019

Sending Hugs (Purple Onion)

Halli Hallo ihr Lieben!
Ich hoffe, ihr hattet einen guten Start ins neue Jahr und ich wünsche euch allen für 2019 Zufriedenheit, Freude, Gesundheit, Zeit und anhaltende Kreativität ;o)
Nun zu meiner Karte: Für das Thema "Alles Neu" bei Challenge Up Your Life habe ich einen meiner neuen Stempel von Purple Onion Designs benutzt:

Heya my dear crafty friends!
I hope you had a good start to the New Year and I wish you all happiness, happiness, health, time and continued creativity in 2019 ;o)
Now for my card: For the theme "All New" at Challenge Up Your Life I used one of my new stamps from Purple Onion Designs:


Den Hintergrund habe ich mit Distress Oxide Inks in den Farben "Peacock Feathers", "Blueprint Sketch" und "Seedless Preserves" gewischt. Anschließend habe ich den Hintergrund erst mit Wasser und dann noch mal mit Copic Opaque White bespritzt. Der Spruch ist aus dem Set "Arctic Animals", das gerade sogar mit 50% Rabatt zu bekommen ist ;o)

I created the background with Distress Oxide Inks in the colors "Peacock Feathers", "Blueprint Sketch" and "Seedless Preserves". Then I sprayed the background first with water and then again with some Copic Opaque White. The sentiment is from the "Arctic Animals" set, which is on sale right now and you could get it with a 50% discount ;o)


Ich hoffe, ihr habt Lust bekommen bei unserer neusten Challenge mitzumachen! Habt ein tolles Wochenende und happy crafting ;o)))

I hope you are going to join us in our first challenge of the year! Have a wonderful weekend and happy crafting ;o)))


Material / supplies:
Stempel / stamps: "Curly - Winter Pig" von Purple Onion Designs
                              "Arctic Animals" von Clearly Besotted
Stanzen / dies: "Wonky Stitches Elle-Ments" von Avery Elle

Dienstag, 3. Juli 2018

"Aloha" - Girl and Turtle


Hallo zusammen!
Bei der Pinspirational Challenge startet heute eine neue Herausforderung für euch. Dieses Mal gibt es ein tolles Inspirationsbild für den Sommer und die anstehenden Ferien. Aber schaut selbst:

Heya everyone!
Over at the PINspirational blog we have a new challenge for you. This time the inspiration pic is perfect for the summer time and the upcoming time of vacations. But look for yourself:

http://pinspirationalchallenges.blogspot.com/2018/07/pinspirational-challenge-219.html

Ich habe mich für das Strandthema ganz allgemein entschieden und für meine Karte sowohl einen Himmel als auch den Strand gewerkelt. Für den Himmel habe ich die wunderbar schimmernden Nuvo Pasten und eine Schablone benutzt, für den Strand habe ich allerdings Distress Inks in den Farben Fossilized Amber and Vintage Photo benutzt. The Stempelbilder habe ich mit Copics coloriert.

I chose to go with the beach theme in general and for my card I created a cloud background with the lovely and shimmery Nuvo paste and also ink up some paper in sand colours. I have used Distress Inks for this in Fossilized Amber and Vintage Photo. The images are from My Favorite Things and are all coloured with Copic markers.


Wenn ihr dieses Mal (wieder?) mitmacht, habt ihr die Chance auf einen tollen Preis von unserem freundlichen Sponsor "Elisabeth Bell". Ich würde mich freuen euer Projekt in unserer Gallerie zu sehen! Habt eine sonnige Woche und happy craftingm wünscht euch eure Maike

In case you feel like taking part in our challenge you'll have the chance to win a fabulous prize by our very kind sponsor "Elisabeth Bell". I would love to see your project in our gallery and hope you'll have a great and sunny week! Happy crafting, yours Maike


Material / supplies:
Stempel / stamps: "BB Polynesian Paradise" von My Favorite Things
Stanzen / dies: "All Prettied Up" von Mama Elephant
                         "Stitched Hillside Border" von Lawn Fawn
                         "Stitched Circle Die" von My Favorite Things

Dienstag, 22. Mai 2018

Blumengrüße zum Geburtstag

Halli Hallo ihr Lieben!
Auf PINspirational startet heute eine neue Challenge. Wie ihr vielleicht wisst, habe ich selten Blumen als Motiv für meine Karten, aber die von Create A Smile hatten es mir eh angetan und ich freue mich, dass ich sie jetzt auch endlich mal benutzt habe ;o) Dies hier ist übrigens das aktuelle Inspirationsbild:

Heya my dear crafty friends!
Today starts a new challenge at the PINspirational blog. As you might know I don't often use flowers as my focal image, but these stamps from Create A Smile have been in my stash for a bit and I am glad I finally got the chance to use them. This is the current inspiration picture:

http://pinspirationalchallenges.blogspot.de/2018/05/pinspirational-challenge-216.html

Zuerst habe ich den Hintergrund für die Blumen erstellt. Dazu habe ich hellgraue Farbe durch den tollen "Blasen"-Stencil aufgetragen. Als nächstes habe ich die Blumen platziert, die ich zuvor auf Bristol Smooth Aquarellpapier weiß embossed und mit den Winsor & Newton Watercolour Markern coloriert hatte. Zum Schluss habe ich den Spruch gestempelt. Weil das ja normalerweise vorher mehr Sinn gemacht hätte (ehem....) habe ich dieses Mal das MISTI gezückt und damit doch noch einen schönen Abdruck hinbekommen. Um dem Spruch etwas mehr Wumms zu geben (mir fällt gerade leider kein besserer Begriff ein) habe ich den letzten Teil auf schwarzen Cardstock in weiß embossed und mit Foamtape hochgestellt. Mir gefällt es so und was meint ihr? Ich hoffe, euch gefällt meine Karte und vielleicht habt ihr ja Lust bei unserer Challenge mitzumachen ;o) Habt eine tolle Woche und happy crafting, eure Maike

First I created the backdrop for the flowers. I sponged some grey ink directly on the card base using this fun irregular dot stencil. Then I added the flowers and leaves I had heat embossed on Bristol Smooth paper and coloured with Winsor & Newton Watercolour markers. Last I added the greeting. For the stamping I used the MISTI tool, to make sure I got a good impression. And to make the greeting a bit more interesting I heat embossed the last word in white on black cardstock. I think it adds a lot to the look. What do you think? I hope you like my card and that you are going to play along with us. Have a wonderful week and happy crafting, yours Maike


Material / supplies:
Stempel / stamps: "Magic Flowers", "Viele Grüße" & "Mini Geburtstag" von Create a Smile
Schablone / stencil: "Bubble" von Stampers Anonymous / Tim Holtz

Challenges:

Montag, 7. Mai 2018

Waving Hello Shaker Card

Halli Hallo ihr Lieben!
Für die Crafty Cardmakers und das Thema "Kein Designpapier" habe ich folgende Karte gewerkelt: 

Heya my dear crafty friends!
I created this card for the Crafty Cardmakers and the new challenge theme "No Patterned Paper":


Zuerst habe ich die Hillside Cover Die ausgestanzt und diese mit Distress Oxide Inks und der Hilfe meiner wundervollen Stencil Brushes eingefärbt. Für den Grund habe ich Vintage Photo und für das Wasser Salty Ocean und Peacock Feathers benutzt. Als nächstes habe ich dann alle Unterwasserlebewesen mit Memento auf Copic freundliches Papier gestempelt und mit eben solchen dann coloriert. Die meisten von ihnen habe ich um das ebenfalls gestempelte Sentiment herum direkt aufgeklebt, nur eine Qualle und ein Büschel Seegras habe ich für später zur Seite gelegt.

I had started by die cutting the Hillside Cover die and did some ink blending with Distress Oxide Inks using Stencil Brushes to get a lighter result than if I had used the foam blending tool. For the ground I used Vintage Photo and for the water Salty Ocean and Peacock Feathers. Next I stamped all images with Memento Ink and coloured them using Copic markers. I glued most the elements directly to the hill piece around the stamped sentiment, except for one jelly fish and a bit of sea grass.


Die beiden wollte ich nämlcih auf die Folie des Shakers kleben um noch etwas mehr Tiefe zu erzeugen. Dank des rechteckigen Rahmens war der Shakerteil leicht herzustellen. Zuerst habe ich eine zurechtgeschnittene Folie mit Scor Tape festgeklebt und dann doppelt gelegtes Foamtape komplett außen herum geklebt. In diese Vertiefung habe ich die Pailletten geschüttet und anschließend habe ich den Wasserhintergrund aufgeklebt - natürlich verkehrt herum, damit man ihn später durch die Folie sehen kann und nicht die etwas unansehnlichere Rückseite davon. Auf die habe ich ebenfalls großzügig Scor Tape geklebt und den Shaker so auf der Kartenbasis befestigt.

I wanted them to go on the front of my shaker to create even more dimension. The shaker was quick to make thanks to this rectangle frame to which I added a piece of acetate with very strong Score Tape and a double layer of foam adhesive. Next I added the shaker pieces, removed the protective foil from the adhesive and glued the water piece to it upside down. Using Score Tape again I then added that piece to my card front and also glued the two missing elements to the outside of the shaker.
 
Damit sollte meine Karte eigentlich fertig sein, aber das weiße Stück Papier, das ich innen heineingeklebt hatte, war mir irgendwie zu grell und zu langweilig gleichzeitig... Also habe ich den Tintenfisch noch einmal in lila gestempelt und für einen sanfteren Look mit Buntstiften coloriert. Mit dem Thema "Wasser" kann man echt viel anstellen finde ich und deshalb würde ich mich sehr freuen, wenn ihr nun auch Lust habt dazu etwas zu kreieren und mit uns zu teilen. Habt eine schöne Woche und happy crafting, wünscht euch eure Maike ;o)

My card could have been done at that point, but I felt, that the inside was too white against the purple so I decided to add another octopus to the inside. This one was coloured with coloured pencils to give it a softer look. There is so much you could create to follow our "Water" theme and I would love to see your creation in our gallery, so why not get crafty?! Have a great week and happy crafting, yours Maike ;o)

Material / supplies:
Stempel / stamps: "Octopi my Heart" & "So Jelly" von Lawn Fawn
                             "Little Mermaids" von The Greeting Farm
Stanzen / dies: "Hillside Cover" von Mama Elephant
                        "Build a Scene - Underwater" von Taylored Expressions

Samstag, 31. März 2018

Up in the Air

Hallo ihr Lieben!
"Fahrzeuge" lautet das neue Thema bei Challenge Up Your Life und ich habe mich für einen Heißluftballon entschieden... ;o) Vor Kurzem habe ich gelernt, dass man in so einem Ding fährt, nicht fliegt und das scheint irgendwie hängen geblieben zu sein...

Heya my dear crafty friends!
"Vehicles" is the new task at the Challenge Up Your Life blog and this is my inspration card:


Den Hintergrund habe ich mit dem Cloud Stencil und Worn Lipstick Distress Oxide Ink gemacht und anschließend dieses schöne Rechteck daraus ausgestanzt. Mit derselben Stanze habe ich anschließend auch noch einmal eine Form aus weißem Papier ausgestanzt, so dass ich aus den beiden Teilen eine Kartenbasis herstellen konnte. Als nächstes habe ich den Ballon gestempelt, coloriert und ausgeschnitten... Das war der Moment, an dem ich meinen Fehler bemerkt habe: Durch die Seile gab es zu viel weiße Fläche, was auf dem Hintergrund echt komisch aussah. Also habe ich eine Maske gestempelt und geschnitten und den Hintergrund dann auch über diesen Teil gewischt, um ein durchgehendes Muster hinzubekommen. Würde ich diese Karte noch einmal machen, würde ich sie einfach direkt als 1-Layer-Karte anlegen. Aber weil ich es jetzt nun einmal konnte, habe ich den Ballon mit Abstandshaltern aufgeklebt ;o)

I created a background using the Cloud Stencil and Worn Lipstick Distress Oxide Ink and die cute the piece to a scalloped edge rectangle. Then I die cut the same shape from white paper, so that I could glue both pieces together and use them as my card base. Next I stamped and coloured the balloon and fussy cut it out. That was when I noticed my mistake... There was too much white space to look good, so I had to stamp and cut a mask and use the same ink and stencil again to get a continuous pattern. If I would create this card again I would make it a one layer card - much less complicated but same look ;o) However, because I could now that I had gone through all the steps I decided to use foam tape to adhere the balloon to my card base with some dimension.


Zum Schluss habe ich das Wort "hi" aus schwarzem Cardstock ausgestanzt und neben den Ballon geklebt. Dann habe ich die türkisen Sternchen noch überall verteilt und meine Karte war fertig. Habt ihr Stempel oder Sticker mit Fahrzeugen drauf bei euch im Schrank oder sonst wo liegen? Dann schnappt die euch doch und kreiert ein Werk damit... Vergesst aber nicht, es dann auch in unserer Gallerie zu verlinken :o) Habt ein schönes Osterwochenende und happy crafting, wünscht euch eure Maike ;o)

To finish the card I die cut the word "hi" from black cardstock and glued it next to the balloon. Now all that was left to do was to scatter a few turquoise stars around on the card and my card was done. Do you have stamps or stickers of any type of vehicle in your craft room? How about creating something with it? But don't forget to link your creation to our gallery then ;o) Have a fantastic Easter weekend and happy crafting, yours Maike


Material/ supplies:
Stempel / stamps: "Up and Away" von Purple Onion Designs
Stanzen / dies: "Hello there" von My Favorite Things
Schablone / stencil: "Mini Cloud Stencil" von My Favorite Things

Samstag, 6. Januar 2018

Keep Swimming (Embossing Wet AND Dry)

Hallo meine Lieben!
Ich hoffe, ihr alle hattet eine schöne, gemütliche und kreative Zeit zwischen Weihnachten und heute ;o) Ich weiß nicht, wie es euch geht, aber mein Basteltisch hat mich in den vergangenen zwei Wochen kaum gesehen: Seit Beginn des Jahres gab es bei uns nämlich bereits drei Geburtstage zu feiern. Für das neue Thema "Embossingfolder" bei Challenge Up Your Life, habe ich dann aber gestern doch ein bisschen mit meinen neuen und alten Goodies gespielt:

Heya my dear crafty friends!
I hope you all had a great, cozy and creative time between Christmas and now ;o) My craft desk hadn't seen me in quite a long time, because we already got to celebrate three birthdays this year. Have you had time to get creative in 2018 yet? For the new task "Embossingfolder" at Challenge Up Your Life which starts today I got some old and new goodies out yesterday to create an inspiration card for you:


Zuerst habe ich mit Distress Oxide Inks den Hintergrund gestaltet. Für den Himmel habe ich die Farben Fossilized Amber und Picked Raspberry benutzt, für das Wasser erst einmal nur Peacock Feathers. Nach dem Trocknen habe ich im oberen Teil die Wolken mit einem Embossing Folder geprägt und die Luftblasen mit einer Schablone und Salty Ocean Distress Oxide Ink aufgetragen.

I started by creating the background with Distress Oxide Inks. For the sky I have used the colours Fossilized Amber and Picked Raspberry, for the water Peacock Feathers. After the ink had dried I added some cloud texture to the sky with an embossing folder and also the bubbles for the water area using a stencil and Salty Ocean Distress Oxide Ink.


Als nächstes habe ich die Meeresbewohner mit Embossingpulver auf die Karte gebracht - nur die ganz kleinen Fische oben rechts sind gestempelt. I finde, die Quallen und der silberne Fisch sind klasse geworden, aber ich bin immer wieder enttäuscht, wie heftig der Unterschied zwischen dem gelben Pulver und seinem Endergebnis ist. Habt ihr Empfehlungen für ein richtig schön deckendes, gelbes Embossingpulver? Ich würde mich echt freuen, wenn ihr mit mir teilen würdet, was ihr so benutzt ;o)

Next I added the critters using embossing powder for all but the tiny ones in the upper right corner. I love how the jelly fish and the silver one turned out, but I am always disappointed when I compare the yellow powder to its end result. Have you any suggestions for a really opaque yellow embossing powder? I would love to hear what you use ;o)


Zum Schluss habe ich dann noch den Spruch gestempelt, mit den Enamel Pfeilen von Create a Smile aufgehübscht und auf die Kartenbasis geklebt. Und weil ein bisschen Glitter immer geht, habe ich die Wolken noch mit meinem Wink of Stella zum Glitzern gebracht. Das wars für heute, ihr Lieben! Ich liebe den Look von Embossing Foldern - auch, wenn sie wie ich gehört habe gerade out sind *grins - und würde mich freuen zu sehen, was ihr aus dem Thema macht. Habt ein wunderschönes Wochenende und happy crafting wünscht euch eure Maike ;o)

My last steps were to stamps the sentiment and accentuate it with the fun enamel arrows by Create a Smile. After I glued the piece to the card base I also added some glitter to the clouds to set them off a bit more. So, that was my card for today, my friends! I do love the look of dry embossing - even though I have heard rumors it isn't the most fashionable technique right now *grin - and I would love to see what you create using your folders. Have a wonderful weekend and happy crafting, yours Maike ;o)


Material / supplies:
Stempel / stamps: "Ocean Fun" von My Favorite Things
Embossingfolder: "Clouds" von TBA
Schablone / Stencil: "Bubbles" von TBA

Challenges:
Related Posts Plugin for WordPress, Blogger...