Posts mit dem Label Christmas Series 2015 werden angezeigt. Alle Posts anzeigen

Montag, 28. Dezember 2015

And the winner is...

Hallo ihr Lieben!
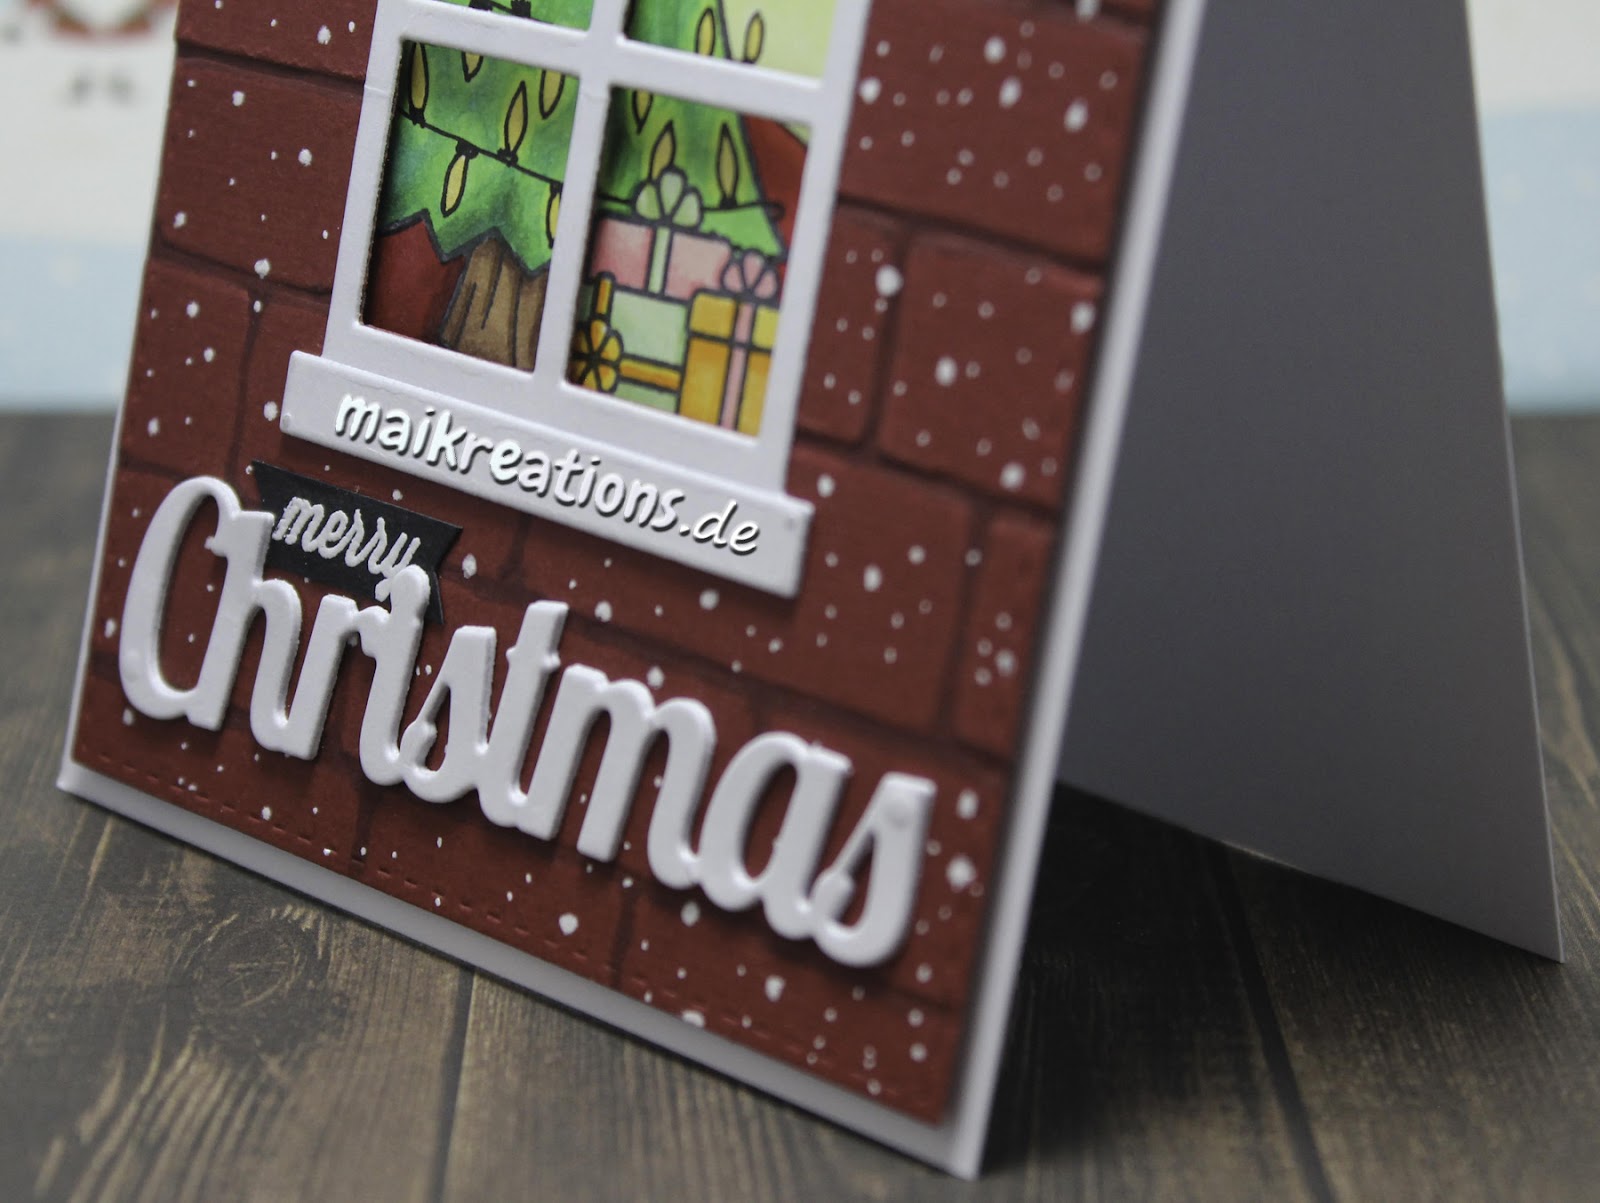
Ich hoffe, ihr verzeiht mir, dass ich einen Tag zu spät dran bin - irgendwie haben die freien Tage dafür gesorgt, dass in meinem Hirn die Tage und Daten durcheinander geraten sind. Hier seht ihr noch einmal einen Überblick über meine Weihnachtsserie 2015:

Hello my dear crafty friends!
I hope you can forgive me for posting this one day too late - the holidays seems to have meddled with my brain and I kind of lost track of the dates and the according week days. Here you can see an overview of all the cards in my Christmas series 2015:


Ich habe für jeden Kommentar einen Zettel mit dem entsprechenden Namen in eine Box geworfen - wobei ich auch berücksichtigt habe, wer es geschafft hat, zu jedem Post etwas zu schreiben und habe für diejenige noch einmal 10 Extralose geschrieben. Dann habe ich die Box kräftig geschüttelt und meinen Mann einen Zettel ziehen lassen. Der Name darauf lautet:

For each comment I wrote the name on a piece of paper and threw it in a box - taking into account those who commented on every post of the series and writing ten extra pieces of paper for them. Then I closed the lid and gave the box a good shake. Next I asked my husband to draw one of the papers out and the name on it is:

CorinnasCreativRausch


Herzlichen Glückwunsch liebe Corinna! Bitte schreib mir eine Email, in der Du mir Deinen Wunsch-Online-Laden nennst, damit ich Dir ganz bald Deinen Gewinn zukommen lassen kann ;o)

Congratulations, Corinna! Please send me an Email stating your favourite online crafting shop and I will send you the gift certificate ;o)


Euch allen herzlichen Dank  fürs Mitmachen und Kommentare hinterlassen und schon einmal jetzt einen guten Rutsch in ein glückliches, kreatives und gesundes Jahr 2016!

Thank you all for taking part in my giveaway and for leaving such lovely comments. Have a very happy, creative and healthy new year!

Donnerstag, 24. Dezember 2015

Christmas Series Card # 24 / Weihnachtsserie Karte # 24 (Colouring on Kraft paper)

Fröhliche Weihnachten, ihr Lieben!!! 
Ich wünsche euch allen ein Fest voller Freude, Glück und Zeit um zur Ruhe zu kommen oder kreativ sein zu können! Heute zeige ich euch die letzte Karte meiner Serie, die euch hoffentlich genauso viel Spaß gemacht hat, wie mir ;o)

Merry Christmas my dear crafty friends!!!
I wish you all a merry Christmas, with lots of wonderful, happy, quiet and creative moments. Today I am showing you the last card of my christmas series and hope you had just as much fun with it as I had ;o)


Auf dem Kraft-Cardstock habe ich mit Kreide-Bleistiften gemalt, die Schneeflocken in Frost White von ColorBox gestempelt und noch den Kartenspruch mit weißem Pulver embossed. Ich mag diesen sanften Look wirklich gerne, den man so bekommt!

I coloured on the kraft cardstock with some chalk pencils from Stabilo, stamped the snowflakes with Frost White ink from ColorBox and added a heat embossed sentiment. That was all, but I really love the soft look!


Habt alle eine wunderbare Weihnachtszeit! Have a very merry Christmas season!

Eure / yours Maike ;o)


Material / supplies:
Stempel / stamps: "Winter Pals" von WPlus9
                            "Zu Weihnachten" von Create a Smile 

Mittwoch, 23. Dezember 2015

Christmas Series card # 23 / Weihnachtsserie Karte # 23 (Last Minute Christmas Card)

Hallöchen ihr Lieben!
Nun geht es wirklich mit Riesenschritten auf Weihnachten zu, daher habe ich heute eine Karte für euch gemacht, die man ganz schnell machen kann. 

Hello my dear crafty friends!
Christmas is just around the corner now and that is why I chose to make a very quick card for today's post.


Für die roten und grünen Streifen habe ich mal wieder mein Gansai Tambi Wasserfarbenset herausgeholt. Mit dem Pinsel habe ich dann einfach unterschiedlich breite Streifen auf das Aquarellpapier gezogen. Nachdem alles trocken war, habe ich eine Stanze von WPlus9 benutzt, um es auszuschneiden und habe die gleiche Form auch noch zwei Mal aus weißem Cardstock ausgestanzt. (2 Stücke deshalb, damit es ein bisschen hübscher ausschaut und es stabiler wird.) Die Rechtecke habe ich Rücken an Rücken zusammengeklebt und  bei ca. einem 3/4 Inch gefalzt und hinter das rot-grüne Papier geklebt, so dass sich die Karte auch gut öffnen lässt. Achtung: Den Kleber nur auf den schmalen Streifen zwischen oberem Rand und Falzung auftragen, sonst lässt sich die Karte nicht öffnen ;o)

I used the Gansai Tambi watercolour set and drew the red and green stripes on a piece of watercolour paper in various widths. After it had dried I used the scalloped die to cut it out and also cut the same shape  twice from some plain white paper als well, because I wanted to create a quick shaped card. I glued both pieces back to back (so that the card would be more sturdy and would look more finished with only the pretty sides showing), before I scored them at about 3/4" and glued it to the back of my watercolour panel. 


Als nächstes habe ich die Weihnachtsbäume gestempelt und mit der passenden Handstanzte ausgeschnitten. Auf den zweiten und dritten Streifen habe ich zum Schluss noch den Kartenspruch gestempelt und weiß embossed und die Bäume auf die Karte geklebt. 
Denkt bitte daran, dass ihr noch bis zum 26.12. die Weihnachtsserie kommentieren könnt, um Lose für mein Gewinnspiel zu sammeln. Zu gewinnen gibt es einen 25 Dollar Gutschein für einen Online-Bastelshop eurer Wahl! Klickt hier für weitere Informationen ;o)

Next I stamped the Christmas trees and punched them out using the coordinating punch from Stampin Up. I added an embossed sentiment to the second and third strip from the top and also a garland to one of the trees. All that was left to do now was to adhere the trees to the card. 
Just a quick reminder, that you can still comment on the posts for my Christmas series in order to get the chance to win a $25 gift certificate to an online craft store of your choice. Click here for more information ;o)

Material / supplies:
Stempel / stamps: "Christbaumfestival" von Stampin Up
                           "Fröhliche Weihnachtszeit" von Klartext Stempel / Danipeuss

Challenges:
                                                (embossing powder used on sentiment and garland)

Dienstag, 22. Dezember 2015

Christmas Series Card # 22 / Weihnachtsserie Karte # 22

Hallo ihr Lieben!
Heute habe ich eine meiner Lieblingskarten der Serie für euch. Ich mag sie so gern, weil sie einerseits niedlich ist, andererseits aber auch traditionellen Weihnachtsfarbengehalten ist. :o) Als erstes habe ich selbst ein gemustertes Papier hergestellt, in dem ich mehrere weihnachtliche Motive aus dem "Holiday Party Animal" Set wiederholend gestempelt und mit Copics ausgemalt habe.

Heya my dear crafty friends!
Today I'd like to show you one of my favourite cards of this series. I like it so much because it has this cute Santa image on it, which I thoroughly adore and it it kept in traditional Christmas colours, yet a lot of fun I'd say ;o) First I created my own patterned paper by repeatedly stamping Christmas related images from the set "Holiday Party Animal"and colouring them with Copics.


Das Papier habe ich dann auf die gleiche Größe wie meine Kartenbasis geschnitten und das rote und weiße Papier dann darüber geklebt. Als nächstes habe ich den Weihnachtsmann ebenfalls mit Copics ausgemalt und ihm noch ein paar Deteils hinzugefügt, wie zum Beispiel die Schuhbänder oder die Schrift auf dem Wunschzettel, von dem er gerade abliest. Da er noch einen Platz auf der Karte brauchte, habe ich das Oval aus Transparentpapier ausgeschnitten und ihn dann darauf befestigt.

I cut the now patterned paper to the same size as my card base, adhered it and also glued the red and white paper on top of that. Next I coloured sweet Santa with Copics and added a little extra detail to the image like the shoe laces and the word on his list. I felt like he needed something to let him pop more, so I decided to cut out an oval shape from vellum and use that to give Santa a little spotlight.


Zum Schluss habe ich noch einen der schönen Lawn Fawn Rahmen herausgesucht, in den mein Kartenspruch super hineinpasste und auch diesen passend mit Copics bemalt. So passt farblich alles gut zusammen - was ich immer sehr mag - und meine Karte ist fertig ;o)

To finish my card I chose a frame for my sentiment and coloured it with the same green Copics I had used for the little images. Now everything goes together nicely - which I always love - and my card is done ;o)


Material / supplies:
Stempel / stamps: "Jingle all the way" von My Favorite Things
                           "Flirty Frames" & "Holiday Party Animal" von Lawn Fawn
Stanzen / dies: "Stitched Basic Edges" von My Favorite Things
                      "Stacked Pierced Ovals" von Create a Smile

Challenges:
Lawnscaping Challenges "Merry Christmas" 
7 Kids College Blog #141 "Anything goes"
Stempelküche Challenge "Last Minute Weihnachtskarte"
Eureka Stamps Challenge "Santa"

Sonntag, 20. Dezember 2015

Christmas Series Card # 21 / Weihnachtsserie Karte # 21 (Easel Card)

Hallo ihr lieben Bastlerinnen und Bastler!
Heute möchte ich euch gerne eine Easel-Karte zeigen, also eine Karte, die man aufstellen kann. Dazu habe ich als erstes den Eisbären und den hüpfenden Pinguin so gestempelt, dass sie aussehen, als würden sie gemeinsam durch den Schnee stampfen. Dazu war einiges an Masking nötig, da ich dem Pinguin nämlich auch noch Schal und Mütze anziehen wolle - er soll ja auch nicht frieren ;o) Nach dem Colorieren habe ich sie dann direkt an der Linie ausgeschnitten und erst einmal zur Seite gelegt.

Hello my dear crafty friends!
Today I would like to share an easel card with you. First I stamped the polar bear and the skipping penguin like they would stamp side by side through the snow.I had to do quite a bit of masking to achieve this look, because I wanted the penguin to have a scarf and a hat as well - I didn't want him to be cold ;o) Once I had stamped and coloured everything I went ahead and fussy cut them out and put them aside for the moment.

Als nächstes habe ich mich um den Hintergrund gekümmert. Dazu habe ich das Papier von Lawn Fawn und ein weißes Stück Papier auf die Größe der Karte zurechgeschitten. Letzteres habe ich danach noch zusammen mit der "Snowcaped" Stanze durch die Big Shot geschickt. Mit einer selbst zurechtgeschnittenen Maske, einem Ink-Blending Tool und Soft Granite Ink von Hero Arts habe ich die Schneehügel und - verwehungen auf den Bergen angedeutet. Um den kleinen, hinteren Berg weiter in den Hintergrund zu drängeln, bin ich an der Stelle mit "Hickory Smoke" drüber gegangen. Beide Teile (Berge und Hintergrund) habe ich bündig zusammengeklebt.

Next step was to create a background. For it I cut the patterned paper from Lawn Fawn and some white paper to the same side as my card base and put the white cardstock through my Big Shot to cut out some  "Snowcaped" mountains. I cut a mask and took out an ink blending tool as well as the "Soft Granite" ink pad from Hero Arts to create the snowy hills. In order to visually push the mountain in the middle back a bit I used some darker grey (Hickory Smoke) on it. Then I adhered both pieces (patterned paper and mountains) together.


Die Kartenbasis habe ich gefalzt, weil ich eine Easelkarte machen wollte. Dabei ist mir ein kleiner Fehler unterlaufen - ich habe nämlich ein bisschen zu weit oben gefalzt. Wenn ihr möchtet, dass eure Karte (fast) gerade stehen kann, falzt ungefähr auf der Hälfte eurer Kartenbasis, dann sollte alles klappen. Glücklicherweise passt der Winkel aber wirklich gut zum Motiv, denn wenn man auf die Karte schaut, entsteht bei diesem Winkel noch mehr der Eindruck, als kämen die beiden Tiere gerade aus den Bergen ins Tal gewandert ;o) Die "Stufe", an der die Karte hält, habe ich einfach aus dem gleichen Designerpapier geschnitten und einen Streifen weißes Papier darübergeklebt.

I scored the card base because I wanted to create an easel card this time. I made a little mistake and sored too far up. If you'd like your card to stand up straight, it is best to score right in the middle of your card base. However, my "mistake" turned out fine, because the angle helps with the illusion that the two critters come from the mountains and are walking towards us ;o) The piece that stops the edge of the paper, so that the card can stand, is just a piece of the same designer paper I have used on the outside with a narrow white strip of paper on top of it for the second part of the greeting.


Material / supplies:
Stempel / stamps: "Let it Snow" von The Greeting Farm
                            "Jingle Greeting" von Mama Elephant
Stanzen / dies:      "Snowcaped" von Mama Elephant

Challenges:
Simon Wednesday Challenge "Die crazy"
7 Kids College Fund # 141 "Anything goes"
A Gem of a Challenge "Anything Christmas goes"
Send a Smile 4 Kids "Winter Fun"
Sweet Stampin Challenge "Merry Christmas"


Freitag, 18. Dezember 2015

Christmas Series Cards # 19 & 20 / Weihnachtsserie Karten # 19 & 20 (Pull Tab Slider Cards)

Hallöchen ihr Lieben!
Heute möchte ich euch 2 Weihnachtskarten zeigen, die beide allerdings dem gleichen Prinzip folgen: Es sind Pull Tab Slider Cards, was bedeutet, dass man an ihnen ziehen kann, um einen versteckten Teil der Karte erscheinen zu lassen. Ich liebe solche Spielereien ;o) Die erste Karte, die ich euch heute zeigen möchte, war mein Prototyp. Nach einer YouTube Anleitung (klick) habe ich diese Karte gebastelt und ihr werdet sehen, dass ich recht nach am Original von Vicky geblieben bin. 

Heya dear crafters!
Today I would love to share two Christmas cards with you, that both follow the same plan so to speak: They are both "Pull Tab Slider Cards", which means that you can pull at a tab and move parts of the card to one side to reveal a hidden part of the card. I love interactive cards ;o) My first card was made following a YouTube tutorial very closely (click) and looks a lot like the card Vicky has made.


Ich finde Vickys Karte wirklich total süß, allerdings hat mich gestört, dass derTeil zum Herausziehen eine andere Farbe hat, als der Rest der Karte. Daher habe ich darauf geachtet das Hintergrundpapier auch dafür zu benutzen und so ein durchgehendes Muster zu haben. Außerdem wollte ich mehr Platz für einen Spruch haben und habe mich daher für eine horizontale Karte entschieden. Das funktioniert zum Glück genauso gut, wie der kurze Slider ;o)

I love Vicky's card, but I didn't like that the slider part was so visible on the card, so I made sure, to continue the background paper on there. Also I wanted the slider piece to be longer in order to have more room for my secret message, so I created a horizontal card and that worked just fine ;o))


Meine zweite Karte wollte ich ganz schlicht halten, aber mit großem Niedlichkeitsfaktor, weshalb ich mich mal wieder für die "Snowflake Grove" Stempel von Purple Onion Designs entschieden habe. Ich freu mich immer wieder, wenn ich die Karte aufziehe und dann der Kartenspruch zum Vorschein kommt.

For my second card I wanted a very clean and simple look, but with a lot of cuteness going on, so I decided to use the "Snowflake Grove" stamps from Purple Onion Designs yet again. :o) I always feel a little giddy when I pull at the slider piece to reveal the sentiment.


Material / supplies:
Card 1: Stempel / stamps: "Ozzie & Harriet" von Whipper Snapper Designs
Card 2: Stempel/ stamps: "Oakeley", "Pine House" & "Snow Cabin on Hill" von Purple Onion Designs
Card 1 & 2 : Stempel / stamp: "Fröhliche Weihnachtszeit" & "Weihnachtsexpress" von Klartext / Danipeuss


Challenges:
7 Kids College Fund Challenge #141 "Anything goes"
Stempelküche "Last-Minute Weihnachtskarte"
Stempelgarten Challenge "Weihnachtszeit"
Color Throwdown #373 "Any Christmas Creation"
World Wide Open Design Team Challenge "Anything goes"
(DTs: Challenge Up Your Life, Crafty Cardmakers & More and PINspirational Challenges)


Mittwoch, 16. Dezember 2015

Christmas Series Card # 18 / Weihnachtsserie Karte # 18 (Card including Christmas Ornament / gift tag)

Hallo ihr Lieben!
Wir befinden uns jetzt wirklich im Endspurt der Weihnachtsserie! Ich hoffe, sie hat euch bisher schon gefallen und dass die letzten Karten euch vielleicht auch noch mal die ein oder andere Inspiration bringen werden. Wenn euch die Serie Freude macht, könnt ihr mir das zeigen, indem ihr mir folgt und hier kommentiert. Ich freu mich immer sehr über eure Kommentare! Bis zum 26.12.15 habt ihr noch Zeit an meinem Gewinnspiel teilzunehmen. Zu gewinnen gibt es einen 25 Dollar Gutschein für einen Online-Bastelshop nach Wahl. Alles genau nachlesen könnt ihr im ersten Post dieser Serie. (klick) Nun aber zur heutigen Karte:

Heya dear crafty friends!
Just a few more cards left for this Christmas series! I hope you have found some cards you liked and that those last few cards will be able to inspire you a little as well. If you have enjoyed the series so far, you could let me know by following my blog and leaving a comment ;o) I always love hearing from you! Until December 26th you can still participate in my giveaway - you could win a $25 gift certificate to an online craft store of your choice. If you'd like to learn more about it you can find all the details in the first post of this series. (click) But now, let's take a look at today's card:


Ich freu mich immer, wenn eine Karte noch einen weiteren Zweck hat - dann hab ich immer das Gefühl, dass sich die ganze Arbeit noch mehr lohnt ;o) Diese Weihnachtskarte ist eine Karte und außerdem kann sich der Empfänger den kleinen Pinguin auch noch in den Baum hängen oder wenn das nicht ganz passt, ihn als Geschenkanhänger benutzen.

I love when a card serves the recipient twice - then I feel like all the effort one puts into a card is even more worthwhile ;o) This Christmas card is a card (no surprise here) but can be used as a Christmas tree ornament as well. Or even as a gift tag. 


Als erstes habe ich das "Chunky Chevron" aus weißem Papier ausgeschnitten und auf roten Cardstock geklebt. Anschließend habe ich die Stanze noch einmal benutzt und sie aus dem rotem Papier ausgetanzt, damit ich fünf dieser Pfeilformen aufeinander- und anschließend in das mittlere Feld der unteren Reihe kleben konnte. Sozusagen als Stufe für den Anhänger, damit er nicht unten durchrutscht. Als nächstes habe ich die Kugel drei Mal ausgestanzt und eine davon bestempelt und mit Copics coloriert. Die anderen beiden habe ich anschließend dahinter geklebt, damit einerseits die durchgefärbte Rückseite verdeckt ist, andererseits gibt das dem Ganzen noch mehr Stabilität.

First I die cut the "Chunky Chevron" from white cardstock and adhered it over red cardstock. Next I die cut the same die from the red cardstock again and glued five of the arrow-shapes together and adhered them in the middle of the bottom row. This is going to be the stand for the ornament piece, so that it doesn't slide off the card. Now I die cut the ornament three times and stamped the penguin on one of them I coloured him with Copics and then glued all the ornaments together. That way it becomes more sturdy and you can't see any bleeding from the markers. 


Zum Schluss habe ich ein Stück Vellum zurechtgeschnitten und den Gruß darauf in gold embossed. Wie ihr sehr sieht man keine Klebestellen vorne und das kommt daher, dass ich das Transparentpapier so lang gelassen habe, dass ich es auf der Rückseite des Chevronpapiers mit Tesafilm befestigt habe. Der Streifen bietet mir genug Platz für den Raum und ist der Haltegurt für den Pinguin. Jetzt kann ihm wirklich nichts mehr passieren, bis er beim Empfänger ankommt ;o)

I cut a strip of vellum down to about 1 inch and embossed my sentiment ("merry Christmas") in "Liquid Platinum" embossing powder. As you can see you can't see any glue and that is because I left the vellum piece long enough so that I could wrap it around the chevron panel and glue it to the back of it using some sticky tape. The vellum is the perfect place for the greeting and also functions as a band to strap the ornament in securely. I think the penguin will now arrive safely at its new home for christmas ;o)


Material / supplies:
Stempel / stamps: "Merry" von Purple Onion Designs
                           "Zu Weihnachten" von Create a Smile
Stanzen / dies: "Chunky Chevron Cover Up" von My Favorite Things
                      "Stitched Circle Tags" von Lawn Fawn

Challenges:

Stempelküche Challenge "Last Minute Weihnachtskarte"
Simon Says Wednesday Challenge "Tag it" (Ornament can be used as gift tag if desired)
Animal Friends Challenge "Weihnachten oder Neujahr"
Sparkles Christmas Challenge "Die Cuts for Christmas"
Deep Ocean Challenge "Anything goes"

Montag, 14. Dezember 2015

Christmas Series Card # 17 ( Weihnachtsserie Karte # 17 (Let's be Merry)

Halli Hallo ihr Lieben!
Ich hoffe, ihr alle hattet einen schönen 3. Advent und habt euer kreatives Mojo aufgefrischt. Heute startet nämlich bei den Crafty Cardmakers & More eine neue Challenge. Dieses Mal geht es um das Thema "Schnee"! Auf meiner Karte habe ich daher Schneeflocken und einen Schneemann verbastelt:

Hello my dear crafty friends!
I hope you all had a wonderful third advent. (Do you celebrate this where you live?) Today starts a new challenge over at the Crafty Cardmakers & More blog and we are asking for cards with "Snow" on it. For my card I paired some snowflakes with a snowman:


Zuerst habe ich einen schmalen Kreis mit Hilfe zweier ineinandergelegten Kreisstanzen und dann noch viele, viele Schneeflocken ausgestanzt. Als nächstes habe ich den Schneemann von Paper Smooches in hellgrau gestempelt und mit der No-Line-Technik ausgemalt. Da seine Arme leider nicht mehr sichtbar waren, habe ich sie einfach abgeschnitten (autsch...) und ihm welche aus Papier zurechtgeschnitten. Im Nachhinein betrachtet denke ich, dass ich sie in Dunkelbraun noch lieber gehabt hätte, aber ich find ihn auch so ganz knuffig ;o)
First I cut out a thin circle of white paper using two of my circle dies and adhered lots and lots of snowflakes to it. Then I stamped and coloured the cute snowman from a Paper Smooches set with Copic markers using the no-line technique. Because his arms weren't visible at all anymore I decided to cut them off (ouch...) but then reattach new ones that I had cut from paper. I think I would have liked them even better had I cut them from dark brown instead of black paper, but nonetheless I think it turned out okay ;o)


Als der Schneeflockenkranz fertig und gut durchgetrocknet war, habe ich ihn auf die Kartenfront gelegt, um den richtigen Platz für den Kartenspruch zu finden. Nachdem ich den Spruch "Let's be Merry" gestempelt habe, habe ich den Kranz an die richtige Stelle geklebt und den Schneemann mit einem Gluedot oben drauf befestigt. Der Form des hellblauen Papier folgend habe ich die oberen Ecken der Kartenbasis abgeschnitten. Eigentlich wollte ich die Karte so lassen, aber dann hatte ich das Gefühl das noch etwas fehlt. Wenn ich dieses Gefühl habe, helfen mir übrigens fast immer die Sequins von Pretty Pink Posh weiter. So auch hier. Nachdem ich die klaren, weißen und rosa-farbenen Sequins aufgeklebt hatte, war die Karte fertig ;o)

When my snowflake-wreath was done and dry I put it on my front panel to find the right placement for the sentiment. After I had stamped the "Let's be Merry" I glued the wreath and the snowman in place and cut off the upper corners of the card base. I thought I would leave it like that, but my card felt a little too empty for my taste. So I added a few Pretty Pink Posh sequins in clear, white and watermelon.

Material / supplies:
Stempel / stamps: "Cool Dudes" von Paper Smooches
                           "Let it snow" von The Greetingfarm
Stanzen / dies: "Stitched Snowflakes" & "Mini-Snowflakes" von Lawn Fawn
                       "Tags a Lot" von Mama Elephant

Samstag, 12. Dezember 2015

Christmas Series card # 16 / Weihnachtsserie Karte #16 (Merry banner)


Hallöchen ihr Lieben!
Wir stehen kurz vor'm dritten Advent und auf dem Blog von "Challenge Up Your Life" gibt es eine neue Challenge für die kommenden zwei Wochen. Das Thema lautet: Punkte! Wir wollen Punkte in allen möglichen Variationen auf euren Karten bewundern! Ich habe mich bei meiner Karte für ein gepunktetes Hintergrundpapier entschieden und außerdem noch den Kreis hinzugefügt - das ist ja auch irgendwie ein großer Punkt, oder?!

Hello my dear crafty friends!
Not long until Christmas now and almost equally exciting: there is a new challenge over at the "Challenge Up Your Life" blog ;o) This time we would like to see dots on your creations. I used some polka dot patterned paper on my card and also punched out a circle, which is a big dot I would say, wouldn't you?!


Als erstes habe ich ein bisschen Hirnschmalz gebraucht, um alles so anzuordnen, dass es auch übereinander passt, aber das ging nach einigen Anfangsschwierigkeiten ganz gut, denke ich. Dafür musste ich zuerst das gemusterte Papier aufkleben, den Kreis ausstanzen, dann die beiden Hügel zusammenfügen (in breiter, als ich es brauchte) und ebenfalls den gleichen Kreis herausstanzen. Die Handstanze habe ich bis ganz an den Karten- und Hügelrand geschoben, so dass die Höhe bei beiden gleich war. Die Platzierung der Hügels wurde dadurch vereinfacht, dass ich nach Augenmaß ausgestanzt habe und dadurch, dass das Papier breiter war als die Karte, konnte ich dann alles passend festkleben und später einfach alles Überhängende abschneiden. 

It took me quite some time to figure out the best way to put this card together, so that everything would fit, but I finally figured it out and maybe, if you'd like to make a card like this, avoiding my mistakes could save you some time ;o) First I glued down the patterned paper to the front and punched out the circle. No mystery there. When it came to the hills that was a different matter. I wanted Santa to stand where the two hills meet, but I couldn't get the placement right. Here is how I did it in the end. I die cut the hills a lot wider than the card and glued them together. Next I punched the circle into that piece at the place that I wanted to end up at the inside of the card. Making sure to place the punch as far in as possible - just as I had done for the cardbase. Next I glued down the hills and cut off the excess. 


Als nächstes habe ich den süßen, kleinen Santa gestempelt und mit Copics ausgemalt und die Teile für das Banner ausgestanzt. Darauf habe ich dann die Buchstaben für den ersten Teil meines Kartenspruches gestempelt und den zweiten Teil habe ich direkt auf die Kartenbasis gestempelt. Als letzten Schritt habe ich das Banner oben links mit Abstandshaltern aufgeklebt und den Santa ebenso in den ausgestanzten Kreis. So hat der Empfänger der Karte auch noch was von ihm, wenn er die Karte öffnet ;o)

Next I stamped and coloured the sweet little Santa and also die cut the banner pieces for the first part of the sentiment. I stamped the letters on the banner and added the second part to the greeting directly to the card base. The last step was to adhere the banner and also Santa to the inside of the circle using foam tape. This way the recipient can enjoy the look of Santa even when he opens the card to read the message inside ;o)


Ich hoffe, ihr habt Ideen bekommen und schließt euch uns an für die aktuelle "Punkte"-Challenge bei Challenge Up Your Life!

I hope you got inspired and have loads of ideas for a new card. Just add some dotted detail and join us for the current challenge over at Challenge Up Your Life!

Material / supplies:
Stempel / stamps: Set from the "Snow Dance Kit" von Create a Smile (retired)
                           "Toboggan Together" & "Jessie's ABCs" von Lawn Fawn
Stanzen / dies: "Stitched Hillside Borders" von Lawn Fawn


 Challenges:
One Crazy Stamper "Christmas / Winter"
Scribbles Designs Challenge "Non Traditional Colours"
Crafter's Cafe "Die cuts or Punches"
Cardmania Challenges "Christmas"

Donnerstag, 10. Dezember 2015

Christmas Series # 15 / Weihnachtsserie #15 (Coordinating tags)

Hallo ihr Lieben!
Vielleicht habt ihr es ja auch schon am Titel gemerkt... heute gibt es keine Karte, sondern 3 verschiedene Tags, die ich gewerkelt habe. 

Hello dear crafty friends!
Today I would like to show you 3 coordinating tags I made. 


Benutzt habe ich die Stempel von der noch recht neuen "Snowflake Grove" Kollektion von Purple Onion Designs  und die Stanzen von MFT für die Tags an sich. Den Hintergrund habe ich mit einer selbstgeschnibbelten Tannenbaum"schablone" einfach in mehreren Lagen und 2 verschiedenen Grüntönen gewischt und finde den Effekt wirklich genial. Es schaut wirklich so aus, als würden Fawn und Oakley vor in einem Wals umherlaufen ;o)

I have used stamps from the new "Snowflake Grove" collection from Purple Onion Designs for my images and the tags are dies from MFT. For the background I cut out a tree shape free hand (because it looked more natural to my eye) and used different layers and two shades of green to achieve this look which I love. It really looks like Fawn and Oakley are walking around in a forest ;o)


Die Farben habe ich so gewählt, dass jede auf jedem Tag irgendwo auftaucht - so dass die 3 Schildchen eine Einheit bilden. Am 24. Dezember werden sie dann an den 3 Geschenken für ein liebes Familienmitglied hängen und hoffentlich zur Freude beitragen.

For the tags I chose three main colours (red, green and blue) which I used on each tag, so they would go together nicely. On December 24th I will put them on the three gifts for a lovely family member and hope to make them smile with those sweet images as well as with the presents ;o))


Material / supplies:
Stempel: "Fawn", "Birch House" & "Oakley" von Purple Onion Designs
Stanzen: "Tag Builder Blueprints 2" von My Favorite Things

Challenges:

Dienstag, 8. Dezember 2015

Christmas Series Card # 14 / Weihnachtsserie Karte # 14 (Christmas Tree)

Halli Hallo ihr Lieben!
Heute habe ich für euch mal eine Karte, die untypischerweise für mich, gar keine süßen Tierchen oder sonstige Kreaturen zeigt. Ich wollte euch im Lauf der Weihnachtsserie aber gerne verschiedene Stile zeigen, damit jeder etwas finden kann, was er mag. Inspiriert wurde diese Karte von der neuen Challenge auf dem {PIN}spirational Challenge Blog. Auch dieses Mal gibt es wieder einen Preis von unserem Sponsor "SLS Lines"  zu gewinnen. Schaut doch mal vorbei und teilt eure Weihnachtsbaumkarten mit uns ;o)

Hello my dear crafty friends!
Today I have a card for you which doesn't feature a cute critter or other creature. This is rather unusual for my cards, but I wanted to show you different styles throughout this christmas card series. My card was inspired by the new challenge over at the {PIN}spirational Challenge blog. As always our dear sponsor "SLS Lines" has a $10 prize for you to win! I'd love to see your take on the inspiration and maybe you will be one of the lucky winners ;o)


Als erstes habe ich roten Cardstock mit einem "Mauer" Embossingfolder geprägt und die Fugen mit einem grauen Copic Marker nachgemalt, um ihnen mehr optische Tiefe zu verleihen. Das "Mauerstück" habe ich  anschließend rechteckig aus- und ein Fenster aus seiner Mitte herausgestanzt. Den Fensterrahmen und Sims habe ich aus weißem Papier ausgestanzt und daufgeklebt. 

First I dry embossed the brick wall pattern into a red piece of cardstock and emphasized the seams with a grey Copic marker to give them more depth. Next I die cut a stitched rectangle from that piece and also die cut the window shape from it. I cut the window frame and the ledge from white cardstock and glued them in place.


Als nächstes habe ich mich um die Gestaltung des Wohnzimmers gekümmert, in das man durch das Fenster hineinschauen können sollte. Dazu habe ich als erstes die Geschenke mit Memento Tuxedo Black gestempelt, eine Maske aus Post-its darüber geklebt und dann den Tannenbaum gestempelt. Die Lichterkette und den Teppich habe ich selber dazugezeichnet. Ausgemalt habe ich alles mit Copics.

Next I stamped the scene that would be visible behind the window. I stamped the stack of gifts in Memento Tuxedo Black, placed a mask on top of them and added the tree. To give the tree more of a christmassy feel I drew the fairy lights on it and drew the rug in as well. Everything was coloured with Copic markers.


Danach habe ich die Wohnzimmerszene so auf die Kartenbasis geklebt, dass ein schöner Ausschnitt davon zu sehen ist und die Mauer mit Abstandspads darüber geklebt. Zum Schluss habe ich noch das Wort "christmas" zwei Mal aus weißem Papier ausgestanzt und zusammengeklebt sowie das Wort "merry" auf ein Stück schwarzes Papier gestempelt und weiß embossed. Beides zusammen ergibt den Kartenspruch vorne auf der Karte. Wie immer darf auch ein wenig Glanz und Schimmer nicht fehlen, daher habe ich auf alle Lämpchen Clear Wink of Stella aufgetragen.

After that was coloured in I placed the living room scene on my card base, so that I liked the part you can see through the cutout. I adhered the panel using foam tape. Next I die cut the word "christmas" two times and glued the pieces together for more thickness and stamped the "merry" in Versamark and added white embossing powder to it. I glued them down below the window to create the sentiment for my card. As always the card needed a little shimmer and shine so I added quite a thick coat of Clear Wink of Stella to the tiny light bulbs. 


Material / supplies:
Stempel / stamps: "Critters in the Forest" & "Toboggan Together" von Lawn Fawn
Stanzen / dies: "Boutique Window" von My Favorite Things
Embossing Folder:  "Brick Wall" von Stampin Up

Freitag, 4. Dezember 2015

Christmas Series Card # 13 / Weihnachtsserie Karte # 13 (Cozy Christmas)

Hallo ihr Lieben!
Die Temperaturen haben sich ja zum Glück wieder ein wenig nach oben bewegt - trotzdem habe ich Kuscheldecke, Kissen und Plüschsocken schon zurecht gelegt. Ihr auch? Passend dazu habe ich heute eine neue Karte für euch. Wie wäre es einmal mit gemütlichen Weihnachtsgrüßen?

Hello my dear crafty friends!
The temperatures in Germany have been quite low a couple of days back, but fortunately it is getting a little warmer again. However, I do have my soft blanket, pillows and warm socks ready ;o) Today's card fits right in with some cozy christmas wishes:


Als erstes habe ich den Pinguin gestempelt und anschließend mit einer Maske abgedeckt, um die Kissen genau über ihn zu stempeln. Ich wollte erreichen, dass es so aussieht, als würde der Pinguin ganz bequem und gemütlich in den Kissen sitzen ;o) Das Sofa habe ich freihand um die Szene drum herum gemalt und hoffe, ihr habt es als solches erkannt *grins. Als nächstes habe ich mit Hellgrau den Hintergrund auf mein blaues Papier gestempelt und das "Wonky Window" aus dem Papier gestanzt.

I started out by stamping and masking the cute penguin by Purple Onion Designs and stamping the pillows from My Favorite Things right on top. I wanted it to look like the penguin is sitting cozily between those fluffy pillows ;o) I added some texture to the back, that is meant to look like a sofa... I hope you did recognize it *grin. Next I stamped the background stamp on top of my blue panel and cut the wonky window out of it. 


Ich habe das gleiche Fenster auch noch einmal aus rotem Cardstock ausgestanzt und den Rahmenteil ausgeschnitten. Alles, was nun noch zu tun war, war den ersten Teil meines Spruches zu stempeln und zu embossen und den zweiten Teil aus schwarzem Cardstock auszuschneiden und aufzukleben. Und dazu muss ich euch was erzählen... Endlich, endlich habe ich "Stick-it paper" bei mir zu Hause und es benutzt, um das Wort "christmas" aufzukleben. Es war sooo viel einfacher, schneller und außerdem klebt es wirklich sehr zuverlässig. Solltet ihr also "Stick-it" finden, dann gönnt euch welches! Wir alle haben uns doch hin und wieder mal eine nette Kleinigkeit verdient, oder? ;o) Das wäre auf jeden Fall mein Tipp dafür ;o)

I cut the window from a red piece of paper as well and fuzzy cut the frame out and glued it on top of the blue panel. All that was left to do now was to stamp and heat emboss the first part of the sentiment and finish it with a black die cut piece. I have to tell you... I finally got my hand on some StickIt-paper and that makes glueing a word die cut down much, much easier. So if you get your hands on some sheets I think you should treat yourself to it! Don't we all deserve a treat once in a while? ;o)


Material / supplies:
Stempel / stamps: "Frost" von Purple Onion Designs
                            "Merry Christmoose" von My Favorite Things
                            "Jessie's ABCs" von Lawn Fawn
Stanzen / dies: "Peek-a-Boo Wonky Windows" von My Favorite Things
                      "Stitched Rectangle" von Simon Says Stamp

Challenges:
Click To Play

Mittwoch, 2. Dezember 2015

Christmas Series Card # 12 / Weihnachtsserie Karte # 12 (Winterberry in the City)

Hallo ihr Lieben!
"Winterberry" ist dieser niedliche Schneemann aus der Stacey Yacula Serie von Purple Onion Designs und mit ihm wollte ich eine eher untypische Schneemannszene gestalten. Heraus kam diese Karte:

Hello my dear crafty friends!
"Winterberry" is this very cute snowman from the Stacey Yacula series over at Purple Onion Designs. I wanted to create a rather non typical snowman scene with him and this is what came out of it:


Als erstes habe ich die Stadt mit schwarzer Tinte auf den grauen Kartenrohling gestempelt und einen Schneehügel aus Transparentpapier zurechtgeschnitten, auf den ich meinen Spruch "Holiday Wishes" ("Weihnachtsgrüße") stempeln konnte. Dazu habe ich Versamark benutzt und weißes Zing!-Embossingpulver von American Crafts. (Ihr werdet feststellen, dass es im Vergleich zu den Schneeflocken leider nicht wirklich weiß ist -also würde ich vermutlich eher zu einem anderen Pulver tendieren, wenn ich die Karte ein zweites Mal machen würde...) 

First I stamped the city scape of London on my grey card base using black ink and I cut a snowy hill from vellum big enough so that I could stamp my sentiment on it. I have used some Versamark Ink and white Zing!- embossing powder by Amercian Crafts. (You might have noticed already that the sentiment isn't really white compared with the snowflakes - so if I ever made another card like this I would definately try a different embossing powder...)


Als nächstes habe ich den Schneemann in Memento "Gray Flannel" gestempelt, mit Copics ausgemalt und ausgeschnitten, damit ich ihn schon mal als Platzhalter auf die Karte legen konnte. Die ausgestanzten Schneeflocken habe ich dann um ihn herum verteilt und nachdem ich mit der Platzierung zufrieden war aufgeklebt. Zum Schluss habe ich "Winterberry" mit Abstandshaltern auf die Karte geklebt.

Next I stamped the snowman in Memento "Gray Flannel", coloured him with Copics and fussy cut him out. I put him down on my card, so that I would know exactly where he would go in the end and placed the snowflakes all around him. When I liked where they wer placed I glued them down using Multi Medium Matte from Ranger and also added "Winterberry" to the card with some foam tapes.


Mit Winterberry ist nun bereits die Hälfte der Weihnachtsserie um - kaum zu fassen, wie schnell das nun ging... Hoffe, ich habe euch auf dem Weg bis hierher schon ein bisschen inspirieren können :o)
Eine wunderschöne und kreative Adventszeit wünscht euch
eure Maike :o)

This card with Winterberry marks the end of the first half of the Christmas Series - can't believe how quickly time went by. I hope I was able to inspire you or give you a good tip along the way so far ;o)
Have a wonderful and creative Advent season,

yours Maike :o)

Material / supplies:
Stempel / stamps: "Winterberry" von Purple Onion Designs
                           "Tim Holtz Cityscapes Stamp Set" von Stampers Anonymous
                           "Simply Stamped - Pinecones" von Taylored Expressions
Stanzen / dies: "Mini Snowflakes" von Lawn Fawn

Colouring: Copics BG18, BG15, BG13, BG32
                            R85, R83, R81
                            YR07, YR16, Y38,
                            E27, E25, E23

Montag, 30. November 2015

Christmas Series Card # 11 / Weihnachtsserie Karte # 11 (Happy Santa)

Hallöchen ihr Lieben!
Heute startet bei den Crafty Cardmakers & More eine neue Challenge und dieses Mal finde ich das Thema sogar noch besser als sonst. Als Inspiration hat Pam sich das Gedicht "Twas the Night Before Christmas" ausgesucht und in diesem einen Gedicht steckt so viel drin, dass man dazu bestimmt ein Dutzend verschiedener Karten gestalten könnte. Lest es euch doch auf dem Blog mal durch und schaut euch die vielen wunderbaren Kreationen meiner Teamies an ;o) Ich habe mir folgenden Zeilen herausgesucht und dazu die folgende Karte erstellt:
"He had a broad face and a little round belly, that shook when he laughed, like a bowlful of jelly!"
 
Hello my dear crafty friends!
Today starts a new challenge over at the Crafty Cardmakers & More and I love the inspiration even more than I did all the ones before. Pam chose the poem "Twas the Night Before Christmas" as your inspiration and I found that I could have made at least a dozen different cards from it. Why not hop on over there, read the poem and get inspired by it as well as by the wonderful cards the other team members have created ;o) I chose these two lines for my inspiration and created the following card:
"He had a broad face and a little round belly, that shook when he laughed, like a bowlful of jelly!"


Als erstes habe ich die Karte mit diesem niedlichen Folder von "Taylored Expressions" embossed und danach eine Form ausgescuht, die ich auf der Vorderseite unterbringen wollte. Diese habe ich dann ganz grob mit Hilfe der Stanze auf das Papier übertragen und anschließend die weihnachtlichen Bilder hineingestempelt. Erst nachdem ich alles mit Copics ausgemalt hatte, habe ich die Form ausgestanzt. Das hat zum Einen den Vorteil, dass man nicht bis zum Papierrand malen muss (was ich wirklich überhaupt nicht gerne mache) und zum anderen hat man ein gleichmäßigeres Bild am Rand, da die "durchstochenen" Teile die Markerfarbe anders aufnehmen würden als der glatte Rest vom Papier.

I have dry embossed my card base using this very cute folder by "Taylored Expressions" and chosen the shape I wanted to go on the card front. I sketched it roughly on a piece of paper and then stamped all the images. After I had coloured them in using Copic markers I die cut the flag shape. I find it easier this way, because I don't particularly like colouring up the the edge of the paper and also the pierced part would take the ink a little differently than the smooth paper. 


Zum Schluss habe ich die Schleifen der Pakete, Rudolfs Glöckchen und den Stern mit Clear Wink of Stella zum Funkeln gebracht. Für Santas Mützenrand war mir dezenter Glanz aber nicht genug, daher habe ich hier "Rock Candy" Distress Stickles zum Verzieren gewählt. Wie immer kommt das leider auf den Fotos nicht so ganz raus.

Before I glued the flag shape to the card front I put some Clear Wink of Stella on Rudolph's nose, the bows and the star. For Santas hat I wanted something more noticable and chose "Rock Candy" Distress Stickles. Unfortunately the pictures don't show all that beautiful shimmer it adds to the card...


Ich würde mich freuen eure Kreationen auch bei den Crafty Cardmakers zu sehen. Denkt auch an mein Gewinnspiel, bei dem es einen $25 Gutschein für einen Bastelonlineshop eurer Wahl zu gewinnen gibt. Mehr darüber erfahrt ihr hier ;o) Viel Spaß auch weiterhin noch an der Weihnachtsserie! ;o)

I would love to see your creations over at the Crafty Cardmakers blog. And don't forget that I have a giveaway for a $25 gift certificate to an online crafting store of your choice. You can find all the details here ;o) I hope you are enjoying this christmas series as much as I do! ;o)

Material / supplies:
Stempel / stamps: "Jingle all the Way" von My Favorite Things
Embossing Folder: "Nordic Holiday" von Taylored Expressions

Challenges:

Related Posts Plugin for WordPress, Blogger...