Halli Hallo ihr Lieben!
Heute habe ich für euch mal eine Karte, die untypischerweise für mich, gar keine süßen Tierchen oder sonstige Kreaturen zeigt. Ich wollte euch im Lauf der Weihnachtsserie aber gerne verschiedene Stile zeigen, damit jeder etwas finden kann, was er mag. Inspiriert wurde diese Karte von der neuen Challenge auf dem {PIN}spirational Challenge Blog. Auch dieses Mal gibt es wieder einen Preis von unserem Sponsor "SLS Lines" zu gewinnen. Schaut doch mal vorbei und teilt eure Weihnachtsbaumkarten mit uns ;o)
Hello my dear crafty friends!
Today I have a card for you which doesn't feature a cute critter or other creature. This is rather unusual for my cards, but I wanted to show you different styles throughout this christmas card series. My card was inspired by the new challenge over at the {PIN}spirational Challenge blog. As always our dear sponsor "SLS Lines" has a $10 prize for you to win! I'd love to see your take on the inspiration and maybe you will be one of the lucky winners ;o)
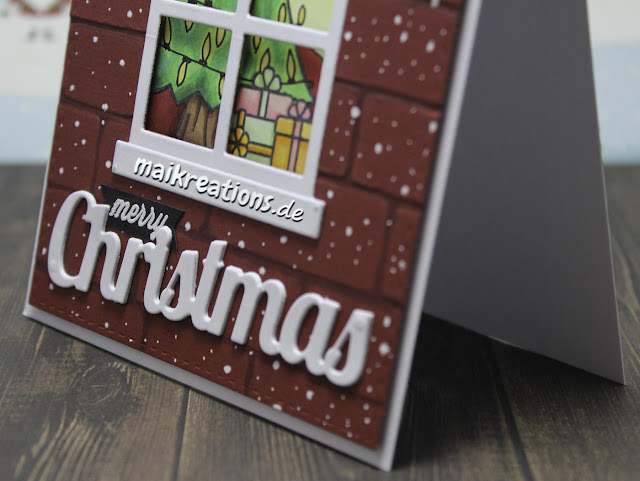
Als erstes habe ich roten Cardstock mit einem "Mauer" Embossingfolder geprägt und die Fugen mit einem grauen Copic Marker nachgemalt, um ihnen mehr optische Tiefe zu verleihen. Das "Mauerstück" habe ich anschließend rechteckig aus- und ein Fenster aus seiner Mitte herausgestanzt. Den Fensterrahmen und Sims habe ich aus weißem Papier ausgestanzt und daufgeklebt.
First I dry embossed the brick wall pattern into a red piece of cardstock and emphasized the seams with a grey Copic marker to give them more depth. Next I die cut a stitched rectangle from that piece and also die cut the window shape from it. I cut the window frame and the ledge from white cardstock and glued them in place.
Als nächstes habe ich mich um die Gestaltung des Wohnzimmers gekümmert, in das man durch das Fenster hineinschauen können sollte. Dazu habe ich als erstes die Geschenke mit Memento Tuxedo Black gestempelt, eine Maske aus Post-its darüber geklebt und dann den Tannenbaum gestempelt. Die Lichterkette und den Teppich habe ich selber dazugezeichnet. Ausgemalt habe ich alles mit Copics.
Next I stamped the scene that would be visible behind the window. I stamped the stack of gifts in Memento Tuxedo Black, placed a mask on top of them and added the tree. To give the tree more of a christmassy feel I drew the fairy lights on it and drew the rug in as well. Everything was coloured with Copic markers.
Danach habe ich die Wohnzimmerszene so auf die Kartenbasis geklebt, dass ein schöner Ausschnitt davon zu sehen ist und die Mauer mit Abstandspads darüber geklebt. Zum Schluss habe ich noch das Wort "christmas" zwei Mal aus weißem Papier ausgestanzt und zusammengeklebt sowie das Wort "merry" auf ein Stück schwarzes Papier gestempelt und weiß embossed. Beides zusammen ergibt den Kartenspruch vorne auf der Karte. Wie immer darf auch ein wenig Glanz und Schimmer nicht fehlen, daher habe ich auf alle Lämpchen Clear Wink of Stella aufgetragen.
After that was coloured in I placed the living room scene on my card base, so that I liked the part you can see through the cutout. I adhered the panel using foam tape. Next I die cut the word "christmas" two times and glued the pieces together for more thickness and stamped the "merry" in Versamark and added white embossing powder to it. I glued them down below the window to create the sentiment for my card. As always the card needed a little shimmer and shine so I added quite a thick coat of Clear Wink of Stella to the tiny light bulbs.
Material / supplies:
Stempel / stamps: "Critters in the Forest" & "Toboggan Together" von Lawn Fawn
Stanzen / dies: "Boutique Window" von My Favorite Things
Embossing Folder: "Brick Wall" von Stampin Up


Great card. I love how you made the Christmas so thick. Good idea!
AntwortenLöschen~Janis, PINspirational DT Sister
Pause Dream Enjoy
PDE Linky Party, Owner & DT Member
Ich hatte ja bereits geschrieben, dass ich Deine Karte mal wieder sehr entzückend finde :) Womit hast Du denn den Schnee gemacht? Oder habe ich das überlesen? Auch wenn Du diesmal keinen kleinen "Freund" auf Deiner Karte hast, finde ich sie trotzdem bezaubernd.
AntwortenLöschenLiebe Grüße von der stempelfrida
http://stempelfrida.blogspot.de
Very pretty! Thank you for sharing with us for the Simon Says Stamp Monday Challenge. ~Michelle
AntwortenLöschen