Posts mit dem Label Sweet Stamp Shop werden angezeigt. Alle Posts anzeigen

Montag, 31. Oktober 2016

Christmas Series Card #5 / Weihnachtsserie Karte #5 (Exploding Box)

Hallo ihr Lieben!
Heute möchte ich euch meinen fünften Beitrag in meiner Weihnachtsserie und gleichzeitig die Karte für die aktuelle Crafty Cardmakers Challenge zeigen. Das Thema lautet "Farbexplosion" und als ich das das erste Mal gelesen hatte, kam mir sofort die Idee eine Art Regenbogenlich mit weihnachtlichen Motiven aus einer Kiste kommen zu lassen:

Heya my dear crafty friends!
Today I would like to show you the fifth project of my Christmas Card series and also my card for the newest challenge at the Crafty Cardmakers. The theme is "Explosion of Colour" and when I first read this I had an idea in my mind of a rainbow light coming out of a box carrying all kinds of Christmas images with it:


Zuerst habe ich ein dunkles Papier gesucht, damit die Farben richtig strahlen können und bin in einem 6x6 Papierpack "Silver & Gold" von We R Memory Keepers fündig geworden. Das habe ich mit der Wellenrandstanze ausgestanzt und den Spruch darauf in weiß embossed. Als nächstes habe ich die Box aus Kraft-Papier ausgestanzt und zusammengeklebt.

First I looked for a dark paper, so that the colours would really shine brightly and found the perfect one when  I looked through the "Gold & Silver" paper pad by We R Memory Keepers. Using a scallop rectangle die I die cut it to size and also white embossed the sentiment on it near the bottom. Next I die cut the box from kraft paper and glued it together.


Um den Regenbogen passgenau hinzubekommen, habe ich mein Lineal geschnappt und den Abstand der Öffnung der Kiste gemessen. Auf einem rechteckigen Stück Aquarellpapier habe ich nun einen ca. 1 cm hohen Steg in genau der gemessenen Breite mittig unten  aufgezeichnet und bin dann vom Ende der Linien in die jeweiligen Ecken am oberen Rand einen Strich gezogen. Den Bereich, der ein wenig wie eine stummelige Taschenlampe mit Lichtkegel ausschaut, habe ich mit Zig Markern coloriert, nach dem Trocknen mit den verschiedenen Weihnachtsmotiven embossed und dann ausgeschnitten.
Das Papier für das sollte etwa so aussehen. Der graue Teil muss später weggeschnitten werden. / The paper for the rainbow should look something like this. Cut away the gray area ;o)

In order to have the rainbow at just the right size I took out my ruler and measured the width of the opening of the box. I drew a land (I hope that this is the correct word - I couldn't really find a translation for the word "Steg" that seemed to be a 100% fit...) of the same width as the opening of the box at the bottom of a rectangular piece of watercolour paper. From the end of side of the land (?) I drew a line to the according top corners. I coloured the area, that looks like a very, very short torch with the cone of light coming out of it, in rainbow colours with Zig markers, heat embossed the Christmas images in white over it, once everything was dry and cut it out. 


Das Regenbogenstück habe ich mit der gleichen Stanze, die ich für das schwarze Papier benutzt habe, durch die Big Shot geschickt, damit der Rand oben übereinanderpasst. Die Box inklusive Lichtexplosion habe ich über dem Spruch festgeklebt und mit zwei weiteren Wellenrechtecken habe ich dann die Rückseite der Karte gebastelt. (Wie das geht, habe ich hier beschrieben: klick) Fertig ist die Karte und ich muss sagen, diesen schwarz-bunt Look finde ich richtig gut - sieht so modern aus... Was meint ihr?

I used the same scallop rectangle die on my rainbow piece as I had done to cut the panel, so that the top would match. I adhered the coloured piece to the box first and then added both to the black paper above the sentiment. Using two more die cuts of the same scallop rectangle in white I created the back of the card. (I have explained how that works in a little more detail in this post: click) And my card was done. I have to say I really love this black- multi coloured look - looks kind of modern... What do you think?

Material / supplies:
Stempel / stamps: "Holiday Marquee Sentiment Set" von Purple Onion Designs
                            "Fall into Christmas" von Sweet Stamp Shop
                            "Baaah Humbug" von Lawn Fawn
Stanzen / dies: "All Prettied Up" von Mama Elephant

Challenges:

Montag, 25. Juli 2016

Heute ist Dein Geburtstag! Box card

Hallöchen ihr Lieben!
Ich weiß nicht, wie es euch geht, aber wenn ich an Sommer denke, dann denke ich ans Meer. Und wenn ich ans Meer denke, dann denke ich an all die wunderbaren Wesen, die man da beim Schnorcheln und Tauchen so entdecken kann. Eine liebe Freundin von mir taucht für ihr Leben gern und für sie habe ich diese Geburtstagskarte gemacht. Inspiriert hat mich dazu das neue "Sommer"-Thema auf dem Crafty Cardmakers Blog:

Heya my dear crafty friends!
I don't know about you, but when I think of summer I think of the sea with its wonderful and colourful creatures. A dear friend of mine loves diving and so I made her this birthday card, inspired by the "Summer Challenge" over at the Crafty Cardmakers blog:


Ich bin dieser Anleitung von Anna Smith größtenteils gefolgt: klick!
I mostly followed this tutorial by Anny Smith: click!


Am meisten begeistert ich, dass diese Karte wirklich ganz wunderbar in einen Umschlag passt und flach liegt! ;o)

I really love that this card fits in an envelope and that it lays completely flat! ;o)


Für die bunte Gestaltung der Karte habe ich alle möglichen Sets mit Meeresbewohnern zusammengesucht und jeweils ein paar von ihnen mit Copics coloriert und sie dann auf und in die Box geklebt. Den Geburtstagsgruß habe ich mit Sets von Create a Smile gestempelt und gestanzt. Das Stanzteil hatte zum Glück genau die richtige Breite für meine Box. ;o)

I stamped lots of critters from differents sets that live in the sea, coloured them with Copics and adhered them to the box. I stamped part of the birthday sentiment and also used a die cut to finish it. (It says: Today is your birthday. Let us celebrate!) Fortunately the die cut word fit exactly on the width of the box ;o)


Material / supplies:
Stempel / stamps: "So Jelly" & "Critters in the Sea" von Lawn Fawn
                             "Fishy" von Sweet Stamp Shop
                             "Mini Geburtstag" von Create a Smile
Stanzen / dies: "Geburtstags-Triple" von Create a Smile

Challenges:

Get Creative Challenge "Lots of blue" 

Sonntag, 13. September 2015

Back to school goodie bag, box and card / Zum Schulanfang

Hallo zusammen!
Ich hoffe, ihr hattet bisher ein schönes Wochenende und seid entspannt in den Sonntag gestartet!!! Eine ganz liebe junge Dame namens Darcey hat in der letzten Woche die Schule gewechselt und dafür wollten wir ihr viel Glück und alles Gute wünschen. Daher hat sich bereits letzte Woche ein Päckchen mit diesem Inhalt auf den Weg zu ihr gemacht:

Heya everybody!
I hope you all had a fantastic weekend and are going to enjoy your sunday. A very sweet young lady called Darcey started at a new school last week and we wanted to let her know that we are thinking of her and wishing her all the best. This is why we sent off a parcel with all of these in it last week:


Für die Karte (links im Bild) habe ich das Notizblatt ausgestanzt, das Gitter und den Spruch darauf gestenpelt und mit klarem Embossingpulver hervorgehoben und danach mit lauter schulrelavanten Zeichen und Sprüchen bestempelt. Darcey ist auch dort wo sie lebt ein eher außergewöhnlicher Name und sie findet ihn selten mal auf einem Andenken und daher wollte ich ihren Namen unbedingt auf der Karte haben. Dazu habe ich die "Quinns ABCs" von Lawn Fawn herausgesucht und nach dem Trocknen mit Copics im Ombre-Look ausgemalt. 

I die cut a piece of paper with the "Memo Pad" die by Technique Tuesday, stamped the "Graph paper" on it in blue and then added the sentiment and all the other school related icons and sentiments in black. Because I wanted the "you are one smart kitty" to stand out a bit more I used clear embossing powder to give it some shine and dimension. Darcey is a rather uncommon name even where she lives and so she doesn't find her name on keepsakes very often. Therefore I wanted to include her name on the card, to make it extra special for her. I took out Lawn Fawn's "Quinns ABCs" and coloured them with Copics in an ombre look.


Als nächstes habe ich die Katze gestempelt. Dazu war ein bisschen Masking nötig... Zuerst habe ich den Hut gestempelt, die Katze dann darunter und als letztes die Bücher. Meine Masken schneide ich in der Regel aus Post-its und versuche mittlerweile auch immer sofort eine Maske anzufertigen, wenn ich einen neuen Stempel in meinem Bastelzimmer willkommen heißen darf. Wenn ich die Masken nämlich habe, dann benutze ich sie auch - wenn nicht, dann bin ich manchmal auch ein bisschen faul und verzichte darauf, obwohl es eine meiner Lieblingstechniken ist, weil man damit so viel mehr aus seinen Stempeln herausholen kann. 
Zum Schluss habe ich dann alles auf einer rosa bestempelte Kartenbasis arrangiert und aufgeklebt.

Next I stamped the cat and needed to do a bit of masking for it. So first I stamped the hat, then the cat underneath it and lastly the books the cat is sitting on. Usually I cut my masks from post its and lately try to make sure that whenever a new stamps decides to take residence in my craft room I cut a mask for it right away. When I have the mask for a stamp I will use it, if not I have to admit that sometimes I am too lazy to get everything out again and fussy cut the mask for it. Which really is bad, because masking is one of my all time favourite techniques as you can get so much more life out of your stamps by it. 
All that was left to do now was to arrange everything on my previously stamped card base and to glue it down.


Mit der "Goodie Bag" Stanze von Lawn Fawn habe ich dann noch dieses kleine Täschchen angefertigt und mit Süßigkeiten gefüllt. Nachdem ich das Stanzteil zweimal vor mir liegen hatte, habe ich eines noch einmal durch die Big Shot geschickt, um das Fenster in die Front zu schneiden und anschließend beide Teile vorne mit dem gleichen Hintergrundstempel verziert, wie die Karte. Den Farbverlauf habe ich durch den Einsatz von drei verschiedenen Stempelkissen erzielt. Dazu habe ich mit der hellsten Farbe (Soft Pink) etwa die obere Hälfte des  Stempels eingefärbt, dann die nächste Farbe benutzt (Bubble Gum) und sie etwas mit dem Pink überlappen lassen und bis fast nach ganz unten aufgetragen und zum Schluss habe ich dann noch mit "Pale Tomatoe" ungefähr das untere Drittel eingefärbt. Bei den Übergängen habe ich darauf geachtet nicht zu fest zu drücken, damit die Farben sich ein bisschen besser vermischen konnten.

I made this cute "Goodie Bag" with a Lawn Fawn die and filled it with some treats. To create the goodie bag I needed the die cut piece twice and also needed to send one of them through once again to create the die cut window. I stamped the background stamp I had used on the card again on the front and back to tie everything together. The ombre look was achieved by using three different ink pads. I used the lightest (Soft Pink) to ink up the upper half of the stamp, before coming in with the second lightest (Bubble Gum) which I made sure overlapped a bit with the first and lastly added "Pale Tomatoe" to the bottom part of the stamp. Where the colours met I made sure to move them back and forth a bit (Jennifer McGuire calls it "chacha-ing") so that the colours would mix a little better. 


Zur Verzierung habe ich noch eine weitere Katze und einen kleinen Apfel ausgestanzt und angemalt. Hier könnt ihr noch einmal beides nebeneinander sehen:

For a bit of embellishment I added another cat and an apple to the front of the card and also stamped the "Puurfect" sentiment. Here you can see the card and the goodie bag side by side:

Material / supplies:
Stempel / stamps: "Smart Kitty" & "Class Act" von WPlus9
                            "Quinn's ABCs Capital" & "Quinn's ABCs" von Lawn Fawn
                            "Plan everyday" von Sweet Stamp Shop

Stanzen "Goodie Bag" & "Quinn'sABCs" von Lawn Fawn
             "Memo Pad" von Technique Tuesday

Challenges:

Sonntag, 12. Juli 2015

Best Fishes

Hallöchen zusammen!
Heute habe ich eine Karte für euch, auf der ihr Distress Inks, Copic Colouring und Embossing findet. 

Hello everybody!
Today I'd like to show you a card where I have used Distress Inks, Copic colouring and heat embossing.


Als erstes habe ich meine Distress Ink Pads in den Farben "Tumbled Glass", "Broken China" und "Peacock Feathers" horizontal über mein Papier gewischt, so dass es aussieht wie Wellen. Dazu habe ich die hellste Farbe oben benutzt und bin nach unten hin immer dunkler geworden. Mit einem Pinsel habe ich anschließend die komplette Fläche mit Farbe gefüllt, habe aber darauf geachtet, dass ich die Konturen soweit es ging behalten habe. Als ich mit dem Farbverlauf zufrieden war, habe ich mit Hilfe des Pinsels Wasser aufgetropft, einen Moment gewartet und das Ganze dass mit einem trockenen Tuch vorsichtig wieder abgetropft. So entstehen die helleren Punkte, die Aussehen wie Luftblasen. 

First I got out my Distress Ink pads in the colours "Tumbled Glass", "Broken China" and "Peacock Feathers" and swiped them over my water colour paper horizontally, so that it looked like waves. I started with my lightest colour for the top part of the paper and worked my way to the darkest colour for the bottom part. Using a brush I pulled the colour from the swipes to fill in the whole paper. I made sure that I kept as much as I could from the wave shapes though. After everything was filled in I flicked some water on top of my background piece, let it sit for a minute and then took it off with a dry towel. That way you get these cool bright spots that look like air bubbles in the water.


Danach habe ich den Hintergrund in Form gestanzt und den Spruch "Best fishes" (in Anlehnung an "Best Wishes" - beste Wünsche) mit Versamark aufgestempelt und weiß embossed. Zum Schluss kamen noch die niedlichen Meeresbewohner von "Sweet Stamp Shop" dazu, die ich schon vor ein paar Tagen mit meinen Copics für #thedailymarker30day2 Challenge ausgemalt hatte.

Then I die cut the nice background shape, added the embossed sentiment and also the sweet fish and other critters from the sea from "Sweet Stamp Shop" which I had already coloured for #thedailymarker30day2 challenge a couple of days back. 


Material / supplies:
Stempel / stamps: "Fishy" von Sweet Stamp Shop
                           "Mini Monograms" von Paper Smooches ("best")
                           "Alphabet Lower Case 1" von Habico ("fishes")

Stanze / die: "Sunshine Layers Die" von WPlus9

Samstag, 21. Februar 2015

Rainbow: Alles Gute / all the best

Hallo liebe Bastelfreunde!
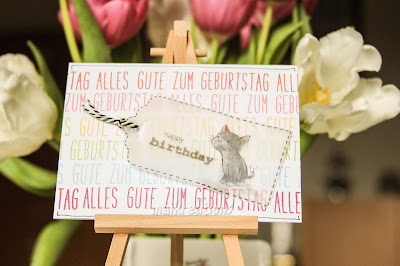
Vor Kurzem habe ich mir Lawn Fawns Milo's ABCs zugelegt, um damit meine eigenen Kartensprüche stempeln zu können. (Es ist ja nicht immer leicht, die passenden Sprüche auf Deutsch zu finden.) Die kleinen Stempel gerade auf den Acrylblock zu setzen hat mich ein wenig Zeit gekostet, aber die hat sich im Endeffekt gelohnt, weil ich sofort mehrere Hintergründe mit dem gleichen Spruch gestempelt habe. Als erstes habe ich den Regenbogen-Hintergrund in eine Karte verwandelt.

Heya crafty friends!
Recently I got Lawn Fawns Milo's ABCs to create my own custom sentiments which I did as soon as I had the stamps. Though it took me quite a while to spell out "Alles Gute zum Geburtstag" (All the best for your birthday) it was well worth it. I created a couple of backgrounds with the sentiment and decided to make the rainbow coloured background into a card first.


Um den Hintergrund nicht zu sehr abzudecken habe ich mich dazu entschieden als Fokuspunkt noch ein Vellum-Tag hinzuzufügen. Erst habe ich mich ein wenig geärgert, weil es sich durch das Anmalen der Katze mit meinen Tombow-Stiften leicht verzogen hat. Mit ein wenig Abstand betrachtet finde ich aber jetzt, dass es der Karte etwas gibt. Mir hat mal jemand gesagt, dass es keine Fehler beim Basteln gibt, sondern Fehler nur kreative  Gelegenheiten sind und das versuche ich mir immer wieder klar zu machen. ;o)

I didn't want to cover up the whole background so I decided to have a vellum tag as my focal point. At first I was a little peeved, because the tag was a little wavy after colouring the cat with my Tombows. Looking at it now I think it actually adds a little something to the card. A while ago someone told me that there are no mistakes in crafting, but only creative oppurtunities... I always try to keep that in mind ;o)


Material / tools:
Stempel / stamps: "Milo's ABCs" von Lawn Fawn
                            "Purrfect Pair" & "Three Amigos" von Mama Elephant
                             "Happy Birthday" von Sweet Stamp Shop

Stanze / punch: "Scalloped Tag Topper Punch" von Stampin Up


An folgenden Challenges möchte ich mit meiner Karte teilnehmen:
I would like to enter my card for the following challenges:

"Birthday Celebration"


"Birthday"
Unser Banner


"Add a little texture" (Who said it had to be on purpose, huh?) :o)
Simon Wednesday Challenge Blog


Montag, 2. Februar 2015

love love love love love you

Hallo zusammen!!!

Inspiriert vom baldigen Valentinstag habe ich diese Karte gemacht.

Hello there! Inspired by the upcoming Valentine's Day I made this card.

Als erstes habe ich den weißen Kartenhintergrund mit dem Polka-Dot-Herz in "Pale Tomatoe" von Hero Arts gestempelt und anschließend das Wort "love" einige Male ausgestanzt und über die Herzen geklebt. Dabei habe ich darauf geachtet, dass ich das erste so aufgeklebt habe, dass es mittig auf der Karte platziert ist. Um so dünne Die-cuts aufzukleben nutze ich gerne mein Tombow Mono Multi Liquid Glue und achte darauf in regelmäßigen Abständen einen Minitropfen Kleber aufzutragen. So hält es gut und es gibt keine häßlichen Kleberückstände. 


First I stamped the polka-dot-heart on the whole background  in "pale tomatoe" by Hero Arts and then die cut the word "love" a few times and glued it right over the hearts. Gluing down the first "love"- die cut  I paid attention to position it right in the middle of the card. When I need to glue down thin strips of paper or more intricate designs I like to use my Tombow Mono Multi Liquid Glue and make sure to put a tiny drop of glue about every 1/4 of an inch and on all the crossing parts. That way it sticks down pretty well and you don't have any glue squeezing out from under the paper.


Material / tools:

Stempel / stamps: "Ich {liebe}Herzen" von Stampin Up
                            "Plan Everyday" von Sweet Stamp Shop

Stanze / die: ""Scripty Love" von Lawn Fawn


Simon Wednesday Challenge Blog
Die Karte möchte ich außerdem noch bei der Simon Says Stamp Challenge "Anything goes" anmelden:
I would like to enter the card at the Simon Says Stamp Challenge "Anything goes":


Samstag, 31. Januar 2015

Happy Birthday on a tag


Hallöchen zusammen!


Heute zeige ich euch eine Karte, die einige meiner Lieblinge verbindet: Tags, Herzen und Geburtstage ;o) Als erstes habe ich die Kartenbasis und das weiße Tag teilweise mit diesen süßen genähten Herzen embossed und anschließend den Geburtstagsgruß gestempelt. (Rückblickend würde ich vermutlich erst stempeln und dann embossen, da ich mehrfach stempeln musste, um ein gutes Stempelergebnis zu bekommen.) Dann habe ich die Herzen ausgestanzt und die drei schmalen Streifen Papier geschnitten, aufgeklebt und mit dem Wink of Stelle Glitterpen ein wenig Glanz & Glitter aufgetragen. Zum Schluss habe ich das weiße schräg versetzt auf das rote Tag geklebt und beide mit Abstandshaltern auf die Kartenbasis geklebt. Voilà!


Hello there! Today I'd like to show you a card that combines some of my favourites: tags, hearts and birthdays :o) First I dry embossed the card base and the white tag partially with these adorable stitched hearts and added the greeting afterwards. (In hindsight I would have done it the other way around, because I had to stamp the sentiment several times to make it work.) Afterwards I die cut the hearts and cut three very thin strips of paper, glued them on and added some shimmer and shine with the Wink of Stelle glitterpen. At the end I glued the red tag slightly tilted to the white piece and used some foam pads to give the tags some dimension on the card.  Voilà!


Material / tools:
Stanzen / dies: "Hearts" von Paper Smooches
                      "Tags STAX" von Die-Namics

Stempel / stamps: "Happy Birthday" von Sweet Stamp Shop

Embossing folder: "love Spun" von American Crafts


Mit der Karte möchte ich an folgenden Challenges teilnehmen:

Night-Shift-Stamping:  "Tags"

Seize the Birthday: "Anything goes"


Simon Says Stamp Wednesday Challenge Blog
Simon Says Stamp: "Anything goes"


Dienstag, 27. Januar 2015

Birthday Balloon

Hallöchen an alle Leser ;o)

Heute gibt es noch eine weitere Geburtstagskarte, die sich mittlerweile schon auf den Weg nach Brandenburg gemacht hat. Mit ihr habe ich mich einer besonderen Herausforderung gestellt und vier Challenges gleichzeitig unter einen Hut gebracht und darauf geachtet, dass es eine Karte ist, die der Empfängerin gefallen wird. Puh!!! Das war nicht ohne, aber das kleine Wunder ist vollbracht! 

Bildunterschrift hinzufügen


Den Ballon habe ich mit fünf Lagen weißem Papier hochgestellt. In die untersten Lagen habe ich einen schmalen Schlitz hineingeschnitten, so dass das Garn unter dem Ballon festgemacht ist, er aber dennoch flach auf der Karte aufliegt. Den Geburtstagsgruß habe ich mit weißem Pulver von American Crafts embossed.

The balloon is popped up with 5 layers of white paper in which I cut a tiny groove so that I could glue the twine down without raising the balloon. I embossed the sentiment on the upper right corner with white powder from American Crafts.


Material / supplies:
Stempel / stamps: "Happy Birthday" & "Plan Everyday" von Sweet Stamp Shop
                           "Sweet & Sassy" von Stampin Up

Stanzen /dies: "Party Balloons" von Die-Namics
                       "Mini Hearts Set" von Simon Says Stamp


An folgenden Challenges möchte ich teilnehmen:

MFT Color Challenge

CAS(E) this sketch

 
 Stempelküche


& Simon Says Stamp


Simon Says Stamp Wednesday Challenge Blog

Danke für eure tollen Challenges!!! Thanks for having these wonderful challenges!!!

Freitag, 23. Januar 2015

"You totally rock!"


Hallo zusammen!

Heute möchte ich euch eine Karte zeigen, die man für viele Gelegenheiten nutzen kann: für den Valentinstag, als Aufmunterung, als Glückwunsch oder zum Geburtstag. Je nachdem, wofür ihr die Karte nutzen wollt, würde ich nur den gestempelten Hintergrund austauschen und schon passt sich dieses Design dem Anlass noch mehr an. 
Den weißen Hintergrund habe ich mit der gleichen Stanze geschnitten, wie das dunkelrosa Papier, damit die Formen übereinstimmen. Außerdem habe ich noch ein Blatt Kopierpapier damit ausgestanzt, das ich dann später als Maske benutzt habe, um den Rand mit Hilfe des Inking Tools von Tim Holtz hellrosa zu gestalten. Die Katze habe ich mit Buntstiften ausgemalt und ausgestanzt. Die Sprechblase ist aus Transparentpapier ausgestanzt und den Spruch habe ich mit Versamark gestempelt, damit das rote Embossingpulver darauf haften konnte. Zum Schluss habe ich das viele Rosa noch mit 2 Stücken Washitape ausgeglichen - es war einfach zu rosa :o)

Hello everyone! Today I would like to share a card with you that you could use for many occasions: Valentine's Day, encouragement, congratulation or even as a birthday card. Depending on which occasion you would want to use it for, I'd switch the background image to something that emphasises the reason why you are sending this card even more. I cut the white paper with the same die as the dark pink backgound paper plus an extra sheet of copy paper which I used as a mask to sponge the edge of the white paper in light pink. For the cat I used coloured pencils. The sentiment is stamped with Versamark ink on a piece of vellum that I die cut to look like a speech bubble. Afterwards I used some red embossing powder to make it stand out. To balance all the pink I used 2 different washi tapes on the upper right corner of the inner panel.


Material / tools:

Stempel/ stamps: "Plan Everyday" von Sweet Stamp Shop
                       "Purrfect Pair" von Mama Elephant
                       " "For the record" von Simon Says Stamp

Stempelkissen / stamp pads: "Watermark" von VersaMark 
                                       "Soft Pink", "Raspberry Jam" & "Blackboard" von Hero Arts

Embossingpulver / embossing powder: ""Rouge" von American Crafts Zing!

Stanzen / dies: "Talk Bubbles" von Simon Says Stamp
                     "On the edge - Brackets" von Sizzix - Alterations by Tim Holtz

Ich möchte die Karte bei folgenden Challenges einstellen:
I would like to enter the card in the following challenges:


Stempelküche:


MFT Sketch Challenge:


& Color Throwdown:

Related Posts Plugin for WordPress, Blogger...