Dienstag, 29. September 2015

Owl the best


Hallo ihr Lieben!
Heute startet eine neue Challenge auf dem {PIN}spirational Challenge Blog. Als Gewinn gibt es dieses Mal einen 15 Dollar Gutschein für den Shop von Deedee's Digis! Zum Herbstbeginn gibt es ein passendes Inspirationsbild, zu dem ich meine  heute Karte gewerkelt habe - würde mich freuen, wenn ihr mal bei uns vorbei schaut und auch eines eurer Werke einstellen würdet!
Normalerweise fällt es mir ziemlich schwer, einen Hintergrundstempel wirklich zum Star der Show zu machen - doch dieses Mal hat es geklappt! Schon als ich ihn das erste Mal gesehen habe, wusste ich, dass ich die Blätter wie buntes Herbstlaub gestalten wollte. Benutzt habe ich hierzu meine Copic Marker. Dieses Mal allerdings mehr für ihre leuchtenden Farben, da ich auf übermäßiges Verwischen zu Gunsten eines mehr grafischen Looks verzichten wollte. 

Heya dear friends!
Today is the start of a new challenge over at the {PIN}spirational Challenge Blog. You can win a $15 gift-certificate to our lovely sponsor's shop Deedee's Digits! The inspiration pic is perfect for the beginning of fall and I hope my card helps to inspire you. We would love it if you would play along and share your projects with us!

Usually it is really hard for me to make a background stamp the star of the show - but I managed it this time. (Or at least I think so..) When I first saw this stamp I knew I wanted to colour it like autumn leaves. To do so I used my Copic markers. This time though I abstained from blending the colours too much in favour of a more graphic look.


Um Platz für den Kartenspruch zu haben, habe ich 2 Lagen Vellum ausgestanzt und diese dann noch einmal mit der gleichen Stanze am Rand gekürzt, die ich auch für mein Panel benutzt habe, damit alles gut aufeinander passt. Im nächsten Schritt habe ich den Ast ausgestanzt, die Eule und den Igel gestempelt und dann alles ausgemalt. 

I needed a place to stamp my sentiment where it wouldn't get lost, so I decided to die cut 2 layers of vellum. After die cutting them I used the same die as I did for the panel to cut off parts of the ovals. This way the layers fit perfectly on top of each other.(And in case you where wondering how I managed to know where to put the die in order to cut at the right place - I didn't... I totally eyeball those things...) Next I die cut the branch, stamped the owl and the hedgehog and coloured all of these with Copic markers.

  
Bevor ich alles aufgeklebt habe, habe ich noch den Kartenspruch gestempelt. Dabei habe ich darauf geachtet, dass der Ast später noch genügend Platz hat. Das ist ein wirklich wichtiger Schritt! Falls ihr schon den ein oder anderen Post von mir gelesen haben solltet, wisst ihr vielleicht, dass ich dazu neige, den Platz für den Spruch zu vergessen und das dann am Ende immer irgendwie hinbiegen muss. Dieses Mal habe ich aber tatsächlich geschafft daran zu denken - Gott sei Dank scheine ich es langsam zu lernen ;o) Um der Karte den letzten Schliff zu geben, habe ich den Clear Wink of Stella Glitter Pen auf allen gold-gelben Blättern aufgetragen.

The last step before assembling was to stamp the sentiment. I made sure, that I would have enough space for all the elements before stamping the sentiment. That is a really important step! If you have read some other posts of mine you might already know by now that I have a tendency to forget to reserve space for my sentiments all the time and then I have to fix it somehow. This time I planned ahead - thank goodness I seem to learn ;o) To finish off the card I took my Clear Wink of Stella Glitter Pen and added it to the golden-yellow leaves only. 


Material / supplies:
Stempel / stamps: "Critters in the forest", "Thank you Tags" & "Milo'sABCs" von Lawn Fawn
                           "Graphic Leaves Background" von Hero Arts

Stanzes / dies: "Sunshine Layers Die" von WPlus9
                      "Die-namics Zig-Zag Stitched Oval STAX" von My Favorite Things

Challenges:

Freitag, 25. September 2015

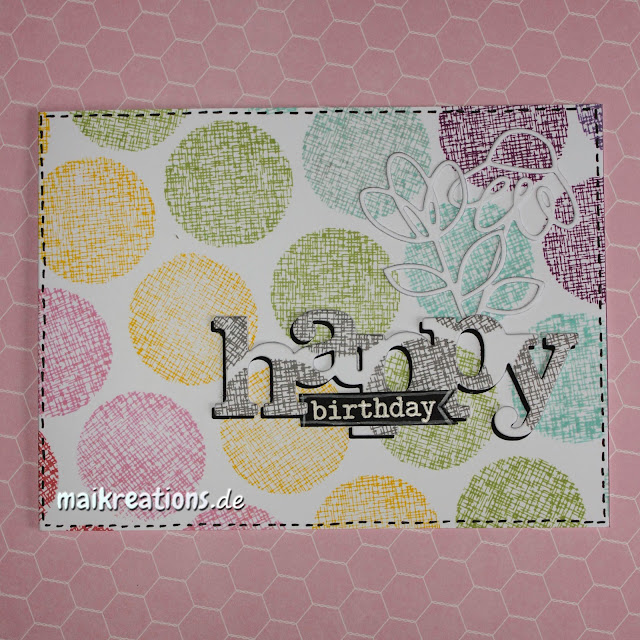
Happy birthday Rainbow dots / Geburtstagskarte

Hallo ihr Lieben!
Heute gibt es mal eine kleine Pause von all den niedlichen Tieren und statt dessen eine recht grafische Karte:

Heya my dear crafty friends!
Today there will be no cute animal on my card for a change. Instead this is a rather graphic card:


Den Stempelkreis mit Leinenstruktur (?) habe ich diagonal über meine gesamte Kartenbasis gestempelt und dabei die Farben in der Reihenfolge der Regenbogenfarben gewählt. In der Regel benutze ich bei schrägem Stempeln für die erste Reihe ein Lineal und stempel am Rand entlang. Den Rest mache ich dann Pi mal Daumen ;o) Während die Tinte trocknete, habe ich das Wort "happy" einmal aus schwarzem und einmal aus weißem Papier ausgestanzt und so übereinandergeklebt, dass ein schmaler schwarzer Rand zu sehen ist. Das Stanzteil habe ich danach dort auf die Karte gelegt, wo ich es am Ende haben wollte und habe mit dem gleichen Stempel wie zuvor noch einmal in dunkelgrau dort abgestempelt, wo das Wort die bunten Kreise verdeckt hat. Um meine Kartenbasis zu schützen, habe ich ein Stück Plastik dazwischengelegt, das ich danach einfach sauber wischen konnte.

I stamped the circle with the burlap structure to create a diagonal line of dots across my card base following the rainbow order. Usually I use a ruler to stamp my first row (here is was the yellow one) along the edge of it to end up with a straight line and then eyeball the other rows. While the stamping dried I cut out the word "happy" from white and black cardstock. I glued them together, so that there was a bit of a black outline visible under the white die cut and placed it on my card where I wanted it to end up. Then I took the same stamp again and stamped on the word die, where the coloured dots were. To protect my card yet be able to see where I needed to stamp I used a piece of acetate beneath the die cut which I could simply wipe clean after using it.


Nachdem ich das ausgestanzte und bestempelte Wort aufgeklebt hatte, habe ich die Blumen und das schwarze "birthday"-Fähnchen aufgeklebt. Für Letzteres hatte ich den Spruch mit Versamark gestempelt und dann mit weißem Embossingpulver embossed. Die Linie außen herum habe ich mit einem Kreisemarker von Stampin Up dazugezeichnet.

After I glued the word die in place I added the outline-flower die cuts and also the black birthday tag. I had heat embossed the word in white and added the line around it using a chalk marker from Stampin Up.


Material / supplies:
Stempel / stamps: "Flower Circles" von Waffle Flower
                            "The Big, the Bold and the Happy" von Winnie & Walter

Stanzen: "In a Word: Happy Cutaway" von Winnie & Walter
              "Dainty Flowers" von Paper Smooches

Mittwoch, 23. September 2015

Herbstliche Dankeskarte / Autumn Thanks card + great news

Hallo ihr Lieben!
Die Kreis-Schablone von My Favorite Things stand schon lange auf meinem Wunschzettel und nachdem ich sie auf dem Stempelmekka ergattert habe, konnte ich sie nun auch endlich auf einer meiner Karten nutzen!

Heya my dear crafty friends!
This circular stencil from My Favorite Things was on my wishlist for the longest time and I finally got my hands on one when I went to the stamping fair in Hagen called Stempelmekka. So here is my card with it:


Als erstes habe ich die Blätter mit Hilfe von selbstgemachten Schablonen und Masken auf meine Kartenbasis aufgetragen. Dazu habe ich pro Blatt in der Regel 2 verschiedene Farben benutzt. Als nächstes habe ich alle Blätter mit Masken geschützt, die oben erwähnte Schablone aufgelegt und mit einem Ink Blending Tool "Tumbled Glass" auf das Papier gebracht. Um aus dem Bereich noch ein bisschen mehr herauszuholen, habe ich die Schablonen der Blätter noch ein weiteres Mal benutzt und durch jeweils beide Schablonen hindurch die etwas dunkleren Blattformen in "Broken China" aufgetragen. 

The first step for this card was to create both masks and stencils for the leaves. I used an Ink Blending tool and two colours for each individual leaf. Afterwards I placed all the masks on top of the leaves and added some "Tumbled Glass" through the circular stencil. In order to take it one step further (though it isn't very noticable in the end" I placed the leaf-stencils below the MFT stencil and thus added some more leaves to that area using "Broken China".


Im nächsten Schritt habe ich die vielen Spritzer um die Blätter herum verteilt. Dazu habe ich die beiden Goldfarben aus dem Gansai Tambi Set mit ordentlich Wasser angerührt und dadurch, dass ich den sehr feuchten Pinsel auf meinen Handrücken geklopft habe, die vielen Punkte aufgetragen. Wenn das Licht  im richtigen Winkel auf sie drauf fällt sieht es wirklich super schön aus. Zuletzt habe ich dann noch das Stanzteil hinzugefügt, das aus 2 Lagen weißem und einer Lage rotem Papier beteht. Das Rot ist "Festive Berries", über das ich mit "Tea Dye Ink" eine Holzstruktur drübergestempelt habe. Beide Farben habe ich auch im Ahornblatt verwendet. 

Next I used the golden metallic colours from the Gansai Tambi set to add some splatters around the leaves. I loaded my brush up with a bit of paint and tapped it on the back of my hand to get a rather random pattern. When the light catches the golden dots it looks really pretty. After that was dry I added the die cut word to the card front which consists of two layers of white and one layer of red paper. I had used "Festive Berries" to colour the paper and stamped over it with "Tea Dye" ink in a wood pattern. Those are the exact same colours I had used for the acorn leaf.


Zum Schluss habe ich noch ein paar tolle Neuigkeiten, die ich unbedingt mit euch teilen möchte!!! Für die Crafty Cardmakers And More gab es einen DT Call auf den ich mich beworben habe und sie haben mich in ihr tolles Team aufgenommen! Alle 2 Wochen werde ich euch hoffentlich mit einer meiner Karten inspirieren können! Ich freu mich riesig, dabei zu sein!!! :o)

And before I will publish this post I just wanted to let you know some fabulous news!!! There was a DT call over at the Crafty Cardmakers And More Challenge blog a while ago and I applied! And now I am very happy to announce that they have accepted me in to their wonderful team. So from now on I hope I'll be able to inspire you with one of my cards! I am so happy and excited to be part of this talented team!!! :o)


Material / supplies:
Stanzen / dies:  "Stitched Leaves" von Lawn Fawn
                       "Hand Lettered Thanks Die" von WPlus9
Schablone / stencil: "Concentric Circle Grid" von My Favorite Things
Colouring: Distress Inks

Challenges:

Sonntag, 20. September 2015

Autumnal Owl Card / Herbstliche Eulenkarte

Halli Hallo ihr Lieben!
In oder auf dieser Karte habe ich 2 wie ich finde tolle Sets verbunden. Zum Einen die Blätter von Lawn Fawn und zum Anderen die süßen Eulen von Clearly Besotted:

Heya my dear crafty friends!
In or better on this card I have combined two fantastic sets. One is the "Stitched Leaves" set from Lawn Fawn , the other is the "Woodland Kisses" set from Clearly Besotted:


Um die Karte zu machen, habe ich als erstes alle Blätter 2x ausgestanzt und mit Distress Inks gefärbt. Dazu habe ich einfach meine liebsten Herbstfarben herausgesucht und ohne groß zu planen die Blätter bunt gemacht. Auf meine Karte habe ich mit Hilfe der Stanze, die ich später für die Eulen benutzt habe, ein Oval gezeichnet und daran die Blätter ausgerichtet und aufgeklebt.

In order to get my card started I cut out each of the stitched leaves twice and coloured them using Distress Inks and an Ink Blending Tool. I chose my favourite autumn colours and inkes the leaves up with no rhyme or reason. Then I used the die I knew I wanted to use to cut out the owls, centered it on my card, drew around it on the outside with a pencil and glued the leaves to the card base using the pencil lines as a guide. 


Anschließend habe ich die Szene mit den Eulen auf Aquarellpapier gestempelt, mit Inktense-Stiften ausgemalt und ausgestanzt. Als nächstes habe ich ein weiteres Oval aus bräunlichem Papier ausgestanzt und mit einer Holzmaserung bestempelt. Beide Teile habe ich dann noch mal mit einer passenden Farbe distressed.

Now I stamped my little scene on watercolour paper, coloured it with Inktense pencils and cut it out. Next I cut another, slightly bigger oval shape from a brownish paper and stamped on top of it with a wood background stamp to give that panel some more interest. I also distressed both pieces with brownish ink.


Als ich die zusammengeklebten Ovale auf meine Blätter gelegt habe, fiel mir auf, dass die Kartenbasis nun viel zu grell aussah. Also habe ich einen geschwungenen Rahmen außen am Rand herum gezeichnet und das Innere mit unregelmäßigen diagonalen Streifen ausgefüllt. Dieser Schritt wäre soooo viel einfacher gewesen, wenn ich die Blätter noch nicht aufgeklebt hätte.... Ich denke, ich werde das irgendwann auch noch lernen - bis dahin muss ich halt improvisieren ;o) Gefallen hat mir das Ganze allerdings erst dann, als ich den Bereich zwischen Rahmen und Papierkante dann noch braun ausgefüllt habe. Ausnahmsweise habe ich den Kartenspruch weggelassen. Sollte einer nötig werden, kann ich ihn immer noch hinzufügen oder auf die Innenseite der Karte stempeln. Auf die Innenseite habe ich aber noch diese süßen Eulen von Cats On Applestrees gestempelt. Es ist eine Mekka-Neuerwerbung und musste unbedingt untergebracht werden ;o)

When I put down the ovals shapes on top of the leaves I noticed, that the card base was too bright in comparison. So I added a frame around the card and filled the inside with hand drawn wonky stripes. This could have been sooo much easier had I not glued everything down before... I feel like I will learn to wait with the gluing things down part one day but until then I will have to improvise. I still felt, that something was missing until I coloured the frame in dark brown. For once I didn't include a sentiment, but if I needed one on there for whatever reason I could add it or stamp it on the inside of the card. I did however add these cute owls from Cats on Appletrees to the inside of the card, because I simply couldn't resist ;o)

Material / supplies:
Stempel / stamps: "Woodland Kisses" von Clearly Besotted
Stanzen / dies: "Stitched Leaves" von Lawn Fawn
                      "Die-namics Zig-Tag Stitched Oval Stax" von My Favorite Things

Challenges:

Freitag, 18. September 2015

Hang in there Fox - Halte durch Fuchskarte

Hallöchen ihr Lieben!
Schön, dass ihr vorbei schaut ;o) Heute möchte ich euch eine Karte zeigen, für die ich den Stempel überall gesucht und nie gefunden habe. Zum Glück gab es aber letztes Wochenende in Hagen das Stempelmekka und dort habe ich den süßen Fuchs von Wild Rose tatsächlich bekommen!

Hello dear crafty friends!
So glad you are stopping by ;o) Today I would like to show you a card that features a stamps I have been looking for all over the world. Fortunately there was a huge stamping fair here in Germany last weekend, where I finally got this little Fox from Wild Rose Studio!


Zuerst habe ich den Fuchs mit Archival Ink in schwarz auf Aquarellpapier gestempelt und ihn dann mit verschiedenen Distress Ink Farben angemalt, wobei ich sie wild untereinander gemischt habe, so dass ich euch die genaue Farbzusammensetzung nicht einmal wirklich sagen kann...

First I stamped the fox on some watercolour paper using Archival ink in black and then I coloured him in with a brush and Distress Inks in various colours. Unfortunately I wouldn't be able to tell you which colours I have used, because I needed to mix a couple of them to get the shade that I wanted...


Nachdem alles getrocknet war habe ich den Spruch "hang in there" ("Halte durch") mit der Farbe "Taupe" von Stampin Up gestempelt. Dann habe ich den Fuchs ausgestanzt und auf ein weiteres "taupe-farbenes" Stanzteil geklebt. Beides zusammen habe ich dann mit Abstandshaltern auf meine bestempelte Kartenbasis geklebt. Dazu habe ich mit dem "Taupe" (ich finde übrigens, dass das ein komisches Wort ist... ) eine Holzmaserung aufgestempelt und den Rand dann noch einmal gewischt, weil mir immer noch zu viel Weiß durchgeschienen hat. Ganz zum Schluss habe ich noch die Epoxypfeile vor und hinter den Kartenspruch geklebt, weil sie einerseits dem ziemlich dezenten Spruch etwas mehr "Standing" geben und zweitens, weil sie farblich so genial zum Himmel passen.

After everything was dry I stamped the sentiment in "Tip Top Taupe" from Stampin Up. Then I die cut the fox and layered it on top of another die cut piece that has the same colour as the ink that I had used before. Before I glued everything on top of my card base I stamped it with a wooden background and blended in the ink a bit around the edges, so that the white wouldn't be as bright. As a finishing touch I added the blue epoxy stickers around the sentiment, because that made it stand out a bit more and also because the colour of the stickers matched the background perfectly ;o)


Material / supplies:
Stempel / stamps: "Fox on branch" von Wild Rose Studio
                           "Into the words" von Memory Box (Great set with lots of sentiments when you love forest animals!!!)
                            "Wood Plank Background" von My Favorite Things 


Challenges:
 

Donnerstag, 17. September 2015

Happy Halloween Cat

Halli Hallo ihr Lieben!
Letztes Jahr habe ich nicht eine einzige Halloweenkarte gebastelt, aber dieses Jahr habe ich so viele süße Stempel, die so liebevoll dazu einladen zu einer Karte zu werden, dass ich nicht widerstehen konnte. Die beiden Motivstempel sind von Purple Onion Designs und aus der neusten Serie von Stacey Yakcula. Sie kreiert die süßesten Stempel! Wirklich! ;o) Wenn ihr mir nicht glaubt, schaut doch einfach selber mal im Shop vorbei? (Ich übernehme aber keine Garantie dafür, dass euer Bastelbudget danach noch genau so hoch ist wie vorher... grins)

Hello my dear crafty friends!
LAst year I haven't made a single Halloween card, but this year I have so many irresistibly cute stamps in my stash that I could not refrain from turning them into cards. The two main images on this card are from part of the newest release from Stacey Yacula over at Purple Onions Designs. She comes up with the cutest stamps! Honestly! ;o) If you don't believe me, why not hop over there and have a look? (However I can't guarantee that you won't be dipping into your crafting budget... grin)


Die beiden Stempel habe ich mit Copics ausgemalt und dann noch einen Hintergrund für die Katze gestaltet, da ich sie mit der quadratischen Stanze ausstanzen wollte, wohingegen ich den Vogel mit nur einer feinen Linie drum herum per Hand ausschneiden wollte und daher für ihn keinen Hintergrund benötigte. 

I coloured both images with Copic markers and created a background for the cat, because I wanted to cut her out using the square die cut whereas I fussy cut the bird and therefore didn't need any background for it. 


Eine rein weiße Kartenbasis fand ich für eine Halloweenkarte zu langweilig, also habe ich mit einem Hintergrundstempel viele kleine Sterne in hellgrau daraufgestempelt. Das Quadrat mit der Katze habe ich dann mit einem passenden lila Designerpapier hinterlegt und in den unteren linken Bereich der Karte geklebt, damit das Vögelchen oben noch ausreichend Platz fand. 

A completely white card base seemed too boring for a halloween card, so I chose to use a background stamp to add lots and lots of tiny little grey stars to the card front. Then I mounted the square piece with the cat on a piece of purple patterned paper to give it a frame, so it could pop more. I glued the piece to the bottom left part of my card base, because I wanted to add the bird to the top right of that piece. 


Den Kartenspruch habe ich direkt über das Katzenquadrat gestempelt und noch einen zweiten Kürbis neben die Katze geklebt, weil es so insgesamt drei Kürbisse auf der Karte sind und eine ungerade Anzahl Elemente für das Auge natürlicher und besser aussieht. Probiert es einfach selbst mal aus. Trotz der vielen Sterne im Hintergrund erschien mir die Karte zu diesem Zeitpunkt noch zu leer, also habe ich (für meine Verhältnisse) tief in die Verzierungskiste gegriffen und nicht nur Liquid Pearls Sterne und Washitapeflaggen, sondern auch noch Pailletten auf der Karte verteilt. Damit war die Karte dann fertig ;o)

I stamped the sentiment right over the square panel and also added a second pumpkin next to the cat. That made a total of three pumpkins on my card and for some reason an odd number always is more pleasing to the eye. You chould give it a try sometimes and see what your eye likes the best. Despite of all the stars in the background my card still seemed kind of empty. So I took out (lots of) embellishments and added them to my card as well: Liquid Pearls stars, washitape and even a couple of sequins. Now my card was done ;o)


Material / supplies:
Stempel / stamps: "Midnight - Halloween kitten" & "Little Boo" von Purple Onion Designs
                            "Good greetings" von Stampin Up
                            "Tiny Star Background" von Hero Arts
Stanzen / dies: "Stitched Squares" von Simon Says

Challenges:
NBUS Challenge #5 "Anything goes" (New stamps from Purple Onion Designs"
 
Simon Says Wednesday Challenge "Die Crazy"
Marker Pop Challenge "Fall / Autumn"
Tuesday Throwdown "For a child"
Addicted to Stamps and More "Make your Mark"

Dienstag, 15. September 2015

Rainbow Boy / Aufmunterungskarte


Hallo zusammen!
Es gibt wieder einmal eine neue {PIN}spirational Challenge, gesponsort dieses Mal von "Little Blue Button" und "All Dressed Up". Hier unser Inspirationsbild:

Hello everybody!
There is a new {PIN}spirational challenge as of today and we have again two very kind sponsors: "Little Blue Button" and "All Dressed Up". Here you can see the inspiration picture:


Für meine Karte habe ich "Sunny mit Schirm" auf eine Größe von etwa 11 cm gezogen, ausgedruckt und mit Copics coloriert. Danach habe ich einen passenden Spruch gesucht und bin schnell fündig geworden. Der Spruch ("Ohne Regen gäbe es keinen Regenbogen") passte super zu dem bunten Schirm. Als Hintergrund für Sunny habe ich ein Papier von "Clever Handmade" namens "Love Birds" ausgewählt.
Nun fehlte noch einen Regenbogen auf der Karte. Dazu habe ich Stanzen von WPlus9 benutzt und den Regenbogen mit den Farben angemalt, die ich zuvor für den Regenschirm und die Jacke benutzt hatte. Auf dem oberen Bild kann man gut sehen, dass ich anschließend mit dem Wink of Stella Stift noch ein wenig Glitzer auf den Regenbogen aufgetragen hab.

I resized "Sunny with umbrella" to approximately 4 inches, printed him out and coloured him in with Copic markers. After that step I needed to find a sentiment for my card which luckily I did rather quickly. I thought the saying "Without the rain there'd be no rainbow" would go perfectly with the image and the way I had coloured the umbrella. As a background for Sunny I chose some patterned paper from "Clever Handmade" called "Love Birds". 
Now I wanted a rainbow for my card and so I chose a die from WPlus9 and coloured it with the same markers I had used on the umbrella and the jacket. On the picture you can see quite clearly that I also added some Wink of Stella Glitter pen to the die cut piece, in order to give it a bit more shimmer and interest.


Da ich wollte, dass der Kartenspruch über das gemusterte Papier hinausragt, musste ich Trick 17 zu Hilfe nehmen: Zuerst habe ich den Spruch auf die Folie von meinem Stampamagic gestempelt, das Wolkenpapier an die Stelle gelegt, an der ich es haben wollte und habe dann mit Hilfe der Folie den richtigen Platz für meinen Stempel gefunden. Abgestempelt habe ich aber erst nachdem ich das Papier wieder weggenommen hatte, damit der Abdruck auf der Kartenbasis klar und sauber wurde. Anschließend habe ich das Tag aufgeklebt und den Spruch noch einmal gestempelt, so dass die Linien genau übereinander passen. Den ersten Stempelabdruck habe ich mit einem Post-it maskiert, damit kleine Ungenauigkeiten beim Stempeln nicht auffallen. Hätte ich sofort beides bestempelt, hätte es vermutlich eine unschöne Lücke gegeben, wo der Übergang vom Papier zur Karte ist - daher dieser etwas komplizierte Weg...

I wanted the sentiment to be on the patterned paper as well as on the card base so I needed the help of my stampamagic tool. First I stamped my sentiment on the piece of acetate, then I placed the patterned paper where I wanted it on my card and positioned the stamp with the help of the acetate piece. Before I stamped down I first removed the patterned paper, so that the stamping would be clean and crisp on the card front. Afterwards I glued the tag down and stamped the sentiment again after making sure I had it in the right spot. Because I didn't want to risk ruining my first stampingI covered the card base with a post it note. Doing it this (slightly complicated) way I end up with a crisp sentiment going across both layers, otherwise there might have been a gap in the sentiment.


Um die Karte abzurunden habe ich noch ein paar klare und blaue Pailletten auf der Karte verteilt und noch einen Pailletten-Regenbogen unter dem Kartenspruch hinzugefügt.

As a finishing touch I scattered some clear and blue sequins on my card and also added the sequin-rainbow below my sentiment. 

Material / supplies:
                           "April Showers Additions" von Clearly Besotted
Stanzen / dies: "Sunshine Layers Die" von WPlus9
                      "Pierced Trad Tags Stackables" von My Favorite Things

Sonntag, 13. September 2015

Back to school goodie bag, box and card / Zum Schulanfang

Hallo zusammen!
Ich hoffe, ihr hattet bisher ein schönes Wochenende und seid entspannt in den Sonntag gestartet!!! Eine ganz liebe junge Dame namens Darcey hat in der letzten Woche die Schule gewechselt und dafür wollten wir ihr viel Glück und alles Gute wünschen. Daher hat sich bereits letzte Woche ein Päckchen mit diesem Inhalt auf den Weg zu ihr gemacht:

Heya everybody!
I hope you all had a fantastic weekend and are going to enjoy your sunday. A very sweet young lady called Darcey started at a new school last week and we wanted to let her know that we are thinking of her and wishing her all the best. This is why we sent off a parcel with all of these in it last week:


Für die Karte (links im Bild) habe ich das Notizblatt ausgestanzt, das Gitter und den Spruch darauf gestenpelt und mit klarem Embossingpulver hervorgehoben und danach mit lauter schulrelavanten Zeichen und Sprüchen bestempelt. Darcey ist auch dort wo sie lebt ein eher außergewöhnlicher Name und sie findet ihn selten mal auf einem Andenken und daher wollte ich ihren Namen unbedingt auf der Karte haben. Dazu habe ich die "Quinns ABCs" von Lawn Fawn herausgesucht und nach dem Trocknen mit Copics im Ombre-Look ausgemalt. 

I die cut a piece of paper with the "Memo Pad" die by Technique Tuesday, stamped the "Graph paper" on it in blue and then added the sentiment and all the other school related icons and sentiments in black. Because I wanted the "you are one smart kitty" to stand out a bit more I used clear embossing powder to give it some shine and dimension. Darcey is a rather uncommon name even where she lives and so she doesn't find her name on keepsakes very often. Therefore I wanted to include her name on the card, to make it extra special for her. I took out Lawn Fawn's "Quinns ABCs" and coloured them with Copics in an ombre look.


Als nächstes habe ich die Katze gestempelt. Dazu war ein bisschen Masking nötig... Zuerst habe ich den Hut gestempelt, die Katze dann darunter und als letztes die Bücher. Meine Masken schneide ich in der Regel aus Post-its und versuche mittlerweile auch immer sofort eine Maske anzufertigen, wenn ich einen neuen Stempel in meinem Bastelzimmer willkommen heißen darf. Wenn ich die Masken nämlich habe, dann benutze ich sie auch - wenn nicht, dann bin ich manchmal auch ein bisschen faul und verzichte darauf, obwohl es eine meiner Lieblingstechniken ist, weil man damit so viel mehr aus seinen Stempeln herausholen kann. 
Zum Schluss habe ich dann alles auf einer rosa bestempelte Kartenbasis arrangiert und aufgeklebt.

Next I stamped the cat and needed to do a bit of masking for it. So first I stamped the hat, then the cat underneath it and lastly the books the cat is sitting on. Usually I cut my masks from post its and lately try to make sure that whenever a new stamps decides to take residence in my craft room I cut a mask for it right away. When I have the mask for a stamp I will use it, if not I have to admit that sometimes I am too lazy to get everything out again and fussy cut the mask for it. Which really is bad, because masking is one of my all time favourite techniques as you can get so much more life out of your stamps by it. 
All that was left to do now was to arrange everything on my previously stamped card base and to glue it down.


Mit der "Goodie Bag" Stanze von Lawn Fawn habe ich dann noch dieses kleine Täschchen angefertigt und mit Süßigkeiten gefüllt. Nachdem ich das Stanzteil zweimal vor mir liegen hatte, habe ich eines noch einmal durch die Big Shot geschickt, um das Fenster in die Front zu schneiden und anschließend beide Teile vorne mit dem gleichen Hintergrundstempel verziert, wie die Karte. Den Farbverlauf habe ich durch den Einsatz von drei verschiedenen Stempelkissen erzielt. Dazu habe ich mit der hellsten Farbe (Soft Pink) etwa die obere Hälfte des  Stempels eingefärbt, dann die nächste Farbe benutzt (Bubble Gum) und sie etwas mit dem Pink überlappen lassen und bis fast nach ganz unten aufgetragen und zum Schluss habe ich dann noch mit "Pale Tomatoe" ungefähr das untere Drittel eingefärbt. Bei den Übergängen habe ich darauf geachtet nicht zu fest zu drücken, damit die Farben sich ein bisschen besser vermischen konnten.

I made this cute "Goodie Bag" with a Lawn Fawn die and filled it with some treats. To create the goodie bag I needed the die cut piece twice and also needed to send one of them through once again to create the die cut window. I stamped the background stamp I had used on the card again on the front and back to tie everything together. The ombre look was achieved by using three different ink pads. I used the lightest (Soft Pink) to ink up the upper half of the stamp, before coming in with the second lightest (Bubble Gum) which I made sure overlapped a bit with the first and lastly added "Pale Tomatoe" to the bottom part of the stamp. Where the colours met I made sure to move them back and forth a bit (Jennifer McGuire calls it "chacha-ing") so that the colours would mix a little better. 


Zur Verzierung habe ich noch eine weitere Katze und einen kleinen Apfel ausgestanzt und angemalt. Hier könnt ihr noch einmal beides nebeneinander sehen:

For a bit of embellishment I added another cat and an apple to the front of the card and also stamped the "Puurfect" sentiment. Here you can see the card and the goodie bag side by side:

Material / supplies:
Stempel / stamps: "Smart Kitty" & "Class Act" von WPlus9
                            "Quinn's ABCs Capital" & "Quinn's ABCs" von Lawn Fawn
                            "Plan everyday" von Sweet Stamp Shop

Stanzen "Goodie Bag" & "Quinn'sABCs" von Lawn Fawn
             "Memo Pad" von Technique Tuesday

Challenges:

Freitag, 11. September 2015

Need a Hug? Colouring fur with Copics & creating a scene

Hallöchen ihr Lieben!
Statt euch heute in allen Einzelheiten zu verraten, was ich gemacht habe, um diese Karte zu machen, dachte ich, sie wäre ein gutes Beispiel, um euch mal zu erklären, wie eine Karte bei mir entsteht...
Angefangen hat alles mit dieser bekloppten Katze, die ich einfach auf ein Stanzteil gestempelt habe, um sie zu kolorieren. Aber was nun? Ich habe hin und her überlegt, wollte sie erst ausschneiden und auf einen Action Wobbler kleben, aber dann hab ich gedacht, dass ich ja auch zuerst einmal probieren könnte, ob ich eine passende Szene für ihn stempeln oder malen kann. Mir fiel ein, dass ich einen Sofastempel von Clearly Besotted habe, den man hervorragend nutzen könnte, damit es so ausschaut, als wäre der Kater aus seinem Schlaf gerissen worden und würde den Betrachter nun entgegenspringen. Um ihn zum umarmen oder ihm ins Gesicht zu springen (wie meine Kater das vermutlich tun würden, wenn sie so aussähen) sei einfach mal dahingestellt. ;o)

Hello my dear friends!
Instead of walking you through the process of how this card came together (as it is almost a one layer card) I thought that this might be a good card to explain to you more about my thoughts when making a card...
I started out by stamping the cat on a die cut piece. The only thing I thought about at this point was how to colour fur properly and so I forgot to plan ahead. Once I had coloured the fur ball I was stuck and didn't know what to do next. I thought about fussy cutting him out and putting him on an Action Wobbler, but then I thought I could try to create a scene for him. (If that hadn't worked out I could have still fussy cut him out to use him on a card differently.) I remembered that sofa stamp I had purchased from Clearly Besotted. It was just the right size to look like the cat had been sleeping on it, until he was woken up and jumped toward the viewer of this card. Whether he jumped up to hug them or scratch their face (like my cats probably would do if I woke them really rudely and they would look like this cat from C.C. Designs) remains to be seen ;o)


Die Couch habe ich blau gemalt, weil das eine gute Komplementärfarbe zu Braun- bzw. Orangetönen ist. Der Teppich sollte eher neutral bleiben, also habe ich meine C-Marker von Copics gewählt und die Farbe überwiegend aufgetupft, um einen faserigen Effekt zu bekommen. Leider ist das im Foto nur andeutungsweise zu sehen... Viel Platz blieb mir leider nicht für meinen Kartenspruch (an dem Punkt hab ich mir mal wieder gewünscht, ich würde genauer planen...), aber solche Probleme sind da, um kreativ angegangen und gelöst zu werden. Darum habe ich mir oranges Papier herausgesucht und mit einer Stanze ausgeschnitten, die gerade so groß war, dass ich den Spruch drauf stempeln konnte. Ein zweites Stanzteil in Blau kam noch als Kontrast darunter und eine Klammer an die Seite, um wenigstens ein bisschen zu verzieren. Zum Schluss habe ich das weiße Papier mit Abstandshaltern auf eine Kraft-Kartenbasis geklebt, die ich zuvor mit einem Pfoten-Hintergrundstempel etwas interessanter gestaltet hatte.

I coloured the couch blue because it is a nice complementary colour to the orange and brown and I chose grey for the carpet as a neutral colour. For it I used my Copic C-markers and dabbed the marker on to get the knotty look. There wasn't a lot of space left for my sentiment at this point (and I wished for the hundreth time I would plan out my cards a bit more..., but especially those tight spots are there to get creative, don't you think?! I chose an orange piece of paper which I cut out with one of my punches and stamped my sentiment on it. Now I needed a contrasting colour to mount the orange piece on, so I grabbed a light blue paper and punched it out using the same punch as before. I finished the sentiment part of with a clip on the side to have a bit of embellishment on the card. Lastly I added the white panel on top of my kraft card base on which I had stamped the pawprint background stamp from MFT in a brown colour. 

Material / supplies:
Stempel / stamps: "Scaredy Cat " von C.C. Designs
                           "Time to relax 2" von Clearly Besotted
                           "Paw Print BAckground" von My Favorite Things
Stanze / die: "Wonky Stitches Elle-ments" von Avery Elle
Colouring: Copics


Challenges:
Simon Says Wednesday Challenge "Use a Stamp"
 "Time Out Challenges "Make your Mark"
Addicted To Stamps "Anything goes"
Creative Knockouts "Clean and Simple"
Moving along with the times "Cute Animal"
Freshly Made Sketches  #203

Mittwoch, 9. September 2015

Halloween Hello Shaker Card / Halloween Schüttelkarte

Hallo ihr Lieben!
Auch, wenn ich nur selten Karten zu Halloween verschicke, habe ich mich mal an eine herangewagt. Diese Hexe von MFT ist einfach zu zauberhaft um sie nicht auf eine Karte zu packen! Was meint ihr?

Heya my lovely friends!
Even though I usually do not send out Halloween cards I made one this year, because I think this little witch from MFT is just too cute to not be on a card. What do you think?


Zuerst habe ich die die Hexe, den Frosch und die beiden Kürbisse mit Memento Ink  gestempelt und mit Copics angemalt. Als nächstes habe ich mich um den Hintergrund gekümmert. Dazu habe ich die Vorderseite der Karte mit der Farbe „Lemon Drop“ gelb eingefärbt, einen Sternenhintergrund darüber gestempelt und klar embossed. Mit verschiedenen Blautönen habe ich dann den Himmel blau eingefärbt. (Durch die gelbe Schicht darunter ist er aber leider nicht mehr so blau geworden, wie ich es mir gewünscht hätte...) Während all dieser Schritte hatte ich eine Maske auf dem Bereich, den ich für den Kartenspruch vorgesehen hatte.

First I stamped all the images in Memento Tuexedo Black and coloured them in using Copic markers. Next I started on the background. For it I coloured the front of my cardbase with "Lemon Drop" Ink, stamped a starry background  and put some clear embossing powder on top. I used different shades of blue to colour the sky. (Unfortunately this didn't give me quite the result I had hoped for, because of the yellow underneath.) However the stars came out really nicely. While I did all of this I had a mask over the area for my sentiment to keep it white.


Mit einem Ziegel-Embossingfolder habe ich ein graues Stück Papier geprägt, mit den Farben Charcoal (grau-schwarz)und Blackboard (schwarz) nur über die erhabenen Stellen gewischt, so dass eine graue Fuge zurückblieb. Leider sind die Farben stark verblasst und der Effekt nicht mehr ganz so gut zu sehen. Beim nächsten Mal würde ich meine Mauer erst einen oder 2 Tage liegen lassen und schauen, ob es mir immer noch gefällt, bevor ich das Papier auf einer meiner Karten festkleben würde. Aus dem Mauerpapier habe ich den Rahmen herausgestanzt und da die Big Shot ja nun schon einmal in Benutzung war auch gleich noch die beiden Hügel und die vielen, vielen kleinen Sterne ausgestanzt.

To give the frame I had planned a bit more texture I embossed a grey piece of cardstock using a brick wall embossing folder and then I rubbed over it lightly with some "Charcoal" and "Blackboard" Ink from HEro Arts. I wanted to have a really nice light grey seam (I hope that is the right term), but unfortunately the colours faded quite a bit, so that the effect isn't as visible as I had wished... From this piece of paper I die cut my frame and while I had the Big Shot out I aslo cut the two hill shapes and loads of little stars as a fillig for my shaker area.


Hinter den Rahmen und die Hügel habe ich ein Stück Plastikfolie geklebt, damit aus meiner Karte eine Shakerkarte werden konnte. Die Sterne habe ich dann alle mittig auf den Hintergrund gelegt und den mit Foamtape präparierten Rahmen dann darüber geklebt. Zum Schluss habe ich dann nur noch die kolorierten Bilder dort aufgeklebt, wo ich sie haben wollte und dann...... kräftig geschüttelt!!! Dafür sind Shakerkarten doch schließlich da, oder?

I glued a piece of acetate behind the frame and the hills, so that my little stars wouldn't fall out ;o) I placed them all in the middle of my card base and glued the frame with foam tape carefully on top. Lastly I added the coloured images to my card and..... shook my card!!! That is why you make shaker cards, isn't it?

Material / supplies:
Stempel / stamps: „Witch Way is the Candy“ von My Favorite Things
                           "Cling Rubber  Stamp Falling Stars" von Simon Says
Stanzen / dies: "Mini stars craft dies" von Simon Says
Colouring: Copics 

Challenges:

Dienstag, 8. September 2015

My creative month / Mein kreativer Monat August 2015

Halli Hallo ihr Lieben!
Heute mal nicht eine Karte, sondern eine ganze Collage. Auf dem Blog AnnasArt zeigt Ingrid ihre eigenen Werke des letzten Monats und gibt anderen Bastlern die Gelegenheit auch ihre Werke gesammelt zu zeigen. Ich finde es ist eine tolle Idee und daher habe ich mich mit Photoshop auseinandergesetzt und diese Collage zusammengestellt.

Hello my friends!
Today I won't show you a new card, but a collage of most of the cards I made in August 2015. Over at the blog AnnasArt a fellow crafter named Ingrid is showing you her own collage and also lets you link your compilation of art projects to her blog to show them to others. I think it is a fabulous idea which is why I used Photoshop to put this collage together for you, Ingrid and myself ;o)


Falls ihr Lust habt, macht doch auch eine eigene Collage und verlinkt sie auf AnnasArt! (Dort werden auch Hilfen zur Erstellung der Collagen angeboten und es gibt aogar etwas zu gewinnen!)
Habt einen wunderbaren und kreativen Tag, bis hoffentlich bald, 
eure Maike ;o)

Maybe you would also like to join in the fun? Then hop over to AnnasArt and link your collage to her blog.
Have a wonderful and creative day and I hope to see you again soon,
yours Maike 


Related Posts Plugin for WordPress, Blogger...