Hallo ihr Lieben!
Heute gibt es mal eine kleine Pause von all den niedlichen Tieren und statt dessen eine recht grafische Karte:
Heya my dear crafty friends!
Today there will be no cute animal on my card for a change. Instead this is a rather graphic card:
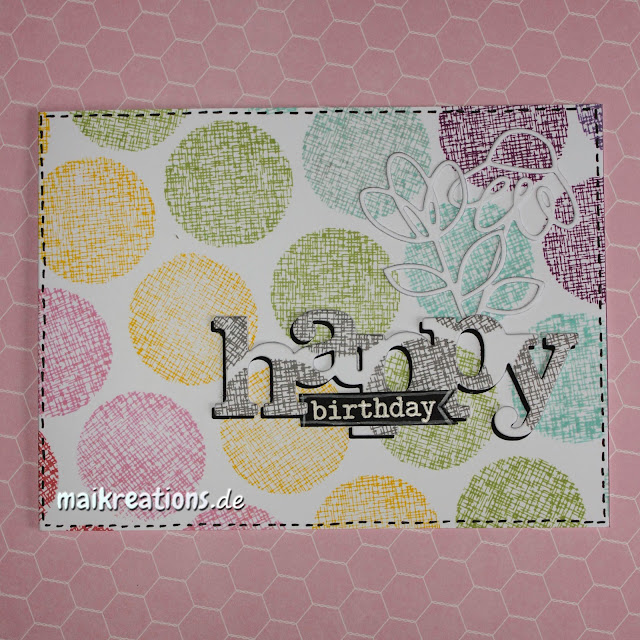
Den Stempelkreis mit Leinenstruktur (?) habe ich diagonal über meine gesamte Kartenbasis gestempelt und dabei die Farben in der Reihenfolge der Regenbogenfarben gewählt. In der Regel benutze ich bei schrägem Stempeln für die erste Reihe ein Lineal und stempel am Rand entlang. Den Rest mache ich dann Pi mal Daumen ;o) Während die Tinte trocknete, habe ich das Wort "happy" einmal aus schwarzem und einmal aus weißem Papier ausgestanzt und so übereinandergeklebt, dass ein schmaler schwarzer Rand zu sehen ist. Das Stanzteil habe ich danach dort auf die Karte gelegt, wo ich es am Ende haben wollte und habe mit dem gleichen Stempel wie zuvor noch einmal in dunkelgrau dort abgestempelt, wo das Wort die bunten Kreise verdeckt hat. Um meine Kartenbasis zu schützen, habe ich ein Stück Plastik dazwischengelegt, das ich danach einfach sauber wischen konnte.
I stamped the circle with the burlap structure to create a diagonal line of dots across my card base following the rainbow order. Usually I use a ruler to stamp my first row (here is was the yellow one) along the edge of it to end up with a straight line and then eyeball the other rows. While the stamping dried I cut out the word "happy" from white and black cardstock. I glued them together, so that there was a bit of a black outline visible under the white die cut and placed it on my card where I wanted it to end up. Then I took the same stamp again and stamped on the word die, where the coloured dots were. To protect my card yet be able to see where I needed to stamp I used a piece of acetate beneath the die cut which I could simply wipe clean after using it.
Nachdem ich das ausgestanzte und bestempelte Wort aufgeklebt hatte, habe ich die Blumen und das schwarze "birthday"-Fähnchen aufgeklebt. Für Letzteres hatte ich den Spruch mit Versamark gestempelt und dann mit weißem Embossingpulver embossed. Die Linie außen herum habe ich mit einem Kreisemarker von Stampin Up dazugezeichnet.
After I glued the word die in place I added the outline-flower die cuts and also the black birthday tag. I had heat embossed the word in white and added the line around it using a chalk marker from Stampin Up.
Material / supplies:
Stempel / stamps: "Flower Circles" von Waffle Flower
"The Big, the Bold and the Happy" von Winnie & Walter
Stanzen: "In a Word: Happy Cutaway" von Winnie & Walter
"Dainty Flowers" von Paper Smooches


A gorgeous CAS card. Thank you for sharing this with us over at Crafting for all Seasons. Sue. DT xx
AntwortenLöschenSuper card, great idea. Thanks for sharing it with us at TTPH this time.
AntwortenLöschenhugs
Dawn DT
http://cherrytreestudio.blogspot.com
hello Malke! fun way to make the background look like designer paper, great job! so glad you played along with us at Simon Says Stamp Wednesday Challenge!
AntwortenLöschensparkle & shine *~*
Super cute!!! Thank you for joining us at TTPH, good luck!!! Amy DT
AntwortenLöschenVery cool....love all of the colorful dots. Thanks for joining us at Seize the Birthday!
AntwortenLöschenWhat a pretty card. Love the big dots and the way you stamped the "happy" too. Thank you so much for entering your card in the Die Cut Diva's Challenge.
AntwortenLöschenWhat a fun and happy card.
AntwortenLöschenSo glad to see you join the Die Cut Divas.
Awesome card. Thank you for joining us at Inky Impressions Challenge blog. Maria
AntwortenLöschen