Posts mit dem Label Winnie&Walter werden angezeigt. Alle Posts anzeigen

Samstag, 1. April 2023

Its your day - go wild!

Heya my lovely crafty friends,
I hope you are all doing well! Today I'd like to share my newest make for the "Sweet Animals" challenge for Challenge Up Your Life with you:


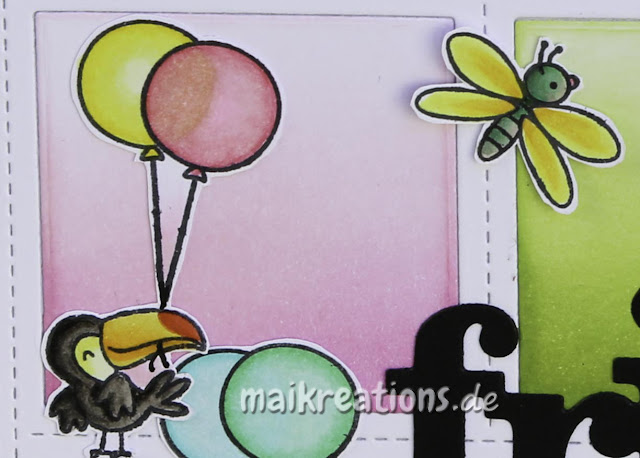
First I die cut this wonderful background die and gave the little segments some colour using Distress Inks. I love this fun, bright backdrop.


Next I added the sweet animals. I chose the cute "Word Buddies" by Hello Bluebird and added some extra butterflies from another set called "Next Door Gnomes".


I hope you like the card and that you will take out some of your sweet animal stamps to play with and later share it in our gallery. Have a fabulous day and happy crafting:-)
Yours Maike

Supplies:
mentioned in the text, will add the links asap


Samstag, 13. Februar 2016

Perrrrrfect Friend

Halli Hallo ihr Lieben!
Dies ist meine letzte Karte für den Guest Designer Call von Gerda Steiner - ich habe mich bemüht immer unterschiedliche Looks zu bekommen. Ich finde immer spannend zu sehen, was man aus einem Set so alles rausholen kann, wenn man sich wirklich mal von den Sprüchen und Bildern leiten lässt ;o)

Heya my dear crafy friends!
This is the last card I am going to enter for the Gerda Steiner Guest Designer Call - I tried to get a few different looks with these cards. It is really surprising to me, how many variations of cards I can get when I let myself be inspired by the sentiments and images in just one set ;o)


Ihr habt sicher schon bemerkt, dass ich kräftige, leuchtende und teilweise auch bunte Karten am liebsten mag - aber manchmal hab ich auch Lust drauf eine eher monochrome Karte zu werkeln. Für diese habe ich das Wort "friends" aus einem weißen Rechteck ausgestanzt und dann den ersten Teil des Kartenspruches darüber gestempelt. Danach habe ich das weiße Papier mit Abstandshaltern auf die Karte geklebt und noch die kleinen Innenteile (wie beim e oder d) hinzugefügt, damit man das Wort auch lesen kann.

You all know that I love colourful cards, but every now and then I feel like creating a more monochrome look. I die cut the word "friend" out of a white panel and stamped the first part of the sentiment above it. Using foam tape I propped the panel up on a kraft card base, making sure to add the inside pieces (like in the e or d) as well, so that the word became legible.


Als nächstes habe ich die beiden süßen Kätzen gestempelt, mit Copics coloriert und ausgeschnitten. Ich habe sie zusammen mit drei Herzen flach auf die Karte aufgeklebt. Die Herzen habe ich aus dem gleichen Papier geschnitten, das ich für die Kartenbasis benutzt habe. Falls ihr eure Karten lieber ein bisschen glitzernder mögt, könntet ihr die Kartenbasis mit ein wenig (oder auch ner Menge) Wink of Stella zum Funkeln bringen und passend dazu die Herzen auch mit Glitter überziehen. Ich habe das hier nicht getan, weil die Karte an jemanden gehen soll, der nicht unbedingt auf Glitzer steht ;o)

Next I stamped, coloured and fussy cut the two cute kitten. I adhered them flat on to the panel and also added three hearts, that I had die cut from the same paper that I used for the card base. If you like a bit more glitter on your cards you could add some (well a lot actually) Wink of Stella to the card base before adhering the white panel on top of it and also cover the hearts with glitter. I didn't do it, because the card is going to go to a friend who isn't particularly fond of glitter ;o)


Material / supplies:
Stempel / stamps: "Playful Kitten" von Gerda Steiner Designs
Stanzen / dies: "Friend Cutaway" von Winnie & Walter
                        "Mini Hearts Set" von Simon Says Stamp

Freitag, 25. September 2015

Happy birthday Rainbow dots / Geburtstagskarte

Hallo ihr Lieben!
Heute gibt es mal eine kleine Pause von all den niedlichen Tieren und statt dessen eine recht grafische Karte:

Heya my dear crafty friends!
Today there will be no cute animal on my card for a change. Instead this is a rather graphic card:


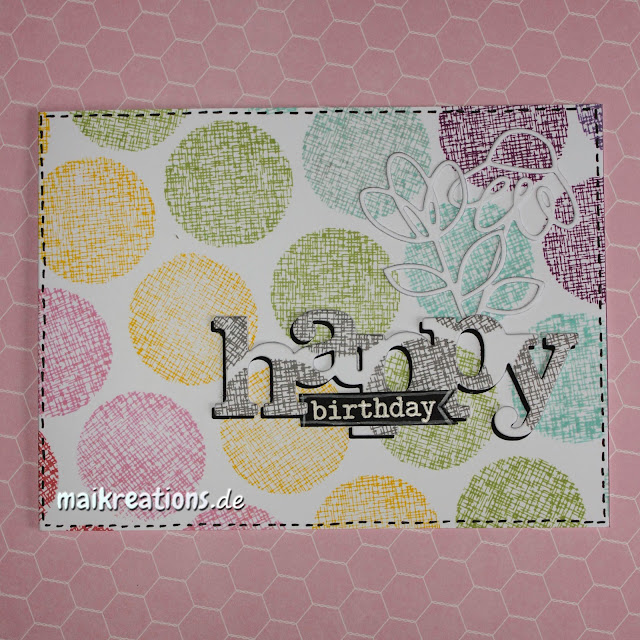
Den Stempelkreis mit Leinenstruktur (?) habe ich diagonal über meine gesamte Kartenbasis gestempelt und dabei die Farben in der Reihenfolge der Regenbogenfarben gewählt. In der Regel benutze ich bei schrägem Stempeln für die erste Reihe ein Lineal und stempel am Rand entlang. Den Rest mache ich dann Pi mal Daumen ;o) Während die Tinte trocknete, habe ich das Wort "happy" einmal aus schwarzem und einmal aus weißem Papier ausgestanzt und so übereinandergeklebt, dass ein schmaler schwarzer Rand zu sehen ist. Das Stanzteil habe ich danach dort auf die Karte gelegt, wo ich es am Ende haben wollte und habe mit dem gleichen Stempel wie zuvor noch einmal in dunkelgrau dort abgestempelt, wo das Wort die bunten Kreise verdeckt hat. Um meine Kartenbasis zu schützen, habe ich ein Stück Plastik dazwischengelegt, das ich danach einfach sauber wischen konnte.

I stamped the circle with the burlap structure to create a diagonal line of dots across my card base following the rainbow order. Usually I use a ruler to stamp my first row (here is was the yellow one) along the edge of it to end up with a straight line and then eyeball the other rows. While the stamping dried I cut out the word "happy" from white and black cardstock. I glued them together, so that there was a bit of a black outline visible under the white die cut and placed it on my card where I wanted it to end up. Then I took the same stamp again and stamped on the word die, where the coloured dots were. To protect my card yet be able to see where I needed to stamp I used a piece of acetate beneath the die cut which I could simply wipe clean after using it.


Nachdem ich das ausgestanzte und bestempelte Wort aufgeklebt hatte, habe ich die Blumen und das schwarze "birthday"-Fähnchen aufgeklebt. Für Letzteres hatte ich den Spruch mit Versamark gestempelt und dann mit weißem Embossingpulver embossed. Die Linie außen herum habe ich mit einem Kreisemarker von Stampin Up dazugezeichnet.

After I glued the word die in place I added the outline-flower die cuts and also the black birthday tag. I had heat embossed the word in white and added the line around it using a chalk marker from Stampin Up.


Material / supplies:
Stempel / stamps: "Flower Circles" von Waffle Flower
                            "The Big, the Bold and the Happy" von Winnie & Walter

Stanzen: "In a Word: Happy Cutaway" von Winnie & Walter
              "Dainty Flowers" von Paper Smooches

Montag, 18. Mai 2015

Hello Zwerg / Hello Gnome

Einen wunderschönen Tag wünsche ich euch! ;o)
Die Gartenzwerge haben sich mir mal wieder förmlich aufgedrängt und einen von ihnen habe ich daher in eine für ihn natürliche Umgebung platziert und daraus eine Karte gemacht.

Wishing you a wonderful day ;o)
The garden gnomes insisted on making another appearance on my blog and so I placed one of them in a natural habitat for him and made a card out of it.


Wie ihr sicher schon mitbekommen habt, feile ich gerade an meinen Copicsfertigkeiten und nutze sie daher auf vielen Karten. Haltet durch, es kommen auch sicher wieder auch wieder Karten ohne Copics ;o) 
Auf dieser Karte habe ich mich um einen anderen Look für das Gras bemüht - inspiriert von Sandy Allnock. Sie hat diese Technik in einem Ihrer Videos benutzt (wenn ich es wiederfinde verlinke ich es hier) und ich habe sie auch einmal ausprobiert. Dazu macht man viele kurze horizontale Striche in dem Bereich, der das Gras darstellen soll und nutzt verschiedene Grüntöne. Ich habe die Farben YG05, YG09, G05, G09 für das Gras und W4 für die Schatten verwendet. 

You might already have noticed that I am trying to improve my Copic skills which is why I am using them all the time right now. But bear with me for there will be cards with other (colouring) techniques again soon - I think ;o) With this piece I tried something new for the grass. Usually I colour a solid area and use a slightly darker colour for the shading. This time however I made short horizontal strokes with my markers YG05, YG09, G05 & G09 and used the W4 to sketch in the shadows. This grass-technique was inspired by Sandy Allnock again.


Den Kartenhintergrund habe ich mit den süßen Schnecken aus dem "You Gnome Me"-Set in einem hellen Grau bestempelt und eine von ihnen angemalt, um auf dem unteren rechten Teil der Karte auch noch einen Blickfang zu haben. Die kolorierte Szene habe ich mit einer Tag-Stanze ausgestanzt, wobei ich die Technik des "teilweise Ausstanzens" benutzt habe, weil die kleinere Blume heil bleiben sollte. (Die Technik habe ich schon einmal bei dieser Karte benutzt und genauer erklärt.) Den überstehenden Teil habe ich am Ende per Hand ausgeschnitten. Bevor ich die Tags aufgeklebt habe, habe ich noch das Wort "hello" mit Versamark auf den Grasbereich gestempelt mit weißem Embossingpulver zum Leuchten gebracht.

I stamped the cute snails in a light grey on the background of my card and coloured the one on the lower right to give that part of the card some interest. Then I die cut a tag from the coloured scene using the partial die-cutting technique, because I wanted the smaller one of the flowers to hang over the edge of the tag. (I  used the same technique on this card and explained it in a little more detail.) For the small part that wasn't cut I used my scissors. Before adding the tags to my card base I stamped the word "hello" in Versamark on the very bottom of the tag and used white embossing powder on it to let the sentiment shine.


Material / supplies:
Stempel / stamps: "You Gnome Me" von My Favorite Things
                            "Our friendship grows" von Lawn Fawn
                            "The Big, the Bold and the Happy" von Winnie & Walter

Stanzen /dies: "Pierced Traditional Tags Stackables" von My Favorite Things

Challenges:
Stempelküche Challenge "Floral" 
Stamping Sensations "Flower Power"
showCASe your Style "Friendship"
Sweet Stampin' Challenge "Clean and simple"


Related Posts Plugin for WordPress, Blogger...