Posts mit dem Label Die-namics werden angezeigt. Alle Posts anzeigen

Dienstag, 13. Februar 2018

Have a Sweet Day

Halli Hallo meine Lieben!
"Sweets for my Sweet" ist das Thema der neuen Papercraft Challenge. Ich habe schon seit einiger Zeit diesen süßen Hasen mit dem überdimensionierten Lolli von Your Next Stamp in meiner Sammlung und jetzt hatte ich endlich mal eine passende Aufgabe für das Schleckermäulchen:

Hello there my crafty friends!
"Sweets for my Sweet" is the theme of our newest Papercraft Challenge. I have had this cute bunny with its huge lillipop in my stash for quite some time now and finally I had the perfect opportunity for this sweety:


Für den Hintergrund habe ich ein grünes Stück Papier an den Rändern dunkler eingefärbt und nach dem Trocknen diesen genialen Hintergrundstempel von Create A Smile darüber embossed. Als Fokussierhilfe habe ich - passend zu den vielen Kreisen im Hintergrund - einen runden Rahmen aus weißem Papier ausgestanzt und mit Transparentpapier hinterlegt. Die Hasendame habe ich so darauf geklebt, dass es ausschaut, als würde sie auf dem unteren Rand sitzen. 

To start with I have used a piece of green cardstock for my background. With some "Lucky Clover" Distress Ink I darkened up the edges to give it more depth and also heat embossed this awesome background stamp from Create A Smile on top after it had all dried. In order to create a place for this cute bunny girl to sit I die cut a circle frame from white paper and glued vellum to the back of it. When I placed the bunny I placed her in a fashion that it looks like she is sitting on the rim of the frame if that makes sense... 


Meinen Spruch habe ich teils gestempelt und die Lücke mit Buchstaben-Aufklebern gefüllt. Ich wollte, dass sich die Farbe des Lollis noch einmal auf der Karte wiederfindet und das geht am besten mit weißen Alphastickern, die man dann entsprechend einfärbt ;o) Den Lolli habe ich zum Schluss noch mit einem Glitzerkleber überzogen sowie eine weiße "Naht" mit einem Gelpen hinzugefügt und damit war meine Karte fertig. Ich hoffe, sie gefällt euch und ich konnte euch vielleicht dazu inspirieren bei uns mitzuspielen. Die liebe Elisa hat einen Überraschungspreis für den Gewinner, also lohnt es sich sogar doppelt mitzumachen ;o) Habt eine schöne Restwoche und happy crafting wünscht euch eure Maike

My sentiment was partly stamped and partly created with letter stickers. I wanted the pink to appear a third time on the card (knowing that the eye likes groups of threes) and that for me is always easiest made with white alpha stickers that I can colour every colour I want. To finish the card I covered the lolli with glitter glue and added a white faux stitching line around the edge of the background paper. I hope you like my card and that I could possibly inspire you to play along with us. Dear Elisa has a surprise for the winner, so that would even be two reasons to play along ;o) Have a great rest of your week and happy crafting, yours Maike


Material / supplies:
Stempel / stamps: "Sprinkles - Sugar Rush" von Your Next Stamp
                             "Stars 'n Scribbles" von Create A Smile
Stanzen / dies: "Single Stitch Line Circle Frame" von My Favorite Things

Challenges:
Your Next Stamp Challenge #82 "Color Challenge" (Green, pink and light pink)

Retro Rubber Challenge Blog "Dotty for You"
-> Background stamp by CAS is a rubber stamp and also appr. one year old.

Dienstag, 19. September 2017

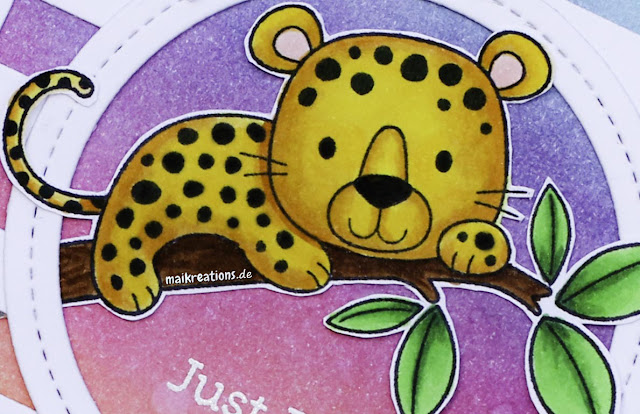
Just Fur You - Leopard

Hallo ihr Lieben!
Für die 2017 Card Design Superstar Challenge: Innovation Master von MFT und für eine wahnsinnig liebe Freundin habe ich diese Karte angefertigt:

Heya my dear crafty friends!
For the 2017 Card Design Superstar Challenge: Innovation Master by MFT and for a very dear friend of mine I made this colourful card:


Zuerst habe ich mit Distress Inks einen Regenbogenhintergrund gewischt und mit ein paar Tropfen Wasser besprenkelt, damit es nicht nur flach farbig ist ;o) Danach habe ich ein wenig mit meinen vorhandenen Stanzen gespielt. Um diesen Cover-Up Look zu erreichen habe ich all die unten aufgeführten Stanzen benutzt und muss sagen, es gefällt mir richtig gut. So eine ähnliche Stanze gibt es seit einiger Zeit von einer anderen Firma und es hat mich so oft in den Fingern gejuckt sie zu bestellten. Jetzt, da ich weiß, dass ich den Look mit ein bisschen mehr Arbeit auch so hinbekomme, kann ich das "gesparte" Geld ja anderweitig investieren ;o)

First I created a rainbow background using Distress Inks and some droplets of water to give it a little bit more interest. In order to get this cover-up look I played with a few of the dies (see further down for the list of supplies) I already had in my stash and I like the result very much. A different company released a die just like this recently and I had the urge to order one for the longest time. But now, that I know that with a few steps more I can get a very similar look, I think I'll get to invest the money I "saved" in some lovely new stamps or so :o)


Als nächstes habe ich dann diesen supersüßen Leopard auf seinem Ast und seine 3 gefiederten Freunde coloriert und ausgeschnitten. Bevor ich alles aufgeklebt habe, habe ich noch eine passende Stelle für meinen Spruch gesucht und diesen dann mit Versamark gestempelt und mit weißem Embossingpulver bestreut. Ich hoffe, euch gefällt die Karte und vielleicht ja sogar meine Idee der Stanzennutzung (die ich sicher auch mal mit anderen Kombinationen ausprobieren werde). Habt einen tollen Tag und happy crafting, eure Maike ;o)

Next I coloured this super cute leopard on his branch and his three feathered friends with Copics and cut them out. Before I glued everything in place, I found the right spot for the sentiment by just placing everything down and then I stamped the "Just Fur You" in Versamark and added white embossing powder to it. I hope you like my card and the way I have combined those dies (which is a technique I am going to try soon with different dies I think). Have a fantastic day and happy crafting, yours Maike


Material / supplies:
Stempel / stamps: "Lovable Leopard" von My Favorite Things
Stanzen / dies: "Bold Stripes Cover Up", "Single Stitch Line Circle Frames" &
                         "Circle STAX" von My Favorite Things

Dienstag, 1. August 2017

You are the coolest - Icecream


Hallo meine lieben Bastelfreunde ;o)
Heute mal eine nicht-niedliche Karte von mir... Ich habe sie für die aktuelle PINspirational Challenge gewerkelt und denke, dass sie sich ganz gut als Männerkarte eignen würde. Was meint ihr? Das hier ist übrigens das neue Inspirationsbild, sieht lecker aus, oder?


Heya my dear crafty friends ;o)
Today I'd like to share a non-cute card with you... I made them for the newest PINspirational challenge and thought it would make a good male card. What do you think? Anyways, this is the inspiration picture, looks yummy, doesn't it?


Als erstes habe ich die Stanzen grob mit einem Bleistift umkreist und anschließend die Flächen mit Wasserfarben  angemalt, wobei ich immer unten links die meiste Farbe aufgetragen habe. Auf die Weise hab ich schnell und einfach den Schatteneffekt bekommen und mit der Wasserfarbe außerdem viel Textur. Zusätzlich habe ich noch einen Kreis mit Wellenrand aus Glitzercardstock ausgestanzt.

I started by tracing around the ice cream dies and colouring each area with watercolours, making sure to put more colour down towards the bottom left of each piece. That way I got a really quick and easy shading and also a lot of texture. I also die cut a scalloped circle from a very glittery cardstock.


Nachdem ich alles aufgeklebt hatte, habe ich den Spruch in zwei Schritten dazu gestempelt. Als erstes habe ich nur das Wort "coolest" in blau gestempelt - das führt dazu, dass das Auge von dem blauen Eis zu dem Schriftzug geleitet wird - und im zweiten Schritt habe ich dann den Rest in schwar gestempelt. Wenn ich an Eis denke, dann kommen mir auch immer direkt Streusel in den Kopf, aber ich wollte den Stanzteilen nichts mehr hinzufügen, weil sie mir so wirklich gut gefallen, also habe ich die Streusel einfach als Punkte auf der ganzen restlichen Karte verteilt. Dazu habe ich alle möglichen Enamel Dot, Dew Drops, etc benutzt ;o) Unsere freundlichen Sponsoren sind dieses Mal "Lemon Shortbread" and "Imagine That" - es gibt also wieder zwei Gewinnchancen ;o) Ich hoffe, ihr verlinkt eure coolen Projekte in den nächsten zwei Wochen mit uns und ich wünsche euch eine tolle (Bastel-)woche!

Once I had adhered everything down I added the stampin in two steps. First I only stamped the word "coolest" in blue - that drags the eye from the blue ice cream across to the sentiment I think - and then added the rest in black. When I think of ice cream I also think of sprinkles, but I didn't want to add them to the die cuts, so I added them around the circle using all kinds of enamel, glitter and dew drops ;o) Our kind sponsors for this challenge are "Lemon Shortbread" and "Imagine That", so you'll have two chances to win! Hope to see your cool projects in our gallery and happy crafting everybody ;o))


Material / supplies:
Stempel / stamps: "Penguins in Paradise" von My Favorite Things
Stanzen / dies: "Die-namics You're the Sweetest", "Stitched Circle Scallop Edges Dies"
                         & "Stitched Circle STAX" von My Favorite Things

Mittwoch, 1. April 2015

"I love you so mush"

Huhu liebe Bastelfreunde ;o)
Heute darf ich euch endlich meine erste Karte als Gastdesignerin für die Stempelküche-Challenge zeigen.

Heya dear crafty friends ;o)
Today I can finally show you my first card as a guest designer over at the Stempelküche-Challenge.


Das Thema lautet: "DIY-Hintergründe".
The theme of this challenge is "DIY - backgrounds".


Ich war hin- und hergerissen: Sollte ich Wasserfarben nehmen, eine Schablone benutzen, die Distress-Inks rauskramen... Dann hielt ich aber eins meiner momentanen Lieblings-Stempelsets (Gleeful Gardens von Lawn Fawn) in der Hand und dachte: "Warum nicht einen eigenen Hintergrund stempeln, maskieren und kolorieren?!" Das scheint im ersten Moment viel Arbeit zu sein, aber mit Hilfe der passenden Stanzen zu dem Set, war es wirklich halb so wild. (Aber auch, wenn man nur die Stempel hat, kann man den Look hinbekommen. Dafür müsstet ihr euch vielleicht 5 oder 6 Masken selber ausschneiden und euch dann langsam & vorsichtig über den gestempelten Bereich vorarbeiten.)

I had so many different ideas in my mind: watercolouring, stencelling, masking, stamping, using my Distress inks... But then I picked up one of my favourite stamp sets at the moment (Gleeful Gardens by Lawn Fawn) and thought: "Why not create a background by combining stamping, masking and colouring?!" At first it might seem like a lot of work but when you have the coordinating dies with the stamp set, it isn't half as bad to create. (However, even if you do not have the coordinating dies you can achieve the same look. You would have to cut out 5 or 6 masks by hand and then work your way across the stamped panel slowly and carefully.)


Das linke Bild zeigt, wie ich gerade ein paar Pilze ausstanze. Damit es nicht zu lange dauert, habe ich durch 5 Post-its gleichzeitig gestanzt und das funktionierte ohne Probleme. Als nächstes habe ich den kleinen Fliegenpilz viele, viele Male auf ein weißes Blatt gestempelt und die Abdrücke mit den Post-its abgedeckt. Das ging sogar erstaunlich schnell, weil das Papier so dünn ist, dass man die schwarze Tinte darunter prima sehen konnte. Nachdem alles abgedeckt war, habe ich mir das Ink-Blending-Tool sowie mein „Mowed Lawn“ Distress Inkpad geschnappt und mit einer tupfenden statt einer wie sonst üblichen kreisenden Bewegung die Farbe aufgetragen. Dabei hätten sich die Post-it-Pilze sonst anheben und ich mir den ganzen schönen Hintergrund ruinieren können. Nachdem ich überall „Mowed Lawn“ aufgetragen und alle Platzhalterpilze entfernt hatte, habe ich die gestempelten Pilze mit meinen Copics angemalt. Einige von euch wissen ja vielleicht, dass ich noch nicht lange stolze Besitzerin von ein paar Copics bin. Daher versuche ich jede sich mir bietende Gelegenheit zu nutzen mit ihnen zu malen.

In the picture on the left you see me cutting out the little mushroom a couple of times. I used 5 layers of post it paper and the Big Shot cut through it without a problem. Afterwards I stamped the coordinating mushroom lots and lots of times on a white piece of cardstock and covered the images with my little yellow post-it masks. It went fairly quickly. Now it was time to get out the „Mowed Lawn“ Distress Ink and my ink blending tool. I pounced the ink blending tool over the masks rather than swiping it because I was afraid I would lift them up otherwise. After I had applied all the ink I wanted. I took off the masks and coloured in all the little mushrooms. I had so much fun colouring them. Some of you might know that I am rather new to the Copic world and therefore I take every chance I get to use them.


Material / supplies:
Stempel / stamps: "Gleeful Gardens" von Lawn Fawn
Stanzen / dies: "Gleeful Gardens coordinating dies" & "Stitched Rectangles Stackables" von Lawn Fawn
                       "Four Point Frame Dies" von Die-namics
Embossing Folder: "Floral" von Darice


Happy Wednesday everyone and keep crafting ;o)))

Montag, 16. März 2015

Hello Bunny

Hallo und herzlich willkommen!
Wie ihr vielleicht gelesen habt, habe ich seit Neustem Copic Markers und die habe ich auf der heutigen Karte noch einmal eingesetzt. Die Farben habe ich bewusst "soft" gehalten, weil die Karte für einen neuen Erdenbürger sein soll & da finde ich persönlich sanfte Farben immer am besten.

Hello and welcome!
You have probably read in a former post that I am now the proud owner of some copic markers and I had to put them to use a little more of course. For this card I have chosen softer colours because it is going to be a card for a new baby and I find that a softer colour palette works best for this occasion.


Dieses Mal habe gab es wenig Schritte, um die Karte fertigzustellen: Bild stempeln, kolorieren einen Kreis ausstanzen und auf einen etwas größeren, roten Kreis aufkleben. Dann das Ganze auf ein gemustertes Papier kleben und mit Washitape noch einen Ausgleich zu dem sehr markanten Bild schaffen. Fertig :o) 
Wenn ich das Foto so anschaue stelle ich fest, dass ich lernen muss, mich auf ein wenig mehr Kontrast beim Schattieren einzulassen, sonst sieht es zu "weichgespült" aus. Malt ihr auch mit Copics und habt vielleicht einen guten Tipp für mich???

All I did was to stamp and colour the image, cut it out with a circle die and then mat it on a slightly larger red circle. I glued both on a colourfully dottet background, added a bit of washi tape to balance the card and I was done ;o)
Looking at this picture I noticed that I need to learn to embrace more contrast when colouring and shading, otherwise it looks too blended. Do you use Copic markers and probably have a great tip for me???


Material / supplies:
Stempel / stamp: "Butterfly Meadow" von Lili of the Valley
Stanzen / dies: "Circle STAX Set 2" von Die-namics
                       "Small Stitched Rectangle Stackables" von Lawn Fawn


Bevor ich heute die Challenges aufführe, an denen ich mit dieser Karte teilnehmen möchte, würde ich Robin gerne "Hallo" sagen. Sie hat sich als vierte Followerin für diesen Blog eingetragen. Ich freu mich total über jeden, der sich die Zeit nimmt und sich anschaut, was ich gebastelt habe und nette Kommentare hinterlässt - und wenn ihr euch dann auch noch entscheidet diesem Blog zu folgen habe, gibt es mir natürlich noch mehr das Gefühl, dass meine Zeit am Basteltisch, aber auch hier auf dem Blog, gut investiert ist. Also: "Danke an euch alle und hallo Robin!"

Before I go on listing the challenges I would like to enter, I wanted to say hello to Robin, who is the fourth follower on this blog! I am so very grateful for all of you who take the time to have a look at the projects that I created and leaving sweet comments - and having you signing on as a follower makes me feel even more like my time is well spend on my craft table and here on the blog! Thank you, guys and hello Robin!


Simon Monday Challenge Blog


Our Blog Logo


Related Posts Plugin for WordPress, Blogger...