Posts mit dem Label Memory Box werden angezeigt. Alle Posts anzeigen

Montag, 18. Mai 2020

Shimmering Butterflies

Hello everyone,
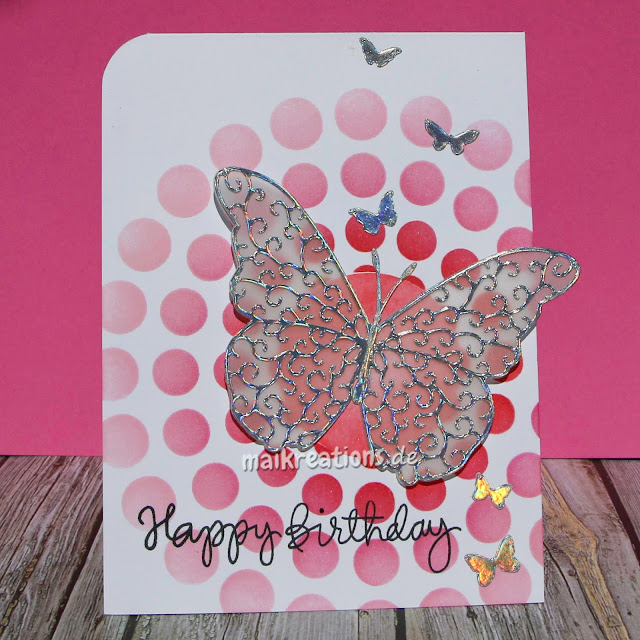
for the newest challenge at the Crafty Cardmakers with the theme "Butterflies" I created this card as an inspiration:


Using a stencil I created the background in an ombre fashion and went on die cutting all the butterflies next. I die cut the big butterfly from some sturdy vellum and die cut the intricate design from the shimmery cardstock next. I did put "Stick It" behind the paper before die-cutting because I am really not good at adhering down tiny things.


I really love the effect the paper gives. Depending on how you tilt it in the light it catches the light differently and thus the card never really looks quite the same... 


I added the small butterflies as extra-embellishment and in order to give the eye something to move along with - and yes, I admit it, because I love the paper so much and wanted even more on my card! I hope you are going to join us for our "Butterfly" challenge at the Crafty Cardmakers! Please stay safe, have a wonderful week and happy crafting!!! Yours Maike


Supplies:
Stamp: "" by Simon Says Stamp
Dies: by Memory Box, though they don't seem to have the exact one I have used any more...
Stencil: by My Favorite Things (discontinued)

Samstag, 16. Dezember 2017

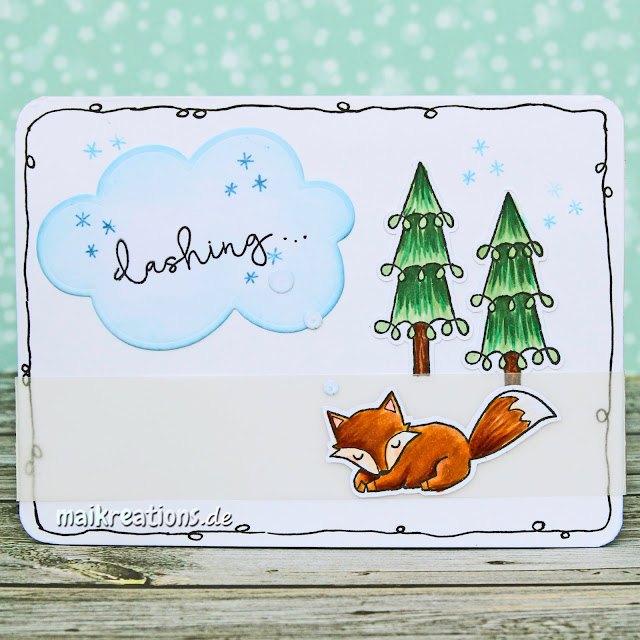
Christmas Series #22 / Weihnachtsserie #22 (Dashing Foxes Pop-up Card)

Halli Hallo ihr Lieben!
Hier hat das Winter-Weihnachtschaos voll zugeschlagen, dehalb muss ich leider meine Karte heute auf die Schnelle mit euch teilen:

Heya my dear crafty friends!
The usual winter and Christmas chaos has hit me this past week, so unfortunately I'll have to share todays card with you in a quick way:


Die Vorderseite ist, wie ihr sehen könnt, recht schlicht gehalten. Der kleine Fuchs schläft auf einem Streifen Vellumpapier, das dabei hilft die Karte geschlossen zu halten. Der Empfänger soll die Überraschung ja nicht zu früh bemerken:

This is the rather plain outside of the card. The fox sleeps on a strip of vellum paper, that helps to hold the card down, so that the recipient only finds out about the surprise when they open the card:


Insgesamt sind es drei Ebenen, die man entdeckt, wenn man die Karte öffnet: Der Hintergrund, der Wald plus Schneehügel und den Fuchs kann man auch noch einmal "ausklappen", um noch mehr Tiefe zu erhalten. Den Spruch, der außen beginnt, wird im Inneren zu Ende geführt. Ich hoffe, euch gefällt meine Winter-Weihnachtskarte passend zum Winter-Weihnachtschaos ;o))? Habt ein wundervolles Adventswochenende und happy crafting, eure Maike ;o)

All in all the inside has three different levels: the sky, the forrest with the snow hills and the fox can be moved up and out as well, for even more dimension. The sentiment starts on the outside and it finished on the inside. I hope you like my Winter-Christmas-Card ;o) It is quite fitting for this winter-Christmas-chaos over here, so I am quite fond of it ;o) Have a wonderful weekend and happy crafting, yours Maike ;o)


Material / supplies:
Stempel / stamps: "Foxy Holidays" von Memory Box (retired?)
                              "Scene It Again" von Clearly Besotted
Stanzen / dies: "Stitched Scallop Basic Edges" von My Favorite Things
                         "TBA" von Simon Says Stamp

Samstag, 22. Juli 2017

One in a melon - Hamster?!


Halli Hallo ihr Lieben!
Bei der neuen Challenge Up Your Life Herausforderung dreht sich alles um Leckereien und wenn ich mir Gilbert den Hamster so anschaue, sieht er mit seiner Melone recht zufrieden aus, oder?

Heya my dear crafty friends!
For the new Challenge Up Your Life task we would like to see cards with lots of tasty treats and when I look at Gilbert the hamster, I think he looks quite content, don't you?


Für meine Karte habe ich zuerst Gilbert und außerdem noch ein paar Extra-Melonen mit Copics coloriert. Für die Melonen habe ich die Marker R35, RV14 und R43benutzt und finde, die Kombination passt super. Die Melonenschnitze habe ich alle per Hand ausgeschnitten, aber für Gilbert habe ich eine Kreisstanze benutzt, weil... Naja, schaut euch mal all die filigranen Blumen an, dann wisst ihr sicher sofort wieso :o)))

For my card I started by colouring Gilbert and also a few extra melons with Copic Markers. For the melons I used R35, RV14 and R43 and I really like this combination for watermelons. I fussy cut the melons and die cut the scene with the cute hamster with a circle die, because, well... Look at all these filigran flowers and you know why ;o)))


Bevor ich die Melonen und den Kreis aufgeklebt habe, kamen noch einmal die Melonen zum Einsatz. Die habe ich mit dem sehr hellen "Fog" von Simon Says Stmap gestempelt, um auch noch was fürs Auge auf der Kartenbasis zu haben. Zuletzt habe ich dann den Spruch - leicht gebogen - neben den Kreis gestempelt und die Karte war fertig.

Before I glued the melons and the scallop circle down I stamped the melon on the card base a few time to give that some interest, too. I used the very subtle "Fog" ink by Simon Says Stamp. Lastly I stamped the sentiment, slightly curved to fit the circle shape and my card was done.


Ich hoffe, ihr teilt eure leckeren Projekte mit uns und verlinkt sie in der CUYL Gallerie, denn ich würde mich freuen zu sehen, was euch zu dem Thema so einfällt! Habt ein wunderbares Wochenende und happy crafting ;o))

I hope you are going to link up your tasty project in our gallery, because I would love to see what you create! Have a great weekend and happy crafting everybody ;o)

Material / supplies:
Stempel / stamps: "Gilbert has a snack" von Stampinbella
                             "Thanks a melon" von Memory Box
Stanzen / dies: "Stitched Circle Scallop Edge Frames" von My Favorite Things

Samstag, 27. Mai 2017

Eule und Brad-Mushrooms ;o)

Halli Hallo ihr Lieben!
Ich hoffe, das Wetter bei euch ist gerade genau so fantastisch, wie es bei uns ist. Den kostbaren Brückentag habe ich zwar überwiegend zum Frühjahrsputz genutzt, aber es blieb auch noch ein wenig Zeit, um eine Karte für die neue CUYL-Challenge zu werkeln. Dabei geht es dieses Mal um "Brads" - also diese Musterklammerdinger ;o) Fürs Scrapbooking habe ich mir mal welche in Pilzform besorgt, die sich aber auch ganz hervorragend auf einer Karte machen, wie ich finde:

Heya my dear friends!
I hope you had good weather over the last couple of days and had the time to make good use of it as well ;o) I had a day off yesterday and although I have done a lot of spring-cleaning I also had the time to create a card for the newest CUYL challenge. It is all about "Brads" this time ;o) A couple of years back I bought some mushroom brads for srapbooking. They look great on cards as well I discovered by playing with them ;o) What do you think?


Den Hintergrund habe ich mit Distress Inks selbst gepinselt und nach dem Trocknen habe ich diesen wunderschönen Spruch gestempelt. Zum Glück habe ich das Misti benutzt, denn auf dem Aquarellpapier war der Abdruck erst nach dem vierten Abstempeln einigermaßen schwarz. Ich denke, auf glattem Papier wäre das Abstempeln weniger problematisch gewesen, aber ich lass es euch wissen, sobald ich es ausprobiert habe ;o)

I created the background with Distress Inks and stamped this beautiful sentiment after the paper was completely dry again. Luckily I thought of using the Misti, because on this watercolour paper it took me four attempts to get the stamped image right. I am sure that it would be a lot easier on smooth paper, but I will let you know :o)


Den Spruch, den ich unter den Baumstamm gestempelt habe, habe ich auch benutzt, um die Kartenbasis ein wenig interessanter zu gestalten. Dazu habe ich die Karte in einem Winkel auf kariertes Papier gelegt und mit Washi-Tape befestigt. So habe ich die Reihen gerade stempeln können, was sonst nicht so mein Talent ist ;o) Danach habe ich die Elemente nur noch dort hingeklebt bzw. festgeklemmt, wo sie für mich am schönsten aussahen.  Vielleicht habt ihr ja Lust bekommen durch eure Brads zu schauen und ein paar davon (oder auch nur eins) in ein Projekt zu integrieren und dieses dann auf dem CUYL Blog einzustellen...?! Ich würde mich auf jeden Fall total darüber freuen! Habt einen wundervollen Tag und happy crafting ;o) Eure Maike

I used the same sentiment I had stamped beneath the log to create a more interesting card base. In order to stamp the greeting evenly (you could say that that usually isn't my special talent) I placed the card base on a graph paper, adhered it temporarily with some Washi Tape and used the lines as orientation. Now all I had to do was to put everything where I thought it looked best and my card was done. I hope I could inspire you a little bit and maybe you find some brads to create a project with. If you do I would be thrilled if you would share your work with us in the CUYL gallery ;o) Have a great day and happy crafting ;o) Yours Maike


Material / supplies:
Stempel / stamps: "Wishing You" & "Charmed" von Mama Elephant
                             "Lumberjack Love" von Neat & Tangled
Stanzen / dies: "Mini Butterflies" von Memory Box
                         "Stitched Rectangles" von Lawn Fawn

Challenges:

Montag, 21. März 2016

Happy Easter

Hallo ihr Lieben!
Ich wünsche euch einen guten Start in die Woche! Heute habe ich noch eine Osterkarte, die euch als Inspiration für die neue Challenge von den Crafty Cardmakers dienen soll ;o)

Heya my dear crafty friends!
I hope you are having a great start to your week! Today I would like to share with you my inspiration card for the new "Easter" challenge over at the Crafty Cardmakers blog:


Als erstes habe ich den blauen Hintergrund und die beiden Grashügel aus gemustertem Papier ausgestanzt. Den "Himmel" und den hinteren Hügel habe ich direkt im Anschluss auf die Kartenbasis aufgeklebt und noch schnell die Blume dazugesetzt. Schon lange hatte ich die Idee einen echten Miniholzzaun zu verwenden und diese Karte hat sich förmlich angeboten. Also hab ich's ausprobiert. Mit meiner Zange habe die Holzstäbchen durchgeschnitten und mit Multi Medium Matte aufgeklebt.

I started by die cutting the blue background and the grassy hills from patterned paper. I glued down the "sky" and the "hill" in the back to the card base first and then stuck down the die cut flower to the left side as well. I had this idea of a proper wooden fence on one of my cards for a while now and this seemed to be the perfect opportunity to give it a go. So i did. With my pliers I cut the wooded pieces (little rods?) in half and glued them to the paper using Multi Medium Matte.


Nachdem der Zaun getrocknet war, habe ich den zweiten Grashügel darüber und die Wolken aufgeklebt. Meinen Spruch wollte ich auf einem Osterei haben, also habe ich mir eine meiner neuen Stanzen geschnappt, eines in der passenden Größe ausgeschnitten und dann mit Copics coloriert. (Y00 & R20 und C2 & C0 für die Schattierung) Bevor ich es neben den süßen Hasen geklebt habe, habe ich noch schnell das "Happy Easter" darauf gestempelt. Fertig war meine Karte ;o)

When everything was dry I added the smaller grassy hill, the clouds and the cute little bunny as well. I wanted my sentiment to be on an Easter egg, so I die cut one of my new Easter egg shaped dies coloured it with Copics (Y00 & R20 and C2 & C0 for the shading). Before I adhered it next to the cute bunny I stamped "Happy Easter" on there and my card was done ;o)


Ich hoffe, ihr teilt eure Oster Kreationen mit uns auf dem Crafty Cardmakers Challenge Blog! Happy crafting ;o)

I hope you will show us your Easter creations over at the Crafty Cardmakers challenge blog! Happy crafting ;o)

Material / supplies:
Stempel/ stamps: "Carrot Bunny Digital Stamp" von Gerda Steiner Designs
                           "Springtime Bunnies" von Memory Box
Stanzen / dies: "Blueprints 26" von My Favorite Things
                        "Straight Easter Egg" von Nellie Snellen
                        "Clouds Dies" & "Dainty Flowers Dies" von Paper Smooches


Montag, 25. Januar 2016

Thank you card: No stamping - just dies (Dankeskarte nur mit Stanzen)

Huhu ihr Lieben!
Bei den Crafty Cardmakers dreht sich dieses Mal alles um Stanzen und daher hatte ich mir vorgenommen eine Karte zu basteln, bei der nichts gestempelt ist. Dies hier ist dabei rausgekommen:

Heya my friends!
The Crafty Cardmakers new challenge theme is "Punches and / or Dies", so I thought I would go ahead and make a card without any stamping on it. This is what I came up with:


Da ich dieses Mal ja nichts zum Ausmalen hatte, habe ich bei der Papierauswahl besonders darauf geachtet, dass die Farben und Muster einerseits gut zusammen passen, andererseits sich aber auch genug voneinander abheben. Die schöne Blumenstanze hatte ich schon lange einmal benutzen wollen und so kam mir die Idee sie als Fokus für eine Dankeskarte zu benutzen.

Because I didn't have anything to colour for / on this card, I made sure that I chose colours and patterns that go well together and that also had enough contrast. I had wanted to use the flower die for a long time and this seemed to be a good time to use it as my focal point.


Den Schmetterling habe ich noch hinzugefügt, nachdem ich mir meine Karte eine Weile angesehen hatte und sie noch zu "blah" fand. Die Oberfläche vom Schmetterling habe ich für etwas Glanz auf meiner Karte noch mit dem Clear Wink of Stella bemalt.

After I thought my card was finished I looked at it for a while and decided it looked too plain for my taste, so I added the butterfly on top of the bloom. I coloured its wings and its body with Clear Wink of Stella and now I was happy with the result.


Material /supplies:
Stanzen/ dies: "Wild Garden by Julie Ebersol" von Essentials by Ellen
                      "Scripty Thanks" von Lawn Fawn
                      "Sunshine Layers Die" von WPlus9
                      "Pippi Butterfly" von Memory Box 

Challenges:

Freitag, 18. September 2015

Hang in there Fox - Halte durch Fuchskarte

Hallöchen ihr Lieben!
Schön, dass ihr vorbei schaut ;o) Heute möchte ich euch eine Karte zeigen, für die ich den Stempel überall gesucht und nie gefunden habe. Zum Glück gab es aber letztes Wochenende in Hagen das Stempelmekka und dort habe ich den süßen Fuchs von Wild Rose tatsächlich bekommen!

Hello dear crafty friends!
So glad you are stopping by ;o) Today I would like to show you a card that features a stamps I have been looking for all over the world. Fortunately there was a huge stamping fair here in Germany last weekend, where I finally got this little Fox from Wild Rose Studio!


Zuerst habe ich den Fuchs mit Archival Ink in schwarz auf Aquarellpapier gestempelt und ihn dann mit verschiedenen Distress Ink Farben angemalt, wobei ich sie wild untereinander gemischt habe, so dass ich euch die genaue Farbzusammensetzung nicht einmal wirklich sagen kann...

First I stamped the fox on some watercolour paper using Archival ink in black and then I coloured him in with a brush and Distress Inks in various colours. Unfortunately I wouldn't be able to tell you which colours I have used, because I needed to mix a couple of them to get the shade that I wanted...


Nachdem alles getrocknet war habe ich den Spruch "hang in there" ("Halte durch") mit der Farbe "Taupe" von Stampin Up gestempelt. Dann habe ich den Fuchs ausgestanzt und auf ein weiteres "taupe-farbenes" Stanzteil geklebt. Beides zusammen habe ich dann mit Abstandshaltern auf meine bestempelte Kartenbasis geklebt. Dazu habe ich mit dem "Taupe" (ich finde übrigens, dass das ein komisches Wort ist... ) eine Holzmaserung aufgestempelt und den Rand dann noch einmal gewischt, weil mir immer noch zu viel Weiß durchgeschienen hat. Ganz zum Schluss habe ich noch die Epoxypfeile vor und hinter den Kartenspruch geklebt, weil sie einerseits dem ziemlich dezenten Spruch etwas mehr "Standing" geben und zweitens, weil sie farblich so genial zum Himmel passen.

After everything was dry I stamped the sentiment in "Tip Top Taupe" from Stampin Up. Then I die cut the fox and layered it on top of another die cut piece that has the same colour as the ink that I had used before. Before I glued everything on top of my card base I stamped it with a wooden background and blended in the ink a bit around the edges, so that the white wouldn't be as bright. As a finishing touch I added the blue epoxy stickers around the sentiment, because that made it stand out a bit more and also because the colour of the stickers matched the background perfectly ;o)


Material / supplies:
Stempel / stamps: "Fox on branch" von Wild Rose Studio
                           "Into the words" von Memory Box (Great set with lots of sentiments when you love forest animals!!!)
                            "Wood Plank Background" von My Favorite Things 


Challenges:
 

Mittwoch, 19. August 2015

Collaboration with Cards by Maaike

Hallo zusammen!
Die heutige Karte ist aus einer Zusammenarbeit mit der sehr talentierten Maaike von "Cards by Maaike" heraus entstanden. Vor einiger Zeit hatte sie selbstgemachte Karten von sich als Preis bei einem Giveaway auf Facebook zur Verfügung gestellt. Da ich ihre Karten durch verschiedene Challenges kannte - ihr Name taucht nicht selten bei den Gewinnern auf - habe ich mitgemacht und wollte soo gerne gewinnen. Und das habe ich. Juhuu ;o) Noch einmal ein herzliches Dankeschön an Maaike für die wundervollen Karten, die sie mir geschickt hat. Nachdem sie Kontakt zu mir aufgenommen hatte, habe ich mich einfach mal getraut zu fragen, ob sie Lust an einer Zusammenarbeit hätte. Und das hatte sie ;o) Also haben wir jeder fleißig Hintergünde gestaltet und verschiedene Pieces zusammengestellt und dem jeweils anderen zugesandt. Die Regel, die wir uns dabei gegeben haben war, dass wir jeder einen Hintergrund und noch ein weiteres Teil verwenden würden. Hier ist meine Karte:

Hello everybody!
Today's card is a collaboration with the very talented Maaike from "Cards by Maaike". A couple of weeks ago she had a giveaway on facebook and the prize was 5 handmade cards from her. I so wanted to win, because I knew her cards from many challenges - her name came up as a winner quite often! So I entered the giveaway and I actually won. Whohoo ;o) Thanks again to Maaike for the wonderful cards she sent me. After she got in contact with me I was brave and asked her if she was interested in a collaboration and she was ;o) We both created some backgrounds and a few other pieces for each other and send them off. The rule we have given ourselves for this collab was, that we would each use a background plus one other piece to create a card. And here is mine: 


Maaike hatte auf ihrem Blog ein Video, wie man aus Rasierschaum und Nachfülltinte wunderschöne Hintergründe gestalten kann. (Link zu ihrem Post findet ihr hier.) I hatte gehofft, dass sie einen davon mitschicken würde. Als ich den Umschlag öffnete und dieses blau marmorierte Papier sah, wusste ich sofort, dass ich daraus eine Karte machen wollte. Passend dazu hatte sie mir diese hübsche Meerjungfrau von Lili of the Valley mitgeschickt. Ich habe sie koloriert und mit einer meiner Tag-Stanzen ausgestanzt. Dann habe ich noch die Kartenbasis  und ein etwas größeres Tag mit den gleichen Farben eingefärbt, die sie für ihren Hintergrund benutzt hatte. (Blue Lagoon & Peacock Feathers Distress Ink von Ranger)

Maaike had made this fabulous backgrounds with shaving foam (of all things) and reinkers. (You can find her video about it here.) I had hoped she would send me one of these and when I opened the envelope and found this blue marbled piece I knew I wanted to turn it into a card. Maaike had send me this cute little mermaid from Lili of the Valley as well. I thought those two pieces would go together nicely and so I coloured the image with Copic markers and cut it out using a tag die. Afterwards I coloured my card base and a slightly bigger tag with the colours that Maaike had used to make this background. (Blue Lagoon & Peacock Feathers Distress Ink by Ranger).


Die einzelnen Lagen habe ich aufeinandergeklebt und oben Klammern angebracht, damit es so ausschaut, als hätte ich alles einfach zusammengetackert. Als Spruch habe ich mir "Just wavin' hello" herausgesucht, weil es so gut zum Thema passt. Die Karte war so gut wie fertig, aber mir fehlte noch der letzte Pfiff, als ich sie so sah. Mir fiel ein, dass ich diese süßen Stanzen für Muscheln, Seesterne und Sanddollars habe. Die habe ich aus einem Papier ausgestanzt, dass ich zuvor mit Versamarktinte bestempelt und mit einem Pulver namens "Bridal" von Embossing Tinsel embossed hatte. Leider kommt es im Bild nicht so rüber, aber die Stanzteile haben einen wundervollen Glanz und schimmern in verschiedenen Farben. 

I glued all the layers together and added some staples to the top, so that it would look like I had simply stapled everything together. I chose the "just wavin' hello" sentiment, because it fitted so nicely with the theme of the card. My card was almost ready, but I felt it was missing something. When I remembered that I had the "Seaside Treasures" die, I put some "Bridal"  Embossing Tinsel on a piece of paper, put my heatgun to it and and die cut the various pieces from it. Unfortunately I didn't manage to capture the shimmer those die cut pieces really have now. I love most about them that they kind of change colour when they are tilted in the light.


Maaike und ich werden bald wieder eine Collaboration machen, also schaut wieder rein ;o)
Und ich kann euch wirklich nur empfehlen auch  ihren Blog einmal zu besuchen! Es lohnt sich!!!


Maaike and I will be doing some more collaborations in the future, so stay tuned ;o)
And I can just recommend to you to visit her blog! It is certainly worth it!!!


Reminder: Giveaway is active until Friday!!! Have a look here! ;o) Good luck to everybody!

Material / supplies:
Stempel/ stamps: "Little Mermaid 1" von Lili of the Valley
                           "Critters in the sea" von Lawn Fawn
Stanzen:               "Pierced Traditional Tags STAX" von My Favorite Things
                            "Seaside Treasures" von Memory Box

Challenges:
Related Posts Plugin for WordPress, Blogger...