Posts mit dem Label One Layer werden angezeigt. Alle Posts anzeigen

Donnerstag, 15. September 2022

Waving hello - one layer card

Heya everyone,
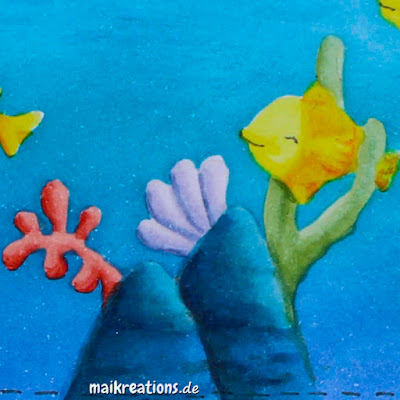
the newest theme over at Papercraft Challenges was a real challenge for me. The theme is "One Layer Wonder" and I always have problems with one layer cards. For some reason, no matter which masking tape I use (and believe me I have tried at least ten different ones), it never really works. Often times I rip the paper and have to start all over again. The one thing that does sort of work is post-it-notes, but with them I only have a small area that is sticky. Ah well, I managed a card in the end and I am rather proud of it, so here it is:

I used some sweet images of Purple Onion Designs and stamped them with "Ink on 3" vanishing ink on my piece of Copic friendly paper and then... I had to hurry ;o) I masked all my images and created the sea and the sky with Distress Inks. Next, while I could still see the lines I coloured all the critters and the other elements with Copic markers. Towards the end I needed a reference sheet with all the images I needed and it was more guessing than actually seeing the lines, but I love the soft look of the no-line-coloring in this summer one-layer card. And I hope you do too ;o))
Have a wonderful day and please consider joining our challenge, especially when you do not like creating one-layer cards that much - in the end it is always very rewarding and a lot of fun, when one accepts a real challenge I find ;o) Happy crafting and I hope to see you soon, yours Maike


Supplies:
Stamps - all by Purple Onion Designs:
"Ida - rabbit", "Peony - mouse", "rocks, seaweed and coral", "Neptune - fish"


Freitag, 26. Oktober 2018

Hello Pumpkin


Hallo zusammen!
Eigentlich hätte mein Post am Diestag live gehen sollen, aber Blogger hat mich da wohl falsch verstanden... Hier also nun mit etwas Verspätung mein DT-Beitrag zur aktuellen PINspirational Challenge

Heya everyone!
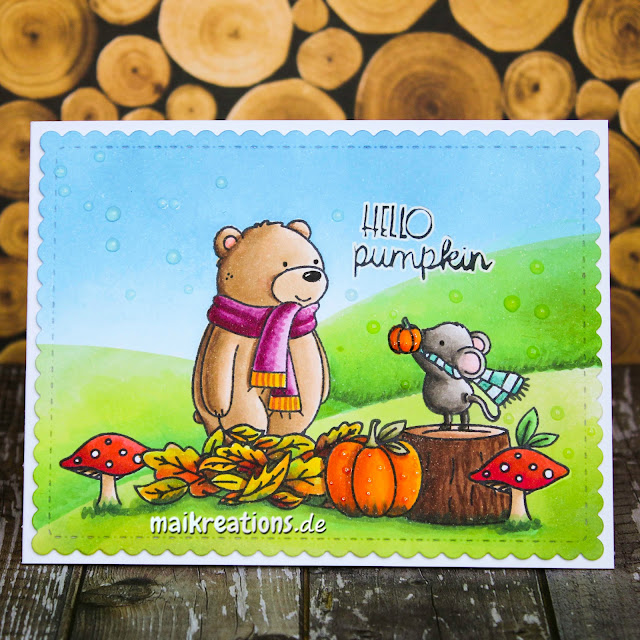
This post was planned for Tuesday, but it seems that blogger and I had a bis of a misunderstanding... Even though it is a little late, I'd like to share my DT project for the current PINspirational Challenge. This is the newest inspiration pic:


Für die Karte habe ich die Stempel vom Stamptember Set von Simon Says Stamp und Neat & Tangled aus dem letzten Jahr benutzt und sehr viel maskiert. Am Ende wurde ich aber mit einer - wie ich finde - niedlichen 1-Layer Herbstszene belohnt.

For this card I have used images from the Stamptember set by Simon Says Stamp and Neat & Tangled from last year which I still totally love! I used a lot of masking to achieve this - as I think - very cute one layer Autumn scene.


Ich hoffe, ihr teilt eure Halloween-, Kürbis- oder sonstigen Werke mit uns bei PINspirational und ich drücke euch die Daumen für den tollen Preis unseres freundlichen Sponsors "The Cutting Cafe". Habt einen schönen Freitag und happy crafting wünscht euch eure Maike

I hope you are going to share your Halloween or pumpkin project with us at PINspirational and I am keeping my fingers crossed that maybe you will win the awesome prize by our kind sponsor "The Cutting Cafe". Have a wonderful Friday and happy crafting. Take care, yours Maike


Material / supplies:
Stempel / stamps: "Hello pumpkin" von Simon Says Stamp und Neat & Tangled
Stanze / die: "All Prettied Up" von Mama Elephant

Challenges:

Montag, 25. September 2017

Jeanins Hochzeitsalbum


Hallo ihr Lieben!
Heute habe ich mal keine Karte für euch, sondern eine Idee für ein kreatives Gruppengeschenk für eine Hochzeit. Eigentlich nicht irgendeine Hochzeit, sondern in diesem speziellen Fall für die Hochzeit von der lieben Jeanin von Some Bits and Pieces, die am Wochenende ihren Alex geheiratet hat. Das hier hat sie von uns allen (uns heißt in diesem Fall viele ihrer Bastelfreundinnen) bekommen:

Heya my dear crafty friends!
Today I'd like to share this idea for a group gift for a wedding with you. Well, actually not any one wedding, because in this case it was the wedding of lovely Jeanin from Some Bits and Pieces who got married to her Alex last weekend. This is what she got from all of us (us meaning many of her crafty friends...):


Jede von uns hat ein 10x10 cm großes Stück Papier auf der Vorder- und Rückseite gestaltet. Hier ist meins - komplett flach gehalten, weil ich ehrlich gesagt nicht mehr wusste, ob es auch in Ebenen gestaltet sein durfte... Naja, sicher ist sicher, oder? ;o))))

We all turned a 10x10 cm piece of paper in something like a card by designing the front and back for Jeanin and her husband. I kept mine completely flat, because to be honest, I wasn't sure anymore if we had established any guidelines for our presents, regarding layers.... Well, better safe than sorry I thought, so this is what I made:

Vorderseite / front

Rückseite / back
Und hier ist noch mal ein Blick auf das auseinandergefächerte Album. Falls ihr Lust habt auch die anderen Seiten anzuschauen, guckt doch mal auf Instagram vorbei und gebt im Suchfeld den Hashtag #jeaninjustmarried ein ;o) Ich hoffe, euch hat unsere Idee gefallen und vielleicht inspiriert sie ja den ein oder anderen ;o) Habt ne tolle und kreative Woche!!!

And here is a different look at the album. In case you'd like to see the other pages as well (which I highly recommend - they are all so different and fun!) just log on to Instagram and search for the hashtag #jeaninjustmarried ;o) I hope you like our idea and maybe we could inspire you with it ;o) Have a fantastic and creative week!!!


PS: Wisst ihr was? Ich liebe unser Hobby, weil es kreativ ist, klar, aber auch, weil der Hauptgrund ist, anderen eine Freude zu machen und das finde ich großartig! Jedes Lächeln, das man mit einer Karte, einem tollen Umschlag, einem Smilespotting-Werk oder einem kleinen handgemachten Geschenk in die Welt bringt ist ein echtes Geschenk. Keine Ahnung, warum das jetzt raus musste, aber es musste! Habt eine tolle Woche und seid großartig!

PS You know what? I truly love our hobby Because it is creative for sure, but especially because one main reason for making cards, beautifying an envelope, leaving smile-spotting cards for random people to see or giving little hand crafted boxes is making people smile. And every little smile that comes to someones face is a real gift. No idea where this all came from, but it had to be typed for some reason... Have a great week and be awesome!

Material / supplies:
Stempel / stamps: "Hochzeit Glückwunsch" von Klartext
Stanzen / dies: "Blueprint 29" von My Favorite Things
                         (but any die that gives you a decent sized opening will work here)
Schablone / stencil: "" will be added


Montag, 13. Juni 2016

Male card: Make a wish cupcake

Hallo ihr Lieben!
Bei der neuen Challenge der Crafty Cardmakers geht es um Karten für Männer. Immer ein schwieriges Unterfangen - zumindest für mich. Ein gutes Rezept ist wie ich finde allerdings eine One-Layer-Karte mit möglichst wenig Schnickedöns, wie man bei mir zu Hause sagt und "männerfreundlichen" Farben. Und hier seht ihr meine Inspirationskarte, die ich nach meinem Männerkarten-Rezept gestrickt habe:

Hello everyone ;o)
I hope you are having a great Monday so far. There is a new challenge at the Crafty Cardmakers asking for "male cards". Always a difficult task, I feel. My go-to-"recipe" for a male card is a one layer card with little or no embellishment and some man-friendly colours. Here you can see what I made following this male-card-recipe:


Zuerst habe ich den Cupcake gestempelt, mit Copics coloriert und eine Maske für das süße Gebäckstück zurechtgeschnitten. Die brauchte ich, um die Sterne "hinter" den Cupcake zu stempeln und der Karte so optisch noch eine weitere Dimension zu geben. Außerdem habe ich die Sterne schwerpunktmäßig von oben links nach unten rechts verteilt, so dass sie den Blick des Betrachters auf den Kartenspruch lenken.

I stamped the cupcake image, coloured it with Copic markers and fussy cut a mask for it from some masking paper. Next I stamped the stars, to give the card more interest and also to help guide the eye towards the sentiment.


Als erstes habe ich den Spruch mit Memento Tuxedo Black Ink gestempelt (wie auch schon den Rest) und dann habe ich mit der Hilfe des Mistis noch einmal an der gleichen Stelle mit Versamark darüber gestempelt und das "make a wish" mit einem klaren Pulver embosst. So muss ich kein schwarzes Pulver benutzen und bekomme doch den gleichen Look hin.

The sentiment was stamped first in Memento Tuxedo Black Ink (like the rest) and then stamped with Versamark Ink - a clear, sticky ink - so that I could heat emboss it with a clear powder. That way I don't get any powder bits on my card, which tends to happen when I want to eliminate the second stamping and use black embossing powder.


Material / supplies:
Stempel / stamps: "Tim Holtz Cling Stamps Birthday" von Stampers Anonymous
                              "Lots of Stars" von Simon Says Stamp
                              "Birthday Wishes" von Pink and Main

Challenges:
Simon Says Wednesday Challenge "Father's Day / For a Guy"
Stempelgarten Challenge "A card for a man"
Creative With Stamps Challenge "Masculine Cards"
Polka Doodle's Craft Challenge "For the Boys"
Crafty Calendar Challenge "For a Male"

Mittwoch, 23. März 2016

Sweet Birthday Wishes

Hallo ihr Lieben!
Ihr braucht ganz schnell noch eine Geburtstagskarte? Ich habe für mich herausgefunden, dass ich für eine ganz schnelle Karte auf meine zwei am meisten benutzten Techniken verzichten muss: Colorieren und Die-Cutting. Was aber zum Glück bleibt ist Stempeln und vielleicht noch ein paar schnelle, künstlerische Hintergründe. Für diese Karte habe ich mich für Ersteres entschieden:

Hello my dear crafty friends!
Do you need a very quick birthday card? I have found out, that if I want to create a really quick card I have to do without two of my favourite and most often used techniques: colouring and die cutting. Luckily that leaves stamping and those quick and artistic backgrounds. For this card I went for the stamping:


Flächige Stempel sind super geeignet, weil man ein super Ergebnis bekommt, wenn man sie einfach nur abstempelt, aber man kann darüber hinaus noch viel mehr damit machen: Masking und so Szenen gestalten, mit Markern Schattierungen hinzufügen, etc. Bei dieser Karte habe ich die Bonbons nur "übereinander" gestempelt und direkt darüber noch den Kartenspruch. Weil sich jetzt alles auf der linken Seite abspielte, habe ich am Rand der rechten Seite zum Ausbalancieren noch ein Streifenmuster gestempelt. Zum Abschluss habe noch eine gestrichelte Linie hinzugefügt und - weil es ja eine Geburtstagskarte ist - noch großzügig Clear Wink of Stella auf alle Bonbons aufgetragen.

Solid stamps are great, because you get awesome results just by stamping them down, but you can do more with them, too: masking and thus creating scenes, using markers for a tiny bit of shading, etc. Here I simply "stacked" the sweets and stamped the sentiment above. Because I had all the interest positioned on the left side of the card I stamped a diagonally striped background stamp just at the edge of the right side. That helped to balance the card. To finish the card I drew a stitched line across the card, just leaving the right side as it was. However, seeing that it is a birthday card, there was something missing still. I quickly figured out that it was glitter and shine. So I took my Clear Wink of Stella and liberally coated the sweets with it. Now it felt like a proper birthday card.


Das Foto ist nicht wirklich das beste, aber man kann hier wenigsten ein bisschen den Schimmer erkennen..

This picture isn't the absolute best, but at least I managed to capture a little bit of the shimmer...

Material / supplies:
Stempel / stamps: "How We Roll" von Waffle Flower / Simon Says Stamp Exclusive
                            "Diagonal Stripes Background" von My Favorite Things

Challenges:

Montag, 17. August 2015

Radio love

Hallo zusammen!
Ich hoffe, ihr alle genießt euer Wochenende und findet vielleicht sogar Zeit zum Stempeln und Basteln ;o) Heute möchte ich euch gerne eine Karte zeigen, die ich mit Create a Smile Stempeln und Distress Inks hergestellt habe.

Hello everybody! 
Hope you are all enjoying your weekend and maybe getting some time to craft as well ;o) Today I would like to show you a card that I have made using some Create a Smile stamps and Distress Inks. 
 

Als erstes habe ich einen Rand mit Kreppband abgeklebt. Danach habe ich das Radio und die Sprechblase gestempelt und sie sofort mit einer Maske geschützt. Ich hatte mir vorgestellt, dass das Radio auf einem Holztisch steht und habe daher den unteren Bereich zuerst einmal braun abgeschwämmt (sagt man das so?) und anschließend mit der gleichen Stempelfarbe (Stained Walnut) noch eine Holzmaserung darüber gestempelt. Als der "Tisch" trocken war habe ich mich um den Himmel gekümmert: Dazu habe ich mit drei verschieden dunklen Tönen den Himmel gestaltet (nach oben und außen hin immer dunkler werdend) und mit einem weißen Sharpie die Sterne und die Milchstraße aufgetragen.

I started this card by masking the edge of my card base, so that I could have the scene I was going to create in the middle of my card and keep a crisp white edge around it. After I had stamped the radio and the speechbubble I immediatly masked them off, too. I had pictured a wooden table for my radio to sit on so I used my ink blending tool to colour the bottom part with Walnut Stain Distress Ink. Using the same colour I added some wood texture to my "table". When everything was dry I took out three different shades of blue to colour the sky. I started with the lightest colour and worked my way up and out getting progressively darker and later added the stars and the milky way using my white Sharpie.


Zum Schluss habe ich dann das Radio und das Herz in der Sprechblase mit Copics koloriert und den schwarzen Rand freihand um die Szene herum gezogen. Fertig ;o)

To finish the card off I coloured the radio and the heart with Copic markers and added a hand drawn black frame all around my scene. Done ;o)


Material / supplies:
Stempel / stamps: "Perfect tune" von Create a Smile
                           "Designer Woodgrain" von Hero Arts


Challenges:
Happy Little Stampers CAS Challenge "Masking"
Wag's n Whiskers Stamps "Frame it out"
Crafty Friends Challenge Blog "Clean and Simple"
AAA cards "Maskerade"
Love to Scrap "Anything goes"


Kurze Erinnerung: Bis Freitag läuft noch mein erstes Giveaway anlässlich meines 100. Posts :o) Wenn ihr noch mitmachen möchtet klickt einfach hier.

Here is a quick reminder that there is still a giveaway going on ;o) Just click here and you can enter to win a $15 gift certificate to the Simon Says Stamp Online shop.  


Für alle, die sich darüber gewundert haben, dass es jetzt trotz meines Versprechens regelmäßig zu posten wieder einige Tage von der Bildfläche verschwunden war, hier der Grund:

For all of you who have wondered why I hadn't posted as regularly as I had promised, here is the reason:


Einer meiner Kater hat einen Diabetes entwickelt und da wir zwei Freigänger haben, mein Kranker aber nicht mehr raus darf, gab es hier viel zu Denken und zu Tun. Von Sorgen machen mal ganz zu schweigen. Drückt mir bitte die Daumen, dass Penny bald wieder gesund wird!

One of my cats was diagnozed with diabetes and because we have two cats running around in our house and the neighbourhood there was a lot of planning and worrying going on here. Please keep your fingers crossed that Penny will become healthy again if you are a lover of all fur babies like I am.
Related Posts Plugin for WordPress, Blogger...