Posts mit dem Label Neat & Tangled werden angezeigt. Alle Posts anzeigen

Dienstag, 1. September 2020

Autumnal Congrats

Hello everyone,
this is my card for the September challenge at Challenge Up Your Life. The theme this time is "Autumn mood" and this is my take on it:


I love this little bear by Neat and Tangled and Simon Says Stamp - it is from a Stamptember stamp set. This cute scarf around his neck just speaks Autumn to me. 


The background was created with Distress Inks and then covered up with this fun die by Altenew. Those huge leaves just look amazin I think. I would love to see your take on the "Autumn Mood" theme! Have afabulous week, stay safe and happy crafting my friends! Hugs, Maike


Supplies:
Stamps: "Hello Pumpkin" by Simon Says Stamp and Neat and Tangled
Dies "Striped Leaves Cover Die" by Altenew

And here two more cards I made with the same stamp set:


Challenges:

Montag, 29. Juni 2020

Big Hugs - Rainbow Background

Hallo everyone ;o)
I hope you are all doing fine and that you get to enjoy some nice summer days! Today I would love to share this super cute card with you which I made for the new "Create Your Own Background" challenge at the Crafty Cardmakers:


Even though it might look different there were only three Distress Inks involved in creating this background: Picked Raspberry, Mustard Seed and Peacock Feathers. I love how you can get a lot more colours simply by overlapping them. It still is magic to me ;o) Once I had the background piece ready I set it aside to let it dry completely and went on die cutting the sentiment three times. I glued the pieces together to make the word die stand out even more. 


In this picture you can see the effect quite well. I am lazy so I usually put "Stick it" behind sentiment dies. Do you glue them together differently? If so I would love to hear which adhesive you use, because all the ones I tried are too runny or too thick when I lay them down and my beloved snail glue doesn't work for me either... Well, back to this card ;o) I had stamped the image in a very light grey and coloured it in a no-line fashion. I thought it would work well on an elephant ;o) I added it to the sentiment strip, added an additional dot detail to the background and my card was done. I hope you like it and that you will join us at the Crafty Cardmakers ;o) Happy crafting everyone ;o)
And...


... to you all!!!

Supplies:
Stamps: "Adorable Elephants" by My Favorite Things
Die: "Big Hugs Die" by Neat and Tangled (Linked to Seven Hills Crafts)

Challenges:

Mittwoch, 6. Mai 2020

Dog Gone Awesome Birthday


Hello there,
thank you for stopping by ;o) Today I would like to share with you the card I made for the newest PINspirational Challenge. This is our current inspration picture:


I do not own a lama stamp, so I thought I would use the striped from the background as inspiration plus use an animal and have it be mainly white. Many of my friend's are dog lovers so I thought this would be a perfect opportunity to use this cute puppy which is one of my newest stamps. I gave it a present to give to the recipient and made it a birthday card. I love how the white dog looks against the colourful and bright stripes. What do you think?


I hope you are going to join us for this fun and happy challenge. I would love to see your project in our gallery! Please stay safe and happy crafting, everyone ;o) Maike


Supplies:
Stamps: "Puppy`s Favorite Things" by Neat and Tangled (it will be discontinued, but you can get it in the sale right now)
              "Party Pals Clear Stamps" by Avery Elle
              Sentiment by My Favorite Things (retired)

Sonntag, 1. März 2020

Happy Holidays Snowman (circular card)


Hello everyone and happy Sunday! 
I hope you had a lovely weekend! A crafty one maybe? Well I did and this was the result ;o) It is my inspiration card for the "Fun Fold Card" challenge at Challenge Up Your Life. I decided on a round card base paired with the circular sentiment die.


I love that this challenge has made me think outside the box and I am so glad I did. I filled the inside of the sentiment with glitter paper by Lawn fawn and added a stamped piece of paper behind that. All this makes the snowman in the middle really be the star of the show.


I hope you are going to join us for this "Fun Fold" challenge! Have a look at the other DT's cards - they are a fabulous inspiration and I hope they will make your fingers itch to craft ;o) Have a lovely and wonderful week everyone! Take care and happy crafting, yours Maike


Supplies:
Stamps: "Santa's Wonderland" by Neat and Tangled (available at Simon Says Stamp)
              "Background Stamp" by My Favourite Things
Dies: "Stitched Circle Stax" & "Happy Holidays Circle Frame Die" by My Favourite Things

Freitag, 26. Oktober 2018

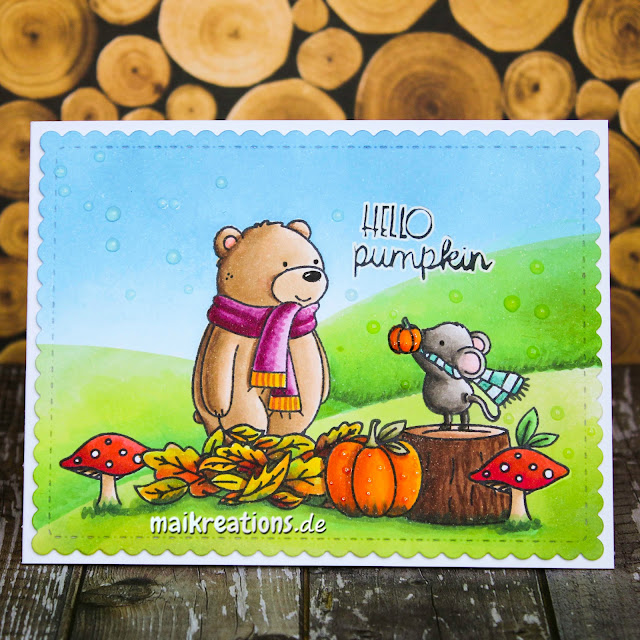
Hello Pumpkin


Hallo zusammen!
Eigentlich hätte mein Post am Diestag live gehen sollen, aber Blogger hat mich da wohl falsch verstanden... Hier also nun mit etwas Verspätung mein DT-Beitrag zur aktuellen PINspirational Challenge

Heya everyone!
This post was planned for Tuesday, but it seems that blogger and I had a bis of a misunderstanding... Even though it is a little late, I'd like to share my DT project for the current PINspirational Challenge. This is the newest inspiration pic:


Für die Karte habe ich die Stempel vom Stamptember Set von Simon Says Stamp und Neat & Tangled aus dem letzten Jahr benutzt und sehr viel maskiert. Am Ende wurde ich aber mit einer - wie ich finde - niedlichen 1-Layer Herbstszene belohnt.

For this card I have used images from the Stamptember set by Simon Says Stamp and Neat & Tangled from last year which I still totally love! I used a lot of masking to achieve this - as I think - very cute one layer Autumn scene.


Ich hoffe, ihr teilt eure Halloween-, Kürbis- oder sonstigen Werke mit uns bei PINspirational und ich drücke euch die Daumen für den tollen Preis unseres freundlichen Sponsors "The Cutting Cafe". Habt einen schönen Freitag und happy crafting wünscht euch eure Maike

I hope you are going to share your Halloween or pumpkin project with us at PINspirational and I am keeping my fingers crossed that maybe you will win the awesome prize by our kind sponsor "The Cutting Cafe". Have a wonderful Friday and happy crafting. Take care, yours Maike


Material / supplies:
Stempel / stamps: "Hello pumpkin" von Simon Says Stamp und Neat & Tangled
Stanze / die: "All Prettied Up" von Mama Elephant

Challenges:

Samstag, 9. Juni 2018

Welcome to the world, sweet baby

Halli Hallo ihr Lieben!
Rund ums Thema "Baby" soll sich alles in den nächsten 2 Wochen bei Challenge Up Your Life drehen und das hier ist meine Inspirationskarte dazu:

Heya my dear crafty friends!
"Baby" is the theme for our newest challenge at Challenge Up Your Life and this is my inspiration card for you:


Zuerst habe ich eine ganze Menge Dreicke ausgestanzt und als Girlande direkt auf die Kartenbasis geklebt. Dabei habe ich darauf geachtet, dass ich ausreichend Platz für den Spruch und den Rahmen haben würde, die ja auch noch mit auf die Karte drauf sollten. Aus weißem Cardstock habe ich den Rahmen ausgestanzt und ein weißes Papier, das ein klitzekleines bisschen kleiner war als der Rahmen im Ombre-Look eingefärbt. Dazu habe ich Distress Oxide Inks in den Farben "Lucky Clover", "Mowed Lawn" and "Twisted Citron" benutzt. 

I started with die cutting lots and lots of little banner shapes which I glued directly to the card base, making sure I had enough room for the sentiment and the frame I wanted to add to the card front. Next I die cut the frame from white card stock and coloured a pice of paper that was just a tiny bit smaller than the frame with Distress Oxide Inks. I used the colours "Lucky Clover", "Mowed Lawn" and "Twisted Citron" to create the ombre background for my Mama Bear and her little one.  


Mama Bär habe ich mit Copics der E10er-Familie coloriert, da ich einen warmen Ton für sie haben wollte. Das Baby habe ich in zarten Rosatönen (RV04, RV02 und R30) coloriert. Das Wort "Welcome" habe ich zuerst nur gestempelt gehabt, aber weil mir das zu schmal und zu unauffällig war, bin ich später noch mit dem Glaze Pen (mit dem ich auch immer einen Klecks auf die Augen setze) drüber gegangen und liebe das leicht erhabene, tiefschwarze Finish. 

I coloured the Mama Bear usiing Copics from the E10 family, because I wanted to give her a slightly reddish fur. The baby was coloured with RV04, RV02 and R30 to give her that soft pink look. When I stamped the word "Welcome" I thought it would have enough "standing" to fill the top of the coloured pice, but it didn't really. So I wrote over it with my beloved Glaze Pen which I always use for the eyes of critters and I think the result looks great. 


Ich hoffe, euch gefällt meine Karte und dass ihr Lust habt bei unserer Challenge mitzumachen. Solltet ihr vielleicht sogar Lust und Zeit haben regelmäßig eure Werke bei uns zu zeigen, könntet ihr auch bei unserem aktuellen DT-Call teilnehmen. Wir suchen Verstärkung für unser kleines, dafür aber umso netteres Team. ;o) Ich hoffe, wir sehen uns auf dem Blog und happy crafting wünscht euch eure Maike

I hope you like my card and that you are going to join us for our challenge as well. In case you are interested in joining us on a more regular basis, we are having a DT-call and I would love for you to check it out here, if you would like to join us and our wonderful team ;o) Hope to see you on the blog and happy crafting, yours Maike


Material / supplies:
                              von Neat & Tangled
Stanzen / dies: "Single Stitch Line Rounded Square Frames" &
                         "Celebratory Banner Die" von My Favorite Things

Mittwoch, 17. Januar 2018

What?! Trifold-Card

Hallo ihr Lieben
und willkommen zum zweiten Post des heutigen Tages ;o) Das neue Thema der Papercraft-Challenge lautet "Trifold" und ich würde euch gerne meine Inspirationskarte zeigen. Unser freundlicher Sponsor "Sparkle N Sprinkle" hat diesen wunderbar lustigen Vogel im Programm, der unbedingt auf die Karte musste und zwar mehrmals. Aber seht selbst:

Heya my dear crafty friends
and welcome to the second post for today ;o) The new theme at Papercraft Challenges is "Trifold" and I would like to share my inspiration card with you. Our kind sponsor "Sprinkle N Sparkle" has got this image of a funny crazy bird and it just had to be part of my card and several time at that. But have a look yourself:


Die Front habe ich bewusst schlicht gehalten. Das Fenster habe ich durch den weißen Rahmen betont und mit den Buchstaben - die den ersten Teil des Spruchs bilden - habe ich das Gelb vom Schnabel aufgenommen. 

I kept the front of the card deliberately simple. The white frame around the window draws more attention to it and the image you see and the yellow letters are the first part of the sentiment.


Wenn man die Karte dann aber öffnet, hoffe ich, dass schlicht nicht das Wort ist, dass jemandem spontan einfällt ;o) I finde diese verrückten Vögel in Regenbogenfarben einfach genial; wie schockiert sie dann noch über das Alter des Empfängers aus den Federn gucken *herrlich... Ich habe sie mir als Chor vorgestellt, also auch, dass sie nachdem sie bis drei gezählt haben...

When you open the card, however, I hope that simple is not the word that comes to mind ;o) I love those birds in rainbow colours; how shocked they look about the recipients age *grin... I pictured them to be a choire, so after counting to three....


auch anfangen "Happy Birthday" zu singen ;o) Den Boden habe ich mit Simon Says Stamp "Fog Ink"und der "Modern Triangles" Schablone von Neat and Tangled gestaltet. Die Wände wurden mit einem der wunderbaren Clarity Stamp Pinseln und "Fossilized Amber Distress Oxide Ink" aufgetragen. Die Pinsel liebe ich übrigens sehr - vor allem in Verbindung mit Schablonen, weil man einen ganz soften Farbauftrag hinbekommt. Ich hoffe, ihr habt auch Lust bekommen eine "Trifold" Kreation zu basteln und mit uns zu teilen ;o) Habt einen tollen Tag und happy crafting, eure Maike

they start singing "Happy Birthday" ;o) I created the floor using Simon Says Stamp "Fog Ink" and the "Modern Triangles" stencil by Neat and Tangled. For the walls I chose to add "Fossilized Amber Distress Oxide Ink" using one of the fabulous Clarity Stamp brushes which I really, really love! I hope you like my card and that you are going to join us with your "Trifold" creation ;o) Have a great day and happy crafting, yours Maike


Material / supplies:
Stempel / stamps: "Cool Chicks" von Sparkle N Sprinkle
                             "You Rock" von Clearly Besotted -> sentiment (retired)
                             "Birthday Greetings" von Altenew
Stanzen / dies: "Stitched Mini Scallop Circle Stax" von My Favorite Things
Stencil: "Modern Triangles" von Neat and Tangled

Challenges:


Dienstag, 5. Dezember 2017

Christmas Series #17 / Weihnachtsserie #17 (A Snoman's Gift - POD)

Hallo zusammen!
Ich hoffe, es geht euch gut und ihr habt Freude an der Weihnachtsserie ;o) Falls ihr es noch nicht gemacht habt, schaut euch doch den ersten Post an und kommentiert dort, um bei meinem Giveaway mitzumachen - es ist noch Zeit genug. Aber nun zur heutigen Karte, die als Inspiration für die aktuelle PINspirational Challenge entstanden ist:

Hello everyone!
I hope you are well and enjoying the Christmas Series so far ;o) If you haven't done so already, check out the first post for the series and comment there to be entered in my giveaway - there is still plenty of time left. But now on to today's card which is an inspiration card for the newest PINspirational Challenge:


 Das hier ist das aktuelle Inspirationsbild: / This is the current inspiration picture:


http://pinspirationalchallenges.blogspot.de/2017/12/pinspirational-challenge-205.html

Für meine Karte habe ich Stempel von Purple Onion Designs benutzt und mich bei den Farben auch größtenteils and der Vorgabe orientiert. Den Hintergrund habe ich mit Hilfe von Masken, Distress Oxide Inks in Salty Ocean und Peacock Feathers und Embossingpaste erstellt, die ich durch eine Schablone von Simon Says Stamp aufgetragen habe, um den Schnee hinzuzufügen. Den Effekt davon liebe ich sehr; mir gefällt vor allem, dass er so richtig schön dimensional ist.

I have used images from Purple Onion Designs and stuck to the colours as well as choosing a snowman as my focal image. The background was created using masks, Distress Oxide Inks in Salty Ocean and Peacock Feathers and after that was dry I added white paste through a stencil by Simon Says Stamp to create some snow. Always love the dimension this technique gives.


Der Spruch besteht aus einer Zuckerstange, die ich durch die Buchstaben O und Y ergänzt und ebenfalls mit einem rot-weißen Streifenmuster versehen habe. Zum Abschluss habe ich noch einen Rahmen aus Glitzerpapier augestanzt und meine Karte war fertig. Ich hoffe, sie hat euch gefallen und ihr zeigt uns eure Schneemann-Werke bei PINspirational :o) Habt eine tolle Woche, passt auf euch auf und happy crafting, eure Maike ;o)

I custom created the sentiment by using a sugar cane and the letters O and Y from a different set, colouring them to fit in with the pattern. To finish everything I added a frame die cut from glitter paper and glued down the images I had previously fussy cut. I hope you like my card and that you will share your snowman creations with us at PINspirational ;o) Have a wonderful week, take care and happy crafting, yours Maike ;o)


Material / supplies:
Stempel / stamps: "Flurry" & "Birch House" von Purple Onion Designs
                             "Beary Merry" von Neat and Tangled (sugar cane)
Stanzen / dies: "Stitched Rectangle Scallop Frames" von My Favorite Things
                        "Quinn's ABCs Dies" (& stamps) von Lawn Fawn

Challenges:


Freitag, 3. November 2017

Christmas Series Card #4 / Weihnachtsserie Karte #4

Halli Hallo ihr Lieben
und willkommen zum vierten Teil meiner Weihnachtsserie Heute möchte ich mit euch meinen ersten Versuch einer Shadowbox teilen. Dank Birkas fabelhaftem Video, musste ich mir nicht einmal selber mein Hirn zermatern ;o)

Heya my dear crafty friends
and welcome to part four of my Christmas series. Today I would like to share my first shadow box card, which turned out really great thanks to Birkas fantastic video ;o)


Um diese Art Karte zu machen braucht man nur 2 Papiere in der Höhe, die die Karte später haben soll. Die muss man auf die Breite schneiden, die die Maße der Breite der Karte, die Tiefe plus etwa 1/4 Inch für die Klebelasche zusammenaddiert ergeben. Gefalzt wird an den gleichen Stellen, einmal von links und einmal von rechts aus gesehen. Wenn man die Papiere faltet erhält man 2 Teile, die wie ein eckiges "J" aussehen und die müssen dann nur noch aneinander geklebt werden. Vergesst nicht, vorher noch ein Fenster in eines der Papiere zu schneiden oder stanzen ;o)

To make this kind of card you need two pieces of paper that are the height you want your card be. To figure out the width you need to add up the measurements of the width of the front of the card, plus the depth, plus about 1/4 of an inch for adhering both papers together. You score them at those same measurements, only one time starting from the left and the next time starting from the right. Once you fold the papers, you will get two kind of "J" shapes that now have to be glued together. Before you do though, don't forget to cut or die cut a window from one of the papers ;o)


Die meisten Stempel, die ich benutzt habe, sind von Neat and Tangled - nur das Sternenbanner ist aus einem der neueren Mama Elephant Releases. Um das Design der Schattenbox auch voll auszukosten, habe ich noch zwei Papierstreifen in den unteren Teil geklebt. Die Maße dieser Teile sind: Höhe, wie ihr das möchtet und in der Breite so breit, wie die Kartenfront, plus 1/2 Inch extra, damit ihr an jeder Seite eine 1/4 Inch Klebelasche habt. Einige meiner Elemente, zum Beispiel den Bären und den Pinguin, habe ich mit einem weiteren Stück Papier verstärkt, dass ich einfach hinten drauf geklebt habe. Den anderen reichte die vorhandene Klebefläche, um fest zu bleiben, weshalb ich diese in Ruhe gelassen habe ;o)

Most of the images I have used are from Neat and Tangled - only the star banner is from one of the newer Mama Elephant releases. In oder to make use of the shadow box design I have inserted two pieces of paper. Measurements of this paper: hight as desired and the width of the paper is the width of the card front plus 1/2 inch, so you can have to 1/4 inch flaps at the side to adhere the paper. Some images, like the bear and the penguin, needed a little strip of paper as reinforcement glued to their backs, but all the other elements for sturdy enough as they were so I left them be ;o)

Blick von oben. / View from the top.

Und so kann man die Karte dann flach zusammenfalten.
And this is how you can fold the card and fit it in an envelope.


Ich hoffe, euch hat meine Karte gefallen! Falls ihr es noch nicht getan habt, vergesst nicht euch als Follower für meinen Blog einzutragen, um keine Weihnachtskarteninspiration zu verpassen und schaut auch noch einmal bei meinem Giveaway vorbei: klick. Habt ein wunderbares Wochenende und happy crafting, eure Maike ;o)

I hope you like my card! If you haven't done so already, why not follow by blog to not miss a single Christmas card inspiration and also have a look at my giveaway: click. Have a wonderful weekend and happy crafting, yours Maike ;o)

Material / supplies:
Stempel / stamps: "Beary Merry" von Neat and Tangled (plus coordinating dies)
                              "Sentiments from a Yeti" von Mama Elephant (plus coordinating dies)
Stanzen / dies: "Mini Scalop Square Stax" von My Favorite Things (window)

Challenges:
As you like it Challenge "Christmas or not Christmas and Why?"
Definately Christmas, because I love to share this annual series & like to get a headstart on my Christmas card production ;o)

Samstag, 28. Oktober 2017

Christmas Series Card # 2 / Weihnachtsserie Karte # 2 (North Pole)

Halli Hallo ihr Lieben!
2 oder mehr Stanzen zu benutzen ist die Herausforderung auf dem Challenge Up Your Life Blog. Also habe ich meine Stanzen herausgekramt und die zweite Karte für meine Weihnachtsserie gebastelt ;o)

Heya my dear crafty friends!
2 or more die cuts are the theme for our new challenge at Challenge Up Your Life. So I got out a lot of my dies and created this card for CUYL and as my second card for my Christmas series ;o)


Zuerst habe ich aus gemustertem Papier von Lawn Fawn - ich liebe diesen Schneeflockenhintergrund - das abgerundete Rechteck mit der "Tür" ausgestanzt. Den Rahmen habe ich mit "Stormy Sky" Distress Ink abgedunkelt, um den Fokus mehr auf den inneren Teil zu lenken, aber trotzdem das Muster nicht völlig zu verbergen. Dann habe ich den mittleren Teil mit den Hügeln, Bergen, Bäumen und dem "North Pole" Schild dekoriert. Auf letzteres habe ich vor dem Aufkleben noch etwas von dem "Schneestift" gegeben, den ich mir letztes Jahr bei einem Discounter gekauft habe und war überrascht, wie toll der Effekt wird, wenn man diese Schneeflüssigkeit heiß macht. Es wird ein wirklich schöner 3D-Schnee und sieht klasse aus!

I started by die cutting the frame with the door from some patterned paper by Lawn Fawn - I love this snowy background! In order to have the focus more on the door-part I darkened the frame with "Stormy Sky" Distress Ink. That way the pattern is still visible but a lot more subtle. Next I decorated the inner part with mountains, snowy hills, trees and the "North Pole" sign. For the sign I have used a snow pen for the first time and was excited to see how well it worked. I love this 3D effect and the snow looks almost real!


Wenn man das Törchen öffnet sieht man Santa, der gerade fröhlich durch den Schnee stapft. Vielleicht ist er ja auf dem Weg zu Dir?! ;o) Coloriert habe ich mit Copic Markern und dem Stern auf dem Tannenbaum habe ich später noch etwas Glitzer verpasst. Ich hoffe, euch gefällt meine Karte und ihr habt nun Lust bekommen auch eure Stanzen rauszukramen und euer Werk später bei Challenge Up Your Life zu verlinken und / oder euch an die Weihnachtskarten zu begeben ;o) Mittwoch folgt die dritte Karte der Serie und falls ihr den ersten Beitrag noch nicht gesehen habt, klickt einfach hier (klick), da findet ihr alle Informationen über die Weihnachtsserie und das angeschlossene Giveaway ;o) Und nun: Habt ein schönes Wochenende und happy crafting, eure Maike ;o)))

When the recipient opens the little door part, he or she can see Santa walking happily in the snow carrying a Christmas tree. Wondering where he is going to? ;o) I coloured everything with Copic markers and added a bit of glitter to the star. I hope I could inspire you to get out your dies to share your creation with us at Challenge Up Your Life and / or to get started with your Christmas cards ;o) The next card of my Christmas series will be published on Wednesday and just in case you haven't seen the first card yet, simply click here (click) to find all the information about the series and the giveaway ;o) Have a great week everyone and happy crafting, yours Maike ;o)))


Material / supplies:
Stempel / stamps: "Santa's Wonderland" von Neat and Tangled
                              "Me and my Yeti" von Mama Elephant
Stanzen / dies: "Stitched Basic Edges" & "Blueprints 30" von My Favorite Things
                         "Snow Capped Mountains" von Mama Elephant

Challenges:

Samstag, 27. Mai 2017

Eule und Brad-Mushrooms ;o)

Halli Hallo ihr Lieben!
Ich hoffe, das Wetter bei euch ist gerade genau so fantastisch, wie es bei uns ist. Den kostbaren Brückentag habe ich zwar überwiegend zum Frühjahrsputz genutzt, aber es blieb auch noch ein wenig Zeit, um eine Karte für die neue CUYL-Challenge zu werkeln. Dabei geht es dieses Mal um "Brads" - also diese Musterklammerdinger ;o) Fürs Scrapbooking habe ich mir mal welche in Pilzform besorgt, die sich aber auch ganz hervorragend auf einer Karte machen, wie ich finde:

Heya my dear friends!
I hope you had good weather over the last couple of days and had the time to make good use of it as well ;o) I had a day off yesterday and although I have done a lot of spring-cleaning I also had the time to create a card for the newest CUYL challenge. It is all about "Brads" this time ;o) A couple of years back I bought some mushroom brads for srapbooking. They look great on cards as well I discovered by playing with them ;o) What do you think?


Den Hintergrund habe ich mit Distress Inks selbst gepinselt und nach dem Trocknen habe ich diesen wunderschönen Spruch gestempelt. Zum Glück habe ich das Misti benutzt, denn auf dem Aquarellpapier war der Abdruck erst nach dem vierten Abstempeln einigermaßen schwarz. Ich denke, auf glattem Papier wäre das Abstempeln weniger problematisch gewesen, aber ich lass es euch wissen, sobald ich es ausprobiert habe ;o)

I created the background with Distress Inks and stamped this beautiful sentiment after the paper was completely dry again. Luckily I thought of using the Misti, because on this watercolour paper it took me four attempts to get the stamped image right. I am sure that it would be a lot easier on smooth paper, but I will let you know :o)


Den Spruch, den ich unter den Baumstamm gestempelt habe, habe ich auch benutzt, um die Kartenbasis ein wenig interessanter zu gestalten. Dazu habe ich die Karte in einem Winkel auf kariertes Papier gelegt und mit Washi-Tape befestigt. So habe ich die Reihen gerade stempeln können, was sonst nicht so mein Talent ist ;o) Danach habe ich die Elemente nur noch dort hingeklebt bzw. festgeklemmt, wo sie für mich am schönsten aussahen.  Vielleicht habt ihr ja Lust bekommen durch eure Brads zu schauen und ein paar davon (oder auch nur eins) in ein Projekt zu integrieren und dieses dann auf dem CUYL Blog einzustellen...?! Ich würde mich auf jeden Fall total darüber freuen! Habt einen wundervollen Tag und happy crafting ;o) Eure Maike

I used the same sentiment I had stamped beneath the log to create a more interesting card base. In order to stamp the greeting evenly (you could say that that usually isn't my special talent) I placed the card base on a graph paper, adhered it temporarily with some Washi Tape and used the lines as orientation. Now all I had to do was to put everything where I thought it looked best and my card was done. I hope I could inspire you a little bit and maybe you find some brads to create a project with. If you do I would be thrilled if you would share your work with us in the CUYL gallery ;o) Have a great day and happy crafting ;o) Yours Maike


Material / supplies:
Stempel / stamps: "Wishing You" & "Charmed" von Mama Elephant
                             "Lumberjack Love" von Neat & Tangled
Stanzen / dies: "Mini Butterflies" von Memory Box
                         "Stitched Rectangles" von Lawn Fawn

Challenges:

Donnerstag, 23. März 2017

Hooray!!!

Hallo meine Lieben!
Heute möchte ich noch mit euch - leider etwas verspätet - meine Karte für die aktuelle Challenge bei CUYL mit euch teilen. Das Thema lautet dieses Mal "Chevron":

Heya my dear crafty friends!
Today I would like to share with you - unfortunately a little belatedly - my card for the new challenge at CUYL. The theme this time is "Chevron" :


Es ist eine Karte für die Lehramtsanwärterin an meiner Schule, die vor Kurzem sehr erfolgreich ihr zweites Staatsexamen bestanden hat. Das Chevron-Papier habe ich sowohl für den unteren Teil der Karte, als auch für das Banner benutzt. Letzteres habe ich mit Copics noch ein wenig nachschattiert, damit es nicht zu flach im Vergleich mit den süßen Tieren aussieht.

This card was made for the teacher in training at our school who aced her final exam a while ago. I used chevron patterned paper for the bottom part of my card as well as for the banner. For the latter I used Copics to give it a bit more dimension.


Zum Colorieren habe ich Winsor & Newton Wasserfarben benutzt, die weniger deckend sind als zum Beispiel Gansai Tambis und zudem noch sehr gut mit Wasser reagieren - so habe ich die Wolken für den Hintergrund "gemalt". Ich hoffe, euch gefällt die Karte und vielleicht habt ihr ja auch noch Chevron Papier zu Hause im Regal oder gestaltet euer eigenes Muster und teilt euer Werk dann auf Challenge Up Your Life ;o) Habt eine tolle Restwoche und happy crafting ;o)

The colouring medium I used for the rest of the card are Winsor & Newton watercolours. They are less opaque than Gansai Tambi watercolours and they react really well with water - that is how I created the clouds in the background. I hope you like the card and maybe you'll find some chevron paper and show us your card with it. (Or you create your own pattern?!) Happy crafting, everyone ;o)


Material / supplies:
Stempel / stamps: "Itty Bitty Welcoming Committee" von Neat and Tangled
Stanzen / dies: "Stitched Basic Scallop Edges" von My Favorite Things
                         "Small Stitched Rectangle Dies" von Lawn Fawn

Challenges:
Simon Says Stamp Wednesday Challenge "More than one Die or Punch"
Stampavie and More "Paper Piecing"
Crafty Addicts "Add a Sentiment"
QKR Stampede "Congratulations"
Cute Card Thursday "Spring Fever"

Dienstag, 5. Juli 2016

Ganz liebe Grüße

Guten Morgen ihr Lieben!
Heute gibt es mal wieder 2 verschiedene Karten von mir und hier ist schon die erste - meine Inspiration für die neue PINspirational Challenge:

Heya my dear crafty friends!
Today I am going to share two cards with you, so let's dive right in with number one - my inspiration card for the newest PINspirational challenge:


Vom Inspirationsbild habe ich die Farben der Blumen übernommen, der Hintergrund zeigt die wichtigsten Gebäude aus Paris und auch den Kartenspruch habe ich auf die Stadt der Liebe hin ausgesucht - daher die ganz lieben Grüße ;o)

I got the inspiration for the flowers from the inspiration picture, the background shows the most important buildings of Paris and because it is the "City of Love" I chose a sentiment that had the word "liebe" ("love") in it.


Zu gewinnen gibt es dieses Mal Digis von unseren Sponsoren Bugaboo und Julia Spiri, also würde ich mich freuen, wenn ihr uns eure Werke auf dem PINspirational Blog zeigt und drücke euch ganz fest die Daumen!

Our kind sponsors Bugaboo and Julia Spiri have great prizes for you again and you could be the lucky winner. So I hope you are going to play along with us over at the PINspirational blog. Good luck ;o)


Material / supplies:
Stempel / stamps: "Doodle Blooms" von Altenew
                              "Immer schön Lächeln" von Klartext / Dani Peuss
                              "Watercolor Stripes" von My Favorite Things
                              "Cityscapes" von Stampers Anonymous Tim Holtz Collection
 Stanzen / dies: "All Prettied Up" von Mama Elephant
                          "Classic Tag 1" von Neat & Tangled

Challenges:
Related Posts Plugin for WordPress, Blogger...