Posts mit dem Label Word Die werden angezeigt. Alle Posts anzeigen

Mittwoch, 15. September 2021

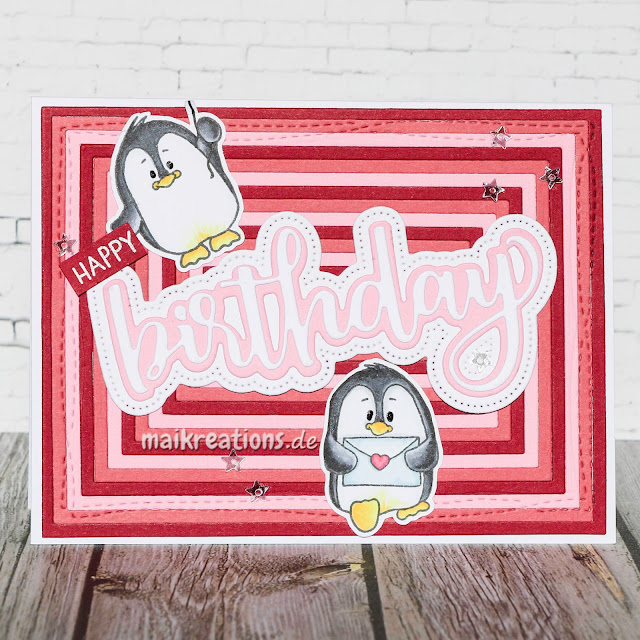
Happy Birthday from the penguins

Hello everyone ;o)
Today I am back with a new card for Papercraft Challenges. This time we want to see the sentiment as the focus piece of your card. I chose to use this huge die from Honey Bee Stamps and love the result:


I started by creating this fun background in pink, red and a very pale pink as well and placed the birthday sentiment on top right in the center. 


Because of all the die cut pieces I feel like the card has a lot of dimension without being bulky though. After adhering the sentiment I placed the two cute penguins around it and stuck the "Happy"-piece to one of the penguin's wings, so that it looks like it is holding it while flying by holding a balloon. 


I decorated the inside as well and added some star sequins to the front and my card was done. I really love the look of this huge sentiment on the front. I hope I could inspire you to create a card with the sentiment as your focus as well and hope you are going to share it with us in our gallery! Have a fabulous day and happy crafting ;o) Yours Maike

Supplies:
Stamps: "Valentine Penguins" by Gerda Steiner Designs
Dies: "Birthday Honey Cuts" by Honey Bee Stamps
         "Sweet Stacks Rectangles Honey Cuts" by Honey Bee Stamps

Sonntag, 15. März 2020

Birthday cake in pastell colours

Hello my crafty friends!
It's the middle of the month so we do have a new challenge for you at Papercraft Challenges ;o) This time our theme for you ist "Pastell Colours" and this is my inspiration card for you:


You (might) know I love rainbows and so when I saw this cake digi stamp by our kind sponsor Dr. Digi I thought it would look wonderful in soft colours. I don't know about you, but I wouldn't mind a cirthday cake like this ;o))) I used Copics to colour the image that I had printed as a watermark version to get very light lines. That simply worked better for me when I thought about a soft look. 


When the image was coloured I chose a patterned paper to match the image and cut it to the size of my card front. I then die cut the frame from it which I have raised with three additional frames in white beneath it. Next I added some Nuvo drops to the card and the sentiment which I had die cut from black paper to make it stand out. For me it didn't look finished only having the black sentiment so I also added the three black stars to tie it all together. Do you like soft colours on a card? I would love for you to try it and share your result in our gallery ;o) Have a wonderful rest of March with lots of sunshine, cake and crafting time! Take care and happy crafting, yours Maike


Supplies:
Stamp: "Cake and Candles" by Dr. Digi 
Dies: "Wonky Scalloped Frames Elle-Ments" by Avery Elle
          "Handlettered Happy Birthday Wafer Die" by Simon Says Stamp

Challenges:


Sonntag, 1. März 2020

Happy Holidays Snowman (circular card)


Hello everyone and happy Sunday! 
I hope you had a lovely weekend! A crafty one maybe? Well I did and this was the result ;o) It is my inspiration card for the "Fun Fold Card" challenge at Challenge Up Your Life. I decided on a round card base paired with the circular sentiment die.


I love that this challenge has made me think outside the box and I am so glad I did. I filled the inside of the sentiment with glitter paper by Lawn fawn and added a stamped piece of paper behind that. All this makes the snowman in the middle really be the star of the show.


I hope you are going to join us for this "Fun Fold" challenge! Have a look at the other DT's cards - they are a fabulous inspiration and I hope they will make your fingers itch to craft ;o) Have a lovely and wonderful week everyone! Take care and happy crafting, yours Maike


Supplies:
Stamps: "Santa's Wonderland" by Neat and Tangled (available at Simon Says Stamp)
              "Background Stamp" by My Favourite Things
Dies: "Stitched Circle Stax" & "Happy Holidays Circle Frame Die" by My Favourite Things

Mittwoch, 15. Januar 2020

Frohe Weihnachten (Bunny in the Snow)

Hello everyone
and welcome to our first Papercraft Challenge of the year. We have decided to run the challenge monthly now to give you even more time to create a project and share your talent with us. The new theme is "Use at Least 2 Designer Papers", which is always a real challenge for me, but also perfect, because (after tidying up my craft room over the Christmas break and realizing just how much paper I really own - way too much let me tell you-) I vowed to start using more patterned paper on my cards and this was my first attempt of that:


Yes, okay, they are very subtle patterns, but a girl has to start somewhere, doesn't she??? ;o) I love this little bunny by Hello Bluebird having fun in the snow. I used the white frame to put a focus on the little scene and also to have enough space between the scene and the pattern if that makes sense... The lovely red die cut which means Christmas in German is by Create a Smile and was just perfect for this card.


I hope you are going to join us for our "Use at Least 2 Designer Papers" challenge and maybe I find new ways to combine papers to be able to use more of the lovely papers I have neatly stashed away in my craft room ;o) Have a lovely week everyone and happy crafting, yours Maike


Supplies:
Stamps: "Skating Party" by Hello Bluebird
              "Yeti for Christmas" by Mama Elephant
Dies: "Weihnachten x3" by Create A Smile (also available in English: "Christmas x3")
Papers: "Sparkle Cardstock Pixie Dust" & "" by Lawn Fawn

Dienstag, 2. Juli 2019

Beary Happy Birthday!


Hello everyone ;o)
I am back with a new card for the "Dies or Punches" challenge over at the Crafty Cardmakers blog: 


For my card I used three different kinds of dies: the panel die, a letter / sentiment die and a letter / banner die. In my head I had pictured something fun and colourful so I started by creating the background paper. I have used Distress Inks in Peacock Feathers and Fozzilized Amber and blended them together to get a kind of ombre background and splattered it with water to get these fun drops in the background.


Once the background was dry I glued it to a card base and added the panel die-cut on top. The bear fit perfectly size- and themewise for what I had in mind, so I took out my Zig markers and coloured it in. 


Once I had the bear adhered I added the sentiment. I always loved the banner letters and thought they would be perfect for this challenge, so I spelled "beary" with it and finished the sentiment with a die-cut "Happy" and a stamped "birthday". I hope you are going to join us for our challenge at the Crafty Cardmakers! Happy crafting, everyone ;o))) Maike

Supplies:
Stamps: "Birthday Bears"  by My Favorite Things (retired it seems)
Dies: "Circle Panel Die" by Your Next Stamp
          "Stitched Banner Alphabet Dies" by My Favorite Things
          "Happy Birthday Wafer Die" by Simon Says Stamp

Challenges:

Montag, 11. März 2019

Big Panda Hugs

Hello everyone!
How are you today? I hope you had a good start to the week and are looking for new crafty challenges. I have one for you if you like the colour "Green" which - incidentally - is the theme of the newest task at the Crafty Cardmakers ;o) This is my inspiration card:


Even though I chose to go with pink letters, my card is mostly green and think that the two colours work really well together. I have tried it with green, black and white letters, but the card ended up looking kind of blahhh, so it had to be pink ;o) 


I hope you are going to join us with a (mostly) "Green" project over at the Crafty Cardmakers gallery ;o) Have a fantastic week and happy crafting! Yours Maike


Material / supplies:
Stempel / stamps: "Happy Panda" (discontinued) & "Watercolor Stripes" von My Favorite Things 
Stanzen / dies: "Big Hugs Die-namics" von My Favorite Things
                         "Wonky Squares Frames"von Avery Elle

Challenges:

Samstag, 31. März 2018

Up in the Air

Hallo ihr Lieben!
"Fahrzeuge" lautet das neue Thema bei Challenge Up Your Life und ich habe mich für einen Heißluftballon entschieden... ;o) Vor Kurzem habe ich gelernt, dass man in so einem Ding fährt, nicht fliegt und das scheint irgendwie hängen geblieben zu sein...

Heya my dear crafty friends!
"Vehicles" is the new task at the Challenge Up Your Life blog and this is my inspration card:


Den Hintergrund habe ich mit dem Cloud Stencil und Worn Lipstick Distress Oxide Ink gemacht und anschließend dieses schöne Rechteck daraus ausgestanzt. Mit derselben Stanze habe ich anschließend auch noch einmal eine Form aus weißem Papier ausgestanzt, so dass ich aus den beiden Teilen eine Kartenbasis herstellen konnte. Als nächstes habe ich den Ballon gestempelt, coloriert und ausgeschnitten... Das war der Moment, an dem ich meinen Fehler bemerkt habe: Durch die Seile gab es zu viel weiße Fläche, was auf dem Hintergrund echt komisch aussah. Also habe ich eine Maske gestempelt und geschnitten und den Hintergrund dann auch über diesen Teil gewischt, um ein durchgehendes Muster hinzubekommen. Würde ich diese Karte noch einmal machen, würde ich sie einfach direkt als 1-Layer-Karte anlegen. Aber weil ich es jetzt nun einmal konnte, habe ich den Ballon mit Abstandshaltern aufgeklebt ;o)

I created a background using the Cloud Stencil and Worn Lipstick Distress Oxide Ink and die cute the piece to a scalloped edge rectangle. Then I die cut the same shape from white paper, so that I could glue both pieces together and use them as my card base. Next I stamped and coloured the balloon and fussy cut it out. That was when I noticed my mistake... There was too much white space to look good, so I had to stamp and cut a mask and use the same ink and stencil again to get a continuous pattern. If I would create this card again I would make it a one layer card - much less complicated but same look ;o) However, because I could now that I had gone through all the steps I decided to use foam tape to adhere the balloon to my card base with some dimension.


Zum Schluss habe ich das Wort "hi" aus schwarzem Cardstock ausgestanzt und neben den Ballon geklebt. Dann habe ich die türkisen Sternchen noch überall verteilt und meine Karte war fertig. Habt ihr Stempel oder Sticker mit Fahrzeugen drauf bei euch im Schrank oder sonst wo liegen? Dann schnappt die euch doch und kreiert ein Werk damit... Vergesst aber nicht, es dann auch in unserer Gallerie zu verlinken :o) Habt ein schönes Osterwochenende und happy crafting, wünscht euch eure Maike ;o)

To finish the card I die cut the word "hi" from black cardstock and glued it next to the balloon. Now all that was left to do was to scatter a few turquoise stars around on the card and my card was done. Do you have stamps or stickers of any type of vehicle in your craft room? How about creating something with it? But don't forget to link your creation to our gallery then ;o) Have a fantastic Easter weekend and happy crafting, yours Maike


Material/ supplies:
Stempel / stamps: "Up and Away" von Purple Onion Designs
Stanzen / dies: "Hello there" von My Favorite Things
Schablone / stencil: "Mini Cloud Stencil" von My Favorite Things

Montag, 12. März 2018

Happy Dance Critters

Halli Hallo ihr Lieben!
Lasst uns das Thema "Grün" für die neue Challenge der Crafty Cardmakers angehen, ja? ;o) Hier ist meine Karte zum Thema:


Heya my dear crafty friends!
Let's "Go Green" for the new Challenge at Crafty Cardmakers, shall we? ;o) This is my take on the theme:


Zuerst habe ich den Hintergrund mit der Nuvo Embellishment Paste in verschiedenen zusammengemischten Farben bestrichen (Citrus Green, Spring Green und einer kleinen Menge Teal) und trocknen lassen. Anschließend habe ich aus dem Papier ein Rechteck und daraus die Fenster ausgestanzt, bevor ich es mit einem der "Next Level" Folder geprägt habe. In Kombination mit der metallisch glänzenden Oberfläche sieht das 3D-Embossing noch mal genialer aus, finde ich ;o)

First I created the background piece with Nuvo Embellishment Paste in Citrus Green, Spring Green and a tiny bit of Teal. I mixed them together until I got the shade of green that I wanted and used a blending tool to get the paste on my paper and then set it aside to dry. Once it was completely dry I die cut a rectangle from the paper and the three windows from the rectangle. Next I used a "Next Level" Folder to emboss the metallic looking piece and really love the effect that gives.


Die Fenster habe ich noch einmal aus Papier in orange ausgestanzt, mit einem Glitzerstift komplett bedeckt und in die äußeren Öffnungen geklebt, damit die Tierchen, die ich mit Copics coloriert und ausgeschnitten hatte, deutlicher zu sehen sind. Für Orange habe ich mich entschieden, weil es die Kontrastfarbe zu Grün ist und die Farben daher sicher gut zusammen passen... Meinen Spruch habe ich dieses Mal geklebt, statt ihn zu stempeln und um das Auge ein wenig zu leiten und den Hintergrund etwas aufzubrechen, habe ich noch die Sternchen aufgeklebt. Fertig war meine Karte. Ich hoffe, sie gefällt euch. Habt auch eine Idee für unsere "Go Green" Challenge? Dann würde ich mich freuen, wenn ihr euer Werk bei den Crafty Cardmakers verlinken würdet. Habt eine tolle Woche und happy crafting wünsche ich euch, eure Maike ;o)

I die cut the windows from some orange paper as well and covered two of them with glitter and adhered them to the apertures on the left and right, so that the colour of the critters, which I had coloured with Copics earlier, would pop even more. I used orange because it is the contrasting colour for / to (?) green. My sentiment is glued on rather than stamped on as usual this time and in order to guide the eyes a little I also added the tiny stars and my card was done. I hope you like it. If you do have an idea for our "Go Green" challenge I would love to see your project in our gallery ;o) Have a wonderful week and happy crafting, yours Maike ;o)


Material / supplies:
Stempel / stamps: "Mini Happy Dance" & "Mini Sticky Note" von Your Next Stamps 
Stanzen / dies: "Stitched Triple Peek-a-Boo Windows" von My Favorite Things
Embossing Folder: "Dotted Next Level Embossing Folder" von We R Memory Keepers
                               --> linked to Simon Says Stamp
Anderes / other: Nuvo Embellishment Paste & Alpha Stickers by Create a Smile

Samstag, 3. Februar 2018

Celebrate - Maaike Uithoven's 2000 follower celebration blog hop


Halli Hallo zusammen!
Vor einer ganzen Weile haben Maaike von "Cards by Maaike" und ich Karten in Collaboration hergestellt. (Klickt hier, für unsere Collaboration.) Vor Kurzem hat sie gefragt, ob ich an einem Blog-Hop teilnehmen würde, der ihre nunmehr fast 2000 Follower auf YouTube feiert und natürlich habe ich zugesagt. Falls ihr ihren Kanal noch nicht kennt, klickt einfach hier ;o)


Heya everyone!
A long while back Maaike of "Cards by Maaike" created a few cards for a collaboration we had - have a look here if you are interested in learning more about it ;o) Not so long ago, she has asked me if I would take part in celebrating her almost 2000 followers on YouTube and of course I said yes. In case you don't know her channel yet, just click here ;o)

https://youtu.be/PEjPkcSAuxg

Die anderen Teilnehmer des Blogs haben alle ebenfalls einen YouTube Kanal und haben anlässlich von Maaikes Meilenstein ein Video für euch aufgenommen. Schon allein dafür lohnt es sich, bei den anderen Craftern vorbeizuschauen, aber es gibt zusätzlich noch bei jedem Stop im Hop etwas zu gewinnen... Unter allen meinen Followern, die hier bis morgen Abend (04.02.2018) einen Kommentar hinterlasse verlose ich einen Preis, den ihr euch selber auswählen dürft: entweder die beiden Karten, die ich für den Hop gebastelt habe oder einen $10 Gutschein für einen Onlinebstelshop eurer Wahl ;o) Nun aber zu meinen Karte:

The other participants all have a YouTube channel as well and made a video for you because of Maaike's milestone. That alone would be worth it to hop over to their channels, don't you think? As an addition you will have the chance to win something at each stop from the hop though... From me you could win either the cards I have created for this hop or a $10 gift certificate to an online craft shop of your choice if you are a follower of my blog and  leave a comment under this post by tomorrow night (04.02.2018). But now, let's take a closer look at the cards:


Zuerst habe ich den Hintergrund mit drei verschiedenen Farben Distress Inks verblendet: Wilted Violet, Seedless Preserves und Picked Raspberry. Danach habe ich sowohl eine kleine Menge Copic Opaque White als auch Perfect Pearls Pulver in dem Farbton Perfect Pearls etwas mit Wasser verdünnt und auf den Hintergrund gesprenkelt ;o) Während der Hintergrund trocknete habe ich  die Elemente für meine Karte gestempelt, coloriert und ausgeschnitten. Dabei habe ich Zig Marker für die Katze und Copics für den kleinen Bären benutzt.

I started by creating a background with three colours of Distress Inks: Wilted Violet, Seedless Preserves and Picked Raspberry. Next I splattered Copic Opaque White over the coloured background as well as some watered done Perfect Pearls powder in the colour Perfect Pearls :o) While that dried I coloured and fussy cut the images for my cards. I used Zig markers for the cat and Copics for the little bear.


Aus dem Hintergrund, den ich auf Kartengröße zurechtgeschnitten hatte, habe ich die Sprechblase mit dem Schriftzug "Celebrate" ausgestanzt. Für die Karte mit dem Bären habe ich das "Original" zu einem Shakerfenster gemacht. Dazu habe ich Folie hinter das Stanzteil geklebt und dann Foamtape am Rand aufgeklebt. Damit die Sterne nicht komplett am Boden liegen, habe ich jeweils einen schmalen Streifen Foamtape von links nach rechts hinter den Zwischenraum der Buchstaben geklebt. Für meine zweite Karte habe ich dann die "Reste" verwendet ;o) In Verbindung mit der Sprechblase in weiß und für den Schatten noch einmal in grau, sieht man ihr gar nicht an, dass sie ein Nebenprodukt ist, oder???

I cut the background piece to size and die cut the "celebrate" speechbubble from it. For the card with the bear, I made a shaker out of the "original" die cut. I glued clear acetate behind the piece and added foam tape around the edge and from left to right where the gaps between the letters are, so that the shaker material wouldn't only be at the bottom. For my second card I used the "scrap pieces" ;o) In combination with the speechbubble dir cut from white and another time from grey paper as a shadow, you wouldn't guess, that it was a by product, or would you?


Damit ihr nun auch Maaike zu ihrem Meilenstein gratulieren und all die anderen Teilnehmer des Hops besuchen könnt, habe ich hier noch mal die Liste aller Stops für euch ;o) Viel Spaß beim Hoppen, happy crafting und bis hoffentlich bald! (Bis Montag vielleicht, um zu sehen, ob du der glückliche Gewinner bist? *grins) Habt ein schönes Wochenende, eure Maike

Below you can find a list of all the people that are taking part in the blog hop so that you could congratulate Maaike to her milestone and watch all the other celebration card videos if you'd like to ;o) Have fun with the hop, happy crafting and I'll hopefully see you soon! (Monday perhaps, to see if you are the lucky winner? *grin) Have a wonderful weekend, yours Maike

Hop along list:
Maaike Uithoven (Congratulations again, Maaike ;o)
Maikreations <-- You are here 


Material / supplies:
Stempel / stamps: "Playful Kitten" von Gerda Steiner Designs
                              "BB Bitty Bears" von My Favorite Things
Stanze / die: "Celebrate Speech Bubble" von My Favorite Things


Dienstag, 4. Juli 2017

Sweet Wishes Cupcakes


Halli Hallo ihr Lieben!
Und da bin ich auch schon wieder mit dem zweiten Post des Tages ;o) Dieses Mal als DT Projekt für die PINspirational Challenges - unten seht ihr das Inspirationsbild:

Heya my dear crafty friends!
I am back once more with a second post today ;o) This time I would like to share my DT project for the PINspirational challenges with you - you can find the inspiration picture below:


Ich wollte mich recht nah an der Vorlage halten und habe darum die Cupcakes und das Holz integriert und die gleichen Farben gewählt, wie im Bild. Wenn ihr genau hinschaut, sehr ihr sogar kleine Blümchen auf dem Hintergrundpapier ;o) Zuerst habe ich die Cupcakes und das süße Häschen gestempelt und coloriert . Dann habe ich den Baumring mit Versamark  auf Vellum gestempelt und weiß embossed. Als alles fertig, trocken bzw. kalt war habe ich die Elemente dann per Hand ausgeschnitten.

I tried to stay very close this time, choosing to use cupcakes and wood in my card and also go with the colour scheme. If you look closely you can even see little flowers on my background paper ;o) I started by stamping and colouring the cupcakes and the cute little bunny with Copic markers. Next I heat embossed the tree rings on vellum and fussy cut all of these elements out.


Das Wort "wishes" habe ich aus einem Stück Papier ausgestanzt, das ich mit den gleichen Farben wie für den Schokokuchen coloriert hatte und dann auch noch den Hintergrund aus dem hübschen Papier ausgestanzt. Es hat einige Zeit gedauert, bis ich den Platz für jedes Teil gefunden habe, aber am Ende war ich dann doch irgendwann zufrieden und hab alles aufgeklebt. Dann habe ich noch das Wort "sweet" aufgestempelt, die Muffinförmchen mit jeder Menge Glitzer überzogen und "Diamond Stickles" auf die kleinen Streusel getupft. Damit war meine Karte fertig.

I die cut the word "wishes" from a piece of paper I had coloured with the same Copics I had used for the chocolate cupcake and also the background panel from some cute patterned paper. I played around with the placement of all the elements, but I finally found an arrangement I liked. After adhering it all down I stamped the word "Sweet" to finish off my sentiment and added lots and lots of glitter to the bottom part of cupcake and also diamond stickles to the little sprinkles on top and my card was done.


Ich hoffe, ihr macht auch bei uns mit und lasst euch von dem Challengebild inspirieren ;o) Unsere freundlichen Sponsoren sind dieses Mal Sherri Baldy und Kitty Bee Design - also gibt es gleich zwei Chancen tolle Digis zu gewinnen! Habt eine wunderbare Woche und bis hoffentlich bald ;o) Eure Maike

I hope you are going to join us with a project as well ;o) Our kind sponsors are Sherri Baldy and Kitty Bee Design - so two chances to win some awesome digi stamps! Have a great week, everyone and hope to see you again soon ;o) Yours Maike

And to all my American Friends: Hope you have an awesome July 4th celebration!

Material / supplies:
Stempel / stamps: "Carnival Cupcakes" von Mama Elephant
                              "Tree Ring" von Concord and 9th
                              "" von
Stanzen / dies: "Scripty Wishes" & "Stitched Rectangles" von Lawn Fawn

Challenges:

Samstag, 10. Juni 2017

Happy Birthday Mosaik

Halli Hallo ihr Lieben!
Heute habe ich eine Karte für euch, die stilmäßig ein wenig anders ist, als sonst - zumindest glaube ich das ;o) Und die Erklärung ist das Thema unserer heute startenden Challenge bei Challenge Up Your Life. Es geht nämlich um "Mosaik". Erst habe ich an alte griechische Wandkunst gedacht, aber nach etwas Recherche habe ich entschiedene, dass scheinbar auch die Gestaltung von Flächen mit wiederkehrenden Mustern und Farben unter ein Mosaik fallen und den farbenfrohen Hintergrund gestaltet, den ihr unten auf der Karte seht:

Heya my dear crafty friends!
Today I have to share a card with you that is a bit different than my usual cards - at least I think so ;o) The explanation is quite simple: the reason is our new challenge at the Challenge Up Your Life blog. The theme this time is "Mosaic". First I thought of old Greek artwork for walls or something like that, but after a bit of research I decided that a repetative pattern using the same shapes and colours would be considered a mosaic and so I created this colourful background you can see on my card below:


Ich habe einen Hintergrundstempel mit einem regelmäßigen Muster ausgewählt und auf ein Stück Aquarellpapier in weiß embosst. Mit Zig Markern in Regenbogenfarben habe ich anschließend die meisten Flächen ausgemalt. Nach dem Trocknen habe ich ein Rechteck aus dem angemalten Hintergrund gestanzt und leicht schräg auf eine taupe-farbene Kartenbasis geklebt. 
Als nächstes habe ich mich um den Spruch gekümmert. Dazu habe ich das Wort "birthday" drei Mal aus dickem, schwarzem Cardstock ausgestanzt und aufeinander geklebt, so dass es nun eher einem Chipboard-Teil ähnelt, als einfach nur Papier. Dann habe ich noch den Anfang des Spruchs "Happy" auf ebenfalls schwarzen Cardstock mit Versamark gestempelt und weiß embosst. Mit einem Bastelmesser habe ich ein möglichst kleines Recheck ausgeschnitten und zusammen mit dem "birthday"-Stanzteil direkt auf den bunten Hintergrund geklebt.

I used a background stamp, heat embossed the pattern in white on some watercolour paper and used Zig markers to colour most of the arrow-shapes in. After that had dried I die cut a rectangle from it and glued it to a taupe coloured card base at a slight angle.
Next I worked on my sentiment. I die cut the word birthday three times from black cardstock and glued the pieces together to get a more chipboard like look. Next I stamped the word "Happy" on black cardstock and white heat embossed it. With a craft knife I cut it to the smallest rectangle shape possible and glued it - directly to the background.


Anschließend habe ich ein paar der niedlichen "Little Cat Agenda" Katzen von Mama Elephant auf Aquarellpapier gestempelt und mit Zigs coloriert. Für die Katzen habe ich eher neutrale Katzentöne benutzt, für ihre Accessoires dann aber die gleichen Farben wie die, die ich für den Hintergrund bereits ausgesucht hatte. Ich hoffe euch gefällt meine Karte mit dem Mosaikhintergrund und ich konnte euch inspirieren bei unserer neusten Challenge mitzuspielen. Habt ein wunderbares Wochenende und happy crafting ;o)

After adding the word die cut as well I stamped and coloured a few of the cute "Little Cat Agenda" cats from Mama Elephant. I used neutral colours for the cats but used the same colours I had for the background for their accessories. After they had dried I cut cut them out and glue them to the card as well. I hope you like my card with the mosaic background and that I could inspire you to join our challenge at CUYL. Have a great weekend and happy crafting, everyone ;o)))

Material / supplies:
Stempel / stamps: "Little Cat Agenda" von Mama Elephant
                              "Chevron Grid Background" von My Favorite Things
Stanzen /dies: "" von Memory Box
                       (retired it seems, but there are lots of great alternatives out there I think)

Challenges:

Dienstag, 6. Dezember 2016

Christmas Series Card #17 / Weihnachtsserie Karte #17 (Girl with gift)

Halli Hallo ihr Lieben!
Ich hoffe, ihr alle hattet einen schönen zweiten Advent! Ich habe ihn genutzt, um Plätzchen für meine Kollegen zu backen und natürlich Karten zu basteln ;o)

Heya my dear crafty friends!
I hope you all had a wonderful weekend! I made the best of it and baked some cookies for my collegues as well as make some cards ;o)


Inspiriert von dem aktuellen Pinspirational Bild habe ich eine Weihnachtskarte, die ich im Sommer gewerkelt habe, hervorgeholt und mich selbst gecased... Oft steht man doch vor dem Problem, dass man nicht genau weiß, was man machen möchte und da habe ich mich an ein Video von Jennifer McGuire erinnert. Darin erwähnt sie, dass sie sich oft ihre alten Karten anschaut und diese als Inspiration nimmt, weil sie ja ihren Stil haben und das reflektieren, was sie an Karten mag. Die Karte mit dem Tannenbaum (klick) hat mir von Anfang an total gut gefallen und ich finde, mit dem Mädchen und dem Geschenk passt das Layout auch sehr gut. Was meint ihr?

Inspired by the newest PINspirational picture I took out a Christmas card I made way back in the summer and cased myself... Often I find myself stuck for ideas and I remembered something Jennifer McGuire said in one of her videos. She mentioned that she would look at her old card and use them as inspiration, because they reflect her style and what she loves. I loved the card with the Christmas tree (click) from the very beginning and I thought the layout would work well with a girl and her gifts. What do you think?


Eine genaue Beschreibung, wie ich die Karte gemacht habe, findet ihr in meinem Post vom Juli :o) Ich habe neben dem Mädchen noch Rudolf und Santa über den Schriftzug gestellt und zusammen haben sie ein wunderbares Set ergeben. Leider sind die Karten schon auf einer langen Reise und ich hatte versäumt sie vorher zu fotografieren... Vielleicht habt ihr aber ja Lust bekommen ein ähnliches Set zu basteln?!

A complete description on how I made the card can be found in my July post ;o) Apart from the girl and the tree I have also placed Rudolph and Santa on top of the sentiment and they made a great set. Unfortunately they have already started their journey and I have forgotten to take a picture first before sending them off... Well, maybe you feel inspired to make a set yourself now?!


Material / supplies:
Stempel / stamps: "Jingle all the Way" von My Favorite Things
                              "Winter Gifts" von Lawn Fawn
                              "Lots of Stars" von Simon Says Stamp
Stanzen / dies: "Merry Script" von Mama Elephant
                         "Wonky Stitches" von Avery Elle
Coloration: Copics


Challenges:
Simon Says Wednesday Challenge "Anything Goes"
Addicted to Stamps "Christmas"
AAA Cards "Christmas"
Paper Creator's Challenge "Christmas"
Dies R Us Challenge "Christmas"
Creatalicious Challenge "Anything goes / optional Christmas Colours"
Christmas Card Challenge "Christmas / optional Candycane"

Samstag, 12. November 2016

Christmas Series Card #9 / Weihnachtsserie Karte #9 ( Be jolly with Elwood)

Halli Hallo ihr Lieben!
Heute habe ich eine Karte mit süßen Motiven von Purple Onion Designs für euch. Passend zum Thema der neuen Challenge "Santa's Helpers" bei CUYL habe ich Elwood als Hauptfigur ausgesucht. Ich finde, er macht sich wirklich gut so als Weihnachtsmannunterstützung ;o) Natürlich ist auch dieses Mal das "Winter Big Scripty Words" Stanzenset von Lawn Fawn wieder mit dabei:

Hello my dear crafty friends!
Today I have a card for you showcasing some cute stamps by Purple Onion Designs. To fit the theme of the newest challenge "Santa's Helpers" over at the CUYL blog, I chose Elwood to be the star of the show and I think he is an adorable little helper ;o) The die set "Winter Big Scripty Words" by Lawn Fawn also makes another appearance:


Als erstes habe ich den Elf und die Hintergrundszene gestempelt und dann mit Distress Inks coloriert. Ich liebe ja den soften Look, den Simone aka Stempelqueen immer so zaubert und habe mir diesen auch als Vorbild genommen, aber ich wage einmal zu behaupten, dass ich noch ein paar Stunden (Wochen, Monate,...) Übung brauche, um in die Nähe zu kommen... Ich bin da einfach nicht geduldig genug für, glaube ich! Naja, ich mag trotzdem, was am Ende dabei herausgekommen ist, ansonsten hätten die beiden ja auch nicht ihren Weg auf die Karte gefunden ;o)

I started by stamping the elf and the background scene and coloured both with Distress Inks. I love the soft colouring by Simone aka Stempelqueen and was aiming for a similar look, but I'd say I will have to put in some practice hours, to even get close. Still I like how it turned out and so both pieces found their way onto my card ;o)


Aus einem Rechteck mit falscher Naht habe ich ein Fenster ausgestanzt und einen roten Rahmen um die Öffnung geklebt. Als nächstes habe ich Elwood auf einen weißen Schatten gestellt und ihn auf das Papier geklebt. Damit der Hut später nicht abgeknickt habe ich zwei Lagen Abstandskleber dahinter geklebt. Zum Schluss habe ich dann alles zusammengeklebt und noch durch einen ausgestanzten Spruch und Sterne in rot ergänzt. Die habe ich großzügig beglittert, weil auf einer Weihnachtskarte Glitter ja nie schaden kann, oder? Ich hoffe, ihr habt ein schönes Wochenende, bleibt gesund und viel Spaß beim Basteln wünscht euch eure
Maike

I die cut a window from a stitched rectangle and glued a red frame around the opening. Next I placed Elwood on a white drop shadow and glued him to the panel. I placed two layers of foam tape behind his hat, so that it would have the right height. To finish the card I die cut the sentiment and some stars from the same red cardstock as the frame and covered them in glitter before gluing them down. Have a great weekend everyone, stay healthy and happy crafting, yours
Maike


Material / supplies:
Stempel / stamps: "Elwood" und "Treehouse" von Purple Onion Designs
                         "LJD Peek-A-Boo Circle Windows" von My Favorite Things
                         "Mini Stars" von Simon Says Stamps

Challenges:

Mittwoch, 9. November 2016

Christmas Series Card #8 / Weihnachtsserie Karte #8 (Be merry background)

Halli Hallo ihr Lieben!
Heute zeige ich euch, wie ich mit Hilfe der "Big Scripty Words" Stanze von Lawn Fawn einen schnellen Hintergrund gebastelt habe. 

Heya my dear crafty friends!
Today I would love to share with you how I have used the "Big Scripty Words" die by Lawn Fawn to create a quick background.


Als erstes habe ich "Stick it" (ein sehr, sehr dünnes doppelseitiges Klebeband) hinter ein weißes Stück Papier geklebt und daraus etwa 10 Mal den Spruch "be merry" ausgestanzt. Die fertigen Stanzteile habe ich anschließend diagonal auf ein rotes Designpapier geklebt, wobei ich nach zwei Reihen von oben eine Reihe frei gelassen habe und daraus dann ein Rechteck mit Wellenrand ausgestanzt.

I started by putting some "Stick it" (a very, very thin double sided adhesive) behind a piece of white cardstock and die cut the words "be merry" from it about 10 times. I glued them in a diagonal fashion on a piece of red patterned paper, though I left the third row blank and die cut a scalloped rectangle from it.


Aus Transparentpapier habe ich ein kleineres Rechteck ausgestanzt, es aufgelegt und ein weiteres "be merry" aufgeklebt. Natürlich dort hin, wo ich zuvor die Lücke gelassen hatte ;o) Jetzt konnte ich auf der Rückseite Flüssigkleber auftragen und das Transparent "unsichtbar" auf dem selbstgemachten Hintergrundpapier befestigen. Ich habe noch zwei weitere weiße 
Stanzteile und zum Schluss eines aus Glitzerpapier darübergeklebt. Dadurch bekommt der Spruch beinahe einen Chipboardcharakter. 

Next I die cut a small stitched rectangle from vellum, laid it in place and glued another "be happy" in the place where there was none on the background paper. Now I could turn the vellum over, put some liquid adhesive behind the words and glued it in place. That way the adhesive cannot be seen from through the vellum. Afterwards I added two more white "be merry" die cuts on top and also added a glittery one. The many layers give the sentiment a chipboard like look which I really like.


Zum Schluss habe ich die Stars der Show "Lasse und Peer" hinzugefügt, die ich auf Bristol Smooth Papier von Strathmore gestempelt, mit Zigs coloriert und dann ausgeschnitten hatte.

In the end I added the stars of this card "Lasse and Peer" which I had stamped on some Strathmore Bristol Smooth paper, coloured with Zig markers and fussy cut out.

Material / supplies:
Stempel / stamps: "Lasse & Peer" von Klartext
Stanzen / dies: "Winter Big Scripty Words" von Lawn Fawn
                         "All Prettied Up" von Mama Elephant

Challenges:
Related Posts Plugin for WordPress, Blogger...