Posts mit dem Label Birthday werden angezeigt. Alle Posts anzeigen

Mittwoch, 18. September 2024

Walk in the fall (Lavender & Thyme)

Hello everyone,
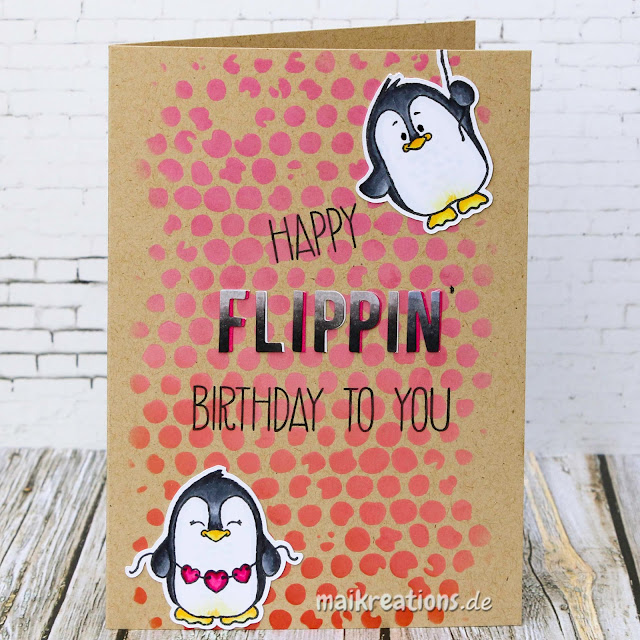
today I would like to share my card for the newest challenge over at Papercraft Challenges with you! The theme for this month is "Fabulous Fall" and here is what I came up with:


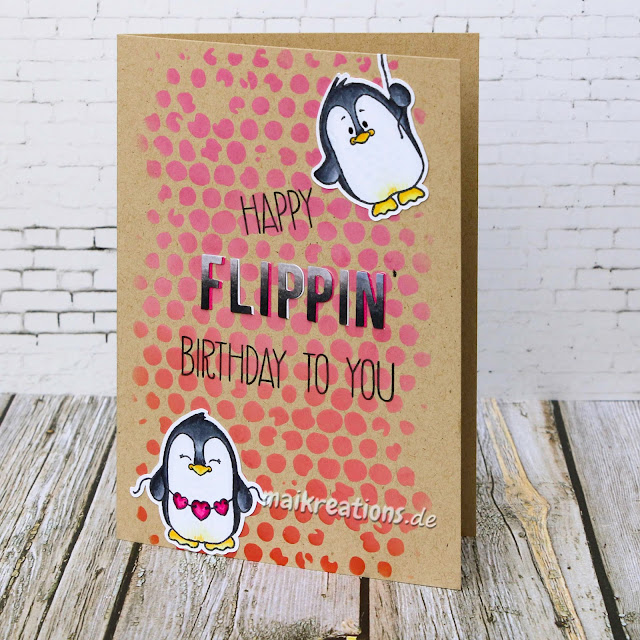
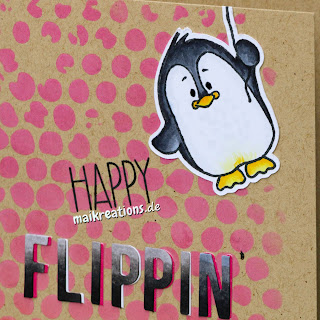
The stamps are from Purple Onion Designs from their designer Stacey Yacula which I am a huge fan of. I just love the cute critters she always comes up with. The two critters are from her "Merriest City" collection but even though they were intended to go on Christmas cards I think the fit perfectly in this little wood with their jackets and the hat. 


For this card I focused on my Copic colouring. I wanted the colours to represent fall and think I nailed it. What do you think? I took ages but I thoroughly enjoyed the process. I glued the background piece flat to the card base and added foam tape behind the critters to give them some dimension. 
I hope you are going to join us with your own "Fabulous Fall" project! Until next time, happy crafting and all the very best to you my crafty friend!!! Yours Maike ;o)


Supplies:
Stamps: "Lavender & Thyme" by Purple Onion Designs
              "Woodland Background" by Purple Onion Designs

Challenges:
Simon Says Wednesday Challenge "Make Your Own Background" (Hope colouring it in counts...)


Samstag, 15. Juni 2024

Have a dino-mite birthday

Hello everyone!
I'd like to share with you my newest creation. It was made for the new theme "For the Boys" over at Papercraft Challenges:


Our kind sponsor Dr Digi provided us with sum fun images and I chose the dino, because there are some birthdays for little boys coming up and for this the cute image is perfect I think. I created a background fpr the dino using a leaves-stencil and also coloured a piece of scrap paper with the same colours I used for the dino to cut the word "birthday" from.


Next step was to assemble everything on an orange-yellowish cardbase to fit with the beak and the bone plates. As a finishing touch I added Nuvo drops in two different colours. If you looks closely you'll see that each drop has a lighter dot in the middle which turned out really great in real life but gets lost a little in the pictures. Next time I want to try creating a rainbow dot that way...


I hope you are going to join us with a creation "For the Boys" and I keep my fingers crossed for you to win the 2 digis by our sponsor Dr. Digi!

Until next time have a fantastic months and happy crafting to you ;o))


Supplies:
Digi stamp: "Stacey the Stegosaurus" by Dr. Digi 
Stamps: "You rock" by Clearly Besotted (discontinued)
Stencil: "Leafy" by Create a Smile
Die: "Birthday" by Create a Smile

Mittwoch, 15. Mai 2024

Flower Power Card

Hello everyone!
I hope you are all doing well. Today I'd like to share a card I made for the current "Flower Power" challenge over at Papercraft Challenges.


There was a lot of masking going on with this card but I really enjoy the layered look without too much bulk. Also, because the layering took some time, I used the provided inside-stamp of the petals to stamp rather than colour them in. It gives a different look and I am not sure I would use it all the time, but with this design I think it worked.


I hope you are going to join us and share your flower project in our gallery. Have a fabulous day and happy crafting my friends!!!
Maike


Supplies:

Stamps: "A Bunch Stamp Set" Waffle Flower (discontinued)

               "Happy Birthday Background" My Favorite Things

Donnerstag, 15. Februar 2024

I see..... soooo many candles ;o))))

Hello everyone,
today I'd like to show you my newest DT card for the Papercraft Challenges blog. The theme this time is "Carneval":


I do not have much use for a carnival themed card, but I have seen so many fortune tellers in this years Rosenmontagsumzug that I thought this would make a great card for the theme. Inside the sentiment goes like this:


I hope you like the card and also that you will join us over at Papercraft Challenges. One lucky crafter will win a prize from Dr. Digistamps who kindly sponsores this month' challenge!
Happy crafting everyone ;o)


Mittwoch, 15. November 2023

30th Birthday (rainbow colours and cats)

Hello everyone!
Today marks the day of the 100th challenge over at Papercraft Challenges, so the theme had to be "Happy Birthday"! I used the opportunity to create a card for a collegue's 30th birthday:


I love all the colour(s) and the vibrancy of this card. My cardbase was covered with this beautiful rainbow coloured paper and I created a tag with a blue sky (I splattered some drops on for more interest) and a grassy hill scene on it so that the cats would have a place to stand. 


I adhered the tag using foam tape and also added a lot of white glue dots across the card going from the top left to the bottom right to add more interest and to help guide the eye. I hope you like the card and that you consider joining us in our birthday celebrations. If you enter you might win a mystery prize, so what`s there to wait? ;o) Have an amazing day and all the very best, Maike


Supplies:
Stamps: Avery Elle (discontinued it seems)
Paper: "Really Rainbow Petite Paper Pack" by Lawn Fawn

Donnerstag, 15. Juni 2023

Girl with saxophone (Happy happy birthday)

Hello and welcome to today's post ;o)
I would like to share my newest card with you which I have created for the new challenge over at Papercraft Challenges. It will be all about girls for the next four weeks and with this image by our kind sponsor Dr. Digi I have created this birthday card:


I really enjoyed colouring this cute girl with her puffy cheeks and after I had coloured her with Copic markers I fussy cut her out. in the stamp there is a dog standing next to her, but I only wanted this part of the image for what I had in mind. Next I prepared the cardbase and stamped a musical note stamp in all the colours of the rainbow because of the piece of background paper I wanted to place the gitl image on. 


The colourful background was created with alcohol inks and some felt pieces on my ink blending tool. It was quite a mess but loads of fun to create ;o) Lastly I added the sentinemt word strips I had heat embossed on black cardstock. I used black to get a really heavy contrast going and I really like the end result. I hope you like it, too and that you will share your "Girls" projects with us over at Papercraft Challenges! Don't forget, you could be the lucky winner and win 2 digis by our sponsor Dr. Digis!!! Have a fabulous day and happy crafting ;o) Yours Maike


Supplies:
Yupo paper by Ranger
Stamps: "Mood music" by Dr. Digi 

Samstag, 15. April 2023

Sending Smiles

 Heya everyone ;o)

Today I would like my "Spring" card for Papercraft Challenges. This time we have a wonderful new sponsor and you could be the winner of 2 digital stamps from Mirtillamente. If you like the fun "flower" on my card you should definately go and have a look ;o)


I printed the stamp on Copic friendly paper and coloured it with Copics, creating a little hill scene in the background. Once the ink had dried I die cut the scene and added the sentiment with white embossing powder. To finish the card I added a fairy from "The Greeting Farm" which made a perfect pair with this adorable flower house.


I also stamped another fairy and the sentiment "Have a fairy nice day", but I didn't catch it on camera yet. We would love to see your "Spring" inspired creations in our gallery. Until then have a fabulous day and happy crafting ;o)


Stamps: "Fairy Tale" Flower House Number 2" Mirtillamente

               "Little Fairies" The Greeting Farm

Dies: "Small Stitched Rectangle Stackables" Lawn Fawn


Samstag, 1. April 2023

Its your day - go wild!

Heya my lovely crafty friends,
I hope you are all doing well! Today I'd like to share my newest make for the "Sweet Animals" challenge for Challenge Up Your Life with you:


First I die cut this wonderful background die and gave the little segments some colour using Distress Inks. I love this fun, bright backdrop.


Next I added the sweet animals. I chose the cute "Word Buddies" by Hello Bluebird and added some extra butterflies from another set called "Next Door Gnomes".


I hope you like the card and that you will take out some of your sweet animal stamps to play with and later share it in our gallery. Have a fabulous day and happy crafting:-)
Yours Maike

Supplies:
mentioned in the text, will add the links asap


Donnerstag, 2. März 2023

Alles Gute zum Geburtstag (Monochrom)

Heya my dear crafty friends,
I am a day late again, but again, I hope you'll forgive me, since I have been feeling poorly for the last few days. However, I would still love to share my make for the newest Challenge Up Your Life challenge with you. The theme is "Monochrome" and this is what I came up with:


I love this cute image and it was perfect for this challenge, because the animal itself only needed black and white to look good and so I could give it a lovely pink sweater and pair it with a light pink background.


The pink letters were coloured with Copic markers and the rest was stamped in jet black ink. I'll admit I added a little bit of colour with this heart I placed in the hand of my critter, but as it is so tiny and kind of neutral coloured I think I'll get away with it or what do you think? 


I hope you are going to join us in this month' challenge. We would love to see what you come up with! Thanks for stopping by and happy crafting to you! Yours Maike

Supplies: tba


Sonntag, 15. Januar 2023

Super fun birthday (snowfight)

Hello everyone ;o)

It is the middle of the month and therefore I'd like to invite you to have a look at our newest challenge at Papercraft Challenges. The theme this time is "Anything Goes" so you can share with us your favourite project - no matter what theme it is. I decided to create a wintery birthday card and here it is:


I made the background using Distress Inks and a stencil I cut from thick cardstock in a curvy shape to create the illusion of hills in the background. The images are from My Favourite Things and I love that you can use some of the set for Christmas cards as well as wintery themed ones. Once the background was dry and I knew which images would go where I heat embossed the sentiment which always looks really nice I think ;o)


Colouring the images was really a lot of fun and quicker than I first thought. I added a few trees and snowflakes to the back to make it look more interesting and also put glitter on the snow and the snowballs. To finish the card I stamped loads of snowballs and the girl inside the card in a light blue shade, hoping this will surprise the recipient. 


It would be lovely having you join our challenge this time! Have a fabulous day and happy crafting, yours Maike

Stamps: "Snow much fun" by My Favourite Things
Dies: "Wonky Rectangle Die" by Avery Elle
         "Mini Snowflakes" by Lawn Fawn 

Dienstag, 15. November 2022

Polka Dot Birthday Party

Hello my dear crafty friends!
Today I'd like to show you the card I made as an inspiration for the "Polka Dot" challenge over at Papercraft Challenges.


I created it for a young lady who turned 16 not too long ago. It was once mentioned, that she enjoys having her name on cards and such, because it is a rather unusual name and you can't easily buy individualised mugs or key chains for her. So I make an effort to add her name to the cards I make, because that is one wish I can fulfill for her. 


I used polka dots as the "wallpaper" and as decoration at the sides and for an envelope I created that was adhered to the back. The decorations and the cute critters are all, except for the tiny mouse, from one set by My Favorite Things which I totally adore and which is, in my opinion, perfect for birthday cards. 


The base for my box card was created without any dies. I just cut two pieces of cardstock to the same size and scored at 0,5 inches and 1,5 inches each. Than I chose one of the pieces to die cut the window from and added two "floor boards". For this I die cut two strips of paper that was 1 inch longer than my card is wide and scored each side at 0,5 inches and glued them to the sides, as you can see a bit better in this picture:


I hope you are going to join us with at Papercraft Challenges, I'd love to see you using polka dot patterns ;o) Have a wonderful day and happy crafting, Maike

Supplies:
Stamps: "SY Sending Sweet Celebration Wishes" by My Favorite Things

Samstag, 1. Oktober 2022

Have a relaxing day (Upcycling)

Hello everyone ;o)
I hope you are all doing well! Today I'd like to share my project for the newest Challenge up your life challenge with you. The theme is "Upcycling" and I have used a brochure that I recently got at a health day in school. I liked the cover right away and thought it would be perfect as a birthday card. So here is what I made from it:


With one of my basic rectangle dies by Lawn Fawn I die cut the part I like best and also a decorative frame from red cardstock which I also used as the inner part of the letters I used for the sentiment. The rest was just a tiny bit of stamping and adhering the different layers together. I hope you like my idea of turning beautiful covers or pictures into cards. If you like the idea of upcycling you should definately visit the blog of my design team friends and get some inspiration from there as well!


Supplies:
Stamps: "Have a sweet birthday" by Lawn Fawn
Dies "Small Stitched Rectangle Dies" & "Scalloped Frame"
         by Lawn Fawn
         "Cool Cuts Cherry Lower Case" by Create A Smile


Donnerstag, 1. September 2022

Happy Birthday (Sweet Celebrations)

Hello everyone!
Today is the start of the 150th challenge at the Challenge Up Your Life blog and we would like to celebrate this anniversary with all of you. So it might not surprise you, that "Anniversary" is our new theme. I chose a birthday theme, because those are the cards I always need the most of:


I stamped the sentiment in different colours and added the starry background with a stencil to give it more of a fun and festive look and glued the panel to a rainbow coloured background. Next I added the adorable critters and my card was done. Most of the time creating it went into the colouring, but it was a lot of fun!


I hope you are going to join our 150th challenge and share your talent with us! Take care my friends and happy crafting! Yours Maike


Stamps: "Sending Sweet Celebration Wishes"  & "Happy Birthday Blend" by My Favorite Things

Samstag, 2. Juli 2022

Happy tropical birthday

Hello everyone ;o)
I hope you are well and happy! It is summer and so we felt a "Tropical" theme would be perfect for our newest challenge at Challenge up your life! I chose to create a card right out of a tropical jungle and here it is:


I used a stencil to create the background and had these wonderful leave dies which I backed with black, so that they wouldn't get visually lost on the busy background.


I love the combination of pink and green, don't you? It looks so fresh and summery... I hope you are going to join us for our "Tropical" theme and because it is summer we will take a short break and will be back with a new theme in September - which means that you'll have two month to join the fun ;o))) Hope you'll have a lovely summer time and happy crafting everyone ;o))) Yours Maike


Supplies:
Stanps: "Loveable Leopards" by My Favorite Things (retired)
             "Flirty Frames" by Lawn Fawn


Sonntag, 15. Mai 2022

Mermaid birthday card with lots of bling

Hello everyone ;o)
Today I'd like to share a new card for the Papercraft Challenges with you. The theme is "Add Bling" and that I did with this one:

You cannot see it too much on this first photo, but I have used shimmering blue cardstock as my background and added two layers of pearlescent vellum to emphasize the water idea. I also added some glitter glue to the edge of the vellum. In order to be able to add even more bling to my card I chose this adorable mermaid image and added glitter glue to all her pearls and some "Wink of Stella" to her mermaid's tail. 

I didn't want her to have to swim alone so I added the fish, shells and the cute sea horse. (Which, by the way, got glittered up as well....) I hope you like all the bling on my card and I also hope that you are going to join us for this challenge. Have a sunny Sunday and a fabulous week! Happy crafting, everyone ;o) Yours Maike


Supplies:
Stamps: "Under the Sea" by C.C. Designs (unfortunately it is retired)
Dies: "All Prettied Up" by Mama Elephant

Challenges:

Mittwoch, 1. Dezember 2021

Happy Flipping Birthday (penguins)

Hello everyone,
I hope you are all happy and doing well. For some reason time always flies around this time of year, so I have to admit it flew by a little and I completely forgot to post this card for Papercraft Challenges. My apologies for those of you who wanted to take a closer look!!!

The card was made for the "Color on Kraft" challenge and I love the effect just of this stencil on the darker paper. It looks great I think:


I used Distress Oxide Inks in three different shades of pink and red and just added those lovely penguins to the front above and below the sentiment.


I hope you still got time to play along with our challenge this month! Our generous sponsor is Gerda Steiner Designs and you might just be the lucky winner and get a gift certificate to their store. Who knows? ;o) Have a lovely day and happy crafting my friends!

                                                    Yours Maike

Supplies:
tba

Freitag, 12. November 2021

Interactive card - camera and hedgehog

Hello everyone,
I am here with an interactive card today as inspiration for the newest challenge at Challenge Up Your Life


I have used the "Magic Iris Camera Add On" to create this card for a lovely person who loves photography and all things outdoor. 


There are many videos out there explaining how to assemble this wonderful die so I won't bore you with it, but I really like the decorated fronts for this "Camera Add On" and thought I would share some tipps and tricks in this regard. The grassy hill in the opening area of the camera gave me a hard time at first. I wanted everything to line up perfectly, but didn't want to glue anything in the circular opening area, if you know what I mean. So I figured a way out in the end: I decided to die cut the grassy part and then use the camera die to die cut it again, so it would match completely - stitches and all. That left me with a tiny piece of grass. So I glued some thin white paper behind the scrap piece of grass that was large enough that it could be adhered beneath the rest of the grassy front. That way the iris could still open and close. 


I hope you are going to join us with an interactice project of your own. They are always so much fun, don't you think so, too? Have a wonderful day and happy crafting everyone ;o))) Yours Maike

Supplies:
Stamps: "Happy Hedgehogs" by My Favorite Things
Dies: "Magic Iris" & "Magic Iris Camera Add On" & "Small Stitched Leaves"
          by Lawn Fawn


Related Posts Plugin for WordPress, Blogger...