Dienstag, 27. Dezember 2016

Winner of my Christmas Series Giveaway / Gewinnerin meiner Weihnachtsserien-Verlosung ;o)

Hallo Ihr Lieben!
Ich hoffe, ihr hattet ein wunderbares Weihnachtsfest mit euren Lieben! Hier seht ihr noch einmal eine Sammlung der 25 Weihnachtskarten und -projekte, die ich hier auf dem Blog und auf Instagram in den letzten 2 Monaten geteilt habe. Hattet ihr eine Lieblingskarte? 

Heya my dear crafty friends!
I hope you had a lovely Christmas with your loved ones! Here you can see a compilation of the 25 Christmas cards and projects that I have shared here on the blog and on Instagram over the last 2 month. Did you have a favorite project?
Auf dem folgenden Foto seht ihr den Namen der Gewinnerin eines 25 Euro Gutscheines zu einem Onlinegeschäft ihrer Wahl:

On the following picture you can find the name of the winner of a $25 gift certificate of her choice:


Herzlichen Glückwunsch, liebe Stempelfrida ;o)))
Ich hab mich über Deine zahlreichen Kommentare sehr gefreut und bin schon gespannt, für welchen Laden Du Dir einen Gutschein wünschen wirst ;o) Fühl Dich gedrückt und ich würde sagen, wir hören uns ganz bald, ja???

Und auch an alle, die jetzt leider nicht gewonnen haben: Ich habe jeden einzelnen Kommentar gelesen und mich so sehr über eure lieben Worte gefreut! Vielen, vielen Dank für eure Unterstützung und euer Interesse an meinen Bastelwerken!


Congratulations dear Stempelfrida ;o)))

And to everyone who didn't win: I read all your comments and your kind and lovely words never failed to make my day a little brighter! Thank you so, so much for your support and your interest in my crafty projects!

Sonntag, 25. Dezember 2016

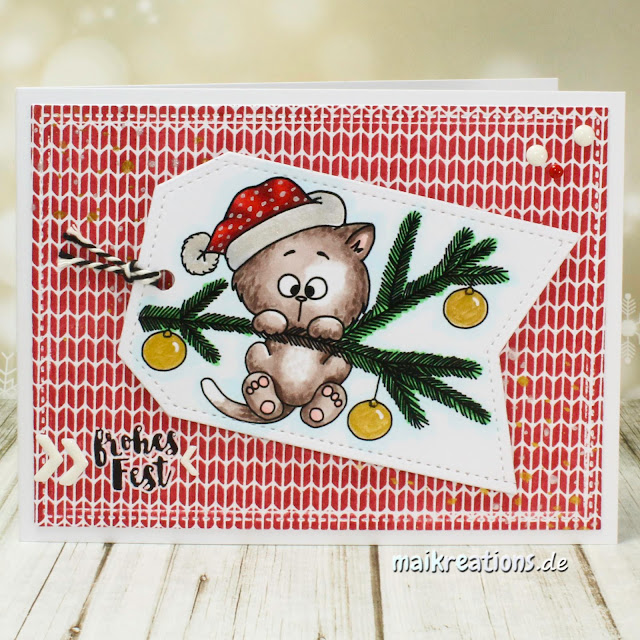
Christmas Card Series #25 Bonus Day / Weihnachtsserie Bonus-Karte #25 (Merry cat)

Halli Hallo ihr Lieben!
Heute schneie ich noch einmal kurz rein, um euch die Bonuskarte zu zeigen, vor allem für all diejenigen, die erst heute Weihnachten einläuten. 

Heya my dear friends!
Today I am just quickly saying hi and to share one last Christmas card with you, for alll those who are celebrating Christmas today.


Viele von euch haben sicher schon bemerkt, dass ich ein absouter Katzenfan bin, mit 2 roten Katern als zusätzlichen Mitbewohnern und in dieses verschreckte Kätzchen hab ich mich sofort verliebt ;o) Momentan ist es noch zu einem reduzierten Preis im Bundle von Gerda Steiner zu erhalten, falls ihr die Miez auch so niedlich findet. Mit zum Bundle gehören noch ein Pinguin und zwei valentinstagorientierte Motive ;o)

Many of you might have noticed, that I am a cat lover (having two cats as room mates as well) and I instantly fell in love with this cutie hanging from the tree ;o) At the moment it is available at a reduced price as part of Gerda Steiner's December January bundle. The other three images are more wintery and two could be used for Valentine's cards ;o)


Für den Mützenrand, den Bommel und die Weihnachtskugels habe ich Finetec Wasserfarben benutzt. Ich liebe diesen Schimmer, den man mit diesen Farben bekommt - es sieht echt toll aus, wenn sie im Licht aufleuchten ;o) Alles andere habe ich mit Copics coloriert.

I have used Finetec Watercolours to colour in the rim of the hat as well as the baubles and used Copics for the rest. Love how this pictures shows all the shimmer and shine you get with these watercolours ;o)


Merry Christmas & Happy Holidays to all of you ;o)

Material / supplies:
Stempel / stamps: "December / January Bundle" von Gerda Steiner Designs
                              "Fröhliche Weihnachtszeit" von Klartext
Stanzen / dies: "Tags-a-Lot" von Mama Elephant
                         "Stitched Rectangles" von Lawn Fawn

Challenges:


Samstag, 24. Dezember 2016

Christmas Series Card #24 / Weihnachtsserie Karte #24 (Frohe Weihnachten)

Frohe Weihnachten!
Ich wünsche euch von Herzen ein wunderschönes Weihnachtsfest im Kreise eurer Lieben, eine besinnliche, freudige, aufregende, entspannende, fröhliche Zeit und alles Liebe! Als ich im August (!) meine ersten Weihnachtskarten geplant habe, war der heutige Tag gedanklich noch sehr weit weg, aber heute ist es soweit und ich zeige euch die letzte Karte meiner zweiten Weihnachtsserie... Ein letztes Mal möchte ich euch daher an mein Gewinnspiel erinnern, bei dem es einen Gutschein über 25 Dollar für einen Bastelshop eurer Wahl zu ergattern gibt. Bis zum 26.12.16 könnt ihr noch teilnehmen - den glücklichen Gewinner ziehe ich dann am Tag darauf ;o) (Hier könnt ihr noch einmal nachlesen, wie ihr am Gewinnspiel teilnehmen könnt.) Nun aber zu meiner Karte:

Merry Christmas, everyone!
I would like to wish you a wonderful Christmas amongst those near to your heart, a quiet, happy, relaxing, exciting merry time together and all the very best! When I started planning for my first Christmas cards back in August (!) Christmas seemed so very far away, but today is the day I am showing you the last card of my second Christmas series... One last time I would like to remind you, that I have a giveaway for a $25 gift certificate to a crafty online store of your choice. You can still participate until the 26th of December 2016 - I will announce the winner on the following day. (You can find all the information about the giveaway here.) But now, lets have a look at the card:


Um die schöne Struktur auf dem grünen Papier zu erhalten, habe ich einen Embossingfolder benutzt und dann hab ich alle Beeren rot übergetupft. Als nächstes habe ich die süßen Motive von Purple Onion Designs plus einen Ilix gestempelt. Coloriert habe ich mit Distress Inks. Nachdem alle Motive trocken waren, habe ich sie ausgeschnitten.

I used an embossing folder to create a nice texture on the green panel I had die cut previously and coloured all the berries red. Next I stamped the cute images by Purple Onion Designs and a holly berry from a Lawn Fawn set. I used Distress Inks to colour them in and after they dried I fussy cut them out.


Anschließend habe ich einen Kreis aus rotem Cardstock ausgestanzt und den Spruch mit Versamark aufgestempelt. Dann weißes Embossingpulver drübergestreut und mich wie immer gefreut, als die Heat Gun ihr Wunderwerk vollbrachte ;o) Nun musste ich nur noch alles an die richtige Stelle kleben (hinter den Kreis und die Köpfe der Tiere habe ich Foamtape geklebt, um mehr Tiefe zu haben) und die Ecken mit dem Corner Chomper abrunden.

Next I die cut a circle from red cardstock, stamped the sentiment and Versamark and white heat embossed it. I don't know about you, but even though I have seen the process happening at leat a hundred times by now, it still amazes me when it goes from powder to a nice smooth finish ;o) All that was left to do now was to assemble everything on the cardbase (I used foam tape behind the circle piece and behind the critters heads to give them the same hight) and to round the top corners with my corner chomper.


Ich wünsche euch und all euren Lieben ein frohes, friedliches, spannendes, erholsames, fröhliches, besinnliches, tolles und gesundes Weihnachtsfest! Ich hoffe, wir sehen uns spätestens in drei Tagen wieder hier, wenn ich den Gewinner / die Gewinnerin meines Gewinnspieles bekannt gebe ;o) Alles Liebe und Gute wünscht euch eure Maike!!!

I hope that you and your loved ones will have a fun, awesome, peaceful, exciting, relaxing, healthy and merry Christmas. I hope to see you here again in three days time (maybe even before that?) when I get to announce the winner of my giveaway ;o) I wish you all the very best, yours Maike!!!

Materialien / supplies:
Stempel / stamps: "Moose Spruce", "Penguin Mistletoe", "Bunny Snowball"
                              von Purple Onion Desings
                             "13 Mal Frohe Weihnachten" von Klartext
Stanzen / dies: "Stitched Circles" von Simon Says Stamp

Challenges:
Alphabet Challenge "U for Use Something Red"
Animal Friends Challenge "Anything Goes"
Through the Purple Haze "Anything Goes"
Cute Card Thursday "Anything Goes"
Crimbo Crackers "Animals"
Creative Knockouts "Christmas Delight"

Dienstag, 20. Dezember 2016

Christmas Series Card #23 / Weihnachtsserie Karte #23 (Poinsettia)

Hallo ihr Lieben
und willkommen zum zweiten Blogpost des Tages! Das Thema unserer neuen Challenge bei Cards und More lautet "Weihnachten" und ich hoffe, dass ihr auch eure letzten Weihnachtskarten noch mit uns teilen werdet ;o) Ich hab mich entschieden eine sehr grafische Karte mit starken Kontrasten zu basteln - nicht mein normaler Stil würde ich behaupten, aber trotzdem gefällt sie mir echt gut:

Heya my crafty friends
and welcome to my second post today! The theme for our newest Cards und More challenge is "Christmas", so I am hoping that you will consider sharing your latest Christmas creations with us ;o) I decided to stray from my usual style a little bit and created a more graphic card with an unusual color combination - at least unusual for me ;o) It's different, but I really like it:


Zuerst habe ich den Hintergrund gestaltet. Dazu habe ich graues Papier, eine Schablone und weiße Embossing-Paste benutzt. Den optischen, aber auch den haptischen Effekt von Embossing-Paste mag ich persönlich total gerne, aber leider denk ich oft nicht daran sie zu benutzen, weil sie in einer Schublade steht und offenbar meine kreativen Prozesse sehr von dem gelenkt werden, was auf meinem Schreibtisch steht... Während der Hintergrund trocknete, habe ich den Weihnachtsstern mit Copics coloriert und habe die Tags vorbereitet.

I started by creating the background piece with some grey paper, a stencil and embossing paste. This raised look and especially the feel of dried embossing paste is always great, but I often don't think of using it... While the background dried I coloured the poinsettia image with Copics and also created the tags.


Als alles getrocknet, ausgestanzt und ausgeschnitten war, habe ich noch den Spruch auf das weiße Tag gestempelt und dann alle Teile auf die Karte geklebt. Da die Tags etwas verloren wirkten, habe ich noch das schwarze Washi-Tape hinzugefügt und in die Blütenmitte habe ich noch goldene Liquid Pearls getupft.

When everything was dry, die cut and fuzzy cut I stamped the sentiment on the white tag and glued everything to the card. The tags seemed to have no "right spot" on the layout so I added the black washi-tape and embellished the poinsetta with golden droplets of Liquid Pearls.


Ich würde mich freuen eure Weihnachtswerke auf dem Cards und More Blog bewundern zu können und wünsche euch - gerade nach dem gestrigen Tag - dass es euch gut geht, ihr all eure Kreativität nutzt, um die Welt ein wenig bunter und heller zu gestalten und wünsche euch allen von Herzen alles Liebe und Gute, eure Maike!!!

I would love to see your Christmas creations on the Cards und More blog and wish all of you - especially after what happened yesterday in Berlin - that you are well, that you can use your creativity to make our world a little bit more colourful and brighter and wish all of you the very best, yours Maike!!!

Material / supplies:
Stempel / stamps: "Christmas Poinsettia" von Sparkle N Sprinkle
Stanzen / dies: "Wonky Stitches Elle-ments" von Avery Elle
                         "Tags A Lot" von Mama Elephant
Schablone / stencil: "Delicate Petals" von Hero Arts

Challenges:

Christmas Series Card #22 / Weihnachtsserie Karte #22 (Christmas Stockings)

Hallo zusammen!
Heute gibt es die letzte Inspirationskarte für die PINspirational Challenges von mir - aber nur für 2016 ;o) Nächstes Jahr geht es natürlich weiter ;o)

Heya my crafty friends!
Today I would like to show you my last inspiration card for PINspirational challenges - but only for 2016 of course ;o) Next year there will be more ;o)


Als erstes habe ich die 5 Weihnachtssocken und die Kissen aufgestempelt, mit Zig Markers coloriert und nachdem alles getrocknet war habe ich sie ausgeschnitten. Als nächstes habe ich das Fenster in eine weiße Kartenbasis gestanzt und den Spruch mit etwas Abstand unter die Öffnung gestempelt.

I started with stamping and colouring the five stockings as well as the pillows and fuzzy cut them outh when everthing was dry. Next I die cut the window in the front of a white card base and stamped the sentiment below it.


Mein nächster Schritt war die Innendekoration der Karte. Dazu habe ich eine Line mit einem schwarzen Copic Multi Liner gezeichnet, an die Enden noch Schleifchen gemalt und dann die Socken direkt darunter geklebt. Nachdem ich auf jede Socke zwei kurze, schwarze Balken gemalt hatte, sah es dann endlich so aus, als würden die Socken an der Leine hängen und ich war zufrieden ;o)

My next step was to decorate the inside of the card with the stockings. So I drew a line with a Copic Multi Liner and glued the stockings right below the line. After I added two short black lines to each sock it looked like they were hanging from the line by clothes pins and my card was done ;o)


Ich mag die fröhlichen Farben der Weihnachtssocken wirklich total gerne und finde sie wirklich niedlich, wie sie da so auf der Leine hängen. Ich hoffe, ihr lasst euch auch von unserem Inspirationsbild zum Basteln verleiten und teilt euer Werk mit uns auf PINspirational Challenges ;o)

I really so like the bright, cheerful colours of the stockings and love how cute they look hanging from the line. I hope you got inspired by my card or our inspiration picture and that you will share your project with us over at the PINspirational challenge blog ;o)


Material / supplies:
Stempel / stamps: "Merry Christmoose" von My Favorite Things
Stanzen / dies: "Rectangle Peek-a-Boo Window" von My Favorite Things

Challenges:

Freitag, 16. Dezember 2016

Christmas Series Card #21 / Weihnachtsserie Karte #21 (Reindeer with ornaments)

Halli Hallo ihr Lieben!
Wir nähern uns Weihnachten mit riesengroßen Schritten, weshalb ich heute noch eine Karte mit einem Digistamp von Gerda Steiner teilen möchte. Diesen gibt es nämlich noch im Dezember in einem wirklich günstigen Set mit insgesamt 5 Digistamps - einer davon ist allerdings eine Überraschung ;o) Der Elch mit den Kugeln im Geweih hatte es mir von Anfang an angetan und er musste unbedingt noch mit in die Weihnachtsserie:

Heya my dear crafty friends!
Christmas isn't far anymore and that is why I wanted to share this card with you featuring a digi stamp by Gerda Steiner Designs. You can buy this stamp plus four others - one of which is a surprise image - in a bundle for a really good price and the images are just too cute. Just as this little reindeer with the Christmas ornaments hanging from its antlers ;o)


Zuerst habe ich das Motiv mit Copics coloriert, das Papier dann auf Kartenbreite zurechtgeschnitten und den Wellenrand gestanzt. Als nächstes habe ich eine Kartenbasis aus rotem Cardstock gefaltet und den Kartenspruch mittig mit Versamark aufgestempelt und anschließend weiß embossed. Die Buchstaben setzen sich so richtig gut von dem dunklen Untergrund ab und der Spruch leuchtet einem fröhlich entgegen ;o)

First I coloured the scene with Copic markers, cut the paper to fit the width of the card base and die cut a scalloped border from the bottom part. Next I used a piece of red cardstock to create a card base, stamped the sentiment on there with Versamark Ink and white heat embossed it. I love how the letters almost shine against the darker background and the cohesive look it creates with all the white paper at the top of the card. ;o)


Um einen Platz zum Schreiben zu haben, habe ich auf die Innenseite noch ein aus weißem Papier gestanztes Rechteck eingeklebt und meine Karte war fertig. Gerne hätte ich über die Lichtbirnen und Weihnachtskugeln noch eine Schicht Glossy Accents gegeben, aber da meine Flasche mal wieder verklebt ist, ging das leider nicht. Stattdessen habe ich Wink of Stelle benutzt, aber wie üblich sieht man das leider auf den Fotos nicht so gut... Ich mag den schlichten Look der Karte super gerne und bin immer noch ganz verliebt in dieses zufrieden grinsende Rentier ;o)

In order to have a place to write on I glued a white scalloped rectangle to the inside of the card base and my card was done. I would have loved to cover the light bulbs and the ornaments with Glossy Accents but the nozzle of my bottle is glued shut again, so I couldn't do that. Instead I used a Wink of Stella to add some glitter, but unfortuanely it doesn't show in the pictures... I really love the simple look of the card and have fallen in love with this cute, grinning reindeer ;o)


Material / supplies:
Stempel / stamps: "Nov / Dec Bundle" von Gerda Steiner Designs
                            "Holiday Marquee Sentinemt Set" von Purple Onion Designs
Stanzen / dies: "Stitched Scallop Basic Edges" von My Favorite Things


Challenges:

Montag, 12. Dezember 2016

Christmas Series Card # 20 / Weihnachtsserie Karte # 20 (Yeti For Christmas?)


Hallo ihr Lieben!
Heute möchte ich euch anlässlich der neuen Challenge bei den Crafty Cardmakers noch einmal eine Karte mit den niedlichen Yetis zeigen. Denn das Thema lautet für die kommenden Woche "Nicht-traditionelle Weihnachten" und da bieten sich die strubbeligen weißen Waldwesen ja geradezu an, oder?

Heya my dear crafty friends!
Today I would like to share my inspiration card for the newest Crafty Cardmakers challenge with you. It is a card with one of the Yetis again, but as the new theme is "Non Traditional Christmas" I thought these cute tousled forrest-creatures were just about perfect ;o) What do you think?


Zuerst habe ich einen Rahmen aus weißem Papier ausgestanzt und in diesen dann noch ein rundes Fenster gestanzt und ihn mit einem Embossing Folder von We R Memory Keepers durch die Big Shot geschickt. Ich fand, dass dieses Muster ein wenig an Eisstrukturen erinnert und dachte, es passt gut zu dem Motiv, das ich mir ausgesucht hatte. 

I started by die cutting the scalloped frame from some white paper and die cut a circle window from it as well as send it through my Big Shot with an embossing folder by We R Memory Keepers. I think this pattern looks a lot like an ice structure and so I thought it would work really well with the image I had planned on using.


Ich habe den Yeti auf ein Stück Aquarellpapier gestempelt, das ein wenig größer als die Fensteröffnung ist und habe mit Distress Inks coloriert. Im Netz habe ich viele, wunderbare softe Colorationen mit Distress Innks gesehen, aber ich denke, daran werde ich noch arbeiten müssen. Mein Ergebnis ist eher farbintensiv geworden, aber da ich den Look mag, macht es mir nichts aus, dass es dieses Mal noch nicht so geklappt hat ;o)

I stamped the Yeti on a piece of watercolor paper that was just a bit bigger than the window and coloured it with Distress Inks. I have seen so many pictures of wonderfully soft colourations, but I think I might keep working on that particular look a bit more. I ended up with rather vibrant colours - oh well, I really love how it turned out, so no harm done ;o) 


Als nächstes habe ich um den Yeti noch ein paar Tannen herum gemalt, damit es ausschaut, als würde er auf einer Lichtung stehen. Auf die Tannenspitzen habe ich etwas Weiß gepinselt, damit es so wirkt, als läge dort Schnee. Zusätzlich habe ich noch kleine weiße Punkte als Schneeflocken um den Yeti herum, aber auch direkt auf ihn gemalt, denn wenn es schneien würde, dann ja wohl auch auf ihn, nicht wahr? Nachdem ich die colorierte Szene und den Rahmen auf die Kartenbasis geklebt hatte, habe ich noch den Spruch auf ein rotes Banner embossed und dieses mittig unter dem Fenster mit Abstandshaltern angebracht. Ich hoffe, meine Karte gefällt euch und ihr kreiert auch eine eigene unkonventionelle Weihnachtskarte, um sie mit uns bei den Crafty Cardmakers zu teilen! Habt eine tolle Woche ;o)

Next to the Yeti I drew a few trees, so that it looks like he stands on a clearing, and added some white to the tips of the trees to make it look like snow. I also added some white dots all around him and put some on him as well, because if it was snowing, he would have some flakes in front of him, too. After I glued the coloured piece and the frame to the card base I added a red banner with an embossed sentiment right below the window and a couple of glittery dots to give the white area a bit more interest. That finished off my card. I hope you like it and you are going to create your own non traditional Christmas project and share it with us at the Crafty Cardmakers! Have a great week, everyone ;o)

Material / supplies:
Stempel / stamps: "BB Beast Friends" von My Favorite Things
Stanzen / dies: "All Prettied Up" von Mama Elephant 
Embossing Folder: "Next Level Embossing Folder" von We R Memory Keepers

Challenges:

Sonntag, 11. Dezember 2016

Christmas Series Card #19 / Weihnachtsserie Karte #19 (Happy Insta-Girls X-Mas Blog Hop)

Halli Hallo ihr Lieben!
Ich freue mich sooo sehr euch heute mal wieder einen unserer Happy-Instagirls Blog Hops präsentieren zu können ;o))) Vielleicht wisst ihr ja, dass die  Happy Instagirls eine Gruppe Mädels ist, die sich über's Liken und Kommentieren auf Instagram gefunden haben. Wir sind alle Kartenbastlerinnen und haben uns gedacht, es wäre doch klasse, wenn wir uns auch mal Karten zuschicken würden, um sie in den Händen halten und nicht nur auf dem Display bestaunen zu können. Und das haben wir nun schon ein paar Mal gemacht und jedes Mal gab es ganz wunderbare Werke zu bestaunen! Heute gibt es einen Blog Hop zum Thema Weihnachts- und Winterkarten und ich denke, dass auch dieses Mal eine ganze Menge Inspiration auf euch wartet ;o)

Heya my dear crafty friends!
I am delighted to be able to present to you a brand new Happy-Instagirls Blog Hop ;o)))  Maybe you have heard of our group of girls who met on Instagram through liking and commenting on each others posts. We
thought it would be great if we could hold the cards in our hands and not only look at pictures of them on our displays. And that is what we did! There were a few hops already and there was always a lot to swoon about and great inspiration as well. This time our blog hop theme is winter and Christmas cards and I am sure that there are lots and lots of awesome projects waiting for you ;o)
Diese wunderbare Winterkarte habe ich von der lieben Vanessa bekommen. Sehen diese vielen Ebenen nicht einfach fantastisch aus? Und die Mäuse sind zauberhaft süß, finde ich!!!
[Liebe Vanessa, vielen Dank für Deine tolle Karte - kurz nach ihrem Eintreffen hatte sie sich schon mit der Winterdeko angefreundet und passt ganz ausgezeichnet dazu ;o)]
Aber nun will ich euch nicht länger auf die Folter spannen... Hier ist das Werk von Vanessa:

This awesome winter card I got from sweet Vanessa. Look at all this dimension. Doesn't it look awesome? And those cute mice are just adorable!!!
I don't want to keep you waiting any longer.... This is Vanessa's beautiful card:


Ich war Jeanins Karten-Wichtel und wollte ihr eine ganz besondere Freude machen, also habe ich frühzeitig angefangen und ihr eine Twist Pop Up Karte nach Video-Anleitung von Maymay gemacht. Und das ist dabei herausgekommen:

I was Jeanin's Secret Santa and I wanted to create a special card for her so I started early and made a Twist Pop Up card for her following the video tutorial by Maymay. And this is what came out of it all:


Die Maße habe ich so angepasst, dass man auch mit A4-Papier arbeiten kann und nicht auf die US-Maße angewiesen ist, wenn ihr Interesse habt, erstelle ich gerne eine Grafik für euch mit den Maßen, die ich benutzt habe ;o) Die Motive sind aus dem Set "Come Let Us Adore Him" von Sugar Pea Design und ich finde sie absolut klasse. Eigentlich war es ein Ersatz für das Santa-Set und ich dachte, dass man die Tiere ja das ganze Jahr über brauchen kann, aber jetzt, da ich damit gearbeitet habe, finde ich die Stempel absolut genial.

I changed the measurements a tiny bit, so that I could use a standard A4 paper, instead of the American size. If you are interested in the exact measurements, just leave a comment and I will add a graphic for it as soon as I can ;o) I love the images from the "Come Let Us Adore Him" set by Sugar Pea Design. Originally I had wanted the set with the three cute Santas, but with this set I talked myself into liking it at first by telling myself I could use the animal stamps all year long after all. However, now that I have worked with the images I am soooo glad I got them - they are absolutely adorable and so much fun to colour!


Den Hintergrund habe ich inspiriert durch Sandy Allnock selbst in Angriff genommen und bin auf das Ergebnis echt sehr stolz. Zeichnerisch bin ich nicht so unbedingt begabt, aber die vielen Tipps aus Sandys Videos haben mir sehr geholfen mich da überhaupt dran zu trauen!

I coloured the background inspired and enabled by Sandy Allnock's videos on YouTube. Even though I am not very talented when it comes to drawing anything free hand - and truly don't feel comfortable doing it - I am quite pleased with how this one turned out and I am very thankful for Sandy's tutorials!

This is what the mechanism of the card looks like, before everything is assambled.


Die Vorderseite der Karte wollte ich recht schlicht halten und da das Kamel keinen Platz mehr im Stall gefunden hatte, habe ich es nach vorne verfrachtet, um dem Stern nach Bethlehem zu folgen. So konnte ich auch das Papier von innen noch einmal benutzen. Das lässt Karten immer noch eine Spur "runder" und professioneller erscheinen finde ich.

I wanted to keep the outside of the card rather plain and seeing as the camel didn't fit into the stable anymore I let it follow the star on the front of the card. That gave me a chance to use the paper, that I had used on the inside, again to tie everything together. 


Falls ihr sehen wollt, wem Jeanin eine Karte gebastelt und geschickt hat, klickt doch einfach hier ;o) Und nur zur Sicherheit, liste ich euch hier einmal alle Teilnehmer auf - so verpasst ihr hoffentlich keine der tollen Karten:

If you are interested in seeing the card that Jeanin made for Biggi, just click here ;o) And just in case you might get lost along the way, I will list all the stops of the Blog Hop for you - that way you won't miss out on any of the inspiration and awesome cards:


Maike (du bist gerade hier)

Ein großes Dankeschön an dieser Stelle auch an Birka, für die Organisation des Hops und einfach dafür, dass sie mich immer wieder inspiriert und mit ihren tollen Karten zum Lächeln bringt! Danke, Birka! ;o)


Material / supplies:
Stempel / stamps: "Come Let Us Adore Him" von Sugar Pea Design
Papier: "Snowflake Bokeh" von Lawn Fawn

Challenges:
CMD Challenges "Christmas / Weihnachten"
Sweet Stampers "Anything goes"
Addicted To Stamps and More "Christmas"
Christmas Cards All Year Around "Anything Christmas"
Copic Marker Spain "Winter or Christmas"
Stempelsonne "Anything goes"
7 Kids College Fund "Anything Goes"
Moving Along with the Times "Christmas Scenes"
Classic Design Team Open Challenge "Anything Goes"

Samstag, 10. Dezember 2016

Christmas Series Card #18 / Weihnachtsserie Karte #18 (Yeti sending Hugs)

Halli Hallo ihr Lieben!
Ab heute möchten wir vom Challenge Up Your Life Team Projekte mit "Transparentpapier" von euch sehen. Ich habe mich für eine eher winterliche Szene entschieden, weil das Vellum klasse geeignet dafür ist.

Heya my dear crafty friends!
Today's challenge at the Challenge Up Your Life blog asks for "Vellum" being part of your project. For my inspiration card I decided on a witery scene, because I thought that Vellum would work well for that.

Als erstes habe ich den Yeti, seinen Schal und eine Reihe Tannenbäume gestempelt, sie mit Copics coloriert und dann ausgeschnitten. Als nächstes habe ich ein Rechteck aus Glitterpapier und ein weiteres, etwas kleineres aus weißem Papier ausgeschnitten. Das Letztere wurde dann noch 2 Mal durch die Big Shot gejagt: einmal, um die Fenster auszuschneiden und ein weiteres Mal, um die Schneeflocken zu embossen.

I started by stamping and colouring the Yeti, his scarf and a bunch of trees, coloured them with Copics and fussy cut them out. Next I cut a rectangle from some glitter paper and one slightly smaller oone from white paper. The latter was sent through the Big Shot twice: once to die cut the windows and the next time to dry emboss the snow on there. 


Als nächstes habe ich das Transparentpapier hinter die Fenster geklebt und ich muss euch sagen, das sieht wirklich klasse aus mit all dem Glitzergedöns dahiner. Leider habe ich es nicht geschafft, den Effekt auf einem Foto sichtbar zu machen. Aber ich hoffe, ihr probiert es zu Hause auch einmal aus und vielleicht findet ihr den Effekt ja auch so klasse wie ich... Den Spruch habe ich mit StazOn Jet Black Ink auf das Transparentpapier gestempelt und dann alles zusammengeklebt. Ich würde mich freuen, wenn ihr eure Vellum-Projekte mit uns bei CUYL teilen würdet ;o) Habt ein wunderschönes Wochenende ;o)

My next step was to glue some Vellum behind the windows and I have to tell you, it looks awesome, when you tilt it in the light, with the glitter behind it. Unfortunately I wasn't able to catch the effect on camera. I am hoping that you will give it a try at home and maybe you'll like the effect as much as I do... I stamped the greeting on the vellum using StazOn Jet Black Ink and glued everything together. I hope you'll join us and show us your "Vellum" projects on CUYL ;o) Happy weekend, everyone ;o)


Material / supplies:
Stempel / stamps: "BB Beast Friends" von My Favorite Things
Stanzen / dies: "Stitched Triple Peek-a-Boo Windows" von My Favorite Things
Embossing Folder: "Snowfall" von Taylored Expressions

Challenges:

Dienstag, 6. Dezember 2016

Christmas Series Card #17 / Weihnachtsserie Karte #17 (Girl with gift)

Halli Hallo ihr Lieben!
Ich hoffe, ihr alle hattet einen schönen zweiten Advent! Ich habe ihn genutzt, um Plätzchen für meine Kollegen zu backen und natürlich Karten zu basteln ;o)

Heya my dear crafty friends!
I hope you all had a wonderful weekend! I made the best of it and baked some cookies for my collegues as well as make some cards ;o)


Inspiriert von dem aktuellen Pinspirational Bild habe ich eine Weihnachtskarte, die ich im Sommer gewerkelt habe, hervorgeholt und mich selbst gecased... Oft steht man doch vor dem Problem, dass man nicht genau weiß, was man machen möchte und da habe ich mich an ein Video von Jennifer McGuire erinnert. Darin erwähnt sie, dass sie sich oft ihre alten Karten anschaut und diese als Inspiration nimmt, weil sie ja ihren Stil haben und das reflektieren, was sie an Karten mag. Die Karte mit dem Tannenbaum (klick) hat mir von Anfang an total gut gefallen und ich finde, mit dem Mädchen und dem Geschenk passt das Layout auch sehr gut. Was meint ihr?

Inspired by the newest PINspirational picture I took out a Christmas card I made way back in the summer and cased myself... Often I find myself stuck for ideas and I remembered something Jennifer McGuire said in one of her videos. She mentioned that she would look at her old card and use them as inspiration, because they reflect her style and what she loves. I loved the card with the Christmas tree (click) from the very beginning and I thought the layout would work well with a girl and her gifts. What do you think?


Eine genaue Beschreibung, wie ich die Karte gemacht habe, findet ihr in meinem Post vom Juli :o) Ich habe neben dem Mädchen noch Rudolf und Santa über den Schriftzug gestellt und zusammen haben sie ein wunderbares Set ergeben. Leider sind die Karten schon auf einer langen Reise und ich hatte versäumt sie vorher zu fotografieren... Vielleicht habt ihr aber ja Lust bekommen ein ähnliches Set zu basteln?!

A complete description on how I made the card can be found in my July post ;o) Apart from the girl and the tree I have also placed Rudolph and Santa on top of the sentiment and they made a great set. Unfortunately they have already started their journey and I have forgotten to take a picture first before sending them off... Well, maybe you feel inspired to make a set yourself now?!


Material / supplies:
Stempel / stamps: "Jingle all the Way" von My Favorite Things
                              "Winter Gifts" von Lawn Fawn
                              "Lots of Stars" von Simon Says Stamp
Stanzen / dies: "Merry Script" von Mama Elephant
                         "Wonky Stitches" von Avery Elle
Coloration: Copics


Challenges:
Simon Says Wednesday Challenge "Anything Goes"
Addicted to Stamps "Christmas"
AAA Cards "Christmas"
Paper Creator's Challenge "Christmas"
Dies R Us Challenge "Christmas"
Creatalicious Challenge "Anything goes / optional Christmas Colours"
Christmas Card Challenge "Christmas / optional Candycane"
Related Posts Plugin for WordPress, Blogger...