Samstag, 30. September 2017

Frohe Weihnachtszeit

Halli Hallo ihr Lieben
und einen schönen Samstag ;o) Bei Challenge Up Your Life wird es Zeit für eine neue Herausforderung und die lautet: "Zeit oder Uhren". Bei Zeit fiel mir sofort die bevorstehende Weihnachtszeit ein, weshalb ich diese Karte gewerkelt habe:

Heya my dear crafty friends
and happy Saturday to all of you ;o) And with it being Saturday it is time for a new challenge at the Challenge Up Your Life blog. The new theme is "time or clocks". When I read the word time I immediately thought about the upcoming Christmas time which is why I made this card:


Zuerst habe ich den gesamten Spruch in rot gestempelt und dann den grünen Hintergrund so gewischt, dass er außen am dunkelsten ist und ein Highlight um das Wort "Weihnachts" blieb. als nächstes habe ich die Ilexe in einem noch dunkleren Grün als Rahmen um den Spruch herum gestempelt. Die Beeren habe ich mit "Candide Apple" Oxide Ink hinzugefügt, damit sie so richtig schön leuchten. Dann habe den süßen Santa gestempelt und mit Copics coloriert.

I started with stamping the complete sentiment in dark red ink and added the green around it, leaving a little highlight around the huge word. Next I added the leaves with a darker shade of green and the berries with "Candide Apple" Oxide Ink, because I really wanted the colour to pop and also stamped the cute Santa and coloured him with Copics.


Nachdem alles getrocknet war, habe ich das große Wort noch einmal ein wenig zur Seite verschoben mit Versamark drüber gestempelt und das Liquid Platinum Embossing Pulver drüber gegeben. Ich liebe den Glanz, den man mit diesem Embossingpulver bekommt! Als letzten Schritt habe ich auf jede Beere noch einen Tropfen Nuvo Drops gegeben und den Santa samt Schatten aufgeklebt.

After everything had dried I stamped the huge word of the sentiment in Versamark Ink, slightly to the left side and added Liquid Platinum Embossing Powder. I love the shine this powder gives! As a last step I added Nuvo Drops to the berries and adhered Santa down on a little drop shadow.


Ich hoffe, ihr macht mit bei unserer Challenge und zeigt uns eure Interpretation des Themas! Habt ein wundervolles Wochenende und happy crafting, eure Maike

I hope you are going to join us for this fortnight's challenge! Looking forward to seeing your creations and wishing you a wonderful weekend! Happy crafting, yours Maike


Material / supplies:
Stempel / stamps: "Weihnachtsüberraschung" & "Clear Snow Dance"
                              von Create a Smile
Stanzen / dies: "All Prettied Up" von Mama Elephant
Hintergrund: Distress Inks in Twisted Citron & Mowed Lawn

Challenges:

Mittwoch, 27. September 2017

Croc-delivered birthday cake

Hallo ihr Lieben!
Das Thema bei PINspirational Challenge lautet "Anything Goes" und das war die perfekte Gelegenheit, eine neue Geburtstagskarte zu werkeln, da ich da wirklich super viele von brauche:

Heya my dear friends!
The new theme at the PINspirational Challenge for the next fortnight is "Anything Goes" and that was the perfect opportunity for me to make a new birthday card, because I do need loads of them:


Das niedliche Krokodil und die Torte die es hält sind Teil eines Gerda Steiner Sets. Guckt es nicht absolut bezaubernd? Mein Hauptanliegen bei dieser Karte war, dass sie bunt und fröhlich aussieht und die Farben das Krokodil hervorheben. Deshalb habe ich mich für den Orangeton für den Rahmen entschieden. Der Stamm war nötig, um dem Gratulanten eine Verankerung auf der Karte zu geben und außerdem war es mir vorher irgendwie zu nackt... 

This cute croc and the cake are part of a Gerda Steiner set in case you were wondering ;o) Doesn't it look too cute? My main idea behind this card was to make it really colourful and to make the crocodile the star of the card. That is also why I went for an orange for the frame, seeing that it is the contrasting colour to / for (?) green. I added the tree trunk because I needed something to ground the image and also without it the card felt too empty somehow...


Das Banner war schlussendlich eine Last-Minute-Ergänzung, weil ich noch ein wenig mehr Party- & Geburtstagsstimmung auf die Karte bringen wollte. Denkt dran, es ist dieses Mal eine "Alles Geht" Challenge bei PINspirational und ich würde mich freuen, eure Werke in der Gallerie anschauen zu können! Habt eine großartige Woche und happy crafting, eure Maike

The banner was a last minute addition, because I wanted to have even more colour and also more of a party atmosphere. Keep in mind, it is an "Anything Goes" challenge at PINspirational and I would love to see which cards you make! Have a great week and happy crafting! ;o) Yours Maike

Material / supplies:
Stempel / stamps: "Party Animals" von Gerda Steiner Designs
                              "Happy Hedgehogs" von My Favorite Things

Stanze / die: "Polaroid Die" von My Favorite Things (unfortunately discontinued)

Challenges:
Simon Says Wednesday Challenge "Pop it up"
Unicorn Challenge "Birthday"
Crafty Catz Weekly Challenge "Birthday Party Time"


Dienstag, 26. September 2017

I'm here - penguin


Halli Hallo ihr Lieben!
Mich auf wenige Farben zu beschränken fällt mir wirklich immer sehr schwer. Dieses Mal wusste ich aber zum Glück recht schnell, was ich für die aktuelle Challenge auf Cards und More machen wollte, als ich dieses Farbschema sah:

Heya my dear crafty friends!
I do have a hard time confining myself to only one or two colours on a card (or anything I create really...). This time however I knew quite quickly what I wanted to make, when I saw the colour scheme for the newest challenge at Cards und More:


Felix mit seinem Friesennerz hatte es mir auf dem Stempelmekka angetan und ich bin so froh, dass er bei mir eingezogen ist, denn ich finde, er ist die perfekte Besetzung für diese Karte. Was meint ihr?

Felix (the penguin) with his coat was one of the stamps I found at the Stempelmekka (a fair in Germany all about stamps). And I am so glad I did find him, because I think he is the perfect image for this card and colour scheme. What do you think?


Coloriert habe ich ihn mit Zig-Markern, bevor ich ihn dann ausgeschnitten und auf den gewischten Wolkenhintergrund geklebt habe. Den Herzregen hatte ich zuvor mit dem Nuvo Embellishment Mousse in Lemon Sorbet auf den Hintergrund aufgetragen.

I coloured the penguin with Zig markers before fussy cutting him out. I glued him on the background piece which I had created using Simon Says Fog Ink and the MFT cloud stencil. I also layered the shower of hearts on top using the Nuvo Embellishment Mousse in Lemon Sorbet.


I hope you are going to join us for this challenge and I am looking forward to seeing your creations - and as always we have a fun prize for the winner. This time it is a surprise sponsored by Elisa! Have a great week and happy crafting, yours Maike ;o)

Material / supplies:
Stempel / stamps: "Felix mit Kostüm" von Kulricke
                              "Get Well Gang" von WPlus9 (sentiment)
Stanzen / dies: "All Prettied Up" von Mama Elephant
                         "Blueprints 29" von My Favorite Things (tag)
Schablone / stencil: "Falling Hearts" von Simon Says Stamp

Challenges:
Simon Says Wednesday Challenge "Pop it up"

Montag, 25. September 2017

Jeanins Hochzeitsalbum


Hallo ihr Lieben!
Heute habe ich mal keine Karte für euch, sondern eine Idee für ein kreatives Gruppengeschenk für eine Hochzeit. Eigentlich nicht irgendeine Hochzeit, sondern in diesem speziellen Fall für die Hochzeit von der lieben Jeanin von Some Bits and Pieces, die am Wochenende ihren Alex geheiratet hat. Das hier hat sie von uns allen (uns heißt in diesem Fall viele ihrer Bastelfreundinnen) bekommen:

Heya my dear crafty friends!
Today I'd like to share this idea for a group gift for a wedding with you. Well, actually not any one wedding, because in this case it was the wedding of lovely Jeanin from Some Bits and Pieces who got married to her Alex last weekend. This is what she got from all of us (us meaning many of her crafty friends...):


Jede von uns hat ein 10x10 cm großes Stück Papier auf der Vorder- und Rückseite gestaltet. Hier ist meins - komplett flach gehalten, weil ich ehrlich gesagt nicht mehr wusste, ob es auch in Ebenen gestaltet sein durfte... Naja, sicher ist sicher, oder? ;o))))

We all turned a 10x10 cm piece of paper in something like a card by designing the front and back for Jeanin and her husband. I kept mine completely flat, because to be honest, I wasn't sure anymore if we had established any guidelines for our presents, regarding layers.... Well, better safe than sorry I thought, so this is what I made:

Vorderseite / front

Rückseite / back
Und hier ist noch mal ein Blick auf das auseinandergefächerte Album. Falls ihr Lust habt auch die anderen Seiten anzuschauen, guckt doch mal auf Instagram vorbei und gebt im Suchfeld den Hashtag #jeaninjustmarried ein ;o) Ich hoffe, euch hat unsere Idee gefallen und vielleicht inspiriert sie ja den ein oder anderen ;o) Habt ne tolle und kreative Woche!!!

And here is a different look at the album. In case you'd like to see the other pages as well (which I highly recommend - they are all so different and fun!) just log on to Instagram and search for the hashtag #jeaninjustmarried ;o) I hope you like our idea and maybe we could inspire you with it ;o) Have a fantastic and creative week!!!


PS: Wisst ihr was? Ich liebe unser Hobby, weil es kreativ ist, klar, aber auch, weil der Hauptgrund ist, anderen eine Freude zu machen und das finde ich großartig! Jedes Lächeln, das man mit einer Karte, einem tollen Umschlag, einem Smilespotting-Werk oder einem kleinen handgemachten Geschenk in die Welt bringt ist ein echtes Geschenk. Keine Ahnung, warum das jetzt raus musste, aber es musste! Habt eine tolle Woche und seid großartig!

PS You know what? I truly love our hobby Because it is creative for sure, but especially because one main reason for making cards, beautifying an envelope, leaving smile-spotting cards for random people to see or giving little hand crafted boxes is making people smile. And every little smile that comes to someones face is a real gift. No idea where this all came from, but it had to be typed for some reason... Have a great week and be awesome!

Material / supplies:
Stempel / stamps: "Hochzeit Glückwunsch" von Klartext
Stanzen / dies: "Blueprint 29" von My Favorite Things
                         (but any die that gives you a decent sized opening will work here)
Schablone / stencil: "" will be added


Donnerstag, 21. September 2017

Are you YETI for Christmas? (MFT 2017 Card Design Super Star Challenge)

Halli Hallo meine Lieben!
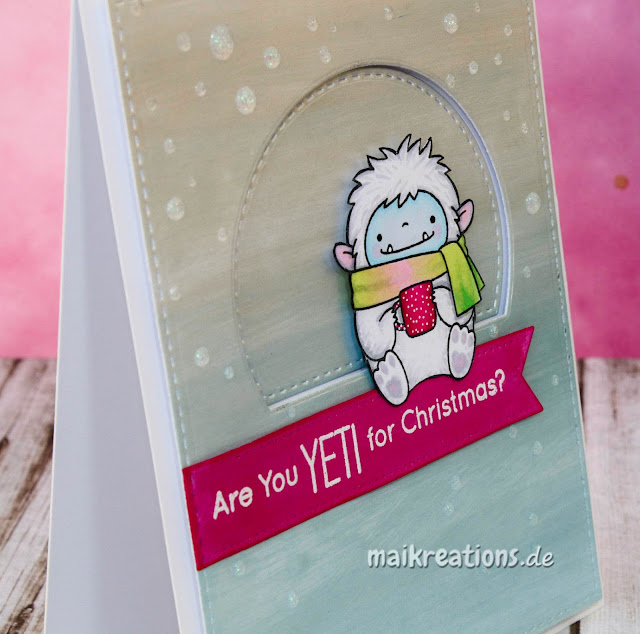
Weihnachtskarten sind ja oft recht frimmelig und hier und dort packt man noch was dazu... Dieses Mal habe ich es aber bewusst ganz schlicht gehalten, denn ich möchte mit dieser CAS-Christmas Karte gerne bei der MFT 2017 Card Design Super Star Challenge im Bereich Clean and Simple mitmachen. Als Fokus habe ich einen dieser niedlichen Yetis von MFT gewählt, weil ich die Minizähnchen und dieses breite Grinsen wirklich hinreißend finde für eine witzige Weihnachtskarte:

Heya my dear crafty friends!
Usually (my) Christmas cards have loads of tiny elements and embellishments.... This time I kept it very simple, because I would like to enter my card in the MFT 2017 Card Design Super Star Challenge for the Clean and Simple category. I have used one of MFT's adorable Yeti's as a focal image, because I think its cute teeth and that grin are perfect for a funny Christmas card:


Für den Hintergrund habe ich das Nuvo Embellishments Mousse in Pure Platinum und Powder Blue benutzt, weil es diesen tollen, winterlichen Schimmer auf die Karte bringt. So sieht es dann aus, wenn man sie nicht zur Lichtquelle hin hält ;o)

For the background I have used the Nuvo Embellishments Mousse in Pure Platinum and Powder Blue to the panel this lovely wintery shimmer. This is how the card looks like when not tilted towards the light source:


Dem Yeti habe ich einen dreifarbigen Schal gemalt, weil "ein vor seiner Höhle Tee-trinkender Yeti" bestimmt gerne viel Farbe in seinem Leben hat. ;o) Und hey, schaut mal, worauf er da sitzt und wie seine Tasse ausschaut ;o) Das Banner habe ich passend zur Tasse mit dem RV09 Copic eingefärbt und den Spruch anschließend in weiß embosst. (Ich weiß nie, wie ich das auf Deutsch schreiben soll...)

I coloured the scarf of the Yeti in three different colours, because I thought a Yeti who sits in front of its cave drinking a hot tea would love a bit of colour in its life ;o) And hey, have a look at what its holding in its hands and what it is sitting on ;o) I coloured the banner the same colour I used for the darkest parts of the cup (RV 09) and heat embossed the sentiment in white. 


Zum Schluss habe ich dann nur noch ein paar Schneeflocken um die Höhle drum herum auf dem Papier verteilt. Hierzu habe ich Nuvo Drops in White Blizzard verwendet - auch die schimmern ganz entzückend, wenn man sie im Licht dreht ;o) Die Fußballen habe ich ein klein wenig rosa coloriert und bin außerdem noch mit meinem Glaze-Pen drüber gegangen, damit sie so richtig schön plustrig aussehen, wie bei meinen Katerstrophen ;o))) Ich hoffe euch gefällt die Karte! Habt eine tolle Restwoche und viel Freude beim Basteln! Eure Maike

To finish the card I added some snowflakes around the cave entrance with Nuvo Drops in White Blizzard. They do catch the light really lovely and give this card even more shimmer. I also added some glaze pen to the soles of the Yeti's feet to make them look a bit more like those of my cats ;o) I hope you like the card! Have a great week and happy crafting, yours Maike


Material / supplies:
Stempel / stamps: "Beast Friends" von My Favorite Things
Stanzen / dies: "Fishtail Flags Stax",  "Stitched Rectangle Stax" &
                         "Stitched Arch Stax" von My Favorite Things

Dienstag, 19. September 2017

Just Fur You - Leopard

Hallo ihr Lieben!
Für die 2017 Card Design Superstar Challenge: Innovation Master von MFT und für eine wahnsinnig liebe Freundin habe ich diese Karte angefertigt:

Heya my dear crafty friends!
For the 2017 Card Design Superstar Challenge: Innovation Master by MFT and for a very dear friend of mine I made this colourful card:


Zuerst habe ich mit Distress Inks einen Regenbogenhintergrund gewischt und mit ein paar Tropfen Wasser besprenkelt, damit es nicht nur flach farbig ist ;o) Danach habe ich ein wenig mit meinen vorhandenen Stanzen gespielt. Um diesen Cover-Up Look zu erreichen habe ich all die unten aufgeführten Stanzen benutzt und muss sagen, es gefällt mir richtig gut. So eine ähnliche Stanze gibt es seit einiger Zeit von einer anderen Firma und es hat mich so oft in den Fingern gejuckt sie zu bestellten. Jetzt, da ich weiß, dass ich den Look mit ein bisschen mehr Arbeit auch so hinbekomme, kann ich das "gesparte" Geld ja anderweitig investieren ;o)

First I created a rainbow background using Distress Inks and some droplets of water to give it a little bit more interest. In order to get this cover-up look I played with a few of the dies (see further down for the list of supplies) I already had in my stash and I like the result very much. A different company released a die just like this recently and I had the urge to order one for the longest time. But now, that I know that with a few steps more I can get a very similar look, I think I'll get to invest the money I "saved" in some lovely new stamps or so :o)


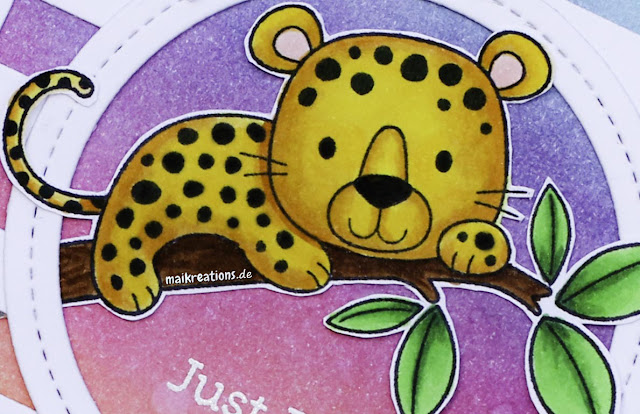
Als nächstes habe ich dann diesen supersüßen Leopard auf seinem Ast und seine 3 gefiederten Freunde coloriert und ausgeschnitten. Bevor ich alles aufgeklebt habe, habe ich noch eine passende Stelle für meinen Spruch gesucht und diesen dann mit Versamark gestempelt und mit weißem Embossingpulver bestreut. Ich hoffe, euch gefällt die Karte und vielleicht ja sogar meine Idee der Stanzennutzung (die ich sicher auch mal mit anderen Kombinationen ausprobieren werde). Habt einen tollen Tag und happy crafting, eure Maike ;o)

Next I coloured this super cute leopard on his branch and his three feathered friends with Copics and cut them out. Before I glued everything in place, I found the right spot for the sentiment by just placing everything down and then I stamped the "Just Fur You" in Versamark and added white embossing powder to it. I hope you like my card and the way I have combined those dies (which is a technique I am going to try soon with different dies I think). Have a fantastic day and happy crafting, yours Maike


Material / supplies:
Stempel / stamps: "Lovable Leopard" von My Favorite Things
Stanzen / dies: "Bold Stripes Cover Up", "Single Stitch Line Circle Frames" &
                         "Circle STAX" von My Favorite Things

Montag, 18. September 2017

Hedgehog Birthday Cake Card

Halli Hallo ihr Lieben!
Der Herbst zieht wieder bei uns im Land ein... Warum ich das Mitte September so keck behaupte? Erstens weil ich letzte Woche bereits auf Grund von blauen Fingern in der Wohnung die Heizung anmachen musste, zweitens, weil die Bäume draußen langsam kahl werden und drittens, weil "Herbst" das neue Challengethema bei den Crafty Cardmakers ist. Zu einer "Happy Fall" Karte konnte ich mich aber noch nicht überreden, - ich hoffe nämlich noch immer darauf, dass der Sommer ein Einsehen hat und noch mal für ein paar Wochen vorbei schaut -  also habe ich eine Geburtstagskarte mit einem der süßen MFT-Igel gemacht. Schaut mal:

Heya my dear crafty friends!
Autumn is (almost) upon us... You probably ask yourself why I am mentioning this mid September? First of all, because we had to turn on our heating again last week already after my fingers turned blue from the cold one afternoon, secondly because the trees outside seem to have already lost more leaves than they have left on their branches and thirdly because "Autumn" ist the new challenge theme at the Crafty Cardmakers. However, I could not yet bring myself to make a "Happy Fall" card, because I am secretely hoping that summer will return for a few (more) precious weeks, so I made a birthday card with one of the cute hedgehog stamps by MFT. But have a look yourself:


Zuerst habe ich den Hintergrund  mit den selben Nuvo Mouse Farben gesteltet, die ich auch schon für die Karte vom Samstag für Birkas Geburtstag benutzt haben. [Allerdings habe ich da noch einen Embossing Folder benutzt und mit dem metallischen Look von dem Mousse sieht das noch mal ganz anders aus - klickt eingach *hier*, wenn ihr die Karte auch sehen möchtet und ihr eventuell auch noch bei der pinken Challenge von uns Happy Crafty Friends mitmachen und mehr als ein Dutzend toller Preise gewinnen möchtet ;o) ] Während der Hintergrund trocknete - was wirklich rasend schnell geht - habe ich die süßen Motive mit Copics coloriert und sie ausgeschnitten.

I started by creating a background with the same Nuvo Mousse colours I had used on Saturday's card for Birka's birthday. [But on that one I used an embossing folder and it gives the background a completely different look - click *here" if you'd like to see it and maybe you feel like joining in on our challenge from the Happy Crafty Friends as well?! There are more than 11 prizes to be won - just saying ;o) ] While the background was drying - which takes almost no time at all - I coloured my images with Copic markers and fussy cut them out. 


Alles, was ich dann noch tun musste, was das Rechteck mit dem Fenster aus dem Hintergrund zu stanzen und die Sprüche zu stempeln, bevor ich dann alles an der richtigen Stelle festgeklebt habe. Ich hoffe, ihr habt Zeit und Lust an unserer "Herbst"-Challenge bei den Crafty Cardmakers mitzumachen. Happy crafting und habt eine fantastische Woche ;o) Das wünscht euch eure Maike

All that was left to do now was to die cut the rectangle and the window from the background piece and add the sentiments before adhering all the different elements. I hope you are going to join us for our "Autumn" challenge at the Crafty Cardmaker! Happy crafting and have a fabulous week ;o) Yours Maike


Material / supplies:
Stempel / stamps: "Happy Hedgehogs" & "Happy Hippos" & "Beary Special Birthday"
                              von My Favorite Things
                         von My Favorite Things

Challenges:

Samstag, 16. September 2017

Happy Birthday Birka - Happy Crafty Girls Blog Hop

Halli Hallo ihr Lieben!

 Und ganz besonders hallo Birka,
wenn Du hierher gehopst bist!
Herzlichen Glückwunsch zu Deinem Geburtstag!!!

Seit Mooooo-na-ten planen wir eine riesengroße Geburtstagsüberraschung für Birka von "Mit Herz und Schere" - ihr kennt sie und ihre wundervollen Karten sicherlich alle ;o) Wie ihr Blogname ja schon verrät hat sie ein Herz fürs Basteln aber auch und vor allem für die Menschen hinter den Scheren und Blogs. Mittlerweile kenne ich sooo viele liebe, talentierte, tolle, herzliche, wunderbare Menschen und das nur, weil sie uns quasi zusammen geführt hat. Und weil wir alle finden, dass Birka dafür mal ein Mega-Danke verdient hat und wir sie einfach mal so richtig aus den Socken hauen wollten, haben wir alle Birka eine pinke Geburtstagskarte gewerkelt (sie ist absolut #teampink) und für sie und euch einen Blog-Hop daraus gemacht ;o) Das hier ist die Karte, die von mir für Birka in die Post in die Schürzentasche von Jessi von der Stempelbar gehüpft ist ;o)

Heya my dear crafty friends!
Today is a very special day: It is Birka's birthday. Some of you may know her and her awesome cards from her Blog "Mit Herz und Schere" or her Instagram account "Biiirka". Through her I got to know sooo many lovely, talented and wonderful people and we all thought / think that she deserves a huge Thank You and an spectacular surprise for it. Birka absolutely loves pink which is why we all created a pink card for her and organised this Blog-Hop for her and you of course ;o) This is the card I created for her:


Hier findet ihr die Hopser-Reihenfolge:
Here you find the links to all stops from the hop:

Maike (Maikreations) --> Du bist hier / You are here

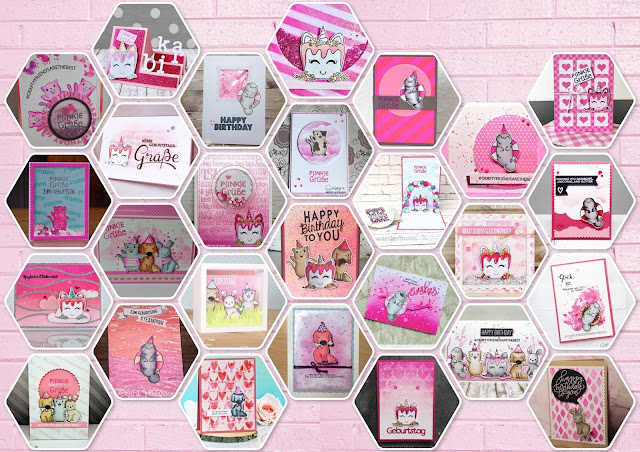
Und hier schon mal ein kleines Schmankerl für die Augen / And this is a preview for you of what we have in store for you:


Und das Tollste ist, dass ihr auch Mitmachen könnt! ;o) Wie? Ganz einfach. Hüpft einfach zu unserem Blog und stellt dort eine pinke Geburtstagskarte für Birka ein. Insgesamt gibt es 11 Sponsoren, die allesamt ganz wunderbare Preise zur Verfügung gestellt haben! Vielen Dank dafür! Dann gibt es auch noch ein ganz exklusives Stempelset mit den selbstgezeichneten Stempeln von einigen der zeichenbegabten Happy Crafty Friends zu gewinnen ;o) Aber schaut selbst: klick!

And the best thing about it is, that you can join in with the fun! ;o) How? That's easy: Hop to our blog and link up your pink birthday card for Birka. We have 11 generous sponsors who are giving away awesome prizes and you can also win a very exclusive cling stamp set with hand-drawn images by some of our drawing-talented Happy Crafty Friends ;o) But have a look yourself: click!


Falls ihr euch fragt, wie meine Karte entstanden ist, hier ein ganz kurzes Rezept: Den Hintergrund habe ich mit den genialen Embossing Mousses von Nuvo in Peony Pink und Pink Flame hergestellt. Die Mousse ist vielseitig einsetzbar, trocknet super schnell und gibt einen genialen metallischen Schimmer (wie man hoffentlich in den Fotos erahnen kann...). Nach dem Trocknen habe ich in das Papier ein Fenster hineingestanzt und es mit einem Geburtstagswörter-Embossingfolder geprägt. Die Stempel stammen - bis auf die Herzen -aus dem Set, das ihr gewinnen könntet ;o)

In case you are wondering how I made my card, here is a short recipe: I created the background using the awesome Embossing Mousses by Nuvo in Peony Pink and Pink Flame. The mousse can be used in many ways, dries super fast and has this brilliant metallic sheen when it is dry (which I hope you can guess from the pictures...). After everything was dry I die cut the round window from the paper and also embossed it with some cute birthday-words. The stamps I used are mostly from the set that you could win ;o)


Es wäre klasse, wenn ihr Lust und Zeit hättet unsere Überraschung für Birka noch größer zu machen, in dem ihr auch eine pinke Geburtstagskarte bastelst und auf dem Happy Crafty Friends Blog einstellst. Das ist übrigens auch der Weg zu einem Gewinn unserer elf Sponsoren ;o))) * ich erwähns nur noch mal so am Rand ;o) Also ran an den Basteltisch, nachdem ihr vielleicht noch mal mit einem Sektchen oder ähnlichem auf unser Geburtstags"kind" Birka angestoßen habt!

Habt ein Wahnsinns-Wochenende und happy crafting ;o) Eure Maike

It would be brilliant if you would make the surprise even bigger for Birka by creating a pink birthday and linking it to our Happy Crafty Friends blog. This would also be the way to win one of the prizes of our eleven sponsors ;o))) *just saying ;o) So start creating everyone, maybe after you lifted a glass of Prosecco or something like it to our dear birthday girl Birka!

Have an awesome weekend and happy crafting ;o) Yours Maike


Wenn ihr eure Werke auf Instagram zeigt, dann benutzt doch bitte die Hashtags
When you post your creations to  Instagram please use the hashtags

#happycraftyfriends and #birkasbirthdayohp

Material / supplies:
Stempel / stamps: "Exclusive Handdrawn Images Set" by the Happy Crafty Friends
                             (not available to buy - but you could win it or get the Digis here)
                             "Tons of Hearts" von Simon Says Stamp
Stanzen / dies: "Stitched Rectangle Stax" & "Peek-a-Boo Circle Windows"
                          von My Favorite Things
Embossing Folder: "Birthday Embossing Folder" von Taylored Expressions

Dienstag, 12. September 2017

Wishing you... more happiness than your heart can hold (Giraffe)


Halli Hallo ihr Lieben!
Mehr Freude, als ihr in euren Herzen tragen könnt, das wünsche ich euch ;o) Eine Giraffe hat übrigens eine Mega-Pumpe von etwa 12kg also fand ich, passte sie ausgesprochen gut zu diesem schönen Spruch. Für die aktuelle PINspirational Challenge gibt es nämlich dieses wundervolle Inspirationsbild:

Heya my dear crafty friends!
More happiness than your heart can hold, that is what I wish everyone of you ;o) A giraffe's heart is 12 kilogramms in weight, so I thought this sentiment would match my image very well ;o) For the newest Pinspirational inspiration picture our lovely team leader Deanne chose this cute picture:


Zuerst habe ich die süße Giraffe aufgestempelt, coloriert und ausgeschnitten. Als nächstes habe ich den Hintergrund mit Distress Oxide Inks gewischt. Benutzt habe ich die Farben Fossilized Amber, Picked Raspberry, Twisted Citron and Peacock Feathers. Um ganz ehrlich zu sein, weiß ich nicht, ob ich die Oxides hasse oder liebe... Während ich an diesem Hintergrund gewerkelt habe, war ich sicher, dass das niemals etwas geben würde. Wenn ich mir aber jetzt die Karte anschaue, sehen die recht hellen Farben auf dem Kraft-Papier total klasse aus. Also werde ich sie erst mal weiter benutzen und euch meine Meinung sagen, falls und wenn ich mir eine "erarbeitet" habe ;o)

I started by stamping, colouring and fussy cutting the giraffe. Next I created the scalloped circle background with Distress Oxide Inks. I used the colours Fossilized Amber, Picked Raspberry, Twisted Citron and Peacock Feathers. To be quite honest with you, I am not yet sure weather I love or hat the Oxides... While I was working with them to create the background I thought it could never turn out nice, but looking at the card now after the ink dried I really like the effect of the bright colours on the kraft paper. So I will continue using them and tell you what I think once I made up my mind ;o)


Nachdem die Tinte trocken war, habe ich mit Jet Black Archival Inkdie Herzen und die beiden Sprüche gestempelt und anschließend alle Teile zusammengeklebt. Und jetzt seid ihr dran ;o) Lasst euch von der niedlichen Babygiraffe oder einfach den Farben oder sonst nicht was auf dem Foto inspirieren und verlinkt euer Werk bei {PIN}spirational - unsere freundlichen Sponsoren Kitty Bee Designs und Bugaboo Stamps haben auch wieder tolle Preise für euch. Habt eine tolle Woche und happy crafting zusammen, eure Maike ;o)

Once the ink was dry I stamped the sentiments and the hearts in Jet Black Archival Ink (using my MISTI) and glued all the elements together. And now it's your turn ;o) Let the picture inspire you and show us your project at {PIN}spirational - our kind sponsors Kitty Bee Designs and Bugaboo Stamps are giving away fabulous prices. Have a great week everyone and happy crafting, yours Maike ;o)


Material / supplies:
Stempel / stamps: "Gerti" von Betty's Creations
                             "Wishing You" von Mama Elephant
Stanzen / dies: "Small Stitched Rectangle Stackables" von Lawn Fawn
Coloration: Distress Oxide Inks (für den Hintergrund / for the background)
                  Copics (für die Giraffe / for the giraffe)

Montag, 4. September 2017

Congratulations Panda


Halli Hallo ihr Lieben!
Zu monochromen Karten – dem Thema unserer neuen Challenge bei den Crafty Cardmakers - fallen mir immer als erstes Trauerkarten ein, aber danach stand mir so gar nicht der Sinn. Deshalb dachte ich, ich gehe mit meiner Karte einfach mal in die komplett andere Richtig: pink statt grau oder schwarz und Freude statt Trauer. Das ist dabei herausgekommen:

Heya my dear crafty friends!
When I think about monochrome cards – which is the theme of our newest challenge over at the Crafty Cardmakers - I usually think of condolence cards first, but I didn't feel like making one of those. That is why I decided to go in a completely opposite direction: pink instead of black and joy instead of grief. This is the result:


Angefangen habe ich mit dem gewischten Hintergrund in "Ultra Pink", wobei ich darauf geachtet habe, dass die Fläche etwas größer war, als der Herz-Rahmen, damit er sich nachher deutlich abheben könnte / kann.  Als die Farbe getrocknet war, habe ich den Herzrahmen direkt auf den pinken Kreis geklebt und den Panda hineingestellt.

I started by applying "Ultra Pink" ink to the card base, making sure, the coloured area was big enough for the heart frame. After the ink was completely dry I adhered the circle frame directly to the pink space and added the panda to it. 


Anschließend habe ich ein Stück Papier mit der gleichen Stempelfarbe eingefärbt und daraus die kleinen Herzchen gestanzt. Für den Spruch habe ich dieses Mal das MISTI benutzt, obwohl ich sonst oft genug zu faul bin es rauszuholen, aber da die Linie des Stempels recht dick ist, wollte ich eine vernünftige Deckung erreichen. Tatsächlich habe ich auch zwei Mal stempeln müssen, damit es gut aussah. Die Herzchen habe ich dann um das Gestempelte herum verteilt und dann war meine Karte fertig. Ich hoffe, euch gefällt meine Karte und dass ihr nun vielleicht auch Lust bekommen habt eine monochrome Karte zu basteln. Habt eine wundervolle Woche ;o) Happy crafting ;o) Eure Maike

Next I coloured a piece of paper with the same pink ink I had used for the background and die cut the little hearts from it. I stamped the sentiment twice with the help of the MISTI, because I wanted it to be nice and black and added the hearts around it. I hope you like the card and that you feel inspired to create a monochrome card yourself. Have a great week everyone ;o) Happy crafting, yours Maike


Material / supplies:
Stempel / stamps: "Happy Pandas" von My Favorite Things
                             "Whatnot Sentiments Nine" von Your Next Stamp
Stanzen / dies: "Heart Frame Elle-ments" von Avery Elle

Related Posts Plugin for WordPress, Blogger...