Mittwoch, 29. Juni 2016

Surprise!!! (Introducing "Moody Unicorns" by Gerda Steiner Designs)

Hallo meine Lieben!
Kennt ihr schon die super knuffigen Einhörner von Gerda Steiner Designs? Ich durfte schon einmal mit ihnen spielen und habe diese regenbogenbunte Karte gebastelt:

Heya my dear crafty friends!
Do you know the "Moody Unicorns" set by Gerda Steiner Designs? They are just the absolut cutest and I got to play with them. I made this rainbow-coloured card with the grinning unicorn:


Aus irgendeinem Grund muss ich immer an Regenbogen denken, wenn ich ein Einhorn sehe. Daher habe ich die Mähne auch in Regenbogenfarben gestaltet ;o) Da der Hintergund dazu passen sollte, habe ich mich hier für einen entsprechenden Farbverlauf entschieden: Begonnen habe ich mit Picked Raspberry, dann ging es weiter mit Squeezed Lemonade, Twisted Citron, Peacock Feathers und Seedless Preserves. Anschließend habe ich eine für mich neue Cover-Up Stanze von My Favorite Things auf den Hintergrundgeklebt, um diesen ein wenig "aufzubrechen"

For some reason I almost always think of rainbows when I see a unicorn. Therefore I had to colour its mane in rainbow colours ;o) Because I wanted my background to match the image, I chose to use those colours from top to bottom: Picked Raspberry, next up was Squeezed Lemonade, then Twisted Citron, Peacock Feathers and last but not least Seedless Preserve. Afterwards I adhered a die cut from one of my newest cover-up dies from MFT to the background to give it even more interest.


Das Einhorn habe ich mit Hilfe einer Tag-Stanze ausgestanzt und außerdem noch ein zweites aus schwarzem Papier erstellt, um eine Art Schatten hinter das erste Schild zu kleben. So hebt es sich einfach viel besser von dem bunten Hintergrund ab. Zum Schluss habe ich dem breit grinsenden Honigkuchenpferd - ähh - Einhorn das Geschenk zwischen die Hufe geklemmt und alles auf die Kartenbasis geklebt.

I die cut the unicorn with the help of a tag die and also die cut the same tag from a black piece of cardstock to create a kind of shadow behind the one with the coloration on it, so that it wouldn't get lost on the busy background. To finish the card I tucked a gift between the unicorn's hooves and adhered the pieces to the cardbase.


Material / supplies:
Stempel / stamps: "Moody Unicorns" von Gerda Steiner Designs
Stanzen / dies: "Classic Stripe Cover" von Mama Elephant
                         "Tag Builder - Blueprints 2" von My Favorite Things

Challenges :
Simon Says Wednesday Challenge "Anything goes"
Addicted to stamps and more "Birthday cards"
Send a Smile 4 Kids "Die cuts / Punches"
Tuesday Throwdown "Fairies / Fantasy"
Sisterhood of Crafters "Create your own background"
Die Cuttin Divas "Birthday"

Samstag, 25. Juni 2016

Tickled Pink for you

 
Halli Hallo ihr Lieben!
Heute habe ich meine neuste Inspirationskarte für den Challenge Up Your Life Blog für euch. Heute startet dort nämlich eine neue Challenge und dieses Mal möchten wir euch mit diesen wunderschönen Farben zum Kreativ sein inspirieren:

Heya my dear crafty friends!
Today I'd like to share with you my newest inspiration for the Challenge Up Your Life blog. Today starts a new challenge and this time we would like to inspire you with these gorgeous colours:


Für die Karte habe ich den Hintergrund mit Hilfe von drei ganz stark verwässerten Distress Inks (Worn Lipstick, Peacock Feathers and Walnut Stain), die ich mit einem Pinsel auf das Aquarellpapier gebracht habe, selber gestaltet. Nachdem das Papier getrocknet war, habe ich es zurechtgeschnitten, das Fenster ausgestanzt und den Spruch dann genau darunter gestempelt.

For my card I created a background by watering down three shades of Distress Inks (Worn Lipstick, Peacock Feathers and Walnut Stain) a lot and then using a brush to paint the stripes on my piece of watercolour paper.  After it had dried I cut it to size, die cut a wonky window from it and stamped the greeting below it.


Als nächstes habe ich den süßen Hasen und seinen Freund, den Teddybären, mit Zigs ausgemalt und auch noch einen ganz schlichten Hintergrund für die beiden gestaltet. Der Fokus sollte auf den beiden Freunden liegen und nicht auf irgendwas Unruhigem aus dem Hintergrund. Hoffe, ihr wisst, was ich meine...

Next I stamped and coloured the cute bunny and its friend the teddybear using Zig markers and also created a very simply background to go behind the window. I wanted the focus to stay on the critters themselves and not anything from behind them if that makes sense...


Die beiden Viecherchen habe ich ausgeschnitten und dann alles an Ort und Stelle geklebt. Die gestrichelte Linie habe ich später noch zugefügt, damit sie zu der Prägung rund um das Fenster passt. Damit war die Karte fertig. Ich hoffe, ihr habt nun auch Lust bei unserer Challenge mitzuspielen! Ich freu mich schon auf eure wunderbaren Werke. Happy crafting, 
eure Maike

After fussy cutting the critters I glued everything in place and added a dash line around the striped piece, so that it would match the stitches around the window and called my card done. I hope you are going to play along with us! Looking forward to your beautiful creations! Happy crafting,
yours Maike ;o)

Material / supplies:
Stempel / stamps: "Snuggle Bunnies" von My Favorite Things
Stanzen / Dies: "Peek-a-boo Wonky Window" von My Favorite Things

Challenges:

Dienstag, 21. Juni 2016

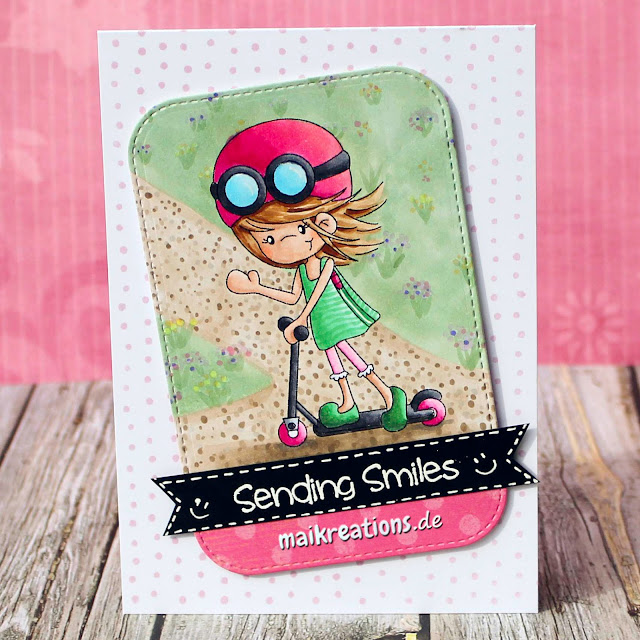
Sending Smiles ;o)


Halli Hallo ihr Lieben!
Heute ist es mal wieder so weit: Es gibt eine neue Challenge auf dem PINspirational Blog! Oben könnt ihr die Karte sehen, die ich zum Thema gewerkelt habe und hier seht ihr das aktuelle Inspirationsbild:

Heya my dear crafty friends!
Today is the start of a new challenge over at the PINspirational Blog. Above you can see the card I have made for it and below you can find our current inspirational picture:


Dieser süße Digistamp ist von unserem Sponsor "A Random Fan". Ich liebe die niedlichen Bilder von ihnen und hatte viel Freude daran, mit diesem hier zu arbeiten. Nachdem ich das Mädchen auf dem Roller ausgedruckt hatte, habe ich es mit Copics ausgemalt und die Umgebung ebenfalls mit Copics gestaltet. Danach habe ich eine Stanze benutzt, um das colorierte Motiv und noch mal die gleiche Form aus gemustertem, rosa Papier auszustanzen. 

This cute image of a girl on her scooter is from our kind sponsor "A Random Fan". I love their sweet images and had a lot of fun playing with this one. After I had printed the image on my paper I coloured it with Copic markers and used a die to cut it out. I used the same die I to cut the pink patterned paper out as well.


Ich habe den oberen Teil des colorierten Stanzteils auf das pinke geklebt und den Spruch genau über die Kanten geklebt, damit das nicht mehr zu sehen ist. Als nächstes habe ich die rosa Punkte auf die Kartenbasis gestempelt und das Mädel mit Abstandshaltern aufgeklebt. Gut, nicht sie, aber das Papier wo sie drauf ist ;o) Die Karte hätte jetzt fertig sein können, aber ich habe noch Wink of Stella auf ihre Brillengläser gepinselt und um den Effekt noch zu verstärken, habe ich außerdem Glossy Accents darauf verteilt. Mir gefällt wie fröhlich und girly die Karte geworden ist und ich hoffe, euch auch!

I glued the top part of the coloured panel on top of the pink one and added a sentiment on top of the "seam", so that it wouldn't be noticable anymore. Next I stamped the "Myriad Dots" stamp on the card base to give it more interest and added the journaling card with some foam tape. Now the card could be done, but I added some Wink of Stella to her glasses and also coated them with Glossy Accents. Love how girly and bright it turned out.I hope you like it, too!


Material / supplies:
Stempel / stamps: "A Hallo" von A Random Fan
                            "Woodland Cuties" von Your Next Stamp
                            "Myriad Dot Background" von My Favorite Things
Stanzen / dies: "Stitched Journaling Card" von Lawn Fawn

Challenges:

Donnerstag, 16. Juni 2016

Karte zum ersten Geburtstag / First birthday card

Hallo ihr Lieben!
Heute habe ich eine Geburtstagskarte zum 1. Geburtstag für euch. Ganz bewusst habe ich die Karte recht schlicht gehalten und den Löwen kräftiger coloriert, als den Rest, da er der Fokus sein soll.

Hello my dear crafty friends!
Today I would like to share a card for a first birthday with you. I kept the design really simple and made sure to colour the lion the most vibrant, because I wanted him to be the focus of the card.


Den Ballon habe ich mit Wasserfarben ganz hell ausgemalt, damit er nicht zu sehr von meinem Fokustier ablenkt. Allerdings wollte ich betonen, dass es sich um einen ersten Geburtstag handelt, also habe ich aus dem Ballon die Ziffer "1" herausgestanzt. Dieses habe ich dann mit Hilfe eines dünnen und mit Kleber versehenen, hinter den Ballon geklebten Stück Papiers wieder an seinen Platz geklebt. Jetzt ist es gut zu erkennen, aber nicht zu aufdringlich.

I coloured the big balloon with watercolours, so that it wouldn't distract from my focal image. However, I wanted to emphasize the fact that it is a card for a one year old, so I die cut the number 1 from the balloon. Instead of poppoing it up or using the negative part though I glued some thin paper to the back and adhered the "1" back into its place. Now you can see it, but it isn't too noticable.


Den Löwen habe ich mit einem "Action Wobbler" auf die Karte aufgebracht, so kann das Geburtstagkind die Karte direkt noch als Spielzeug benutzen ;o)

I adhered the lion with an "Action Wobbler" to the card, so that the birthday boy can use the card as a toy as well ;o)


Für den Hintergrund habe ich - faulerweise - das tolle "Watercolor Wash" Papier von My Favorite Things benutzt. Es passt klasse zu dem Ballon, aber ich musste nicht noch einmal darauf warten, dass alles trocknet, bevor ich es benutzen konnte.

I used the "Watercolor Wash" paper from My Favorite Thingsfor the background, because I was just a teeny tiny bit too lazy to make my own and also too impatient for a new piece to dry. I think it workd really well on this design.


Material / supplies:
Stempel / stamps: "Leo" von Bettys Creations
                           "Party Animal" von WPlus9 (Balloon)
Stanzen: "Geburtstags-Triple" von Create a Smile

Challenges:
Simon Wednesday Challenge "Animal Magic"
Copic Marker Spain "Anything goes"
Scrap Creations "Father's Day / Masculine card" 
Ellibelle's "Critters and Creatures #5"
Try it on Tuesdays "All about him"
Double Click "For a man or a boy"

Montag, 13. Juni 2016

Male card: Make a wish cupcake

Hallo ihr Lieben!
Bei der neuen Challenge der Crafty Cardmakers geht es um Karten für Männer. Immer ein schwieriges Unterfangen - zumindest für mich. Ein gutes Rezept ist wie ich finde allerdings eine One-Layer-Karte mit möglichst wenig Schnickedöns, wie man bei mir zu Hause sagt und "männerfreundlichen" Farben. Und hier seht ihr meine Inspirationskarte, die ich nach meinem Männerkarten-Rezept gestrickt habe:

Hello everyone ;o)
I hope you are having a great Monday so far. There is a new challenge at the Crafty Cardmakers asking for "male cards". Always a difficult task, I feel. My go-to-"recipe" for a male card is a one layer card with little or no embellishment and some man-friendly colours. Here you can see what I made following this male-card-recipe:


Zuerst habe ich den Cupcake gestempelt, mit Copics coloriert und eine Maske für das süße Gebäckstück zurechtgeschnitten. Die brauchte ich, um die Sterne "hinter" den Cupcake zu stempeln und der Karte so optisch noch eine weitere Dimension zu geben. Außerdem habe ich die Sterne schwerpunktmäßig von oben links nach unten rechts verteilt, so dass sie den Blick des Betrachters auf den Kartenspruch lenken.

I stamped the cupcake image, coloured it with Copic markers and fussy cut a mask for it from some masking paper. Next I stamped the stars, to give the card more interest and also to help guide the eye towards the sentiment.


Als erstes habe ich den Spruch mit Memento Tuxedo Black Ink gestempelt (wie auch schon den Rest) und dann habe ich mit der Hilfe des Mistis noch einmal an der gleichen Stelle mit Versamark darüber gestempelt und das "make a wish" mit einem klaren Pulver embosst. So muss ich kein schwarzes Pulver benutzen und bekomme doch den gleichen Look hin.

The sentiment was stamped first in Memento Tuxedo Black Ink (like the rest) and then stamped with Versamark Ink - a clear, sticky ink - so that I could heat emboss it with a clear powder. That way I don't get any powder bits on my card, which tends to happen when I want to eliminate the second stamping and use black embossing powder.


Material / supplies:
Stempel / stamps: "Tim Holtz Cling Stamps Birthday" von Stampers Anonymous
                              "Lots of Stars" von Simon Says Stamp
                              "Birthday Wishes" von Pink and Main

Challenges:
Simon Says Wednesday Challenge "Father's Day / For a Guy"
Stempelgarten Challenge "A card for a man"
Creative With Stamps Challenge "Masculine Cards"
Polka Doodle's Craft Challenge "For the Boys"
Crafty Calendar Challenge "For a Male"

Samstag, 11. Juni 2016

Hoppy Birthday

Halli Hallo ihr Lieben!
Ich wünsche euch einen wunderbaren Start ins Wochenende. Unser neues Thema auf dem Challenge Up Your Life Blog heißt "Rahmen" und ich hoffe, dass ihr ganz kräftig mitspielen werdet. Dies ist meine Isspirationskarte für euch:

Heya everyone!
I hope you are going to have a wonderful weekend. The new task at the Challenge Up Your Life blog is to create something that has to do with "frames" and I hope you are going to play along with us. This is my inspiration card:


Ich hab mich daran erinnert, dass ich diese geniale Rahmen-Stanze in meiner Sammlung habe und dachte, dass sie ideal zu dem Thema passt. Ich wollte eine CAS-Karte gestalten, aber mit starkem Kontrast (oder Wumms, wie man hier in unserem Haus sagen würde) und habe mich deshalb für das knallpinke Papier als Hintergrund für den Rahmen entschieden. Um dem Papier ein subtiles Muster zu geben und weil mich der Hase an einen erinnert, der von einem Zauberer aus dem Hut gezaubert wird, habe ich ein paar Sterne auf das Papier gestempelt. Dazu habe ich pinke Stempelfarbe benutzt, um einen Ton-in-Ton Look zu bekommen.

I remembered that I had this awesome frame-die in my stash and thought it would be perfect for this challenge. I wanted to create a CAS card, but with a lot of contrast, so I decided on this bright pink paper for the backdrop of the frame. To give it a bit more interest and because this bunny reminds me so much of a bunny that comes out of a wizard's hat I stamped some tone on tone stars on it.


Mit einem Fingerschwämmchen habe ich den Bereich um den Rahmen herum noch mit "Picked Rasberry" Distress Ink eingefärbt, bevor ich das Hasenbild aufgeklebt habe. Zuletzt habe ich dann noch den Aufhänger für den Rahmen hinzugefügt und den Kartenspruch gestempelt.

With the help of a finger dabber I coloured the area around the frame with "Picked Rasberry" Distress Ink, before adhering the frame with the bunny down. Last I added the hanger and also stamped the sentiment.


Eine schnell gemachte Karte, die aber wirklich was her macht, finde ich. Ich würde mich freuen, wenn ihr Lust hättet euch von unserem neuen Thema inspirieren zu lassen und eure Werke auf Challenge Up Your Life mit uns teilen würdet! Genießt das Wochenende und happy crafting,
eure Maike

This is a quick card to make, but it looks great with all the contrast I think. I would love if we could inspire you with our new task and would love to see your creations on the Challenge Up Your Life blog! Have an awesome weekend and happy crafting,
yours Maike


Material / supplies:
Stempel / stamps: "Peek A Boo Animals" von Craftin Desert Divas
                             "Lots of Stars" von Simon Says Stamp
                             "Critters Down Under" von Lawn Fawn
Stanze / die: "DIY Dies Perfect Picture" von Technique Tuesday
Coloration: Copics

Challenges:

Dienstag, 7. Juni 2016

Did someone say cake? (Strawberry Fairy / Erdbeerfee)

Hallo ihr Lieben!
Zeit für eine neue Challenge auf dem Cards und More Blog. Dieses Mal soll es um besondere Ereignisse gehen. Ich habe mich für das Thema Geburtstag entschieden. Verwendet habe ich für diese Karte einen Digistamp unseres Sponsoren "A Day For Daisies":

Heya my crafty friends!
It is time for a new challenge over at the Cards und More blog. This time we would like to see your creations for special occasions. I decided to make a birthday card and used a digi stamp from our sponsor "A Day For Daisies" to create it:


Zuerst habe ich den Digistamp ausgesdruckt, coloriert und anschließend ausgestanzt. Weil ich wusste, dass ich viel Rot auf der Karte haben wollte, habe ich den Rahmen in der Farbe angemalt, die ich auch als Mittelton für die Erdbeeren und das Kleid der niedlichen Fee benutzt habe: R27.

I started by printing, colouring and die cutting the cute fairy image. I knew I wanted to have lots of red on my card, so I coloured the frame with the same Copic marker that I had used on the strawberries and her dress: R27.


Nachdem ich das colorierte Papier und seinen Rahmen auf die Kartenbasis geklebt habe, habe ich den Kartenspruch gestempelt und noch ein paar Enamel-Sticker auf der Karte verteilt. Ich hoffe, euch gefällt meine Karte und dass ihr eure Werke mit uns teilen werdet ;o) Happy crafting!

After I had glued the coloured piece and its frame to the card base I added the sentiment and also some enamel stickers to finish off the design. I hope you like it and that you are going to play along with us ;o) Happy crafting!


Material / supplies:
Stempel / stamps: "Strawberry Birthday Cake" von A Day For Daisies
                              "Delicious Birthday" von My Favorite Things
Stanze / die: "Scallop Squares Dies" von Pretty Pink Posh
Stickers: Create a Smile

Challenges:

Jessas Hochzeitskarte / Jessa's wedding card

Hallöchen zusammen!
Ich hoffe, ihr hattet einen guten Start in die Woche ;o) Ich weiß nicht, ob ihr es wusstet, aber die liebe Jessa von "Useless Trinkets" hat vor Kurzem geheiratet und die Herstellung ihrer Hochzeitskarte fiel genau in den Zeitraum, in dem ich meine Inspirationskarte für die neue PINspirational Challenge werkeln wollte. Das Bild zeigt Vögel in einem Nest und bei Nest habe ich an ein Zuhause gedacht, bei Zuhause an Geborgenheit, bei Geborgenheit dann an Liebe und von Liebe bin ich zurück zur Hochzeit von Jessa gekommen. Das erklärt dann sicherlich auch, wie es zu dieser Karte kam:

Heya everybody!
I hope you had a good start to your week ;o) I don't know if you knew, but the lovely Jessa from "Useless Trinkets" got married in May and the making of her card happened, when I started thinking about the inspiration card for the new PINspirational Challenge. The inspiration pic shows some birds near their nest and my thought process suddenly went from nest to home to a feeling of security to love and from there right back to Jessa's wedding. This seems to be the reason why I came up with this card:


Erst wollte ich Jessa ja eine Monster-Hochzeitskarte machen ( - wer mit ihren wunderbar humorvollen Werken vertraut ist, weiß sicherlich warum und wer sie nicht kennt, sollte schnell mal bei ihr vorbei hüpfen). Aber da ich keine Monsterchen habe, hoffe ich, dass sie sich auch über die Piepmätze gefreut hat ;o) Bei dem Design habe ich mich an ihren Gäste-Goodies orientiert. (Falls ihr möchtet, schaut sie euch doch mal hier auf Jessas Instagram-Account an.)

First I wanted to make a card using monsters (and if you know Jessa's wonderfully and humorous cards, you will certainly know why and if you aren't familiar with her projects I highly recommend taking a look at them). Unfortunately I don't own any monster stamps, so I hope she likes those little love birds, too ;o) The design of my card loosely follows her design of the gift bags for her guest. (If you are interested in comparing those designs and in getting to know Jessa's work a little better, why not also take a look here at her instagram account?!)


Und nun zum Karten-Rezept: Als erstes habe ich die Schneekugel, die Vögelchen und die Torte gestempelt und mit Zigs coloriert, weil ich einen recht soften Look für die Karte haben wollte. Als nächstes habe ich dann alles ausgeschnitten und mit weißem Embossingpulver noch einen Spruch auf den Sockel der Schneekugel hinzugefügt. Danach habe ich das karierte Muster auf Vanille-farbenes Papier gestempelt, es auf die richtige Größe geschnitten und das Stück Glitzertape oben angebracht - genauso, wie Jessa auf ihren Gastgeschenken. Allerdings habe ich mich für ein goldenes Tape entschieden, statt ein pinkes zu benutzen ;o) Alles, was nun zu tun war, war alles an die richtige Stelle zu kleben. Ein kleiner Trick, der das Leben eines jeden Crafters leichter macht, hat mir dabei geholfen: Die Füße der Vögel habe ich nicht ausgeschnitten, weil mir das zu fisselig ist. Stattdessen habe ich die beiden an die Stelle gestempelt, wo sie stehen sollte und dann die Körper einfach nur noch auf die Beinchen drauf geklebt. Viel einfacher so ;o)

Now to the card-recipe: I stamped the snow globe, the birds and the cake all seperately and coloured them with Zig markers, because I wanted to achieve a rather soft look. Next I fussy cut all of them out and added the sentiment with white embossing powder to the bottom part of the globe. Afterwards I stamped a grid pattern on some vanilla coloured cardstock, cut it to size and added a piece of glitter tape to the top, just as Jessa did on her gift bags. I used a golden colour instead of a bright pink one though ;o) Now all that was left to do was to assemble the card. A little trick to make a crafter's life easier helped me: I didn't cut out the bird's feet but rather stamped them and then placed the coloured birds on top. Much easier ;o)


Das ist das aktuelle Inspirationsbild für die PINspirational Challenge und vergesst nicht, dass unser Sponsor "Robyn's Fetish" einen Preis von 2 Digistamps für den Gewinner gestiftet hat.

This is the current inspiration pic at the PINspirational Challenge and don't forget our kind sponsor "Robyn's Fetish" offers a prize of 2 digi stamps to the winner ;o)


Material / supplies:
Stempel / stamps: "Happy wedding" & "Ready, Set, Snow" von Lawn Fawn
                              "Grid Background" von My Favorite Things

Challenges:

Samstag, 4. Juni 2016

Rainbow Flowers

Hallöchen ihr Lieben ;o)
Diesen Stempel von Neat & Tangled wollte ich schon eine ganze Weile haben und endlich konnte ich ihn in meinem Bastelzimmer willkommen heißen. Als erstes hab ich mir gedacht, dass ich wohl noch warten würde, bis ich ihn benutzte, weil es ein herbstliches Design ist und ich im Sommer (und auch nur, wenn jede Woche ein paar sommerliche Stunden bereit hält) wirklich noch nicht an den Herbst denken möchte. Dann hatte ich die Idee. Ich liebe gerade die Regenbogenfarben und dachte mir, ich könnte ja eine bunte Karte daraus machen:

Heya my dear friends ;o)
I had an eye on this particular stamp by Neat & Tangled for ages and finally got it. At first I thought, well this is in autumny stamp, right? So what do I do with it in the summer time? Then it hit me. I wanted to create some rainbow coloured leaves and thus came up with this design:


Das ist eine recht ungewöhnliche Karte für mich, finde ich. Wahrscheinlich, weil ich sonst eher selten so starke Kontraste auf meinen Karten habe, aber hier fand ich den schwarz-weiß gestreiften Hintergrund einfach perfekt zu den knalligen Blättern passend. Zuerst habe ich den Stempel mit Versamark auf Aquarellpapier gestempelt und weiß embossed. Coloriert habe ich dann mit je 2 Zig Markern pro Blatt. Als erstes habe ich die dunkelste Farbe an den Außenkanten der Blattsegmente benutzt, dann habe ich mit dem helleren Stift einen Übergang gemalt und zum Schluss habe ich die Farbe mit einem Wassertankpinsel vermalt.

This is quite a different look for me, because of the bold black an white background I think, but I really love how it turned out. I stamped the image with Versamark Ink on some watercolour paper and white heat embossed it. I used two different Zig markers on each leaf: First I used the darkest one at the edges of each segment, then I blended the ink with a lighter shade and lastly used a water brush to lighten the colour towards the outside of the leaf. (Hope that makes sense...)


Nachdem alles getrocknet war, habe ich das "Happy Birthday" auf den freien Streifen gestempelt, das Motiv per Hand ausgeschnitten und mit Abstandshaltern auf das schwarz-weiße Papier geklebt. Um noch ein wenig Farbe auf die Kartenbasis zu bringen, habe ich Enamel Dots in all den Farben, die ich für die Blätter benutzt habe, herausgesucht und um das Aquarellteil heraum verteilt.

After everything had dried stamped the happy birthday to the white strip and fussy cut the whole image out. Next I adhered it to the patterned paper with some foam tape. To add some interest to the black and white parts of the card I scattered enamel dots in rainbow colours around the journaling card.


Material / supplies:
Stempel / stamps: "Maple Leaves Journaling Card" von Neat & Tangled
                            "Birthday Wishes" von Pink and Main
Colouring: Zig Markers

Challenges:
Related Posts Plugin for WordPress, Blogger...