Donnerstag, 31. März 2016

Thanks - a carrot bunch ;o)

Hallo ihr lieben Kreativen,
bevor wir alle keine Häschen mehr sehen können, wollte ich euch noch schnell diese Karte zeigen:

Hello everyone ;o)
Before you can't stand the sight of cute little bunnies anymore, I wanted to show you my newest card:


Eine liebe Freundin hat mir vor Kurzem bei ein wenig Gartenarbeit geholfen und ich habe diese Karte gemacht, um mich für ihre Hilfe zu bedanken. Das Papier habe ich selber hergestellt, weil ich einen Erdton haben wollte und meine Papiersammlung das nicht hergegeben hat. (Und das, obwohl ich so viel Papier habe...) Den Himmel habe ich auch mit Distress Inks gewischt und habe, als alles trocken war, die nötigen Teile ausgestanzt.

A dear friend of mine helped with some gardening, so I made this card to thank her. I made the paper myself by sponging different shades of browns on a piece of white paper. I wanted to create the look of earth and am rather pleased with the result ;o) I did the same for the sky and waited until everything was dry before die cutting the three hills and the sky piece. 


Als nächstes habe ich die Möhren und den Hasen gestempelt, coloriert und ausgeschnitten. Da ich den Hasen auf den "Hügel" hinter dem "s" stellen wollte und es -für mich- besser wirkt, wenn der erhobene Fuß außen ist, habe ich ihn mit der Spiegeltechnik gestempelt. (Die Technik habe ich in diesem Post ausführlicher beschrieben und mit Bildern veranschaulicht: klick) Man bekommt mit dieser Stempeltechnik zwar in der Regel keinen ganz so klaren Abdruck, aber er ist okay und im Gesicht arbeite ich dann einfach ein wenig nach.

Next I stamped, coloured and fussy cut the carrots and the bunny. Because I wanted the bunny to stand on the slight "hill" behind the letter "s" I used the mirror stamping technique. (I have described it in detail and with the help of a few pictures in this post: click) You won't get as crips an outline as if you would stamp directly to paper, but it usually works well enough ;o)


Ich wollte noch einen kleinen Clou für die Karte und habe deshalb noch eine Nachricht unter den fünf Karotten versteckt, die ich als Gruppe zusammengestempelt habe. Zum Schluss habe ich noch ein paar Wölkchen in den Himmel gestempelt (die leider deutlich blasser geworden sind, als ich es wollte) und alles an seinem Ort festgeklebt.

I didn't want the card to be too plain, so I hid this message unter the five carrots that I had stamped as a group. Lastly I stamped some clouds in the sky (which turned out a lot paler than I had hoped) and glued everything down at its designated place. 


Material / supplies:
Stempel / stamps: "Happy Hoppy" von Gerda Steiner Designs
                             "Thank you Tags" von Lawn Fawn
Stanzen / dies: "Stitched Hillside Borders" von Lawn Fawn
                         "Thanks Word Die" von Clearly Besotted
Distress Ink Colours: Earth - Walnut Stain, Vintage Photo & Ground Espresso
                                  Sky - Tumbled Glass, Broken China & Peacock Feathers

Challenges:
GSD Share Your Designs Challenge
Stempelküche Challenge "Frühlingsgefühle" (Endlich wieder Gartenarbeit - hihi ;o)
Simon Says Wednesday Challenge "Anything goes"
Marker Pop Challenge "Critters"
Addicted To Stamps and More "Make your mark"

Dienstag, 29. März 2016

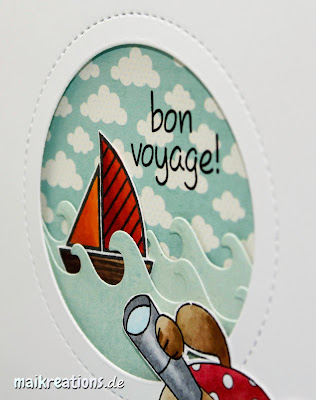
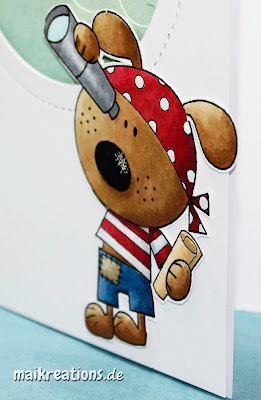
Bon Voyage - Pirate Dog

Hallo ihr Lieben!
Ich hoffe, ihr hattet ein paar schöne Ostertage und nicht zu viel Regen ;o) Heute möchte ich euch meine Inspirationskarte zur aktuelle PINspirational Challenge zeigen:

Hello my dear crafty friends!
I hope you all had a few lovely and not too rainy days this Easter ;o)Today I would like to show you my inspiration card for the current PINspirational Challenge:


Unser Sponsor ist dieses Mal "All Dressed Up Stamps" und zu gewinnen gibt es 2 Digis aus ihrer Kollektion. Dies hier ist das PINspirational Bild:

Our kind sponsor this time is "All Dressed Up Stamps" and you could win 2 digis from their collection on etsy. This is our PINspirational picture:


Ich liebe diesen Spruch, neben Johnny Depp, weil er mich immer zum Lachen bringt ;o) Aber nun zur Karte. Zuerst habe ich den süßen Hund ausgedruckt, mit Copics coloriert und anschließend ausgeschnitten. Nachdem ich das Fenster aus dem Papier geschnitten habe, habe ich mich um die Szene gekümmert, die man dort hindurch sehen kann. Dafür habe ich zwei Wellenformen ausgestanzt und ein gemustertes Papier mit den süßen Wölkchen zurecht geschnitten.

I really love the sentiment next to Johnny Depp, because it never fails to make me smile :o) But now on to my card. I printed and coloured the cute pirate dog and cut it out. After I had die cut the peek-a-boo window for my panel I prepared the scene that went behind it. I die cut two wave shapes from light blue paper and also cut a piece of patterned paper to size.


Das Schiff habe ich nach dem Colorieren ebenfalls ausgeschnitten und zwischen die Wellen geklebt. Danach habe ich den Spruch gestempelt und das weiße Papier mit Abstandshaltern darüber geklebt. Zum Schluss habe ich den Hund noch an die passende Stelle geklebt und fertig war die Karte. Ich hoffe, sie gefällt euch ;o)

After I had coloured the boat I fussy cut it as well and glued it down between the waves. Next I stamped the sentiment and adhered the white panel with the window with foam tapes to give it more dimension. Finally I stuck the dog down, having its right ear hang over the edge of the card just a little bit and my card was done. I hope you like it ;o)


Habt einen wunderschönen Tag und denkt dran: Sei immer Du selbst... ;o)

Have a fantastic day and remember to always be yourself... ;o)

Material / supplies:
Stempel / stamps: "Pirate Puppy" von All Dressed Up
                              "Sailing" von Simon Says Stamp
 Stanzen / dies: "Making Waves" & "Jumbo Peek-a-Boo Circle" von My Favorite Things

Challenges:

Samstag, 26. März 2016

ENTlich bist Du da

Halli Hallo ihr Lieben!
Dies hier ist meine vierte und leider auch schon letzte Gastdesign Karte für den Gerda Steiner Blog.
Hello my dear crafty friends!
This is my fourth and unfortunately last card for my guest design over at the Gerda Steiner Designs blog.


Ich wollte den Kartenspruch unter den Enten stehen habe, weshalb ich beim Stempeln des süßen Federviehs darauf geachtet habe, ausreichend Platz nach unten zu lassen. Nachdem ich alle Abdrücke aufgestempelt hatte, holte ich die Copics raus und machte mich an die Arbeit sie zu colorieren. Den Rest habe ich dann im Anschluss hinzugemalt. Es hat sich herausgestellt, dass es am einfachsten war zuerst ein ganz helles Blau für den Himmel zu benutzen und erst dann das Gras hinzuzufügen. Ganz zum Schluss kam dann das kühle Nass hinzu.

I knew I wanted the sentiment to be below the ducks so I made sure to leave enough space. Once I had stamped all the images, I coloured them in using Copic markers. Next I added the grass at the shore and the water.


Als ich die Buchstaben für meinen Spruch ausgestanzt habe, habe ich bewusst die ersten drei als Gro- und die weiteren als Kleinbuchstaben ausgestanzt, um das Wortspiel noch ein wenig mehr hervorzuheben. Nachdem ich den unteren Teil mit Versamark gestempelt und dann weiß embossed habe, hab ich die Buchstaben mit Abstandshaltern aufgeklebt.

When I die cut the letters for the sentiment I deliberately die cut the first ones in capital letters to emphasize the play on words here. The sentiment means "Finally you are here", but usually you would spell the first word a bit differently. I purposely misspelled it and wrote "ENTlich", because in German the word "Ente" means duck. After I had heat embossed the second part of the sentiment I adhered the die cut letters and glued the panel to a white card base.


Material / supplies:
Stempel / stamps: "Lucky Duck" von Gerda Steiner Designs
                            "Jessie's ABCs" von Lawn Fawn
Stanzen / dies: "Quinns ABCs - Lawn Cuts" von Lawn Fawn
                      "Stiched Rectangle" von Simon Says Stamp

Freitag, 25. März 2016

Happy Insta Girls Oster Hop

Halli Hallo ihr Lieben!
Heute ist es endlich soweit: die Happy Insta Girls hopsen wieder ;o) Dieses Mal haben wir uns Osterkarten geschickt. (Welche Geschichte sich hinter den Happy Insta Girls verbirgt und wie ich zu diesen wunderbaren und kreativen Mädels dazugestoßen bin, könnt ihr hier nachlesen, falls ihr mögt.)

Hello my dear crafty friends!
Today we finally have a new  Happy Insta Girls Blog Hop for you ;o) This time we sent each other Easter cards. (If you would like to learn more about the wonderful story behind the Happy Insta Girls and how I became part of it, just click here.)
Es ist immer ganz spannend, weil man ja nie weiß, von wem man eine Karte bekommen wird. Dieses Mal hatte ich großes Losglück und habe diese witzige Karte von Tanja vom "Stempelspielplatz" bekommen.  Ist der Hase nicht einfach zu süß, mit seinem schiefen Lächeln und den... ehm... Hasenzähnen?!

Every time it is very exciting to find out whom we are going to send a card to but also whose card is going to be in our letter box. This time I had been very lucky in the draw, because a couple of days ago I got this super fun card by Tanja from "Stempelspielplatz" . Wouldn't you agree that this bunny is simply too cute with its crooked smile and its.... ummm.... little buck teeth?!


Danke Hasi, ähm, ich meine natürlich Tanja, dass Du mich mit Deiner Karte so zum Grinsen gebracht hast!

Thank you Tanja, for making me smile with this Easter card!

Meine Karte ging dieses Mal an Dana von "Pixels & Glue", die immer so wunderschöne grafische Karten macht. Ich hoffe, dass sie auch Osterhäschen auf Karten mag, denn diese Karte ist hier in einen Umschlag mit ihrem Namen gehüpft:
My card went to Dana from "Pixels & Glue" this time. She makes beautiful graphic cards a lot of times, but I hope she does like Easter bunnies, too, because this is the card that hopped into the envelope with her name on:


Ihr habt bestimmt schon bemerkt, dass für einen vollständigen Spruch noch etwas fehlt... Wir hatten als optionales Gimmick, dass wir etwas an der Karte, im Umschlag oder sonst wo, verstecken - wie es sich halt an Ostern gehört ;o) Also habe ich den zweiten Teil der Karte sozusagen innen versteckt:

You have probably already noticed that the sentiment isn't complete... An optional twist for our hop was to hide something. It could be inside the envelope, someplace on or in the card - just as you would anticipate for an Easter gift ;o) So I hid the second part of my card on the inside:


Das Häschen hat zum Glück alle Ostereier gefunden und in den Korb gelegt. Ich frag mich, wo der Osterhase als nächstes hinhüpfen wird... Falls er unserem Blog Hop folgt, dann sehen wir ihn als nächstes bei Dana. ;o)
Und nur für den Fall, dass ihr euch zwischendurch verlauft, ist hier die komplette Liste unseres Oster-Hoppel-Hops:

The bunny has now found all the eggs and placed them neatly in the basket. Wonder where he is going to hop to next... If he follows our blog hop, he will be seen next over at Dana's. ;o)
And just in case you might get lost along the way, this is the complete Easter-hop with links:


Maike <-- hier seid ihr gerade :o)

Material / supplies:
Stempel / stamps: "Eggstra Special Easter" von Lawn Fawn
Stanzen / dies: "Grassy Border" von Lawn Fawn

(I mirror stamped the bunny and also altered the appearance of the basket by masking - just in case you were wondering where the extra images came from) Happy crafting, everyone ;o)

Challenges:
CMD Challenge "Ostern"
7 Kids College Kids #148 "Anything goes"

Mittwoch, 23. März 2016

Sweet Birthday Wishes

Hallo ihr Lieben!
Ihr braucht ganz schnell noch eine Geburtstagskarte? Ich habe für mich herausgefunden, dass ich für eine ganz schnelle Karte auf meine zwei am meisten benutzten Techniken verzichten muss: Colorieren und Die-Cutting. Was aber zum Glück bleibt ist Stempeln und vielleicht noch ein paar schnelle, künstlerische Hintergründe. Für diese Karte habe ich mich für Ersteres entschieden:

Hello my dear crafty friends!
Do you need a very quick birthday card? I have found out, that if I want to create a really quick card I have to do without two of my favourite and most often used techniques: colouring and die cutting. Luckily that leaves stamping and those quick and artistic backgrounds. For this card I went for the stamping:


Flächige Stempel sind super geeignet, weil man ein super Ergebnis bekommt, wenn man sie einfach nur abstempelt, aber man kann darüber hinaus noch viel mehr damit machen: Masking und so Szenen gestalten, mit Markern Schattierungen hinzufügen, etc. Bei dieser Karte habe ich die Bonbons nur "übereinander" gestempelt und direkt darüber noch den Kartenspruch. Weil sich jetzt alles auf der linken Seite abspielte, habe ich am Rand der rechten Seite zum Ausbalancieren noch ein Streifenmuster gestempelt. Zum Abschluss habe noch eine gestrichelte Linie hinzugefügt und - weil es ja eine Geburtstagskarte ist - noch großzügig Clear Wink of Stella auf alle Bonbons aufgetragen.

Solid stamps are great, because you get awesome results just by stamping them down, but you can do more with them, too: masking and thus creating scenes, using markers for a tiny bit of shading, etc. Here I simply "stacked" the sweets and stamped the sentiment above. Because I had all the interest positioned on the left side of the card I stamped a diagonally striped background stamp just at the edge of the right side. That helped to balance the card. To finish the card I drew a stitched line across the card, just leaving the right side as it was. However, seeing that it is a birthday card, there was something missing still. I quickly figured out that it was glitter and shine. So I took my Clear Wink of Stella and liberally coated the sweets with it. Now it felt like a proper birthday card.


Das Foto ist nicht wirklich das beste, aber man kann hier wenigsten ein bisschen den Schimmer erkennen..

This picture isn't the absolute best, but at least I managed to capture a little bit of the shimmer...

Material / supplies:
Stempel / stamps: "How We Roll" von Waffle Flower / Simon Says Stamp Exclusive
                            "Diagonal Stripes Background" von My Favorite Things

Challenges:

Montag, 21. März 2016

Happy Easter

Hallo ihr Lieben!
Ich wünsche euch einen guten Start in die Woche! Heute habe ich noch eine Osterkarte, die euch als Inspiration für die neue Challenge von den Crafty Cardmakers dienen soll ;o)

Heya my dear crafty friends!
I hope you are having a great start to your week! Today I would like to share with you my inspiration card for the new "Easter" challenge over at the Crafty Cardmakers blog:


Als erstes habe ich den blauen Hintergrund und die beiden Grashügel aus gemustertem Papier ausgestanzt. Den "Himmel" und den hinteren Hügel habe ich direkt im Anschluss auf die Kartenbasis aufgeklebt und noch schnell die Blume dazugesetzt. Schon lange hatte ich die Idee einen echten Miniholzzaun zu verwenden und diese Karte hat sich förmlich angeboten. Also hab ich's ausprobiert. Mit meiner Zange habe die Holzstäbchen durchgeschnitten und mit Multi Medium Matte aufgeklebt.

I started by die cutting the blue background and the grassy hills from patterned paper. I glued down the "sky" and the "hill" in the back to the card base first and then stuck down the die cut flower to the left side as well. I had this idea of a proper wooden fence on one of my cards for a while now and this seemed to be the perfect opportunity to give it a go. So i did. With my pliers I cut the wooded pieces (little rods?) in half and glued them to the paper using Multi Medium Matte.


Nachdem der Zaun getrocknet war, habe ich den zweiten Grashügel darüber und die Wolken aufgeklebt. Meinen Spruch wollte ich auf einem Osterei haben, also habe ich mir eine meiner neuen Stanzen geschnappt, eines in der passenden Größe ausgeschnitten und dann mit Copics coloriert. (Y00 & R20 und C2 & C0 für die Schattierung) Bevor ich es neben den süßen Hasen geklebt habe, habe ich noch schnell das "Happy Easter" darauf gestempelt. Fertig war meine Karte ;o)

When everything was dry I added the smaller grassy hill, the clouds and the cute little bunny as well. I wanted my sentiment to be on an Easter egg, so I die cut one of my new Easter egg shaped dies coloured it with Copics (Y00 & R20 and C2 & C0 for the shading). Before I adhered it next to the cute bunny I stamped "Happy Easter" on there and my card was done ;o)


Ich hoffe, ihr teilt eure Oster Kreationen mit uns auf dem Crafty Cardmakers Challenge Blog! Happy crafting ;o)

I hope you will show us your Easter creations over at the Crafty Cardmakers challenge blog! Happy crafting ;o)

Material / supplies:
Stempel/ stamps: "Carrot Bunny Digital Stamp" von Gerda Steiner Designs
                           "Springtime Bunnies" von Memory Box
Stanzen / dies: "Blueprints 26" von My Favorite Things
                        "Straight Easter Egg" von Nellie Snellen
                        "Clouds Dies" & "Dainty Flowers Dies" von Paper Smooches


Sonntag, 20. März 2016

You are the best! (GSD Bunnies)

Hallo ihr Lieben!
Dies ist nun schon meine dritte und damit vorletzte Karte für den Gerda Steiner Design Blog. Die Zeit rast ganz schön... Vielleicht erkennt ihr den Süßen ganz unten ja wieder - er ist aus dem Set "Happy Hoppy" und dieses mal wollte ich eine bunte, fröhliche Karte machen, bei der alle drei Hasen zur Geltung kommen ;o)

Hello my dear crafty friends!
This is the third card for my guest design for the Gerda Steiner Designs blog. I have used all three bunnies from the "Happy Hoppy" clear stamp set to create a fun and colourful card.


Die Häschen habe ich dieses Mal weiß coloriert, damit sie gegen die bunten Hintergründe richtig gut herausstechen. Nachdem ich die drei Süßen gestempelt, coloriert und ausgeschnitten habe, habe ich die drei Eiformen aus dem Papier gestanzt. Das Papier habe ich an die passende Stelle auf die Kartenbasis gelegt und habe ihre Position mit einem Bleistift eingezeichnet. Dann habe ich mit Post-Its die Formen eine nach der anderen maskiert, die Bleistiftlinie wegradiert (wichtig, damit sie nicht unter der Farbe "gefangen" wird) und habe dann mit einem Ink Blending Tool ganz sachte die Farben aufgetragen.

For my card I chose to go with white bunnies, so that they would stand out against the yellow, pink and turquoise backdrops. When I had coloured and fussy cut the three cuties I die cut the egg-shapes from a white panel. With the help of that panel and a pencil I marked where I wanted to sponge on the ink, masked off the area, erased the pencil line (this is an important step, which I always need to remind myself of, because you don't want the pencil to get "trapped" under the ink) and used an ink blending tool to lightly sponge on the ink.


Als nächstes waren die Rahmen für die Öffnungen dran. Dazu habe ich die gleiche Stanze wie zuvor zusammen mit einer etwas größeren benutzt und so den Rahmen bekommen. Die habe ich dann mit den gleichen Farben (Squeezed Lemonade, Spun Sugar & Peacock Feathers) eingefärbt - allerdings ein klein bisschen dunkler, damit sie sich besser absetzen. Die Rahmen habe ich dann mit Flüssigkleber an ihren Bestimmungsort geklebt, habe den Kartenspruch gestempelt und das Papier mit Abstandshaltern auf die Kartenbasis geklebt.

Next I die cut the frames for the egg shaped holes and coloured them with the same colours (Squeezed Lemonade, Spun Sugar & Peacock Feathers) only this time I put lots of ink on there, so that the frame would be a little darker than the background colour. I glued the frames in place with some liquid glue, stamped the sentiment and adhered the panel to my card base using foam tape.


Nun kam der Teil, der mir am meisten Spaß gemacht hast. Ich habe eine Öffnung für jeden Hasen ausgewählt und sie ebenfalls mit Abstandshaltern hineingeklebt. Dem Hasen rechts habe ich noch einen Eierballon in die Hand gedrückt und fertig war die Karte. Ich hoffe sie gefällt euch  Happy crafting ;o)

Now came the fun part. I chose a space for each bunny, added them using foam tape as well and also added an Easter egg balloon to the bunny on the right. I hope you like the card. Happy crafting, everyone ;o)

Material / supplies:
Stempel / stamps: "Happy Hoppy" von Gerda Steiner Designs
                            "Frohe Ostern" von Efco (Osterei)
Stanzen / dies: "Stitched Rectangles" von Lawn Fawn
                         "Straight Easter Egg" von Nellie Snellen

Samstag, 19. März 2016

Frohe Ostern mit Willa / Happy Easter with Willa

Huhu ihr Lieben!
Dieser kleine süße Hase heißt Willa und wie man sieht geht sie gern spazieren ;o) Die Karte habe ich als Inspirationskarte für die neue Herausforderung auf dem Challenge Up Your Life Blog gewerkelt. Das Thema lautet dieses Mal "Häschen":

Hello my dear crafty friends!
May I introduce you to the cute bunny Willa, who loves to be outside and to go for a walk ;o) I made this card for the newest challenge over at the Challenge Up Your Life blog. The topic this time is "bunnies":


Als erstes habe ich den Hintergrund für die Karte gestaltet. Dazu habe ich die Ostereier mit Antique Linen Distress Ink aufgestempelt und mit Copics coloriert. Mit Hilfe der E20er und einem braunen Multi Liner habe ich die Holzstruktur aufgemalt, wobei ich darauf geachtet habe, die obere rechte Ecke heller zu lassen, da ich mir aus der Richtung meine Lichtquelle vorgestellt habe.

I started by creating the Easter egg background. I stamped the eggs with Antique Linen Distress Ink and coloured them using Copic markers. Then I created a paper that looked like wood using E20ies markers and a brown Multi Liner, making sure to leave a highlight at the top right, where I imagined my light source to be.


Mit meinem Skalpellmesser habe ich ein Loch in das Ostereierpapier geschnitten, das groß genug war, dass man es nicht mehr sehen konnte, aber nicht zu groß, damit ich den Rahmen noch darauf festkleben konnte. Aud die Kartenbasis habe ich einen Himmel gewischt (mit dem Ink Blending Tool und einer Wolkenmaske) und 2 Lagen Gras darüber geklebt. Jetzt war es an der Zeit den Spruch zu stempeln und das Papier mit Abstandshaltern aufzukleben. Als letztes habe ich Willa in den Rahmen geklebt. Da ihre Ohren aus dem Rahmen herausschauen und sie als gehendes Häschen gezeichnet wurde, sieht es so aus, als würde sie auf einen zu laufen, wenn man die Karte in den Händen hält.

With the help of my craft knife I cut a hole into the Easter egg panel that was big enough, so that the edges wouldn't be visible, but not too big, so that I would still have enough room for the adhesive. I sponged a sky directly on the card base and added to layers of grass on top. Now it was time to stamp the sentiment and to adhere the panel to the card base using foam tape, to give the card a bit of dimension. Finally I added Willa to the frame. Because her ears are on top of the frame and she is drawn as a walking bunny it actually looks like she is walking towards whoever is holding the card.


Ich würde mich freuen, wenn ihr bei der "Häschen" Challenge mitmachen und eure Werke bei uns verlinken würdet ;o)

I hope you are going to join us for this fun "Bunnies" Challenge over at Challenge Up Your Life ;o)

Material / supplies:
Stempel / stamps: "Willa" von Purple Onion Designs
                            "Frohe Ostern" von Efco
Stanzen /dies: "Frame 4" von Paper Smooches
                      "Grassy Border" von Lawn Fawn


Donnerstag, 17. März 2016

Rezeptkarte Möhrenkuchen / Recipe Tag Carrot Cake

Hallo ihr Lieben!
Heute möchte ich eine Rezeptkarte und mal keine traditionelle Grußkarte mit euch teilen. Vor Kurzem habe ich einer lieben Freundin von mir ein Stück meines Schokomöhrenkuchens mitgebracht und sie versuchte daraufhin mich dazu zu überreden meinen Job sausen zu lassen und eine Bäckerei aufzumachen ;o) Keine Chance, da ich wirklich nicht so gut backe, aber dieses Rezept ist genial. Daher wollte ich die Rezeptkarte samt Rezept und das kleine Dankeschön-Geschenk mit euch teilen, dass ich meiner Freundin jetzt fertig gemacht habe:

Hello my friends!
Today I would like to share with you a recipe tag instead of a card. A short while back I gace one of my wonderful friends a piece of my carrot-chocolate cake and she then tried to persuade me to quit my job and to open a bakery ;o) Well, not a chance, because I am usually not all that great at baking, but this recipe truly is awesome. So I thought I would share the recipe card with you along with the actual recipe and the little treats I gave to my friend this week:


Zutaten:
350g fein geriebene Möhren, 200g Butter, 150g Kuvertüre (zartbitter), 250g Kuvertüre (Vollmilch), 150g Zucker, 1 Pck. Vanillezucker, 180g Mehl, 120g gemahlene Haselnüsse, 1/2 Pck. Backpulver & 4 Eier

Ingredients:
350g finely grated carrots, 200g Butter, 150 g  dark couverture, 250g milk chocolate couverture, 150g sugar, 1 pack of vanilla sugar, 180g flour, 120g finely ground hazelnuts, 1/2 pack of baking powder & 4 eggs.


Zubereitung:
(Nachdem ich die Möhren gerieben habe, heize ich in der Regel den Backofen schon einmal auf 150°C. Umluft vor, dann passt es bei meinem Ofen mit der Zeit.)
1.) Butter, Zartbitterkuvertüre und 50g von der Vollmilchkuvertüre in einem Topf schmelzen.
     Zucker, Vanillezucker, Mehl, Nüsse und Backpulver mischen.
2.) Eier verquirlen und dann die Kuvertüremischung einrühren. Dann abwechselnd die
     Möhren und das Mehlgemisch zugeben und unterrühren.
3.) Eine Springform (26cm) mit Backpapier auslegen und den Rand einfetten.
     Teig einfüllen und circa 40- 45 Minuten backen.

4.) Den gut ausgekühlten Kuchen mit der restlichen Vollmilchkuvertüre überziehen.
     Wenn man mag, kann man den Kuchen jetzt auch noch z.B. mit so niedlichen
     Zuckermöhren verzieren ;o)

Viel Spaß und guten Appetit!

Preparation:
(Usually I grate the carrots first and then I heat up the oven to 300°F. so that it is hot enough just in time, if you have an oven with circulating air. Otherwise it is 350°F.)
1.) Melt the butter, all the dark and 50g of the milk chocolate in a pot.
     Mix the sugar, vanilla sugar, flour, nuts and baking powder in a bowl.

2.) Whisk the eggs for about two minutes and add the chocolate mix to it. Next add the
     carrots and the flour mixture in turns.
3.) Put some parchment paper to the bottom of a 10 inch springform tin and use a bit of
     butter to grease the sides of the tin. Fill in the cake batter and put it in the oven for about
     40 to 45 minutes.

4.) After baking let the cake cool down, then coat it with the rest of the milk chocolate. If you
     like you can add decorations to the cake while the chocolate hasn't dried completely -
     you could use little sugar carrots for example ;o)

Have fun and enjoy!

Material / supplies (for the tag):
Stempel / stamps: "Recipe for Happiness" von My Favorite Things
Stanzen / dies: "Tags a Lot" von Mama Elephant
                         "Stitched Labels 1" von Pretty Pink Posh

Challenges:
7 Kids College Fund #147 "Anything goes"
ABC Challenge "D is for Delicious"
The Sisterhood of Crafters "Use Dies or Punches"
Unicorn Challenge "Clean and Simple"
Craft Your Passion "Anything goes"

Dienstag, 15. März 2016

Have a special day

Hallöchen zusammen!
Heute möchte ich euch meine Inspirationskarte für die neue PINspirational Challenge zeigen. Unser Sponsor ist dieses Mal Elisabeth Bell Designs und wenn ihr auch mitmacht, könnt ihr einen Gutschein für ihren Shop gewinnen.

Hello everybody!
Today I'd like to show you my inspiration card for the new PINspirational Challenge. Our kind sponsor this time is Elisabeth Bell Designs and you could be our lucky winner this time. All you have to do is link your card to our challenge ;o)


Ich wollte eine schlichte Mädchen-Geburtstagskarte mit diesem süßen Schaf aus der "Lunar Animals" Sammlung machen und das ist dann dabei herausgekommen ;o) Damit die Wolltiere alle ungefähr den gleichen Platz haben, hab ich mir Lineal und Bleistift geschnappt und 12 gleich große Felder auf das Panel gezeichnet. Eines davon habe ich, wie ihr ja sicher schon entdeckt habt, für den Kartenspruch reserviert.

I wanted to create a really clean and simple birthday card for a girl using this cute sheep from the "Lunar Animals" set and this is what the finished card looked like ;o) In order to grant each animal an equal amount of space I took out my ruler and pencil and drew 12 squares on the panel. I reserved one for the sentiment and placed a sheep in each of the other ones.


Als Spruch hatte ich mir "have a special day" ausgesucht, weshalb ich ein Schaf anders colorieren wollte als die anderen und entschied mich für ein schwarzes Schaf. Um noch einen draufzusetzen, habe ich dem ganz besonderen Schaf noch eine rosa Krone aufgesetzt. Nachdem ich das gleiche rosa Papier auch auf meine Kartenbasis geklabt habe, hab ich die Schafe mit Abstandsklebern aufgeklebt und die Krone mit dem Clear Wink of Stella noch ein wenig zum Glitzern gebracht.

Because the sentiment says "have a special day" I wanted to make one sheep look different from the others and decided to colour it black. To top it all off I placed a pink crown on that special sheep's head. After I had adhered a pink piece of cardstock on my card base I stuck the white panel down with foam tape to give it a little bit of interest and made the crown sparkle a little with a Clear Wink of Stella glitter pen.

Inspirationsbild der PINspirational Challenge/ inspiration picture for the PINspirational challenge:
Material / supplies:
Stempel / stamps: "Lunar animals" von Mama Elephant
                              "Eggstra Special Easter" von Lawn Fawn (sentiment)
Stanze / die: "Stitched Rectangle" von Simon Says Stamp

Lil Wizard: Have a magical day

Hallo ihr Lieben!
Findet ihr nicht auch, dass zu einem Zauberer ein unruhiger Nachthimmel total gut passt? Zum Glück habe ich für diese Karte, die euch als Inspiration für unser neues Cards und More Challengethema "Use Ribbon" dienen soll, ein Himmel-Tutorial auf dem Copic Marker Deutschland Blog gefunden. (Klick) Das Digi nennt sich Lil Wizard und ist von Rick St. Dennis - unserem Sponsor für die aktuelle Challenge. Zu gewinnen gibt es zwei seiner Digis ;o)

Hello my crafty friends!
Wouldn't you agree that a night sky goes really well with the image of a wizard? Luckily I found a tutorial for one on the Copic Marker Germany blog (click) for my inspiration card for our new "Use Ribbon" challenge over at Cards und More. (There are loads of pictures and the author listed all the markers he has used, so even if you don't speak German this could be a useful tutorial for you, too, if you are looking into colouring a night sky...) The digi stamp is called "Lil Wizard" and from Rick St. Dennis who is our kind sponsor this time. You can win two of his digis ;o)


Nach dem Colorieren des Magiers (für die gelben Apllikationen auf seinem Mantel habe ich übrigens fluoreszierende Copics benutzt), habe ich ihn ausgestanzt und anschließend die Kartenbasis mit den Sternen bestempelt. Das Band habe ich als Girlande und als Akzent (rechts unten) eingesetzt. Da ich keinen geeigneten Spruch in meiner Stempelsammlung gefunden habe, hab ich ihn dieses Mal selber geschrieben...

After I had coloured the wizard (I have used fluorecent Copics for all the pattern on his cloak) I die cut the scene and next stamped all the stars on the card base. I have used the ribbon to make a garland and also used two pieces as an accent behind the die cut piece. Unfortunately I couldn't find the right sentiment in my stash, so I had to write it myself this time...


Ich hoffe, ihr zeigt uns, was ihr alles mit Bändern zaubern könnt und verlinkt eure Werke auf dem Card und More Blog! Habt eine zauberhafte Woche, ihr Lieben ;o)

I hope you are going to show us the magical things you can make with ribbon and link your projects to the Cards and More blog! Have a magical week, my friends ;o)

Material / supplies:
Stempel / stamps: "Lil Wizard" von Rick St. Dennis
                              "Starry Sky" von Hero Arts
Stanze / die: "Stitched Square" von Simon Says Stamp

Challenges:
Simon Monday Challenge "Use some lucky stars"
Ellibelle's Creative Moments "Let's Color"
Dream Valley Challenges "All about Birthdays"
Quirky Crafts "Quirky Masculine with ribbon or twine"

Samstag, 12. März 2016

Hello Duck (Guest Design for Gerda Steiner Designs)

Hallöchen ihr Lieben!
Heute gibt es hier auf meinem Blog die zweite Karte, die ich als Gastdesignerin für Gerda Steiner Designs gewerkelt habe. Hierfür habe ich das süße Stempelset "Lucky Duck" verwendet:

Hello my dear crafty friends!
Today I'd like to show you the second card I have made as the guest designer for Gerda Steiner Designs. I used the adorable "Lucky Duck" stamp set:


Als erstes habe ich die niedliche tauchende Ente gestempelt und ihr direkt eine Maske verpasst. Um den Hintergrund zu gestalten habe ich mir als erstes den unteren Teil vorgenommen. Dazu habe ich die Distress Inks Salty Ocean, Blueprint Sketch und Chipped Sapphire mit dem Ink Blending Tool aufgetragen, dann einige Tropfen Wasser auf den Bereich gespritzt und nach etwa einer Minuten mit einem trockenen Tuch die restliche Flüssigkeit abgetupft. Als nächstes habe ich eine Maske über das Wasser geklebt und den Bereich darüber mit der Farbe Mustard Seed eingefärbt, bevor ich die runde Maske für die Sonne aufgeklebt habe. Da ich einen Sonnenuntergang darstellen wollte, habe ich überwiegend orange-rote Farben benutzt: Spiced Marmelade, Abandoned Coral, Candied Apple und ein kleines bisschen Seedless Preserves ganz oben am Rand.

First I stamped the cute diving duck and  masked it off. In order to create the background I started with the bottom part first using three different shades of blue Distress Inks: Salty Ocean, Blueprint Sketch and Chipped Sapphire and added a few drops of water next. I let the droplets sit for about a minute before I took them off with a tissue. Next I masked the water area as well and added a layer of Mustard Seed before placing a circle mask on top. Because I wanted to create the look of a sunset I used red and orangy colours: Spiced Marmelade, Abandoned Coral, Candied Apple and a tiny, tiny bit of Seedless Preserves at the very top.

Nachdem alles trocken war, habe ich die Ente mit Copics coloriert und das Wort "hello" aus dem unteres Teil herausgestanzt. Hinter das entstandene Loch habe ich Vellum geklebt und anschließend die inneren Buchstabenteile wieder aufgeklebt. Hinter das ausgestanzte Wort habe ich orangefarbenen Cardstock auf die Kartenbasis geklebt, weil das am ehesten nach dem Licht eines Sonnenuntergangs ausschaute. Nun blieb nur noch die Fische um das Wort herum zu verteilen und die Szene mit Abstandshaltern auf die Kartenbasis zu kleben.

When everything was dry I coloured the duck in using Copic markers and also die cut the word hello from the bottom part of the panel. I adhered some vellum behind the panel to be able to stick the inner parts of the letters back where they belonged. Then I placed an orange piece of cardstock behind the area with the die cutting to make it look like the red from the sun set would shine through the vellum. Now all that was left to do was to glue the little fish all around the die cut sentiment and to adhere the finished panel to the vanilla card base. 


Habt ein schönes Wochenende & happy crafting ;o)
Have a great weekend, everone & happy crafting ;o)

Maike

Material / supplies:
Stempel / stamps: "Lucky Duck" von Gerda Steiner Designs
Stanzen / dies: "Scripty Hello" von Lawn Fawn
                      "Sunshine Layers Dies" von WPlus9

Donnerstag, 10. März 2016

Recipe For Happiness / Rezept fürs Glück

Hallöchen ihr Lieben!
Vor Kurzem gab es bei der MFT Challenge einen Sketch, den ich absolut genial fand. Leider habe ich ihn erst ganz kurz vor Challengeende entdeckt und konnte daher nicht mehr rechtzeitig eine Karte basteln. Weil mir der Sketch aber so gut gefallen hat, aber ich einfach jetzt eine Karte danach gebastelt, die ich mit euch teilen möchte:

Heya my dear friends!
A while back I found a sketch at the MFT challenge blog that I really loved, but only discovered shortly before they closed the link up. However I did like the sketch very much, so I still made a card with it and would like to share it with you now:


Die Töpfe habe ich nebeneinander gestempelt und dann das Brett selber hinzugemalt, da ich kein Regal in passender Größe gefunden habe. Die Holzstruktur habe ich wie bei dieser Karte (klick) gestaltet, nur, dass ich dieses Mal die E20er Serie benutzt habe. 

I stamped the pots next to each other and added the wooden board myself, because I couldn't find one that had the right size in my stash. I made it look like wood like I did on this card (click) - only that I have used the E20-series this time.


Das Rechteck habe ich aus hellblauem Designerpapier ausgestanzt und anschließend mit den Farben  Peacock Feathers und Blueprint Sketch distressed, damit es nicht so flach wirkte.

Because I didn't want the rectangle looking too flat I used the colours Peacock Feathers and Blueprint Sketch to distress the edges a bit. 


Den Spruch habe ich auf schwarzen Cardstock mit Weiß embossed und die Enden zurecht geschnitten. Den niedlichen Koch habe ich auf die rechte obere Ecke des Spruches platziert, so dass es fast so ausschaut, als würde er auf einem Treppchen oder so etwas stehen ;o) Zur Auflockerung und um das Design auszubalancieren, habe ich dann noch den Salzstreuer auf der linken Seite hinzugefügt. Wie findet ihr denn den Aufbau der Karte?

I stamped the sentiment using Versamark and heat embossed it in white on black cardstock. To give it more interest I cut both ends into flag shapes. I placed the adorable cook on the top right of the banner, so that it almost looks like he is standing on a podium or something like it ;o) Finally I added the salt shaker the top left of the sentiment to balance out the design. I hope you like the way the card turned out ;o)

Material / supplies:
Stempel / stamps: "Recipe For Happiness" von My Favorite Things
Stanzen / dies: "Wonky Stitched Elle-Ments" von Avery Elle
Papier / paper: "Brights Collection" von Avery Elle

Challenges:

Montag, 7. März 2016

Happy birthday foxy!

Hallo ihr Lieben!
Ich wünsche euch einen wunderbaren Start in eine tolle Woche und hoffe, ihr hattet ein schönes Wochenende. Meins war gruselig... aber gewollt gruselig ;o) In Bottrop gibt es das Grusellabyrinth und ich habe mich überreden lassen dort mit hin zu gehen und das, obwohl ich die wohl größte Schissbuchs vor'm Herrn bin *grins. Mein Fazit: Ich habe es überlebt und obwohl ich mich an manchen Stellen sehr erschreckt habe, war es ein tolles Erlebnis. Die Crew schafft es, dass man sich auf die Geschichte einlassen kann und die Räume sind wirklich sehr liebevoll gestaltet. Also, falls ihr euch mal gruseln möchtet, kann ich das Grusellabyrinth empfehlen. 
Aber nun zu meiner Karte - ich hoffe, die wird euch nicht zu sehr gruseln: 

Hello my dear crafty friends!
I hope you had a good start into a fantastic week and that you also had a fabulous weekend. Mine was scary... but volitional scary ;o) (I hope that is how you say it when someone - i.e. me - has agreed to being scared for 100 minutes straight even though they are chicken-hearted...) We went to a Horror Labyrinth here in North Rhine-Westphalia and I did have a lot of fun. Don't get me wrong, I was scared silly most of the time, but it was also fun. The actors have been fantastic and the rooms were so well designed, that I almost forgot it was just a play. So if you are ever in this area and like to get scared, then I can recommend the Horrow Labyrinth whole heartedly.
But now, let's move on to my card - which hopefully you won't find scary:


Abgesehen von dem No-Line-Coloring für den Fuchs ist dies eine schnell zu bastelnde Karte.Mit Twisted Citron und einem Ink-Blending Tool habe ich die untere rechte Ecke der Kartenbasis eingefärbt. Dann habe ich aus Masking Papier ein Herz herausgestanzt und dann als Schablone benutzt, um die Herzen, nach oben hin heller werdend, aufzutragen. Zum Schluss habe ich dann nur noch den Geburtstagsgruß gestempelt und den Fuchs mit Abstandshaltern aufgeklebt.

Apart from the no line colouring on the fox this was a really quick card to make. I used Twisted Citron and an ink blending tool to bring some colour to the bottom right corner of the card. Next I die cut a mask for the hearts and sponged ink through it as well, getting lighter towards the top. All that was left to do now was to stamp the sentiment and adhere the fox with some foam tape.


Auf dem Crafty Cardmakers Challenge Blog lautet das neue Thema "Go Green" - ihr seht also, woher meine Inspiration kam - und ich würde mich freuen, wenn auch ihr Lust hättet bei uns mitzuspielen.

The new challenge over at the Crafty Cardmakers blog is "Go Green" - so I think you can see where I got my inspiration from - and I would love to see your creations there as well ;o) 

Material / supplies:
Stempel / stamps: "Charmed" & "Bear Hugs" von Mama Elephant
                           "Critters in the forest" von Lawn Fawn ("foxy")

Challenges:
Related Posts Plugin for WordPress, Blogger...