Sonntag, 31. Januar 2016

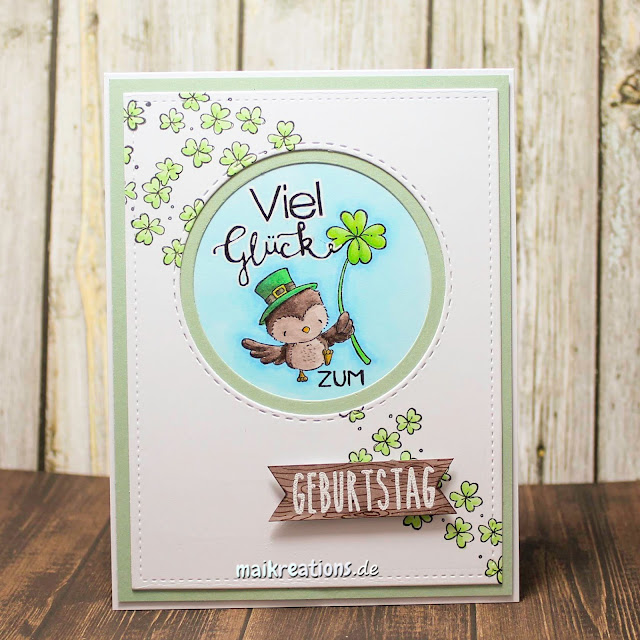
Viel Glück zum Geburtstag (Lucky)

Hallöchen allerseits ;o)
Nachdem ich euch vorgestern ja meine "Schrottkarte" im Zuge des Happy Insta Girls Schrott Hop gezeigt habe (falls ihr noch nicht durchgehüpft seid, klickt einfach hier), wollte ich euch heute wieder eine normale Karte zeigen, mit Stempeln die ich gerne mag ;o))) Die Stempel von Purple Onion Designs gehören zu meinen Favoriten, wie ihr sicher schon wisst und ich finde, sie lassen sich fabelhaft mit den Sprüchen aus den Sets von Create a Smile kombinieren:

Hello everyone ;o)
The day before yesterday I had the... ummm... pleasure to show you my "trash-card" as part of the Happy Insta Girls Schrott Hop (if you haven't hopped along yet, simply click here), so today I wanted to share a more normal (for me) card with supplies I chose and like ;o))) As you might know the stamps from Purple Onion Designs are amongst my favourites and I like to combine them with the sentiments from Create a Smile stamps:


Coloriert habe ich mit Copics - übrigens auch das Stückchen Papier für das Wort Geburtstag. Ich wollte, dass es zur Eule passt, also habe ich es einfach mit dem gleichen Stift (E74) angemalt und dann mit einem Copic Fineliner die Holzstruktur aufgemalt. 

I coloured everything with Copic markers. Even the strip of paper for the embossed part of the sentiment (Geburtstag means birthday). I used the same E74 I had used on the owl to colour the whole piece of paper brown and then added some wood texture with a Copic fineliner. 


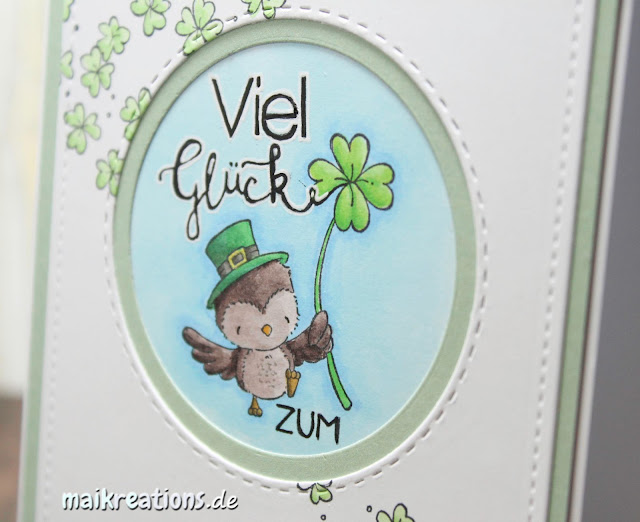
Zum Schluss habe ich noch etwas Wink of Stella Clear Marker auf die Kleeblätter gepinselt - ja, auch die vielen kleinen - und das "Viel Glück" mit einem weißen Gelstift umrandet.

To finish the card I coloured over the clovers - yes, even the little ones - with my Wink of Stella Clear pen and also added a white trim around the first part of the sentiment. 


Material / supplies:
Stempel / stamps: "Lucky" & "Clover Patch" von Purple Onion Designs
                            "Glück ist..." & "Mini Geburtstag" von Create a Smile
Stanzen / dies: "Stitched Circles" von Simon Says Stamp


Challenges:

Freitag, 29. Januar 2016

Happy Insta Girls Schrott Hop

Erinnert ihr euch noch an den Happy Insta Girls Nikolaus Blog Hop? (klick)
Die Karten waren alle wunderschön und bei all der Freude über die schönen Kreationen hatte ich irgendwie ganz verdrängt, dass da ja auch noch der Schrott-Teil war...

Do you remember our Happy Insta Girls Sankt Nicholas blog hop? (click)
The cards were clever and beautiful and with all the fun going on I somehow managed to forget about the second part which is the "Junk"-hop...


Von der lieben Jessa bin ich ja reich beschenkt worden, also hatte ich einiges an Auswahl. Trotzdem, oder gerade deswegen, fiel es mir anfangs echt schwer aus den ganzen Sachen eine zusammenpassende Karte zu erstellen. Nur noch mal zur Erinnerung - das habe ich alles von ihr bekommen:

Dear Jessa was very generous, so I had a lot to choose from. Even so - or because of that - it took me quite some time to get into it and find things I could combine to a somewhat decent card. Just to remind you - this is what I got from her:


Und nun freue ich mich sehr euch zeigen zu können, was daraus geworden ist :-)

And now I am very happy to show you what I made from Jessa's things:


Habt ihr schon erkannt, was alles von Jessa stammt? Also da wäre das Ribbon aus einer Art geprägter Folie, die silberfarbenen Rub Ons, die hell, hell leuchtenden Sterne und das blaue Chipboardteil mit leichtem Glitzerrand ;o
Eine Weihnachtskarte habe ich dann aber auch noch gemacht, weil ich den Weihnachtsmannstempel von Jessa wirklich süß fand:
Have you spotted all the elements I got from Jessa? There is the fake ribbon, the silvery rub ons, those bright, bright stars and also the chipboard label with just a hint of glitter around the edges :o)
Once that first card was done I thought I would make a christmas card as well, because I really liked the santa stamp she had given me:


Falls ihr noch mehr Inspirationen haben möchtet, wie man aus Dingen, die manch einer als "Schrott" weiterverschenkt, tolle Karten machen kann, dann schaut doch auch einmal bei den anderen Mädels vorbei und hüpft zu ihren Blogs:

If you'd like some more inspiration on how you can turn things that could be viewed as "junk" into great cards you should take a look at all the other cards from the girls and hop along with us:

Maike {hier seid ihr gerade / you are here}

Viel Spaß beim Hüpfen und euch allen einen kreativen Tag! Have fun with the hop and a creative day! ;o)

Mittwoch, 27. Januar 2016

Glückskuh

Hallöchen ihr Lieben!
Habt ihr schon mal eine Kuh an einem riesengroßen Kleeblatt knabbern sehen? Nein? Na, hier ist eine ;o)

Heya my dear crafty friends!
Have you ever seen a cow chewing on some clover? No? Well, here is one ;o)


Aus irgendeinem Grund kann man die Wortstreifen auf dem Foto nicht ganz so gut erkennen. Wenn man sie in der Hand hält kann man den zweifarbigen Spruch "Good Luck" jedoch prima lesen. Schade, dass die Kamera bzw. das Licht da nicht immer so mitspielen...

For some reason the word strips are not easy to read in the picture. But I hope you'll believe me, when I tell you that the sentiment is quite legible in real life. It is a shame, that the camera or the lighting (whatever it was in this case) isn't as cooperative as I would like it to be...


Nun zur Karte: Ich habe als erstes den Rahmen ausgestanzt, dann die Kuh mit Memento Ink draufgestempelt und anschließend mit Copics coloriert. Auf meine Kartenbasis habe ich als nächstes ein grünes Papier geklebt, das farblich gut zum Kleeblatt und den gestempelten Wortstreifen passt. Den Rahmen habe ich nur innen festgeklebt, so dass ich die äußeren Bögen ein wenig hochklappen konnte. Das gibt der Karte trotz des CAS-Looks noch etwas verspieltes.

Back to the card itself: First I die cut the frame from some white paper, stamped the image with Memento Ink and coloured it with Copic markers. I adhered a piece of green cardstock to my cardbase that would go nicely with the clover and the stamped word labels. I glued the frame down leaving the outer edge without any adhesive, so that I could bend it upwards a little. That gives the otherwise very CAS card a tiny bit of playfulness.


Material / supplies:
Stempel / stamps: "Lunar Animals" von Mama Elephant
                            "Glück ist.." von Create a Smile
                            "Label Maker Sentiments" von My Favorite Things
Stanze / die: "Doily Square Die" von Waffle Flower


Ich wünsche euch allen eine GLÜCKliche Woche ;o)
Wishing you all a week with lots of GOOD LUCK ;o)

Challenges:
CMD Challenge "Glücksbringer"
7 Kids College Fund Challenge #144 "Anything goes"

Montag, 25. Januar 2016

Thank you card: No stamping - just dies (Dankeskarte nur mit Stanzen)

Huhu ihr Lieben!
Bei den Crafty Cardmakers dreht sich dieses Mal alles um Stanzen und daher hatte ich mir vorgenommen eine Karte zu basteln, bei der nichts gestempelt ist. Dies hier ist dabei rausgekommen:

Heya my friends!
The Crafty Cardmakers new challenge theme is "Punches and / or Dies", so I thought I would go ahead and make a card without any stamping on it. This is what I came up with:


Da ich dieses Mal ja nichts zum Ausmalen hatte, habe ich bei der Papierauswahl besonders darauf geachtet, dass die Farben und Muster einerseits gut zusammen passen, andererseits sich aber auch genug voneinander abheben. Die schöne Blumenstanze hatte ich schon lange einmal benutzen wollen und so kam mir die Idee sie als Fokus für eine Dankeskarte zu benutzen.

Because I didn't have anything to colour for / on this card, I made sure that I chose colours and patterns that go well together and that also had enough contrast. I had wanted to use the flower die for a long time and this seemed to be a good time to use it as my focal point.


Den Schmetterling habe ich noch hinzugefügt, nachdem ich mir meine Karte eine Weile angesehen hatte und sie noch zu "blah" fand. Die Oberfläche vom Schmetterling habe ich für etwas Glanz auf meiner Karte noch mit dem Clear Wink of Stella bemalt.

After I thought my card was finished I looked at it for a while and decided it looked too plain for my taste, so I added the butterfly on top of the bloom. I coloured its wings and its body with Clear Wink of Stella and now I was happy with the result.


Material /supplies:
Stanzen/ dies: "Wild Garden by Julie Ebersol" von Essentials by Ellen
                      "Scripty Thanks" von Lawn Fawn
                      "Sunshine Layers Die" von WPlus9
                      "Pippi Butterfly" von Memory Box 

Challenges:

Samstag, 23. Januar 2016

Monster Jacobs gute Laune ;o)

Hallöchen ihr Lieben!
Heute haben wir wieder eine neue Aufgabe für auch auf dem Challenge Up Your Life Blog. Für mich war es dieses Mal wirklich eine Herausforderung, denn es sollen die Farben "blau, grün und gelb" benutzt werden. Puh, nicht so einfach, aber das Ergebnis mag ich sehr gern - und das nicht nur, weil Jacob mal wieder mit dabei ist ;o)

Heya my dear crafty friends!
Today we have a new challenge starting over at the Challenge Up Your Life blog. It was literally a challenge for me this time, because we should use the colours "blue, green and yellow". Phew, not my most commonly used colours, but I quite like the result - and not just because Jacob the monster makes an appearance again ;o)


Als erstes habe ich die Sterne und den Spruch gestempelt. Nachdem die Stempelfarbe getrocknet war, habe ich dann die durchsichtige Strukturpaste in der unteren linken Ecke aufgetragen.

First I stamped the stars using green, blue and yellow. When the ink had dried I stamped the sentiment (which could be translated as : My high spirits are looking for my motivation. Now all of them are gone!) and added the translucent paste to the bottom left corner of my card base. 


Das musste ich dann wirklich eine ganze Weile trocknen lassen, bevor ich Jacob gefahrlos dort drauf kleben konnte. (Die Paste hat die Kartenbasis außerdem leicht gewellt, weshalb ich die Karte über Nacht unter einen Stapel Bücher gelegt hatte...) Um den schockierte Gesichtsausdruck von Jacob noch zu unterstützen, habe ich den unteren Teil von ihm direkt auf die Karte und nur den Kopf und die Hand mit dem Eis mit Abstandshaltern aufgeklebt. Mit einem 1/4" Crop-a-Dile habedann noch die obere rechte Ecke abgerundet.

I had to let it dry for quite some time, before I could add Jacob on top. To give him more dimension and to emphasize his huge eyes I glued his bottom part directly to the card base but added some foam tape to his head and als to hand holding the ice cream. Lastly I rounded the top right corner to balance the design.


Material / supplies:
Stempel / stamps: "Jacob mit Eis" und "Meine gute Laune" von der Stempelbar
                             "Lots of Stars" von Simon Says
Schablone / stencil: "Concentric Circle Grid" von My Favorite Things

Donnerstag, 21. Januar 2016

Birthday Wishes - just for you -

Hallöchen ihr Lieben!
Farblich hat mich gerade glaube ich das Valentinsfieber gepackt ;o) Schon immer mochte ich die Kombination aus rosa, weiß und grau total gerne, aber ich glaube, dass ich damit bisher noch nie bewusst  eine Karte gewerkelt habe. Das habe ich mit dieser hier jetzt aber geändert:

Hello my dear crafty friends!
Colourwise I seem to be in the mood for Valentine's Day ;o) I have always loved the combination of pink, white and grey, but I can't recall ever consciously making a card with these colours. So, here it is:

Als erstes habe ich das Quadrat ausgestanzt und während es noch in der Stanze war von Außen nach Innen mit "Picked Raspberry" abgewischt (hier fällt mir grad echt kein besseres Wort ein...) So bekommt man nämlich ohne etwas abkleben zu müssen einen schönen weißen Rand. Ich liebe diesen Trick ;o) Während das nun trocknete, habe ich mich um die Kartenbasis gekümmert. Ich wusste ja, dass ich unten einen ziemlich breiten Rand haben würde, der ganz ohne irgendwas ziemlich langweilig aussehen würde. Daher entschloss ich mich Ton in Ton einen Hintergrundstempel von MFT darauf zu stempeln. Jetzt ist der Bereich nicht leer, aber das Auge wird auch nicht abgelenkt.

First I die cut a square, left the paper inside the die and sponged with "Picked Raspberry" from the outside towards the inside. That way I can leave a tiny white border without having to mask it off. Love this trick ;o) While that piece wad drying I stamped a letter-pattern with grey on my grey cardbase. That way the larger area below the coloured piece isn't too bland.


Als nächstes habe ich den Spruch gestempelt und dabei darauf geachtet, dass meine Katze und das Regal noch genügend Platz hatten. Das Regal habe ich direkt auf die Kartenbasis aufgeklebt. Für die Katze habe ich Abstandshalter benutzt, um ein wenig Tiefe zu erzeugen. Zuletzt bin ich über die Wollknäule noch mit dem Wink of Stella Glitzerstift drüber gegangen. 

Next I stamped the sentiment - making sure to leave enough for the shelf and the cat which I added after the stamping had dried. I glued the shelf directly to the card base and used foam tape for the cat to give it some dimension. Lastly I added the extra ball of wool to the bottom right and covered it with Clear Wink of Stella.


Material / supplies:
Stempel / stamps: "I Knead You" & "Birthday Wishes & Balloons" von My Favorite Things
                            "Tiny Alphabet Background" von Simon Says Stamp
Stanzen / dies: "Stitched Squares" von Simon Says Stamp

Challenges:

Dienstag, 19. Januar 2016

Skies are gray Magic Card

Hallo ihr Lieben!
Das nassgraue Wetter hat uns ja nun richtig erwischt... Aber, die neue PINspirational Challenge setzt mit seinem Thema "You are my sunshine"  ein paar fröhliche Akzente dagegen ;o) Dies ist meine Inspirationskarte für euch:

Hello my crafty friends!
Over here in Germany the weather became wet and yucky... However the new PINspirational challenge could just help to brighten the mood with the next fortnight's theme being "You are my sunshine" ;o) This is my card for your inspiration:


Ich habe mich das allererste Mal an eine "Magic Card" gewagt und mag mein Endergebnis wirklich sehr - ABER ich habe einen wirklich doofen Fehler eingebaut... Die Karte wollte ich trotzdem mit euch teilen, weil ich hoffe, dass wenn eine(r) von euch sich auch an die Konstruktion einer magischen Karte machen möchte, ich den Fehler schon für euch gemacht habe und ihr euch zumindest den ersparen könnt ;o) Die Anleitung habe ich hier auf YouTube gefunden (klick) und konnte dem Video auch gut folgen. Ich kann es wirklich sehr empfehlen!

I made a "Magic Card" for the first time and mostly like how it turned out, BUT I made one major mistake. I am still sharing this card with you because I hope this post might just help one of you to not make the same mistake I have made. I have followed this tutorial (click) for the construction of the card and I have to say that works just fine. I can wholeheartedly recommend watching the video if you are thinking of making a "Magic Card" yourself.


Den Fehler habe ich gemacht, als ich die Szene gestempelt habe, die man beim Herausziehen sieht. Die Maske für meinen kleinen Waschbären hatte ich sogar geschnitten, weil mir irgendwie klar war, dass ich ihn maskieren muss, wenn ich den Rest hinzustempel. (Da der Waschbär ja komplett auf der Vorderseite zu sehen ist, hätte er ja auch auf dem herausziehbaren Teil "ganz" sein müssen...) Aber dann hat mein Hirn mir einen Streich gespielt und so hab ich gedacht, es wäre doch schön, wenn der Hase zum Waschbären gehoppelt kommt und habe dann ihn statt des Waschbären maskiert.

The mistake happened when I planned out the scene. I cut a mask for the cute racoon, because at that moment I knew that I needed him masked completely when creating a scene, because the image was on the front. And it was whole. However, when I actually stamped the scene I thought it was so much better if the bunny was in front of the racoon, the I masked off the bunny instead of the racoon. 

Material / supplies:
Stempel / stamps: "Woodland Cuties" von Your next Stamp
                           "Sending Sunshine" von WPlus9
Stanzen / dies: "Stitched Rectangle" von Simon Says


Challenges:
Marker Pop Challenge "Critters"
7 Kids College Challenge #143 "Anything goes"
Bastel-Traum "Valentin"
Alphabet Challenge "W is for Window"
My creative Moments "Let's colour"
One Crazy Stamper "Anything goes"

Sonntag, 17. Januar 2016

Did someone say CAKE?

Hallo ihr Lieben!
Heute habe ich eine ganz schlichte und schnell gemacht Karte für euch. Mir passiert es trotz aller Planungsversuche immer wieder, dass ich zu einem Geburtstag aufbrechen möchte und dann feststelle, dass ich nicht die richtige Karte für die Person habe. Darum habe ich mir etwas überlegt, was wahrscheinlich bei fast jedem funktioniert: nämlich Kuchen. Die Farbgestaltung lässt sich unkompliziert an die Vorlieben der zu Beschenkenden anpassen:

Hello my dear crafty friends!
Today I'd like to share a simple and quickly made card with you. I don't know about your organizing skills, but with me it seems that - no matter how hard I try - it still happens that I am invited to a birthday and think I have everything ready and then notice that I do not have a card. So I thought about a design that would work for everyone. Everyone loves cake on their birthday as far as I know and you can change the colours to whichever is best for the birthday boy or girl you want to give this card to:


In 3 - 4 Schritten ist die Karte fertig:
Schritt 1: Bring Farbe auf die Mitte der Kartenbasis auf und arbeite Dich von dort aus nach Außen - dabei immer heller werdend. Mit einem Marker, der ein kleines bisschen dunkler ist als die aufgetragene Farbe nun ein paar Punkte in verschiedenen Größen aufmalen. Ich finde, das gibt dem Hintergrund noch ein wenig mehr Tiefe.
Schritt 2: Stempel den Cupcake und mal ihn aus. Am besten benutzt man für den Wrapper entweder die gleiche Farbe, wie für den Hintergrund oder nimmt die Kontrastfarbe. Schneide den Cupcake aus - lass dabei aber einen kleinen weißen Rand, damit er sich besser vom Hintergrund abhebt.


There are 3 - 4 steps to this card:
Step 1: Sponge some colour on your cardbase, starting from the middle and working your way out - getting lighter towards the outside edge. Use a marker that is close in colour but just a little darker to add some random dots. This gives the background more depths I find.
Step 2: Stamp and colour the cupcake - the best is to use the same colour for the cupcake wrapper as you have for the background or use the complementary colour, if you would like it to pop more. Cut the cupcake out leaving a bit of a border.


Schritt 3: Stempel den Spruch. Ich habe mir einen wirklich prominenten Spruch ausgesucht, damit der auch wirklich heraussticht. Zeichne dann mit einem dünnen Fineliner einen Rahmen um die Karte.
Schritt 4: Komplett optional - macht aber optisch einiges her: Tupfe noch ein paar Punkte in Gold oder Silber auf den Hintergrund und den Cupcake Wrapper (je nachdem, was besser zu Deinem gewählten Farbschema passt) und gib den Kirschen noch ein bisschen Glitter mit roten Stickles.

Step 3: Stamp the sentiment. I went with a really bold sentiment to have it stand out more. Draw a border around your card with a black fine tip marker.
Step 4: Totally optional, but makes the card so much nicer in real life: Add some gold or silver coloured dots to the background and the cupcake wrapper (depending on the colour scheme you chose) and also coat the cherries with red stickles. 


Material / supplies:
Stempel / stamps: "Carnival Cupcakes" von Mama Elephant
                           "Delicious Birthday" von My Favorite Things

Challenges:
Time Out Challenges "Birthday with optional twist of sponging"
Addicted to CAS "Code Word: Cake"
Seize the birthday "Clean and Simple"
Addicted to Stamps and More "Anything goes"
7 Kids College Fund #143 "Anything goes"
Stempelsonnenchallenges "Anything goes"

Donnerstag, 14. Januar 2016

Viel Glück mit Pilzen und Klee

Hallo Hallo meine Lieben!
Heute möchte ich euch eine "Viel Glück" Karte zeigen, die schnell gemacht ist und sich gut verschicken lässt! Ich mag diese niedlichen Pilze, ihr nicht auch? (Und ich hätte nie gedacht, dass ich Pilze mal niedlich finden könnte....)

Hello my dear crafty friends!
Today I'd like to show you an almost one layer "Good luck" card, which can be made rather quickly. I love these cute mushrooms, don't you? (And I would have never thought that mushroom even could be cute...)


Als erstes habe ich das weiße Papier ausgestanzt und die Pilze gestempelt - dabei habe ich dieses Mal sogar bedacht, dass ich Platz für meinen Spruch brauche. Der tatsächliche Stempel sieht so aus wie meine unterste Pilzreihe. Da ich aber nicht wollte, dass alle Reihen gleich aussehen, habe ich den Stempel in den obersten beiden Reihen nur teilweise abgestempelt und / oder den Rand abgeklebt, so dass immer genau fünf Pilze nebeneinander stehen.

First I die cut the white panel and stamped the mushrooms - making sure to leave enough room for the sentiment though. The actual stamp looks like the bottom line of mushrooms on my card. Because I didn't want all rows to looks the same I alternated the stamping by just partially stamping it and masking the edges.


Als nächstes habe ich die Pilze mit Copics coloriert, mit dem Clear Wink of Stella ein klitzekleines bisschen zum glitzern gebracht und dann das "Viel Glück" gestempelt. Zum Schluss habe ich noch die süßen Kleeblätter Ton in Ton auf die Kartenbasis gestempelt und dann das weiße Papier mittog drauf geklebt. 

I coloured the mushrooms with Copic markers, added some Clear Wink of Stella and also stamped the sentiment. Next I stamped the cute clover in a dark grey ink on my grey card base and added the paper panel on top.


Material / supplies:
Stempel / stamps: "Woodland Friends" von Penny Black
                           "Glück ist..." von Create a Smile
Stanzen: "Stitched Rectangles" von Simon Says 

Challenges:

Montag, 11. Januar 2016

Home Sweet Home (Toadstool House)

Hallo ihr Lieben!
Die Crafty Cardmakers & More haben ab heute eine neue Challenge für euch. Dieses Mal geht es um das Thema "Neu". Das kann ein neues zu Hause, eine neu geschlossene Ehe, ein neues Baby sein oder was auch immer euch dazu einfällt... Ich habe mich für das neue Haus entschieden, weil eine liebe Freundin diese Woche in ein neues Haus zieht:

Hello my crafty friends!
The Crafty Cardmakers & More have a new challenge for you starting today. The theme this time is "New". It could be a project for a new baby, a new marriage, a new home or whatever comes to your mind...I chose to go with the new house idea, because a lovely friend of mine is moving house this week:


Angefangen habe ich damit, den Hintergrund für die Karte zu gestalten. Dazu habe ich mit Distress Inks in rosa Tönen den Ombre-Effekt direkt auf die Kartenbasis gewischt und nachdem alles trocken war, habe ich das Chevron-Muster in weiß embossed.

I started with creating the background for my card. For it I chose a couple of pink Distress Inks and sponged them on going from the darkest to the lighter one, so that I would end up with an ombre-look. After everything was dry I added the chevron pattern on top using some white embossing powder. 


Als Motiv habe ich dieses süße Pilzhaus von Purple Onion Designs gewählt und es mit Copics coloriert. Anschließend habe ich es ausgestanzt und den Kartenspruch darunter gestempelt. 

As my focal point I chose to stamp this very cute toadstool house from Purple Onion Designs on a die cut piece and coloured it with Copic markers. Next I stamped the sentiment just beneath the image.


Um das Auge noch mehr zu dem Spruch zu leiten, habe ich 3 weiße Enamel-Punkte hinzugefügt und damit war meine Karte fertig. Ich würde mich freuen, wenn ihr uns eure "Neu"-Projekte auf dem Crafty Cardmakers & More Blog zeigen würdet ;o) Habt eine wunderbare Woche!

In order to draw the eye towards the sentiment I added three white enamel dots right underneath it and my card was done. I hope you are going to join us over at the Crafty Cardmakers & More challenge with your "new"-project :o) Have a wonderful week everyone!

Material / supplies:
Stempel / stamps "Toadstool House" & "Home sweet home" von Purple Onion Designs
                           "Fine Chevron" von My Favorite Things
Distress Inks: "Spun Sugar" & "Worn Lipstick"
Embossing Powder: "Opaque Bright White" von WOW!

Challenges:

Samstag, 9. Januar 2016

Happy Birthday card (Skating Henry)

Hallo ihr Lieben!
Heute gibt es eine neue Challenge auf dem "Challenge Up Your Life" Blog. Das Thema lautet "Stars & Stripes" und dies ist meine Inspirationskarte:

Heya my dear crafty friends!
Today starts a new challenge over at the "Challenge Up Your Life" blog and the theme is "stars & stripes". This is my inspiration card:


Den Hintergrund habe ich gestempelt und das Plastikfenster ist mit einem Sternenmuster embossed. In die Kartenbasis und das Streifenpapier habe ich ein Fenster gestanzt, das Plastikteil dazwischen gelegt und alles passend aufgeklebt.

I stamped the red stripes on my background piece, dry embossed the stars on a piece of acetate and die cut a circle window in both the card base and the background paper. Then I sandwiched the acetate between the two and glued everything together.

 
Henry, den Bären habe ich mit Copic Stiften coloriert. Außerdem habe ich noch ein weißes Stück Papier im Ombre-Look mit den gleichen Farben wie Henrys Fell angemalt (E40er Serie) und daraus das Wort "birthday" gestanzt. Das Wort "Happy" und den Kartenspruch im Inneren der Karte habe ich mit dem gleichen Blauton ("Navy" von Hero Arts) gestempelt.

I coloured Henry the bear with Copic markers and also coloured a piece of white paper in an ombre look using the same colours I had used on the bear's fur (E40 series) and die cut the word birthday from it. Next I stamped the word "Happy" and the sentiment on the inside of the card with "Navy" ink by Hero Arts.


Zum Schluss habe ich noch ein paar Glitzersterne auf der Karte verteilt. Ich hoffe, ihr habt Lust bekommen auch eine "Stars & Stripes" Karte zu basteln! Ich freu mich schon auf eure Werke!

Finally I die cut a few glittery stars and scattered them on the card. I hope you got in the mood for to make a "stars & stripes" card yourself and that you will join us at the Challenge Up Your Life blog! Looking forward to seeing your creations!

Material / supplies:
Stempel / stamps: "Henry" von Purple Onion Designs
                           "Label Maker Sentiments" von My Favorite Things
Stanzen / dies: "Birthday Word Die" von Clearly Besotted 
                       "Stitched Circles" & "Stitched Rectangles" von Simon Says

Donnerstag, 7. Januar 2016

You're how old? (Window Slider card)

Hallo ihr Lieben!
Heute möchte ich euch eine Karte zeigen, die ich für ein Geburtstagkind zum 30. angefertigt habe:

Heya my dear crafty friends!
Today I would like to show you a card I made for a birthday boy on his 30th birthday:


Noch sieht es ja nicht besonders spektakulär aus, aber wenn man an dem Band zieht, kann man die versteckten Teile der Karte sehen:

Doesn't look like much yet, but when you pull on the ribbon you get to see the hidden parts of this card:


Wie man eine solche Karte macht, habe ich durch dieses Video (klick) von Dawn gelernt. Ich wollte allerdings unbedingt eine Szene stempeln und außerdem den Hintergrund farblich zusammenpassend gestalten. Wenn ihr schon ein paar meiner Karten gesehen habt, dann wisst ihr sicherlich, dass ich, was das angeht, einen kleinen Tick habe. 

I learned how to make a "Window Slider card" from this video (click) by Dawn. I wanted to take it one step further and create a little scene and also have all the colours match. If you are familiar with some of my cards, you will know, that I like it when everything goes together.


Falls ihr genauso viel Freude an interaktiven Kartan habt, wie ich, rate ich euch dringend, das Video einmal anzuschauen und vielleicht auch eine Karte dieser Art zu machen. Wenn man den Kniff erst einmal verstanden hat, ist es gar nicht mehr schwer ;o)

If you love interactive cards with a hidden secret just as much as I do, I'd highly recommend to check out Dawn's video and to make a card like this yourself. Once you know how it works it really isn't all that hard to make ;o)


Material / supplies:
Stempel / stamps: "Quinn's 123s" & "Hats Off To You" von Lawn Fawn
                           "You Rock" von Clearly Besotted
                            "Three Amigos" von Mama Elephant
                            "Polynesian Paradise" von My Favorite Things
Coloration: Copics

Challenges:
Simon Monday Challenge "Something New" (new card design for me)

Dienstag, 5. Januar 2016

Welcome Baby Boy

Hallo ihr Lieben!
Endlich schaffe ich es, den ersten Post für das Jahr 2016 zu verfassen! Irgendwie gibt es aber gerade am Jahresanfang bei uns immer so viel zu feien... Ich hoffe, ihr seid gut ins Neue Jahr gerutscht und dass 2016 zum bisher kreativsten Jahr für euch wird! Da hätte ich auch gleich eine Idee, wo ihr eure kreativen Talente einsetzen könntet, denn ab heute gibt es wieder eine neue Challenge auf dem {PIN}spirational Challenge Blog! Das Inspirationsbild zeigt eine wunderschöne, weiße Eule und soll eure Kreativität anregen. Wie immer lohnt sich das Mitmachen, weil unsere Sponsoren "Kitty Bee Design" und "Bugaboo Digi Stamps" tolle Preise für euch bereitgestellt haben ;o) Ich habe die süße Eule von Kitty Bee Design benutzt. Eigentlich sitzt sie auf einem Ast, aber da ich den Stempel als Buchstaben "O" einsetzen wollte, habe ich den einfach weggeschnitten. So macht man ganz einfach mehr aus dem, was man hat ;o)

Heya my dear crafty friends!
Finally I get around to publishing my first post for the year 2016! There are just so many things to celebrate right at the beginning of January in our family... I hope you had a great start and that this year will be your most creative one yet! Coincidentally I know just the place where you could show your talents: Over at the {PIN}spirational challenge blog we have a new inspiration picture for you! It shows a very beautiful, white owl and we hope that it will start your creative juices. Our kind sponsors "Kitty Bee Design" and "Bugaboo Digi Stamps" offer great prizes for the winners. ;o) I used an image from Kitty Bee Design on my card. Usually it sits on a branch, but because I wanted to substitute it for the letter "O", I simply cut away the branch and thus got even more use out of it:


Den Hintergrund habe ich mit einer Schablone und meinem neuen Copic Airbrush System kreiert - ich mag das ja so gerne, wenn man die Farben so schön abstimmen kann. Die Ränder der Wolken sind nicht besonders klar definiert, was vermutlich daran liegt, dass ich die Schablone nicht flächig aufgeklebt hatte und sie sich durch den Luftdruck bewegt hat. Für diese Karte finde ich den Effekt sogar ganz schön, muss mir aber auf Dauer sicher was einfallen lassen, wie ich das besser hinbekomme. Ich übe ja auch noch ;o) Falls ihr Tipps für mich habt, bitte immer her damit ;o)

I made the background piece using my new Copic Airbrush system - as you might know already, I love to match the colour of my elements and with the Airbrush system I could have the same colour pallette on the owl, the letters and the clouds ;o) This makes me very happy ;o) For some reason though, the edges of the clouds are now all that well defined, which I really like for this card, but I will have to figure out ho to get sharper edges in the future... Maybe it was because I didn't glue the whole stencil down?! If you have any tips for me, that would be very much appreciated ;o)


Die Luftballons habe ich aus Designerpapier ausgestanzt und mit passenden Copics so coloriert, dass oben ein Highlight zu sehen ist. Danach musste ich einfach nur noch alles auf am richtigen Ort auf der Karte festkleben ;o)

I die cut the balloons from some patterned paper and used matching Copics to create a highlight on their tops. Now all that was left to do was to glue everything in place ;o)
This is the {PIN}spirational inspiration picture ;o)


Material / supplies:
Stempel / stamps: "Hanging Around" Kitty Bee Design
                           "Quinn's Capital ABCs" von Lawn Fawn
                           "Handwritten Borders" von Simon Says Stamp
Stanzen / dies: "Quinn's Capital ABCs Dies" & "Party Balloons" von Lawn Fawn
Related Posts Plugin for WordPress, Blogger...